Preface
This tutorial assumes some background knowledge of programming, but no prior experience with Raspbian (or any Linux distribution), GPIO microprocessors (Pi, Arduino, etc.), or Python. References may be made to previous tutorials.
My main programming languages are Java, C#.NET, and VB.NET. You may notice some slight differences between my Python code and the standard conventions and formatting for Python. This should not affect your understanding of the code.
Goal
Send data as a device-to-cloud message from your Raspberry Pi 3 to Microsoft Azure’s IoT Hub, and set up another app to retrieve the data.
Example Use Cases
- Outdoor temperature sensor
- Motion-detecting module for a pet door
- Vehicle-counting system for a busy street
Getting Started
You will need to have completed Tutorials 0 and 1, in order to have your Pi in optimum shape and a code base to work with. The general concepts in this tutorial are still applicable if you haven’t, but the code examples will be directly based off earlier tutorials.
Some prior reading on how circuits behave, including voltages and currents, will be helpful as well.
Visual Studio (2017 preferred, Community version or higher) will also be required to complete the second half of the tutorial. Other IDEs may work as well.
Sending a Message
Return to the completed module from Tutorial 1. If you’ll recall, we set up an IoT client and used server messages to toggle an LED. This time, we’ll add an extra method that will take a string and automatically transmit it to the server, as well as a method to transmit key-value pairs for more specific data uploads.
Let’s start with the basics, however. Remember that we should be grouping our variables, methods, and execution code separately. Start by creating a basic callback method for sending messages, and our method for sending a simple string.
def send_confirm_callback(message, result, context):
print ("Message ID %s status: %s" % (message.message_id, result)
def sendText(str):
global CLIENT, send_confirm_callback
msg = IoTHubMessage(str)
print ("Sending message [%s]..." % (str))
CLIENT.send_event_async(msg, send_confirm_callback, 0)
Tip: As warned before, don’t just copy-paste the code you see here. Formatting differences may result in unintended consequences within the Python IDE. Also, ensure you’re using Python 2.
Now that we have the method to send a message, let’s modify the execution code to call this function. Beware that a Free subscription to IoT Hub limits you to 8000 messages a day, so if you want your Pi to be running all day, you will need to set your message interval carefully. We’ll stick on the safe side, and use an interval of 15 seconds.
...
turnLightOn()
print ("Starting IoT Hub Client...")
main()
while True:
sendText("hello, iothub")
time.sleep(15)
Every 15 seconds, your device will send a message to the server. Run the module and see what the console outputs. If all goes well, your messages will successfully be sent and received by the IoT Hub.
Let’s bring up your Azure portal for a moment here. Navigate to your IoT Hub, and scroll down to the Metrics view of your Hub. Ensure that the ‘Telemetry messages sent’ box is checked under ‘Available metrics’. If your code is running, you should see some response on the graph that indicates your Hub is indeed receiving the Pi’s messages. It may take a moment to update.
Unfortunately, there’s no way for you to view the raw data via the Azure portal. Worry not, we’ll get to that in a moment. For now, let’s also set up the method to send key-value pairs. When your device contains multiple sensors and needs to report the data in an organized manner, key-value pairs are the way to go. This method will allow you to send a single pair of key and value.
def sendKeyValuePair(key, value)
global CLIENT, send_confirm_callback
msg_txt = ("%s, %s" % (key, value))
msg = IoTHubMessage(msg_txt)
propmap = msg.properties()
propmap.add(key, value)
CLIENT.send_event_async(msg, send_confirm_callback, 0)
If you’d like to give this a try, go ahead and amend the sendText call in your execution code to use sendKeyValuePair with two arguments.
Sending an Input Value
In order for our Pi to be a useful IoT device, it needs to be able to transmit information about its real-time state, and not just pre-programmed messages. We’ll be setting up a relatively simple switch to send a value to the server.
In order to protect our Pi from drawing too much current, we’ll need to use a couple of resistors along with a switch to get this working. Here is the parts list for the circuit:
- Push switch (or just two wires you can touch together)
- A resistor, preferably around 1 kiloOhm
- A resistor, preferably around 10 kiloOhm (or 10x the first resistor)
- A few wires, depending on how you’ve set up your breadboard
Left disconnected, the Pi’s pins will read an indeterminate state, so this can’t be a simple power-switch-pin circuit. Instead, the idea is to have your Pi constantly read a GROUND signal to indicate that the button is not being pressed. When a ‘positive’ voltage is applied by the switch, which will be the Pi’s 3V output, we want to read that the switch has indeed been depressed and current is flowing. To do this, we’ll need to use our resistors in such a way that they are always connected to GROUND, but will transmit a voltage signal to the Pi and not short it out.
WARNING: Shorting out your Pi by connecting the 3V or 5V source to any GROUND pin will immediately shut down your device and may cause permanent damage to its circuitry or loss of data. Avoid loose wires and triple-check your circuit after assembly before attempting to run any code.
Assemble the circuit as follows, with your resistors values as close as possible:
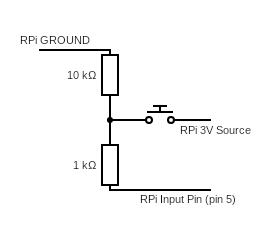
Note that, as mentioned in Tutorial 1, you may use whatever numbered GPIO pin you want. For the purposes of this tutorial, we’ve selected pin 5, as written in the diagram.
Now we need a code block to read the value of pin 5.
def readSwitch():
return GPIO.input(5)
You may recall that we have to add a setup line to initialize pin 5 as an input pin!
...
GPIO.setmode(GPIO.BCM)
GPIO.setup(6, GPIO.OUT)
GPIO.setup(5, GPIO.IN)
...
In order to test our circuit (after you’ve triple-checked your connections), let’s modify the While loop a little bit. We’ll have the LED react to the state of our switch. Note that this effect would normally be implemented in an analog fashion with the LED directly connected to the switch. This code is, fundamentally, a software-based switch.
...
turnLightOn()
print ("Starting IoT Hub Client...")
main()
while True:
time.sleep(1)
if readSwitch() == GPIO.HIGH:
turnLightOn()
else:
turnLightOff()
Run the module. When you depress the switch (or touch the functionally equivalent wires together), the LED should turn on. When you let go, the LED should turn off. Because we set the timer to work at 1 second intervals, the response may not be immediate, but it should roughly follow the switch’s position.
Now, let’s send some potentially useful data. Rather than sending “hello, iothub”, let’s transmit the state of our switch. Rewrite the While loop completely.
...
while True:
sendKeyValuePair("buttonState", readSwitch())
toggleLight()
time.sleep(15)
...
Run your module, and check your Metrics page on Azure to see if you are receiving the data. Don’t worry if you don’t immediately see a spike in received messages; it might take a couple of seconds to refresh. Congratulations, you are now uploading your Pi’s physical status to the cloud.
Preparing for Data Retrieval
When looking for methods to recover data sent from your Pi, a common but somewhat unhelpful guide you might find directs you towards building a webapp that runs within the Azure webpage environment. If you were to need to access this data in a more specific manner, you’ll need to build a program that will contact the server and request for the data to be transmitted back.
In order to continue, you will need to have Visual Studio installed on your Windows machine. This guide will be using a .NET API to connect to the IoT Hub service.
NOTE: If you prefer Java to .NET, there is an Event Hubs package available for it. The initialization and setup is not necessarily similar to the below tutorial. Read the Microsoft Helpdoc for more details.
Let’s set up our project first. Create a New Project, using the .NET language of your choice, and set it as a Console application. Save the project and create a new solution when prompted.
In Visual Studio, access the menu Tools>Nuget Package Manager>Package Manager Console. This will open a command-line window in your environment, with the new line reading “PM>”. We’ll use this to download and install our dependencies quickly.
Run the following lines. Each will take a few seconds to complete, depending on your internet and hard-drive speed.
install-package microsoft.azure.eventhubs
install-package microsoft.azure.eventhubs.processor
With these two libraries (and their dependencies) installed, we now need to import them into our console application.
For the purposes of this tutorial, I will be using VB.NET to demonstrate the necessary code for readability. The C# equivalent is not much different.
Imports Microsoft.Azure.EventHubs
Imports Microsoft.Azure.EventHubs.Processor
Imports System.Text
Module Module1
...
Tip: VB uses the apostrophe (') for comments.
Before we can move on towards coding, however, we have to prepare our IoT Hub as well. Specifically, we need to direct the incoming telemetry into a storage container so that the data is actually collectable. Open your Azure portal, and let’s get that set up.
Setting Up Storage
Note: This part gets complicated. Follow each step carefully.
Create the storage by accessing Create a resource>Storage>Storage account>Create. Within the wizard, set a unique name (preferably something related to your Hub’s name) and set the resource group to be the same as the one your Hub uses. Account kind should be “General purpose”.
We need to redirect the incoming telemetry into the storage account. Open your IoT Hub’s page and find “Endpoints” within the menu, under Messaging. Add an Azure Storage Container and select your previously created storage account. This will bring you to a menu titled “Containers” and it will be empty. Create a Blob or Container and select it. Save the name of your container.
Add a new Route (again, under Messaging). The Data source should be “Device Messages”, and the endpoint should be the one you just created. Either disable the Rule, or write “true” in the query string, so that all incoming messages are directed into storage. Alternatively, if you don’t create a new route, by default all messages go into the “Events (messages/events)” endpoint. If you’d prefer to keep the amount of clutter low, you may choose to do this instead; however, this will make data more difficult to sort through.
Our data now takes this pathway:
Pi -> IoT Hub Messages -> Your Endpoint -> Your Route -> Storage Account -> Storage Container
While we’re here, let’s take note of some very important connection keys. Navigate to your Storage account, and find “Access keys” under the Settings menu. Save the first Connection string.
Head back to your IoT Hub page and go to your “Endpoints” again. Click on the Events endpoint (messages/events), and save the Event Hub-compatible name and endpoint.
Still inside the Properties of the endpoint, add a new ‘Consumer group’ at the bottom. All you need to enter is a name; “myapp” will suffice. Remember this consumer group’s name as well.
Starting to Program
Cool! Now that we have all this set up, we can get coding. As a side-note, messages are queued by default up to a day to be consumed (and marked read). If your Pi is currently actively uploading messages, you will have to download a lot of it before you can see the latest updates. If you haven’t already, ensure your Pi’s Python code has stopped executing with Ctrl+C.
Return to your console application project. We’ll start off with a new asynchronous method.
Module Module1
      Sub Main()
      End Sub

      Private Async Function BeginListening() As Task

      End Function
An Async function allows for code execution to occur asynchronously, which prevents the application from hanging unexpectedly when downloading or printing messages. Because we’re waiting for the server to give us new messages, an Async method works well here.
Private Async Function BeginListening() As Task
      Dim CompatibleName as String = "iothub-ehub-..."
      Dim ConsumerGroup as String = "myapp"
      Dim CompatibleEndpoint as String = "Endpoint=sb://..."
      Dim ConnectionString as String = "DefaultEndpointsProtocol..."
      Dim ContainerName as String = "containerName"
Tip: Once again, don’t copy-paste the code. Formatting differences in your IDE may cause unintended behaviors.
Fill in the correct strings for each of these variables. If these are incorrect, your application will not run properly. After creating these variables, let’s instantiate the host.
Private Async Function BeginListening() As Task
      ...
      Dim host = new EventProcessorHost(
            CompatibleName,
            ConsumerGroup,
            CompatibleEndpoint,
            ConnectionString,
            ContainerName)
End Function
In order to keep the console application from terminating immediately, we’ll wait for a user keypress.
...

      Dim host = new EventProcessorHost(
            ...)
      Console.Writeline("Listening. Press ENTER to stop.")
      Console.ReadLine()

      Await host.UnregisterEventProcessorAsync()

End Function
Wait, when did we ever register an event processor? We haven’t yet, because we need to implement it ourselves. Unfortunately, there isn’t any default one that comes with the API for us to use.
...
End Function
Partial Public Class BasicProcessor
Implements IEventProcessor
End Class
The Partial tag lets us pick and choose which methods within IEventProcessor to implement. Since there are a few methods to implement that we don’t quite need right now, Partial is perfect.
Partial Public Class BasicProcessor
      Implements IEventProcessor
      Function ProcessEventsAsync(ByVal context as PartitionContext,
            By Val messages As IEnumerable(Of EventData)) As Task
            Implements IEventProcessor.ProcessEventsAsync
      End Function
End Class
Note: The function declaration should be on one line. I’ve broken it into smaller pieces for readability.
All we need to do now is make something happen with the messages that the EventProcessorHost finds and passes to our newly declared function. For now, let’s just print out the raw message text.
Function ProcessEventsAsync(...) Implements ...
      For Each eventData In messages
            Dim data = Encoding.UTF8.GetString(
                  eventData.Body.Array,
                  eventData.Body.Offset,
                  eventData.Body.Count)
            Console.Writeline("Partition " & context.PartitionId & ", Data: " & data)
      Next
      Return context.CheckpointAsync()
End Function
We’re simply decoding the byte array into a UTF8 string, printing the details, and letting the Host know that we’ve read the message. Oh, but let’s not forget that the data we’re sending might also include some key-value pairs! If you’ve completed the Python tutorial up until now, your While loop will be sending {“buttonState”, “0/1”} as dictated by the status of your switch. Let’s read this as well.
Function ProcessEventsAsync(...) Implements ...
      For Each eventData In messages
            Dim data = Encoding.UTF8.GetString(...)
            Console.Writeline("Partition " ...)
            Console.WriteLine(eventData.Properties.Count & " sets of Key-Value pairs")
            For Each piece In eventData.Properties
                  Console.WriteLine("K-V: " & piece.Key & " - " & piece.Value.ToString)
            Next
      Next
      Return context.CheckpointAsync()

End Function
Note: There is a nested For loop. Don’t forget the second Next statement.
Finally, we need to register our event processor:
...
Dim host = new EventProcessorHost(
...)

Await host.RegisterEventProcessorAsync(Of BasicProcessor)()
      Console.Writeline("Listening. Press ENTER to stop.")
      Console.ReadLine()

Await host.UnregisterEventProcessorAsync()
End Function
Now all we need to do is to make a call towards our function from within the Main method. This is what your final code should look like:
Imports...
...
Module Module1
      Sub Main()
            BeginListening.GetAwaiter.GetResult()
            Console.Writeline("Finished. Press any key to exit.")
            Dim a = Console.ReadKey
      End Sub

      Private Async Function BeginListening(...)...
            ...
      End Function
End Module

Partial Public Class BasicProcessor
...
End Class
Testing Your Application
Build and run your console application. At the same time, start running the Python code on your Pi. Ensure your Python code is successfully uploading data to your IoT Hub.
Your console output should produce three lines for each received message; the first tells us that a message was received in a certain partition and the immediate text associated with that event, the second counts the number of key-value pairs included with the message, and the third will print the status of your circuit’s switch with a dash (-) between the key and value.
Conclusion
Congratulations! You’ve assembled a circuit that can indicate a switch’s status to your Raspberry Pi 3, generated and transmitted Strings as well as Key/Value data to your IoT Hub, and created a Console application to retrieve the data being uploaded to your IoT Hub.
What Can I Do Next?
Figure out what other sensors you’d like to include in your circuit, and follow their instructions as to how to import their associated libraries. Send more Key/Value pairs with other potentially useful data. Implement the other functions from IEventProcessor.
Others In This Series
Tutorial 1 | Tutorial 3
Eugene is a DevOps engineer for Nintendo.
He is a hobbyist tinkerer with a love for combining artistic vision with engineering rigor. His multidisciplinary background means there's enjoyment to be found at all corners of a project.


 General
  News
News  Suggestion
  Question
  Bug
Bug  Answer
  Joke
Joke  Praise
  Rant
Rant  Admin
Admin 


