Introduction
Today, we are going to go through how to use C++ in a GUI project using CLI (Common Language Interface) and we are going to discuss FCFS (first come first serve) algorithm and how to draw it using the GDI library and we are going to go step by step into creating your first CLI project till publishing.
The "Using the Code: section is divided into:
- Setting up your CLI project
- Simple test
- Start working
- Heading towards processing what is inside the table
- How to Parse the Text Boxes Inside the Table
- Draw using the GDI library
- Publish our work
Background
FCFS (first come first serve) is an algorithm that the OS uses for sorting which process to use the CPU... simply which process will come now will be served now, then the other, then the other.
We are going to implement this using the GDI library.
Using the Code
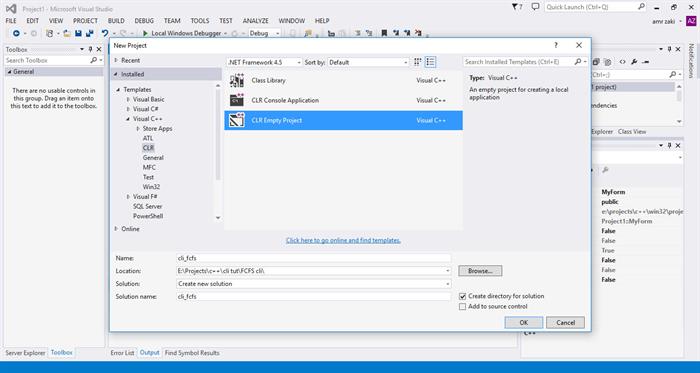
1. Setting Up
Start with creating a new empty clr project:
Add new form:

Add this bit of code in your form.cpp:
using namespace System;
using namespace System::Windows::Forms;
[STAThread]
void main(array<String^>^ args) {
Application::EnableVisualStyles();
Application::SetCompatibleTextRenderingDefault(false);
<<projectName>>::<<formName>> form;
Application::Run(%form);
}
Open properties:
Under Configuration Properties > Linker > Advanced, change Entry Point to "main" (without quotation marks).
Under Configuration Properties > Linker > System, change SubSystem to "Windows (/SUBSYSTEM/WINDOWS)".
2. Simple Test
In your designer, let us just start with dragging a button into your form:
Double click this button and a function in the backcode would be automatically added to you and add this simple code to test if your program works just fine.
private: System::Void button1_Click(System::Object^  sender, System::EventArgs^  e)
 {
  MessageBox::Show("hi");
 }
Now just run:
If this appeared, then all your configurations are just right !!
3. So Let's Start on Working
First, let's change the name of the button we just added from properties:
Let's add a table to the form:
Change some of its properties, just change column number to be three:
Now, just add 3 labels and change their names like what we did with button properties>>appearance>>text.
Now let's return back to the back code and modify our old button_click function but before define an int:
int u = 1;
private: System::Void button1_Click(System::Object^ sender, System::EventArgs^ e)
{
TextBox^ t1 = gcnew TextBox();
TextBox^ t2 = gcnew TextBox();
Button^ b1 = gcnew Button();
b1->Text = "color" + u.ToString();
b1->Name = "color" + u.ToString();
b1->Click += gcnew System::EventHandler(this, &cli_fcfs::MyForm::OnClick);
tableLayoutPanel1->Controls->Add(t1, 0, u);
tableLayoutPanel1->Controls->Add(t2, 1, u);
tableLayoutPanel1->Controls->Add(b1, 2, u);
u++;
}
It would be like this:
When you create the onclick event, this would be created:
void OnClick(System::Object ^sender, System::EventArgs ^e);
Button^ temp = gcnew Button();
};
}
void cli_fcfs::MyForm::OnClick(System::Object ^sender, System::EventArgs ^e)
{
temp = (Button^)(Object^)sender;
button2->Visible = true;
pictureBox1->Visible = true;
}
This would look like:
So when you run your code, it should look something like this when you click on the add button:
4. Heading Towards Processing What Is Inside the Table
Begin with adding a button for processing:
and double click it to create a function in the back code.
Now, let's add the picture box that I have told you about:
and in the properties>>image, put this image:
and add some events to this picture box.
Add a mouse move event so that when user just moves the mouse, the color selected would be captured in a temp storage:
Until he clicks the mouse ... then the picture box would disappear ...and the color would be captured.
So, let's add another event.
Also let's add a button to show the user which color he will select if he clicks the mouse.
And change is properties >>flat style to flat and properties >>text to nothing
Now let's make button & the picture box and the button invisible when the user first opens the form as we need them to be invisible until user clicks them.
Now let's modify pictureBox1_MouseMoveon:
Color pixel;
private: System::Void pictureBox1_MouseMove
(System::Object^ sender, System::Windows::Forms::MouseEventArgs^ e)
{
Bitmap ^ bmpSource = reinterpret_cast<Bitmap ^>
(pictureBox1->Image); pixel = bmpSource->GetPixel(e->X, e->Y); button2->BackColor = pixel;}
Now, let's modify pictureBox1_MouseClick:
private: System::Void pictureBox1_MouseClick
(System::Object^ sender, System::Windows::Forms::MouseEventArgs^ e)
{
pictureBox1->Visible = false;
button2->Visible = false;
temp->BackColor = pixel; }
5. How to Parse the Text Boxes Inside the Table
We will discuss two types of parsing elements in your form, the first is how to parse controls in columns of a table. The second would be later discussed as to how to parse controls if you know their name.
But first, let's define two lists that we would put our elements in. We define them outside of any function.
ArrayList names;
ArrayList cpu_burst_names;
Then, let's start with the first method inside the process_Click:
private: System::Void process_Click(System::Object^ sender, System::EventArgs^ e)
{
for (int i = 1; i < u; i++)
{
TextBox^ t1 = gcnew TextBox(); t1 = (TextBox^)tableLayoutPanel1->GetControlFromPosition(0, i);
names.Add(t1->Text); }
for (int i = 1; i < u; i++)
{
TextBox^ t1 = gcnew TextBox();;
t1 = (TextBox^)tableLayoutPanel1->GetControlFromPosition(1, i);
cpu_burst_names.Add(t1->Text);
}
draw(); }
6. Let's Draw Using the GDI Library
Simply start with creating a function called draw():
void draw()
{
auto g = this->CreateGraphics();
int count = 0; int x = 50; int sum_cpu = 0;
for (int i = 0; i < names.Count; i++) {
String^ color_name = "color" + (i + 1); Control^ ctn1 = FindControl(color_name);
Pen^ my_pen = gcnew Pen((Color)ctn1->BackColor); String^ a = (cpu_burst_names[i]->ToString()); int^ width;
width = Convert::ToInt32(a); g->DrawRectangle(my_pen, x, tableLayoutPanel1->Size.Height, *width * 10, 50);
Rectangle r(x, tableLayoutPanel1->Size.Height, *width * 10, 50);
StringFormat^ sf = gcnew StringFormat();
SolidBrush^ br = gcnew SolidBrush(Color::Black);
System::Drawing::Font^ f = gcnew System::Drawing::Font("Arial", 10);
SolidBrush^ baaaa = gcnew SolidBrush((Color)ctn1->BackColor);
g->FillRectangle(baaaa, r); g->DrawString(names[i]->ToString(), f, br, midp(r).X, midp(r).Y, sf);
sum_cpu = sum_cpu + Convert::ToInt32(cpu_burst_names[i]->ToString());
int^ temp = sum_cpu;
System::String^ str = temp->ToString(); g->DrawString(str, f, br, r.Right - 10, r.Bottom, sf);
x = x + *width * 10; }
}
Now let's define the function that parses the form for a special control and returns that control:
Control^ FindControl(String^ strControlName)
{
 if (strControlName->Length == 0 ||
     this->Controls->Find(strControlName, true)->Length == 0)
  return nullptr;


 return this->Controls->Find(strControlName, true)[0];
}
Now, we are going to write the function of the middle:
Point midp(Rectangle r)
{
Rectangle a = (Rectangle)r; int x = a.Location.X;
int y = a.Location.Y;
int h = a.Height;
int w = a.Width;
Point pp;
pp.X = x + w / 2 - 5; pp.Y = y + h / 2 - 5; return pp;
}
It simply calculates the middle point of a rectangle so that we display the name of the process in the middle.
So at the end, it should look something like this:
7. Let's Publish Our Work
Ideally, you should have made your project release not debug ... but for a weird reason, this didn't work with me.
So simply after debugging your project ...go to its directory >>debug>>yourName.exe and copy this file.
It could need some dependencies ... so look for them inside Visual Studio bin files:
it would be very important for me to know what do you think these tutorials ... are they up to what you have expected ?? ... it would be really important for me to hear your feedback
Points of Interest
We would like to invite you to our tutorials using GDI in C#:
History
- 9th March, 2016: Initial version
This member has not yet provided a Biography. Assume it's interesting and varied, and probably something to do with programming.


 General
  News
News  Suggestion
  Question
  Bug
Bug  Answer
  Joke
Joke  Praise
  Rant
Rant  Admin
Admin 


