Installation steps
- Download and install the Domain Access module using this link.
- Then paste the following in your settings.php file:
include DRUPAL_ROOT . '/sites/all/modules/domain/settings.inc';
- Then rebuild the permission.
Domain Access
- Enable “Domain Access” in the modules section.

- Navigate to “Admin->Structure->Domains”.
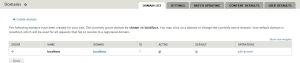
- There will be multiple tabs, but for now we will navigate to the “Domain List” tab. There we will find “localhost” as the only domain listed.
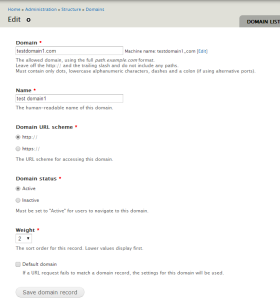
- There we will find an option labelled as “Create Domain”. Then we click on that link to create a new domain with the “Domain” value as “testdomain1.com” and “Name” value as “test domain1″ and then we leave all other fields as it is and then we click on “Save Domain Record” button.
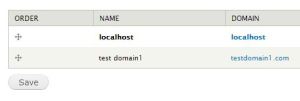
- After saving the new domain record we will see a domain with the name “test domain1″ appears in the “Domain List”.
- Navigate to the windows “hosts” file located at “Windows/system32/drivers/etc/hosts” and then define an alias as “127.0.0.1 testdomain1.com” and then we restart the server.
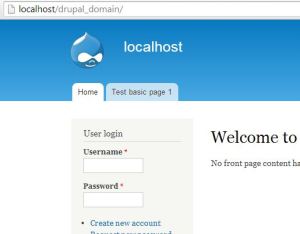
- Now we navigate to our “Domain List” and there we will notice that the active domain is highlighted. For now we see that “localhost” is highlighted.

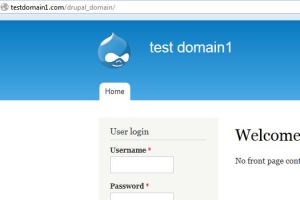
- Now we open http://testdomain1.com/<your-drupal-installation-directory> in a separate window. After that we login as administrator and then we navigate to “Domian List”, there we would see that “test domain1″ is highlighted.

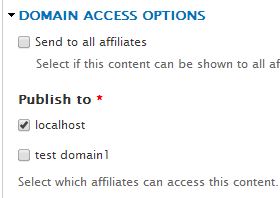
- Then we proceed to create a node of basic page content type. When we create a node, we will get an option as “Domain access options” on the node creation page.
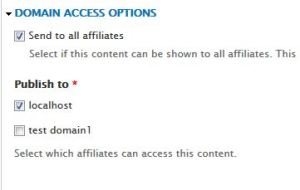
Here we have two options
- Send to all affiliates: After checking this option, the content will be published on all domains.
- Publish To: Here we will have all the domain names listed. We can select the domain, where we want this node to be published.
Note: We need to avoid selecting “Send to all affiliates” option if we need to publish a node to particular domains. But the nodes will be shown to the administrator, even when logged in from a domain in which a node is restricted.
We had created a node named as “Test basic page 1″, and then we had set “localhost” in the “Publish To” section and we had unchecked “Send to all affiliates”, as a result the page is not shown up on “testdomain1.com” and it is shown up on “localhost”. When we try to access this page via URL also on “testdomain1.com” we will be redirected to access denied page.
In the “Domain List” we have an option as “DEFAULT”.
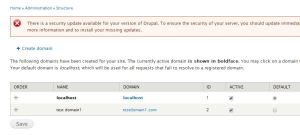
We can set our default domain here. Our default domain is the one, which will be used for all requests that fail to resolve to a registered domain.
Domain Alias
- Enable “Domain Alias” in the modules section.
- Navigate to the windows “hosts” file located at “Windows/system32/drivers/etc/hosts” and then define an alias as “127.0.0.1 testdomain2.com” and then we restart the server.
- Then navigate to “Domain List” and edit the domain named as “test domain1″.

- Then we will find the “Aliases” tab. Click on that tab.

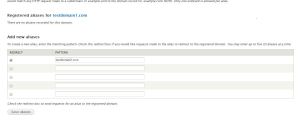
- Then we could find that in the “Registered aliases for testdomain1.com” section there are no aliases recorded for this domain. Then in the “Add new aliases” section we add an alias as “testdomain2.com”.
- Now when we open http://testdomain2.com/<your-drupal-installation-directory>, we will notice that we are automatically redirected to “http://testdomain1.com/<your-drupal-installation-directory>. Hence we had successfully created an alias for http://testdomain1.com/<your-drupal-installation-directory>.
Note: We cannot have a domain, present in our “Domain List” in the alias section.
Domain Configuration
- Enable “Domain Configuration” in the modules section.
- Then navigate to “Domain List” and edit the domain named as “test domain1″.
- Then we will find the “SETTINGS” tab. Click on that tab.

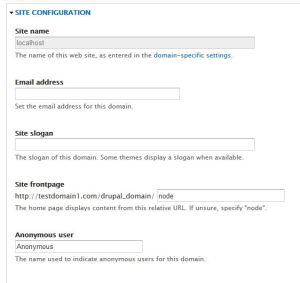
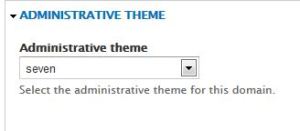
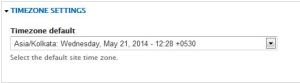
- In the “SETTINGS” page we have the complete site settings for that particular domain:
- Site Configuration
- Administrative Theme.
- Time zone Settings.
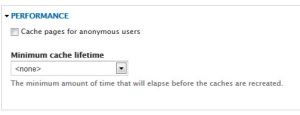
- Performance
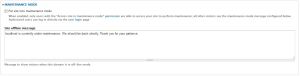
- Maintenance mode
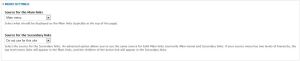
- Menu Settings
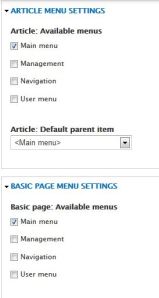
- Content type menu Settings
Domain Content
- Enable ‘Domain Content’ in the modules section.
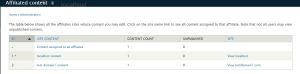
- Then in the admin panel we would see a tab labelled as “Affiliated Content” would appear.

- The “Affiliated Content” section shows all the affiliate sites, whose content we can edit. We can click on the affiliate site’s link to view the content that has been assigned to it.
Here we have two site’s that is localhost and testdomain1.com, after clicking on any of which we can see the content that has been assigned to it, and we can also edit the content.
- Then we create a node of basic page content type, and in its domain access option, we unchecked “Send to all affiliates”, and in “Publish to” section we only select localhost.
- Then go to “Affiliated content” section and we open “localhost” to view the content assigned to it. We could see that “Test Basic Page 1″ is listed.

- Then we open “testdomain1.com” to view the content assigned to it. We could see that there is no content listed.

Domain Source
- Enable ‘Domain Source’ in the modules section.
- After that we create a node of basic page content type. Then on the node creation page we would get an option labelled as “Source Domain”.
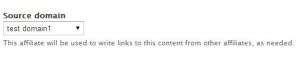
- In the “Source domain” section we would get a drop down box in which all the domains that we had defined would be listed along with the “Active Domain” option.
In our case we will have “Active Domain”, “localhost” and “test domain1″ in the drop down list.
- When we define a source domain for a node, and then if we open that node from any other domain other than the source domain defined for that node, then we will automatically be redirected to the source domain. If we are logged in as admin from any other domain, other than the source domain defined for that node, and then we edit that node, then we would be redirected to the source domain, and then we would be required to login as admin again, and after that we would be able to edit that node.
In our case we had defined a node of basic page content type and we gave the source domain for that node as “test domain1″. The we open “localhost” and after that we open the node defined, then we notice that we are automatically redirected to “testdomain1.com”, and then we are able to view that node.
- When we select “Active Domain”, then the current domain in which we are working would be used as the source domain.
Domain Strict
- Enable ‘Domain Strict’ in the modules section.
- Then we create a node of basic page content type, and in its domain access option, we unchecked “Send to all affiliates”, and in “Publish to” section we select both “localhost” and “test domain1″. After doing this the node so defined can be viewed on “testdomain1.com” and “localhost”.
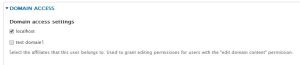
- Then we create two users, “testuser1″ and “testuser2″ from the admin side and on the user creation page, in the “Domain Access” section we select “localhost” for testuser1, and “test domain1″ for testuser2.
Domain access settings for testuser1.
Domain access settings for testuser2.
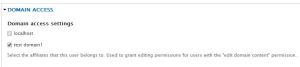
In the “Domain Access” section we select the affiliates to which a user belongs to. This is used to grant editing permissions for users with the “edit domain content” permission.
The users that we had created can successfully log in on any domain. This should not be misunderstood that, if we had selected “localhost” for testuser1 then he would only be able to login on localhost domain. The “testuser1″ can also login on “testdomain1.com”.
We can restrict the users to be able to login to only particular domain, which I will discuss later.
- After we enable “Domain Strict”, then the node for which “Send to all affiliates” is unchecked, then that node could not be viewed by anonymous users.
- “Domain Strict” allows only the registered users to view a node after they login, on the basis of the domain(affiliate selected for the user at the time of user creation) a user belongs to. It forces users to be assigned to a domain in order to view content on a domain.
Here we had created a node which is published to both “localhost” and “test domain1″. And after that we had created two users, “testuser1″ which belongs to “localhost” and “testuser2″ which belongs to “test domain1″.
Now when “testuser1″ logs in on “localhost” then the “testuser1″ would be able to view the that node. And when “testuser2″ logs in on “localhost” then the “testuser2″ wont be able to view that node. And vice-versa happens on “testdomain1.com” for “testuser1″ and “testuser2″.
Domain Theme
- Install a theme and just “enable” it. We can find many Drupal responsive themes available for free on this site http://www.devsaran.com/free-drupal-theme.
- Enable ‘Domain Theme’ in the modules section.
- Then navigate to “Domain List” and edit the domain named as “test domain1″.
- Then we will find the “THEME” tab on the domain edit page. Click on that tab.

- In the theme page we find that “Bartik” is the default theme selected for “testdomain1.com”.

- Since I had installed “Nexus theme”, I select that theme and then set it as domain theme for “testdomain1.com”.
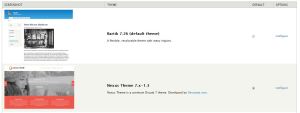
- Then we open http://testdomain1.com/<your-drupal-installation-directory>, we will find we will have a different theme for it, and we have “Bartik” for http://localhost/<your-drupal-installation-directory>.

Domain Bonus
- Download and install the “Domain Bonus” module from here. Then Enable ‘Domain Bonus’ in the modules section.
- Previously we had created two users, “testuser1″ who belonged to “localhost” and “testuser2″ which belonged to “test domain1″ respectively.
- The “Domain Bonus” module restricts the users from logging in on any other domain to which they don’t belong.
In our case “testuser1″ is successfully able to login on “localhost”, but “testuser1″ is restricted from logging in on “test domain1″.
Blocks provided by Domain Access module
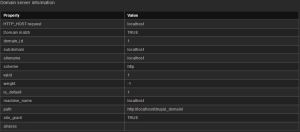
- Domain access server information : Displays the active domain’s server information.
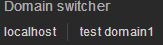
- Domain switcher : Provides an interface to switch between domains on a single click. The active domain will be highlighted.
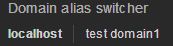
- Domain alias switcher : Provides an interface to switch between domains on a single click. The active domain will be highlighted.
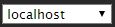
- Domain list navigator : Provides a drop down interface to switch between domains. The active domain will be selected.
This member has not yet provided a Biography. Assume it's interesting and varied, and probably something to do with programming.


 General
  News
News  Suggestion
  Question
  Bug
Bug  Answer
  Joke
Joke  Praise
  Rant
Rant  Admin
Admin 


