Contents
- Introduction
- Background
- The Bot Connector
- A First Sample
- Using the Emulator
- Persistence
- The Bot Builder
- Forms and Real Conversations
- Reacting To System Messages
- Real Language Understanding
- LUIS
- Supervised Learning
- Integration
- Automated Creation
- Architecture of a Real Solution
- Conclusions
- History
Introduction
At this year's Build conference Microsoft revealed part of the strategy to tackle the mobile dominance of Google and Apple: Intelligent bots. This strategy essentially decouples the service from a particular application. Instead of using a specific application or website to access some service we will just open Skype, Telegram, or some other program or service to start a communication channel.
First, this may seem like redundancy and a step back. In fact, however, this system provides a lot of advantages. The biggest benefit is that the conversation is supposed to be as natural as possible. Think of a Google search box that is capable of a conversation. Additionally, services may communicate with each other without knowing API details or even each other's endpoint. Finally, intelligent services may actually be placed on top to provide some information to the bot reducing duplication on the human side.
The latter is the basis of a lot of interesting demos. Skype with Cortana integration is capable of knowing our travel schedule, being able to contact another bot, initiate the conversation, and supply the necessary infos like our membership ID, date of travel, and room preferences to the hotel bot.
Background
Now things like reserving a room, ordering a pizza, or searching for a specific information seem to be interesting, yes, but may be to trivial to provide a real value to customers. However, working in the area of IoT and home automation I will try to show you some more interesting scenarios that centering around the Microsoft Bot Framework.
In the worst case having a bot solution is yet another project that needs to be maintained. In the best case the bot layer is right in the middle between our solution and customers, may it be for voice recognition, chats, service connections, or even command line interfaces. The reality will usually lie between these two extremes.
So what is about to come in the following lines? We will start with the essentials to understand Microsoft's solution to provide useful bots. Then we will have a greater look at the Bot Builder providing us with more powerful abstractions. As language processing is of the essence a quick introduction to LUIS has to be included. Finally, we will have a look at parts of a real project using the Bot Framework for allowing home automation via chat or voice.
The Bot Connector
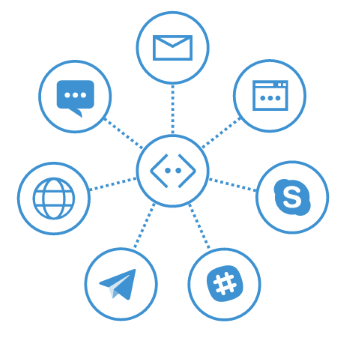
The bot connector is the central component connecting our bot to Microsoft's infrastructure. The infrastructure then provides the connections to the various channels such as Skype, mail, text, or a variety of other possibilities. We do not need to adjust our application for these different channels. The following image is illustrating this concept.

The bot connector also comes in form of a C# project template / library. It is, however, not required to include the library nor do we need to use the project template. The whole architecture is REST-based, i.e., there is no constraint on framework or language. The only constraints are given by the endpoint names and exposed behavior.
Microsoft is also very generous regarding the hosting requirements or our bots. If course we could host it in Microsoft Azure, but we don't have to. Actually, as long as the endpoints are accessible from the bot connector service we are good to go.
With that all being said let's get out hands dirty playing around with the Microsoft Bot Framework.
A First Sample
Instead of going through the API and discover abilities in a more academic fashion we will look at an example first. In order to get the sample to work we have to download and install the project template from Microsoft.
- Install Visual Studio 2015 Update 1 or higher.
- All VS extensions should be up to date.
- Download and install the Bot Application template:
- Download the file from aka.ms/bf-bc-vstemplate.
- Save the file to
%USERPROFILE%\Documents\Visual Studio 2015\Templates\ProjectTemplates\Visual C#.
- Use the new Bot Application template from Visual C# templates.
Once we create a new project based on this template we get a quick echo server only replying the number of send characters. The following code contains the endpoint definition and core functionality.
[BotAuthentication]
public class MessagesController : ApiController
{
public async Task<Message> Post([FromBody]Message message)
{
if (message.Type == "Message")
{
var length = (message.Text ?? String.Empty).Length;
return message.CreateReplyMessage($"You sent {length} characters");
}
else
{
return HandleSystemMessage(message);
}
}
}
The endpoint listens at /message. The API is sensitive to POST requests. The provided parameter is serialized from the given request body send in form of a JSON string.
How can we now talk to our bot?
Using the Emulator
One way is by using the browser with tooling such as PostMan. There are certainly other ways, but all of them include providing the correct scheme and information as the bot connector would. That is tedious. However, there is a simple way: Somebody wrote a small WPF application that already serializes messages as the bot connector would do. Furthermore, it also deserializes the responses as expected.
In short this application allows us to use our bot without actually linking it to the bot connector. This is quite nice for debugging purposes and certainly a productivity gain. The application is called the Bot Framework Emulator. It can be downloaded from the Microsoft homepage via aka.ms/bf-bc-emulator in form of a click once application.
Setting a breakpoint on our application works the same as with any other debugging steps in web applications. Once a message is received we our application code is called and we can take action.
Let's use the emulator to show a specific scenario that is alleviated by the Bot Framework: Storing state from one message to persist during a conversation.
Persistence
The topic of preserving state is one of the most demanded capabilities for a bot platform. After all we somehow need to take information gathered during previous messages to infer missing pieces of information in the current message. This conversation-awareness is important in providing users an adequate experience.
The Microsoft Bot Framework offers different kinds of persistence. We can store data per user, per channel, or per user in channel. The mechanism is always the same, which is similar to using cookies. An incoming message contains the previously set entries applicable to this message, while the outgoing message contains the changed entries.
Let's see how this looks like by adjusting the example. In this case we use the GetBotPerUserInConversationData extension method to retrieve stored data of the length property. The call to the SetBotPerUserInConversationData extension method stores some data in the persistence layer.
public async Task<Message> Post([FromBody]Message message)
{
if (message.Type == "Message")
{
var previousLength = message.GetBotPerUserInConversationData<Int32?≫("length");
var previousMessage = previousLength.HasValue ? $"(previously sent {previousLength.Value} characters)" : String.Empty;
var length = (message.Text ?? String.Empty).Length;
var reply = message.CreateReplyMessage($"You sent {length} characters {previousMessage}");
reply.SetBotPerUserInConversationData("length", length);
return reply;
}
}
Of course the persistence layer is also replicated in the emulator. We can therefore test the code easily.
With persistence in mind we can build much more powerful conversation schemes that remember things and can complete some required knowledge graph just by asking for missing things. But wait, before we start building a library providing such useful functionality on top of the Bot Framework we should have a look at the Bot Builder.
The Bot Builder
The Bot Builder is Microsoft's secret sauce to let us sketch truly powerful conversations. It comes with several handy classes and extension methods. In the subsequent sections we'll have a look at some of the offered capabilities.
We can get the Bot Builder from NuGet. The latest version is available here. Please note that this article refers to the v1 version of the bot builder (hence the link to v1.2.3). Obviously, some parts of the API changed in later versions, however, the concepts remain the same.
Forms and Real Conversations
Before the form element the web has been static. The ability to gather and transmit information, however, is the unique selling point of the web as we know it today. The importance of collecting information is only emphasized by companies such as Google or Facebook.
To make our bots truly productive and helpful we need a way to gather missing information or collect data in an ordered fashion. Here the idea of a form comes in handy again.
The essential idea is simple: Consider a type that needs to be filled. We only need to go over each field, look at the field's type and try to construct the type with the user's help. The process may be recursive.
Let's consider the following class:
public class CarSelection
{
    public MultimediaEquipment Multimedia;
    public String Name;
    public CarModel Model;
    public List<CupHolderChoice> CupHolders;
}
Here we use a broad variety ranging from simple enum fields to lists of classes. The following sub-types are used to model the previously shown class.
public enum SeatChoice
{
    Leather,
    Cloth
}

public enum CoreSystem
{
    VideoWithGps,
    VideoOnly,
    GpsOnly,
    Basic
}

public enum CarModel
{
    Basic,
    Standard,
    Premium
}

public enum CupHolderChoice
{
	Tiny,
	Standard,
	Large,
	American
}

public class MultimediaEquipment
{
    public CoreSystem System;
    public Int32? VideoDevices;
}
How can a conversation to fill this type look like?
The idea is to use the Microsoft Bot Builder to do the hard job. The code is s simple as decorating the classes as [Serializable] and changing our message handler to look like:
public async Task<Message> Post([FromBody]Message message)
{
if (message.Type == "Message")
{
return await Conversation.SendAsync(message, BuildDialog);
}
}
where we use the following two helper functions.
private static IDialog<CarSelection> BuildDialog()
{
    return Chain.From(() => FormDialog.FromForm(BuildForm));
}

private static IForm<CarSelection> BuildForm()
{
    return new FormBuilder<CarSelection>()
        .Message("Simple conversation demo!")
        .Build();
}
The main class to use is the Conversation helper provided by the Microsoft Bot Builder. Here we need to identify a bot to respond to by specifying the received message. Also we need to pass the callback to a dialog creator, which - in turn - also demands a callback to create a form. There are quite some callbacks in the code.
Nevertheless, once all these callbacks are correctly wired we set up a quite effortless presented form - covered by the bot network. Once everything is ready we could obtain the result via a callback, e.g.:
private static IForm<CarSelection> BuildForm()
{
    return new FormBuilder<CarSelection>()
        .Message("Simple conversation demo!")
        .OnCompletionAsync((session, car) => Task.FromResult(false))
        .Build();
}
Now that we glimpsed at the Bot Builder its time to demystify these system messages.
Reacting To System Messages
One thing that has not been discussed yet is the message type. Until now all incoming messages have been regarded as chat messages, but this is only one - even though the most common - type of message. Some other types are also defined to be fixed as system messages. These messages are used by the bot connector glue to inform us about certain events.
The idea behind these messages is to give us the ability to mold the connector to our needs. For instance, we might want to change something in our database or get some data from our database to the connector once a user connects or disconnects.
By default, the following boilerplate code is already provided by the template.
private Message HandleSystemMessage(Message message)
{
    if (message.Type == "Ping")
    {
        var reply = message.CreateReplyMessage();
        reply.Type = message.Type;
        return reply;
    }
    else if (message.Type == "DeleteUserData")
    {
    }
    else if (message.Type == "BotAddedToConversation")
    {
    }
    else if (message.Type == "BotRemovedFromConversation")
    {
    }
    else if (message.Type == "UserAddedToConversation")
    {
    }
    else if (message.Type == "UserRemovedFromConversation")
    {
    }
    else if (message.Type == "EndOfConversation")
    {
    }

    return null;
}
Even though we could implement a different response to a Ping message we should essentially use the given code. This one ensures to flag our bot as active when pinged from the bot connector. Furthermore, we could record this standard call.
The other kinds of messages are left empty on purpose. One thing we should definitely do is to remove expired data once a bot or user has been removed from the conversation or once the conversation ended.
Real Language Understanding
The problem with bots is usually that they are regarded as "stupid". We enter some text snippet and if it's a little bit off the norm we will get an error. The level of tolerance and text understanding is certainly below any expectation from a normal conversation.
Microsoft realized this problem some time ago and build a solution to tackle it: It is called Language Understanding Intelligence Service out short LUIS. It is part of Microsoft's cognitive services, which may be familiar under their former name project Oxford. At its core it's a machine learning solution with a language knowledge layer.
LUIS
In order to use LUIS we require an account on the official LUIS website. Here we can create new projects, import projects, or edit existing projects. A project is simply stored in form of a JSON file providing great flexibility and the possibility to generate projects, e.g., from Excel sheets.
The following image outlines what LUIS is all about. It allows us to outsource the most important parts of language recognition to an external service.
For a simple demo we log into LUIS website and create a new project using English as language. The language choice is important. Text recognition is only possible with a layer that knows how to do natural language processing (NLP). This layer, however, will be bound to grammar rules and language specifics that require a specific locale to be selected.
For our simple demo we'll build a quick hotel search recognition API. Our goal is to detect the intention of searching for hotels in a city. We would like to know if the hotel search is meant (or not) and in what city we should search. This gives us our two most important building blocks of LUIS: Intent and entity. Intents may or may not contain entities, entities cannot be detected without intent.
Learning intents with our without entities works in the same way. The provide so-called utterances, which represent samples for a given intent. Since a new LUIS project starts without any knowledge besides the NLP layer we also need to provide the mapping of the entered utterances, i.e., what the intent is and which entities are included if any.
Supervised Learning
The key to understand LUIS is to understand supervised learning. Supervised learning is given when we constantly follow a loop of facing a problem, suggesting a solution, and being confirmed or corrected by the real answer. The problem with this approach is, however, that the supervisor has not only a lot to do, but is considered to know it all. The system is not learning from user input even though we can use user input to improve the system. In this case we tell the system which user statements have been detected correctly and which should have been evaluated differently (and how).
So let's try this with our previously started sample. First we give the system a bare minimum to go live. With a single intent and entity we need to provide three utterances:
stays in brasov.
find me rooms in london.
room in berlin.
This is sufficient to train the system and publish the API. The query tester we see afterwards is also giving us the URL to make some RESTful calls from our sample bot connector.
After clicking the link we get to see the response. This response forms the basis for our own class model. These classes will then carry the data received from querying LUIS.
The classes to carry the model can be generated from the JSON in the response of a sample query. Let's assume we used the following query: "hotels in berlin". A standard GET request to https://api.projectoxford.ai/luis/v1/application?id={id}&subscription-key={key}&q=hotels%20in%20berlin yields
{
  "query": "hotels in berlin",
  "intents": [
    {
      "intent": "HotelSearch",
      "score": 0.999999046
    },
    {
      "intent": "None",
      "score": 0.126684889
    }
  ],
  "entities": [
    {
      "entity": "berlin",
      "type": "Location",
      "startIndex": 10,
      "endIndex": 15,
      "score": 0.779263258
    }
  ]
}
Pasting this in Visual Studio with the special option "generate classes from JSON" gives us a set of classes to work with (even though some refactoring would be great).
Before the LUIS API is used by our bot connector we need to integrate it in the message receiver.
Integration
With all the work being done we should extend the bot connector as follows to evaluate the user message with the help of LUIS. Then we are ready to provide some user defined input by using the emulator. Here we use the following code, where T will be set to the corresponding JSON-defined classes:
public static async Task<T> RequestAsync<T>(string input)
{
    var strEscaped = Uri.EscapeDataString(input);
    var url = $"https://api.projectoxford.ai/luis/v1/application?id={id}&subscription-key={key}&q={strEscaped}";

    using (var client = new HttpClient())
    {
        var response = await client.GetAsync(url);

        if (response.IsSuccessStatusCode)
        {
            var content = await response.Content.ReadAsStringAsync();
            return JsonConvert.DeserializeObject<T>(content);
        }
    }

    return default(T);
}
The application-id (id) and subscription key (key) need to be defined globally.
In our case the integration of LUIS with the shown code may be as easy as adjusting the message receiver to become:
public async Task<Message> Post([FromBody]Message message)
{
if (message.Type == "Message")
{
var response = await Luis.RequestAsync<LuisResponse>(message.Text);
var intent = response.Intents.FirstOrDefault(m => m.Score > 0.5);
var city = response.Entities.FirstOrDefault();
if (intent.Intent == "HotelSearch" && city != null)
{
return message.CreateReplyMessage($"Looking for hotels in {city.Entity}?");
}
return message.CreateReplyMessage("Sorry, I didn't understand ...");
}
}
Now let's have a chat and see what the system is capable of.
Me: Find me hotels in Berlin.
Bot: Sorry, I didn't understand ...
Me: Show me rooms in Munich.
Bot: Sorry, I didn't understand ...
Me: Hotels in Brussels.
Bot: Sorry, I didn't understand ...
This does not look all too good, however, remember that the system only knows the bare minimum. We can now go back to the LUIS website and take a look at "suggestions". The suggestions are previously noted user queries that have not been seen already. Therefore the system is not sure yet if it inferred the right answer. Hence all we see are suggestions that need to be verified. Either we accept the given answer or we correct it.
Automated Creation
Now we can leave it all up to the user with us only checking occasionally if there is anything new to consider. However, even though we could start with a crappy user experience we usually want to avoid such a behavior - even if it would be only for a short time. Instead, we want to come up with a decent solution right away.
The key here is to have a team (or at least a dedicated person) to fill a kind of database with all possible utterances to identify every previously recognized entity and intent. This database, which could be as simple as a CSV file or an Excel spreadsheet is then converted to the LUIS project. A LUIS project file is only JSON and may look as follows.
For an Excel spreadsheet we may use some tooling to do the conversion. Let's say we have a spreadsheet that consists of a single sheet with columns denoting the utterance, its intention, all entities and some more data.
We could use the excellent EEPlus library to perform the transformation from the original spreadsheet to a LUIS project. We only need to make sure to transform it into an object model that can be serialized in the JSON form that is specified for a LUIS project.
The generated project can be imported easily.
Such a work flow makes it possible to save and restore projects without being dependent on the LUIS website.
Architecture of a Real Solution
The question at this point is certainly: How does a real application using the Microsoft Bot Framework look like? In this section we look at the relevant parts from an application that acts as a surrogate to allow users to communicate with their smart home solution. Details of the smart home solution will be hidden, however, the outlined architecture and the shown code are in a pre-production stage, not too far away from becoming reality.
The architecture of the solution is shown in the figure below. We can see that the application consists of several parts, each one worth discussing. Since the article is about the Microsoft Bot Framework we will only touch the smart home proxy. The whole project will potentially be described in greater detail in another article (depending on the interest).
The smart home proxy is a simple Node.js-based web server running in the local environment of the user. It is responsible for communicating to the smart home services (which know how to communicate with the devices) and offers a webpage to the user for entering the required credentials, accounts and associated channels.
The smart home proxy establishes a P2P connection to the smart home bot service hosted in Microsoft Azure. The connection is based on the websocket protocol and allows the bot service to associate users in channels with smart homes (or, more specifically, smart home proxies). The connection has to be encrypted with both sides using certificates for authentication and verification.
The smart home bot service is using the bot connector template by Microsoft. It is hosted in Azure for convenience and may be also deployed on premise as discussed earlier. The bot connector is then used to establish the coupling to the various channels. The framework is also used to give us persistence and a lot of useful services and information.
Within our application we use the full variety of the Bot Framework by including the Bot Builder library. Some interactions may require a form (adding new smart home rules which trigger actions based on conditions) to be filled out, others can be done in a single line. If not enough information is received we may want to infer the missing pieces from the context generated in the conversation. Hence we require quite some user-specific dictionary of the previous message.
Invasive actions that may perform critical actions require confirmation on the users side. Otherwise, we may invoke these actions caused by a misunderstanding. More lenient actions can be invoked on chance. Reading the sensor data is never considered harmful.
The main task of the bot service is to translate user intentions to API calls of the smart home proxy.
Conclusions
The Microsoft Bot Framework gives us a lot of possibilities and freedom of choice. Together with the powerful cognitive services we have quite an interesting technology in our hands.
Personally, I regard the framework as a possible game changer. It has the ability to act as the center piece in many service related products. The real question is now not about the applicability of the technology, but rather about the related business case.
History
- v1.0.0 | Initial Release | 13.06.2016
- v1.0.1 | Fixed some typos | 19.06.2016
- v1.0.2 | Updated NuGet link | 23.08.2016
Florian lives in Munich, Germany. He started his programming career with Perl. After programming C/C++ for some years he discovered his favorite programming language C#. He did work at Siemens as a programmer until he decided to study Physics.
During his studies he worked as an IT consultant for various companies. After graduating with a PhD in theoretical particle Physics he is working as a senior technical consultant in the field of home automation and IoT.
Florian has been giving lectures in C#, HTML5 with CSS3 and JavaScript, software design, and other topics. He is regularly giving talks at user groups, conferences, and companies. He is actively contributing to open-source projects. Florian is the maintainer of AngleSharp, a completely managed browser engine.


 General
  News
News  Suggestion
  Question
  Bug
Bug  Answer
  Joke
Joke  Praise
  Rant
Rant  Admin
Admin 


![Rose | [Rose]](https://codeproject.global.ssl.fastly.net/script/Forums/Images/rose.gif)


