Introduction
Among other devices Windows IoT runs on the Raspberry Pi. While the Raspberry Pi doesn't have a real time clock built in Windows will reach out to the internet to get the current time and set the time in a fake hardware clock. This works will enough for many purposes. But when working with a solution that isn't connected to the Internet that requires the current time this isn't good enough. Real time clocks for the Raspberry Pi are available for a low price but Windows IoT doesn't yet have native support for them on the Raspberry Pi. Looking at other solutions on the internet that make use of the an I2C real time clock on the Raspberry Pi most of the solutions I've seen require a program to directly retrieve time from the RTC each instance that time is needed or to remember the difference between the time in the system clock and attached real time clock. While these solutions work I personally find them a little convoluted. The solution that I present here is meant to initialize the system clock on ever boot. Unlike the other solutions that I've seen once this is setup there is no need to make changes to existing programs to use it. The APIs normally used for retrieving time can be used, such as DateTime.Now.
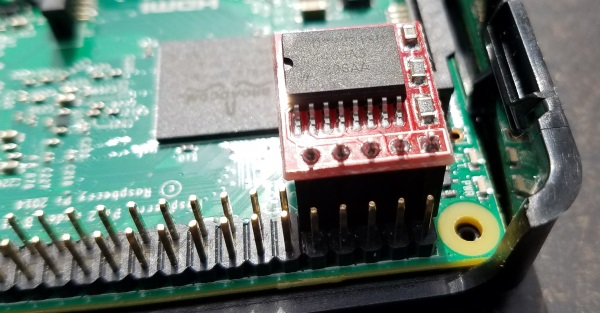
DS3231 Realtime clock attacked to a Raspberry Pi
Requirements
I'm writing this with a person that has already done development on Windows IoT. You will need to know how to make a program with Visual Studio,C#, and be familiar with the C/C++ language to understand what is written here. You also need to already know how to remote into your Windows IoT device using power shell.
Setting the System Time
Windows IoT on the Raspberry Pi runs UWP (Universal Windows Platform) applications. UWP applications run sandboxed; they generally cannot make any changes to the system that have an affect on other programs within the system. If you look through the UWP classes you will not find any class that can be used to set the system time. Despite this you may encounter post on the Internet stating that you can change the system time by using a [DllImport] to a native Win32 function. This isn't true. While you can compile and run the code for making this Win32 call it will have no effect on the system. I show the code in the following only so that you can recognize it.
[DllImport("kernelbase.dll", SetLastError = true)]
static extern bool SetSystemTime(ref SystemTime time);
This function takes a time and date in the SystemTime parameter. The time must be UTC time. Remember to do necessary adjustments to UTC when populating the information to be passed to this function. The layout of this parameter will need to be defined in UWP to use this function.
[StructLayout(LayoutKind.Sequential)]
public struct SystemTime
{
    [MarshalAs(UnmanagedType.U2)]
    public short Year;
    [MarshalAs(UnmanagedType.U2)]
    public short Month;
    [MarshalAs(UnmanagedType.U2)]
    public short DayOfWeek;
    [MarshalAs(UnmanagedType.U2)]
    public short Day;
    [MarshalAs(UnmanagedType.U2)]
    public short Hour;
    [MarshalAs(UnmanagedType.U2)]
    public short Minute;
    [MarshalAs(UnmanagedType.U2)]
    public short Second;
    [MarshalAs(UnmanagedType.U2)]
    public short Milliseconds;

    public SystemTime(DateTime dt)
    {
        Year = (short)dt.Year;
        Month = (short)dt.Month;
        DayOfWeek = (short)dt.DayOfWeek;
        Day = (short)dt.Day;
        Hour = (short)dt.Hour;
        Minute = (short)dt.Minute;
        Second = (short)dt.Second;
        Milliseconds = (short)dt.Millisecond;
    }
}
When I first wrote code to use this I thought my work was half done. It wasn't until testing that I discovered that this code has no effect at all. After trying some other things that didn't work the final working solution that I came up with was to use a power shell script. You don't need to know much about power shell to follow this solution. The powershell script is only two lines.
The set-date command in power shell can be used to set the date and time. My solution for setting the time was going to involve having a program write the current time to a file and then have a power shell script extract the time from that file and pass it to set-date. UWP applications only have access to write in specific areas of the file system, mostly locations that are specific to the application. (More information on data storage on UWP and the restrictions can be found here). Rather than deal with the restrictions and requirements for writing to a file I decided to make a console application that would output the time and have its output captured to be forwarded to the set-date. Testing this out only required a program that would output a date in the needed format. For now it did not need to be the correct date
int main (Platform::Array<Platform::String^>^ args)
{
   cout << "2020/03/04 01:23" << endl;
   return 0;
}
Initial version of SetTimeTool
As a matter of preference I keep a folder on my computer named shares into which I have many other folders for various purposes. I decided to do the same thing on my Raspberry Pi. From my desktop computer I opened the file explorer and entered the path \\IPADDRESS\c$\ (where IPADDRESS should have the name or IP address of your Raspberry Pi) and created the folder path c:\shares\boot. You can create a different file path if you like, this is just a matter of my preference. I copied my executable (named SetTimeTool.exe) into this folder and started a remote power shell session into the device. Changing to this path (using the same commands that one would use if in the command prompt) typing the following two lines was all it took to have the time outputted by the executable applied to the system time.
$CurrentDate = ( c:\shares\boot\SetTimeTool.exe )  |Out-String
set-date $CurrentDate
Now that we know how to change the time from the command prompt our job is half done. The above commands will be scheduled to run at boot-up. We will come back to that in a moment. The executable needs to be updated so that it pulls the actual time from a real time clock accessory. The clock chip I am going to use is the DS3231. If you use a different clock you will need to change the code accordingly.
About the DS3231
Breakout boards for the DS3231 are available for about $10. The one I happen to get was acquired through Amazon. The unit I received had a battery soldered to contacts to keep the clock backed up when it is not in use. The battery on my unit was DOA but with replacement the unity worked fine. This unit handles time information in Binary Coded Decimal (BCD) format. A convenience of this format is that if I were driving LCDs with this system less electronics would be needed to convert the time into something to be displayed; I could send the information as-is to hardware for displaying hex numbers without any conversion needed. I'm not using this to build a hardware clock though. I'll need a function to convert between twos-complement (normal) encoding and BCD encoding. The DS3231 can also format time in 12-hour format (with a bit for AM and PM) or in 24-hour time. I will only use the 24 hour format. The DS3231 also has a temperature sensor. That is not a capability that is of interest for this post. But I will include the code for reading it. If accurate reading of the temperature is needed I Would suggest care consideration of placement of the DS3231 or the use of a different component for temperature sensing. The Raspberry Pi itself gives off heat when in operation and if the chip is close to the Pi then the temperature sensed will be above higher than the temperature in the rest of the environment. Communication with the DS3231 is over I2C. It's I2C address is 0x68.

BCD Encoding
Conversion between BCD and two's complements encoded is easy. When displaying a BCD in hex format it is easy to see the decimal number that it represents. The number 59 in hex is written as 0x3B. If we wanted to display that in a format that a person could read some conversion would be necessary. However, if the value to be worked with is in BCD then when we display the BCD encoded of 59 in hex we get 0x59. For the value 12 it would be 0x12. for 2 it would be 0x02. Given a two's complement encoding of a number conversion to a 2-digit BCD can be found with a few math operations. Take the result of the value mod 10 (value % 10) and add to it the value divided by 10 (integer divide) and multiplied by 16. The conversion of BCD back to twos complement can be done with a few bit operations and a multiplication. Add the lower nibble (4-bits) of the BCD value to the upper nibble multiplied by 10.
static int BcdToInt(byte bcd)
{
    int retVal = (bcd & 0xF) + ((bcd >> 4) * 10);
    return retVal;
}

static byte IntToBcd(int v)
{
    var retVal =(byte)( (v % 10) | (v / 10) << 0x4);
    return retVal;
}
Functions to convert twos complement and decimal and BCD
Initializing I2C
To communicate with the clock through I2C we need to get a reference to an object that provides an interface to the I2C controller. The DeviceInformation class can be used to get references to objects that control other hardware. In the below I query for the ID to the I2C controllers and then request a reference to the device located at address 0x68 on the first I2C controller. In theory a device can have multiple I2C controllers. The Raspberry Pi has one; the first controller will be the only controller. The _device object can be used for all communication with the clock.
async void Init(int address)
{
    var advancedQuerySyntaxString = I2cDevice.GetDeviceSelector();
    var controllerDeviceIds = await DeviceInformation.FindAllAsync(advancedQuerySyntaxString);
    I2cConnectionSettings connectionSettings = new I2cConnectionSettings(address);
    connectionSettings.BusSpeed = I2cBusSpeed.StandardMode;
    _device = await I2cDevice.FromIdAsync(controllerDeviceIds[0].Id, connectionSettings);
    _initComplete = true;
}
There could be several devices on an I2C bus. I won't go into the details of what is happening electrically when communication occurs with an I2C device. From the perspective of the code a message encoded in an array of bytes is transmitted to an I2C device and its response is received as an atomic operation. A buffer into which to save the response must be allocated before the operation. For read/write operations We will use a method named ReadWrite that takes two parameters; the byte array of information to send to the device and a byte array into which to save the response. We will also perform a write-only operation when setting the time. The Write function accepts an array of bytes containing the data to be written. To know what we can write it is necessary to take a look at the registers in the D3231.
The layout of the DS3231 Registers
The DS3231 holds values for the current date and time, the last temperature reading, and a few other bits of information across a series of registers. According to the data sheet (from this page) the register layout follows.
| Address | MSB
Bit 7
| Bit 7 | Bit 5 | Bit 4 | Bit 3 | Bit 2 | Bit 1 | LSB
Bit 0
|
| 00h | 0 | 10 seconds | seconds |
| 01h | 10 minutes | minutes |
| 02h | 0 | 12/!24 hours | AM/!PM or 20 hour | 10 hour | hours |
| 03h | 0 | 0 | 0 | 0 | 0 | Day |
| 04h | 0 | 0 | 10 Date | Date |
| 05h | Century | 0 | 0 | 10 Month | Month |
| 06h | 10 Year | Year |
| 07h | ALARM |
| 08h |
| 09h |
| 0Ah |
| 0Bh |
| 0Ch |
| 0Dh |
| 0Eh |
| 0Fh |
| 10h | Offset |
| 11h | Temperature Integer |
| 12h | Temp fraction | 0 |
I've omitted some detailed in the above simplified register layout. The chip does support alarms; something that I won't be using. If we want to read from one of the register we pass an array of a single byte. The byte's value will be the offset of the register to begin reading. We also need to pass the array into which the response will go. If a multi-byte array as passed for the response then it will be populated with the registers that follow the offset specified until the array is full. If a byte array of at least 6 bytes all of the registers for the time can be read in a single operation. If we want to write to the registers (to set the time) a byte array must be populated where the first element is the register offset to begin writing and all the bytes that follow are the values to write to the registers.
The temperature is split across two registers. The first register has the integer part of the temperature in Celsius. The second part is stored in 2-bits of a register in increments of 0.25 degrees Celsius. If we only wanted to read the temperature it could be done as follows.
public float ReadTemperature()
{
    byte[] buffer = new byte[2];
    _device.WriteRead(new byte[] { 0x11 }, buffer);
    float temperature = (float)buffer[0] + ((float)(buffer[1]>>6) / 4f);
    return temperature;
}
Reading the temperature from the D3231
Here a 2 byte array is allocated to receive the temperature. The ReadWrite method is called with an array containing 011h meaning that we want the information at register offset 0x11 (17 in decimal). The 2-byte buffer will be populated with the interger temperature from register 11h in the first byte of the array and the fractional part from register 12h will be populated into the second byte. Bit shifting is used to get only the 2 most significant bits and a division is used to scale them down to the fractional part.
Reading the time requires more bit manipulation but the interaction with the component is the same. We'll have it populate a byte array and then will manipulate the bits to get the time in the format that we need. The first 7 bytes of the DS3121 contain the time components. So we will grab the first 8 bytes with a couple of lines of code.
sbyte[] readBuffer = new byte[0x7h];
_device.WriteRead(new byte[] { 0x00 }, readBuffer);
After decoding the date and the time in separate variables it is assembled together into a single DateTime object. Since the DS3121 only records the year as a 2 digit number it is necessary to add 2,000 to the year to get the actual years.
public DateTime? ReadTime()
{
    if (!_initComplete)
        return null;
    byte[] readBuffer = new byte[0x7h];
    _device.WriteRead(new byte[] { 0x00 }, readBuffer);

    int seconds = BcdToInt(readBuffer[0]);
    int minutes = BcdToInt(readBuffer[1]);
    bool is24HourCock = (readBuffer[2] >> 0x6) != 1;
    int hours;
    if (is24HourCock)
        hours = (readBuffer[2] & 0xF) + ((readBuffer[2] >> 4) & 0x1) * 10 + ((readBuffer[2] >> 0x5) * 20);
    else
        hours = (readBuffer[2] & 0xF) + ((readBuffer[2] >> 4) & 0x1) * 10 + ((readBuffer[2] >> 0x5) * 12); ;
    int day = BcdToInt(readBuffer[3]);
    int date = BcdToInt(readBuffer[4]);
    int months = BcdToInt((byte)(readBuffer[5]&(byte)0x3f));
    int year = BcdToInt(readBuffer[6]);

    return new DateTime(2000+year, months, date, hours, minutes, seconds);
}
Setting the time is the reverse of decoding operation. I convert the components of the time back to BCD values and stuff them into an array. The first element of the array is the offset of the first register to write. The rest of the values of the array are the data to be written. I am only writing the time in 24 hour format.
public void WriteTime(DateTime dateTime)
{
    byte[] buffer = new byte[8];
    int offset = 0;
    buffer[offset++] = 0;
    buffer[offset++] = IntToBcd(dateTime.Second);
    buffer[offset++] = IntToBcd(dateTime.Minute);
    buffer[offset++] = IntToBcd(dateTime.Hour);
    buffer[offset++] = (byte)dateTime.DayOfWeek;
    buffer[offset++] = IntToBcd(dateTime.Day);
    buffer[offset++] = IntToBcd(dateTime.Month);
    buffer[offset++] = IntToBcd(dateTime.Year % 100);
    _device.Write(buffer);
}
Setting the Time
Now that we have a clock that can retain the time we need to set it. Another initial source of time is needed. This other source of time could be an initial boot so that NTP could be used to set the system clock. It could also be from a user or another sensor (ex: GPS receives the current time). What ever the source of the time is we now have all the operations needed to set the real time clock. The demonstration application will read from the RTC and the system (fake hardware) clock once per second and display the values that it has read. It also displays a date and time picker so that a user can set the time in the RTC. If you want to see if the RTC is really working you can set this application as the default application and reboot the Raspberry Pi while disconnected from the network. Let's take what we have learned and apply it to the console mode application.
Completing the SetTimeTool Program
The set time tool is a console mode program. As of yet a console mode program can only be written in C++. I want this program to be able to do two things. Primarily this program needs to read the time from the real time clock and print it to its output. I also want to be able to use the program to set the time in the real time clock. To keep things simple when setting the real time clock this program is going to take the system time and copy it into the RTC. The main method of the program follows.
int main (Platform::Array<Platform::String^>^ args)
{
bool setTime = false;
if (args->Length > 1)
{
setTime = (args->get(1)->Equals(ref new String(L"set-time")));
}
String^ aqs = I2cDevice::GetDeviceSelector();
auto controllerList = concurrency::create_task(DeviceInformation::FindAllAsync(aqs)).get();
if (controllerList->Size < 1) {
cout << "no i2c controller found " << endl;
return -1;
}
I2cConnectionSettings^ settings = ref new I2cConnectionSettings(0x68);
settings->BusSpeed = I2cBusSpeed::StandardMode;
String^ controllerId = controllerList->GetAt(0)->Id;
auto realTimeClock = concurrency::create_task(I2cDevice::FromIdAsync(controllerId, settings)).get();
if (setTime) SetTime(realTimeClock);
else ShowTime(realTimeClock);
return 0;
}
We still need to define the methods for showing the time and for setting it along with porting the BCD/Integer conversion functions. The conversion functions are almost identical in C++ to the C# versions.
byte BcdToInt(byte bcd)
{
byte retVal = (bcd & 0xF) + ((bcd >> 4) * 10);
return retVal;
}
byte IntToBcd(int v)
{
byte retVal = (byte)((v % 10) | (v / 10) << 0x4);
cout << v << " - " << (int) retVal << endl;
return retVal;
}
void SetTime(I2cDevice^ realTimeClock)
{
SYSTEMTIME systemTime;
GetSystemTime(&systemTime);
std::vector<BYTE> setTimeCommand;
setTimeCommand.push_back((BYTE)0x00);
setTimeCommand.push_back(IntToBcd(systemTime.wSecond));
setTimeCommand.push_back(IntToBcd(systemTime.wMinute));
setTimeCommand.push_back(IntToBcd(systemTime.wHour));
setTimeCommand.push_back(IntToBcd(systemTime.wDayOfWeek));
setTimeCommand.push_back(IntToBcd(systemTime.wDay));
setTimeCommand.push_back(IntToBcd(systemTime.wMonth));
setTimeCommand.push_back(IntToBcd(systemTime.wYear % 100));
for (int i = 0; i < 10; ++i)
setTimeCommand.push_back(0);
realTimeClock->Write(ArrayReference<BYTE>(setTimeCommand.data(), static_cast<unsigned int>(setTimeCommand.size())));
}
Showing the time involved a little more thought. Notice in the above that when I request the time from the system that I am using the GetSystemTime() method. There is also a GetLocalTime(). Using the system time is easier since I don't need to worry about the complexities of daylight savings times rules in various geographies. However the power shell set-date command works with local time. So I need to convert the UTC time read from the chip back to local time. There are no functions in Win32 to directly convert the UTC time to the local time. But if more than one method is used we can do the conversion. I found the series of functions that need to be called on a Microsoft page here which shows the use of 3 functions to do this conversion.
SystemTimeToFileTime(&time, &FileTime);
FileTimeToLocalFileTime(&FileTime, &LocalFileTime);
FileTimeToSystemTime(&LocalFileTime, &LocalTime);
With the knowledge in hand we can complete the last function needed to show the time. The code looks similar to the C# version.
void ShowTime(I2cDevice^ realTimeClock)
{
std::vector<BYTE> readCommand;
Array<BYTE>^ resultBuffer = ref new Array<BYTE>(0x7);;
readCommand.push_back((BYTE)0x00);
realTimeClock->WriteRead(ArrayReference<BYTE>(readCommand.data(), static_cast<unsigned int>(readCommand.size())), resultBuffer);
SYSTEMTIME time;
ZeroMemory(&time, sizeof(time));
time.wSecond = BcdToInt(resultBuffer[0]);
time.wMinute = BcdToInt(resultBuffer[1]);
bool is24HourCock = (resultBuffer[2] >> 0x6) != 1;
if (is24HourCock)
time.wHour = (resultBuffer[2] & 0xF) + ((resultBuffer[2] >> 4) & 0x1) * 10 + ((resultBuffer[2] >> 0x5) * 20);
else
time.wHour = (resultBuffer[2] & 0xF) + ((resultBuffer[2] >> 4) & 0x1) * 10 + ((resultBuffer[2] >> 0x5) * 12); ;
time.wDayOfWeek = BcdToInt(resultBuffer[3]);
time.wDay = BcdToInt(resultBuffer[4]);
time.wMonth = BcdToInt((byte)(resultBuffer[5] & (byte)0x3f));
time.wYear = BcdToInt(resultBuffer[6]) + 2000;
FILETIME FileTime, LocalFileTime;
SYSTEMTIME LocalTime;
SystemTimeToFileTime(&time, &FileTime);
FileTimeToLocalFileTime(&FileTime, &LocalFileTime);
FileTimeToSystemTime(&LocalFileTime, &LocalTime);
std::cout << LocalTime.wMonth << "/" << LocalTime.wDay << "/" << LocalTime.wYear
<< " " << setfill('0') << setw(2) << LocalTime.wHour << ":" << LocalTime.wMinute << ":" << LocalTime.wSecond;
}
With the program source code complete all that is left is to make sure that the power shell commands that I had typed earlier run on every boot. Using notepad I saved the text of the 2 lines script to a file named UpdateTime.ps1 and copied it to the Raspberry Pi in the path c:\shares\boot. To test it I ensured the RTC had the correct time by setting the system time to the correct time and then running .\SetTimeTool.exe set-time. I then intentionally set the system clock to the wrong date and time by typing Set-date "2010/01/02 15:16" (to set the time ) and then ran date to have the system show its date. As expected the system now shows it has the incorrect date. I ran .\UpdateTime.ps1 and then ran date again and saw that the correct time now showed. For the last test I made a UWP application that does nothing more than show the system time updating once a second and set it as the default program. I scheduled my UpdateTime.ps1 script to run on boot using the following power shell command.
schtasks /create /tn "Update Time Script" /tr C:\shares\boot\UpdateTime.ps1 /sc onstart /ru SYSTEM
This is necessary because to ensure that the program is working it is going to need to boot off network (which will prevent us from being able to invoke programs remotely) so that the script is the only thing making changes to the clock. Remove power from the device, wait a few moments, then turn it back on. You should see the time set correctly.
For other Clock Implementations
There are several other chips available for acting as a real time clock. Some GPS receivers have a battery backup so that once they get the time they can continue to serve the time even if a GPS fix is not available. This code wouldn't directly work with these other chips, but it can be easily adapted so that the same technique can be used for initializing the clocks from a real time source at bootup.
History
- 2016 July 20 - Initial Publication


 General
  News
News  Suggestion
  Question
  Bug
Bug  Answer
  Joke
Joke  Praise
  Rant
Rant  Admin
Admin 


