Background
This is in continuation to article 'Getting Started with Angular2 - Part1'. In part-1, we have learned how to make environment ready for angular2 application. In this article, we will start with how to write a simple Hello World application and try to add more features in upcoming articles.
Getting Started
Now let us start building our 'Hello World' application. To start, we will first create our HTML file, say index.html in the project folder and here we will add references to scripts and css that are required for our application and write our custom Angular Directives.
Yes, you read it right ‘custom Angular Directives’. “What this Directive mean”, may be the question in the mind of programmers new to this technology.
So, Let us understand what this ‘Directive’ mean here. To put it in simple way, we know many HTML elements or say tags like <p>, <h1> etc., All these tags have some predefined functionalities. Say, if browser comes across the tag <h1>, it understands as heading element with specific font-size and displays on browser accordingly. Similarly, what if we want to create our own custom elements with some definition and reuse that custom element in our application.
This custom element is called Directive. Both Angular JS 1.x and Angular2 have different ways of creating Directive and in this article we will be focusing on Angular2. We will be using Angular Directive in our index.html file
Now back to our index.html file. Let us add some polyfills required for older browsers. I have also added bootstrap.css for better UI.
<html>
  <head>
    <title>Angular 2 Sample</title>
    <meta charset="UTF-8">
    <meta name="viewport" content="width=device-width, initial-scale=1">
    <!-- 1. Load libraries -->
     <!-- Polyfill(s) for older browsers -->
    <script src="node_modules/core-js/client/shim.min.js"></script>
    <script src="node_modules/zone.js/dist/zone.js"></script>
    <script src="node_modules/reflect-metadata/Reflect.js"></script>
    <script src="node_modules/systemjs/dist/system.src.js"></script>
  </head>
  <!-- 3. Display the application -->

  <body>
       <my-app>Loading...</my-app>
  </body>
</html>
Notice, that I have added our custom angular directive <my-app> under <body> tag. The definition for this tag or say Directive will be written in Component and placed in typescript file (i.e, file with .ts as extension).
Currently, the content of this tag is “Loading…” which will be displayed on the browser until the actual definition is loaded.
So, Let us create our first Component in the steps below.
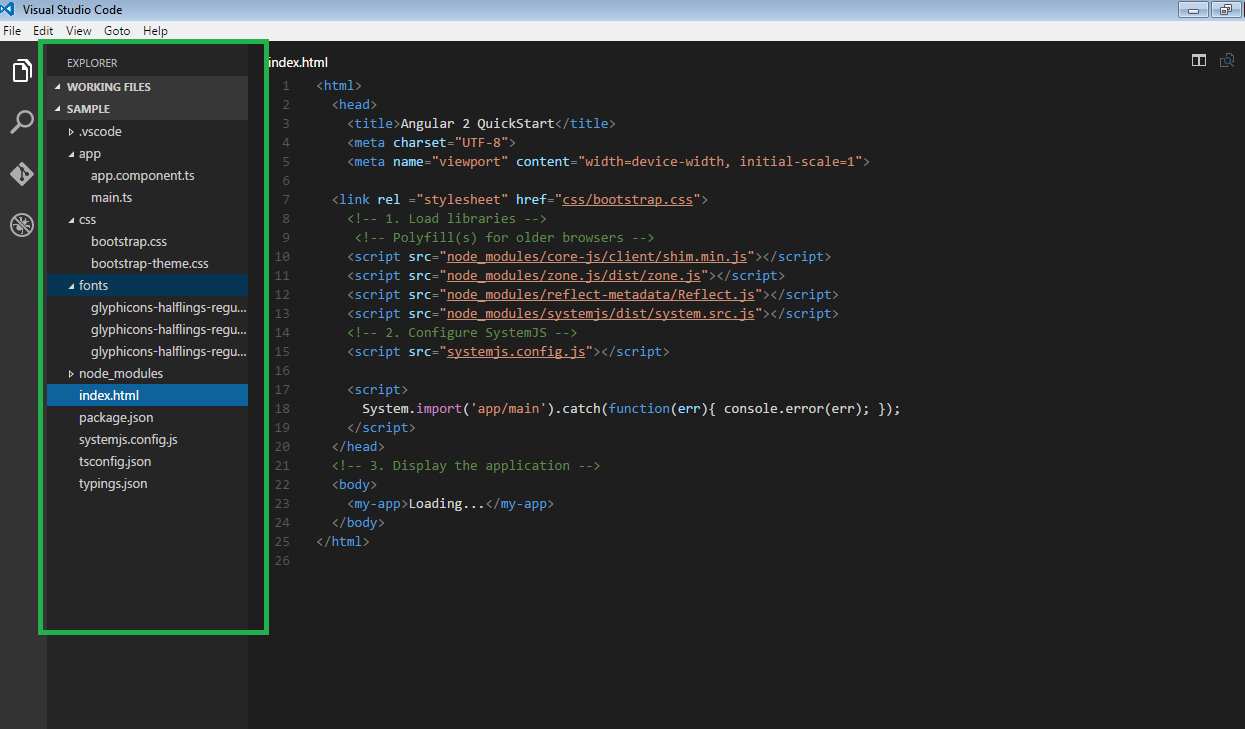
Step 1: - Creating a proper folder structure
Create a folder with name ‘app’ in the project folder ‘Angular2-Sample. In this folder, we will be placing our typescript files which contains logic.
Let us understand the significance of name of the ‘app’ folder before directly jumping into code.
For that, If we go through the systemjs.config file, for ‘app’ keyword (refer the content below taken from the systemjs.config file) the folder is mapped to ‘app’ folder.
var map = {
'app': 'app',
'@angular': 'node_modules/@angular',
'angular2-in-memory-web-api': 'node_modules/angular2-in-memory-web-api',
'rxjs': 'node_modules/rxjs'
};
If we want to rename our ‘app’ (refer the content below, taken from the systemjs.config file), then we also need to modify in systemjs.config file. The default mapping is with the name ‘app’.
Next, in our code, when we reference the path as ‘@angular/core’, it will map the path to ‘node_modules/@angular/core’.
Step 2 - Defining Component
Now, Let us create our First Component and save the file with .ts as extension. For a file containing Component, the standard naming convention is someName.component.ts. Let us name our file as ‘app.component.ts’ and place it under 'app' folder
Let us name the Class as AppComponent
export class AppComponent{

}
In this class we write properties and methods required for our view or html page. The keyword ‘export’ makes the Component modular or say we can use this class in other files by importing this class name. The first Component of the application is also known as root Component
Next, we write Metadata of the Component above the Class AppComponent as,
@Component({
           selector: ’my-app’,
           template:’<h1>Hello World, Welcome to Angular2</h1>’
})
Then, as the keyword ‘Component’ is defined in @angular/core module, we will add it’s reference as,
import {Component} from ‘@angular/core’;
So our code in app.component.ts looks like,
import {Component} from '@angular/core';

@Component({
        selector:’my-app’,
        template:’<h1>Hello World, Welcome to Angular2</h1>’
})

export class AppComponent{

}
Remember the tag <my-app> in index.html page, When angular compiler comes across this tag, it replaces the tag’s content ‘Loading...’ with the content in ‘template’ <h1>Hello World, Welcome to Angular2</h1> and the same is displayed by browser as output.
If we recollect the definition of Component defined in the start of our article 'Getting Started with Angular2 - Part1'
Component = class + Metadata + template.
Step 3 - Initializing the Component in main.ts file
By this time, we have created index.html and app.component.ts files. Index.html contains the custom tag and its definition in app.component.ts file. Now let us bootstrap or initialize our root Component i.e AppComponent
For this, under the same ‘app’ folder, in the new file ‘main.ts’, we write
bootstrap(AppComponent)
As bootstrap keyword is defined in @angular/platform-browser-dynamic and AppComponent class in ./app.component, we will import these files as below and place it on top position in the file.
import {bootstrap} from '@angular/platform-browser-dynamic';
import {AppComponent} from './app.component';
Step 4 - Adding the references in Index.html file
So, we have created files, index.html, app.component.ts, main.ts file.
As this main.ts file contains initialization code, we add it’s reference in our index.html file as System.import(‘app/main’),
<script>
      System.import('app/main').catch(function(err){ console.error(err); });
</script>
And as the System.import is defined in systemjs.config file, we will add the reference of this file in our index.html as below,
<script src="systemjs.config.js"></script>
Let us Summarize
- We have used directive <my-app>Loading… </my-app> in index.html
-
Defined the <my-app> tag’s definition in Component in app.component.ts.
-
Then to initialize the root Component i.e, AppComponent, we have written bootstrap(AppComponent)in main.ts file.
-
And then, referenced this main.ts file in index.html as, System.import(‘app/main’). Also in index.html added, reference path to Systemjs.config.
In the figure, you can see the folder structure of our application which is highlighted with green border.
Step 5 - Executing our Application
Let us now execute our application.
From command prompt, navigate to our application folder (where index.html is present) or if you are using ‘Visual Code’ as editor, then you can right click on index.html file and the select the option ‘open with command prompt’ to directly navigate to required folder.
Then, on command prompt, execute the command npm start
This starts the services tsc (typescript compiler) and concurrently runs two services npm run in watch mode i.e ‘npm run tsc:w’ and npm run in lite mode i.e ‘npm run lite’. The service tsc -w compiles the typescript code into javascript and runs in watch mode, so that if any changes made to application and saved, it will automatically detects the changes and shows the updated output on browser (without the need of refreshing browser manually).
Check the screenshot to view npm services. If the code is free of errors, you can see the output as required and if your code contains any errors, the error messages will be thrown on command prompt and writes the error to npm log file.

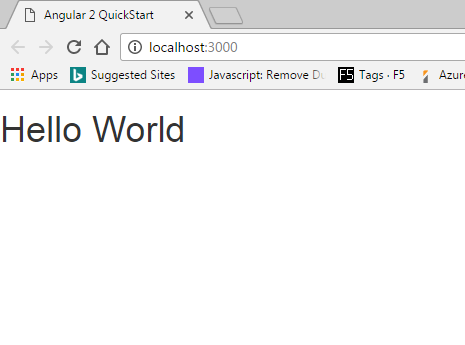
Output
Our code got successfully executed and you can see the output as "Hello World" displayed on browser.
Conclusion
Till the stage, we have seen how to write a simple Hello World application in Angular2. In our next article, let us add few more concepts of Angular2 to our application and learn some more new concepts in the process.
This member has not yet provided a Biography. Assume it's interesting and varied, and probably something to do with programming.


 General
  News
News  Suggestion
  Question
  Bug
Bug  Answer
  Joke
Joke  Praise
  Rant
Rant  Admin
Admin 


