Introduction
In this article, we look into how to setup local development environment for Angular 2. This article covers minimum required configuration for creating hello world based application in Angular using Typescript and ES6.
I would like to get feedback on this article. Please feel free to share your comments or you can also email me at shettyashwin@outlook.com. If you like this article, please don't forget to rate it.
Other articles on Angular 2.
Prerequisites
You will need Nodejs & npm installed on your local system. You can verify the same in your system by running node --version & npm --version. I am using node version 6.9.1 & npm version 3.10.8.
Let's Get Started
Let's get started on building our environment, In this article, we will be building environment which is dependent on TypeScript and ES6. Open a command prompt/terminal to install typescript package via npm.
npm install -g typescript
By using -g, we have just installed typescript which is accessible globally across all your applications. Now let's create a folder in which we will have our application code. I have created my folder at D:\RD\AngularII, but you can choose a different path based on your preference. Inside AngularII folder, we will create a separate folder for this session. Before executing the below command, please make sure your command prompt / terminal is set to folder in which we will have our application code (in my case, it is D:\Rd\AngularII).
mkdir gettingStarted && cd gettingStarted
The above command will create a folder and set your base directory to folder we just created. To build our application using typescript, we will have to add tsconfig.json. Using tsconfig.json, we will define output type and directory.
tsc --init --target es5 --sourceMap --experimentalDecorators --emitDecoratorMetadata
The above command will create tsconfig.json in your root directory. Open tsconfig.json in Notepad or any text editor you are comfortable with. Add the below tag to compileroption section.
"outDir" : "build"
By adding the above tag, we just configured typescript output to build folder at root level. This build folder will have scripts which will be served to web browser. Similarly, we will configure typescript to exclude node_modules from bundling. Add the below tag to your tsconfig.json.
"exclude": ["node_modules"]
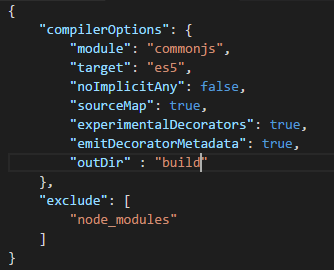
Your final version of tsconfig.json should look like this:
Package.json file will also be required. In Package.json, we will have information about dependence and task which we will use regularly for development. Run the below command in your command prompt/terminal. This will initiate an interactive workflow.
npm init
Below are the details which you can enter in interactive mode. You can press enter to ignore other values.
- Name: session-v
- Version: 1.0.0
- Description: A session 5 tutorial
- Main: index.js
- Author: [Your Name]
Let's add our dependence which is required to run this app. Please note if you are using npm 3 or above, you will have to manually load dependencies. Below commands are based on npm 3 features. For below npm 3 version, you will only have to include angular2. It will automatically load other dependencies.
npm install --save @angular/common@2.4.0 @angular/compiler@2.4.0
@angular/core@2.4.0 @angular/platform-browser@2.4.0 @angular/platform-browser-dynamic@2.4.0
@angular/router@3.4.0 systemjs@0.19.40 core-js@2.4.1 reflect-metadata@0.1.8 rxjs@5.0.1 zone.js@0.7.4

npm install --save-dev lite-server concurrently
Lite-Server and Concurrently are only required for development, so we have added --save-dev as a parameter. Modules loaded using --save-dev will not be bundled with application final code.
Open and add the following tags to your package.json which should be available at your root folder. These tags are tasks which will be used for (watch) reloading script on code change and (serve) for hosting our application locally.
"scripts": {
    "start": "concurrently \"npm run watch\" \"npm run serve\"",
    "watch": "tsc -w",
    "serve": "lite-server"
  },
This is how your final package.json should look like:

To understand why we are using ^ above, please visit https://docs.npmjs.com/files/package.json#dependencies to get clear details.
Create app folder at root and create a new file inside it with name app.component.ts and add our first component. In this tutorial, all our .ts files will be maintained in this app folder.
import { Component } from '@angular/core';

@Component({
  selector: 'my-app',
  template: '<h1>Hello, Angular2</h1>'
})
export class AppComponent { }
To bundle our app modules, add a new file with name app.module.ts.
import { NgModule }      from '@angular/core';
import { BrowserModule } from '@angular/platform-browser';
import { AppComponent }  from './app.component';

@NgModule({
  imports:      [ BrowserModule ],
  declarations: [ AppComponent ],
  bootstrap:    [ AppComponent ]
})
export class AppModule { }
Now add index.html at root level which will work as a start page.
<html>
<head>
  <script src="node_modules/core-js/client/shim.min.js"></script>
  <script src="node_modules/zone.js/dist/zone.js"></script>
  <script src="node_modules/reflect-metadata/Reflect.js"></script>
  <script src="node_modules/systemjs/dist/system.src.js"></script>
  <script src="systemjs.config.js"></script>
  <script>
    System.import('applicationStartup').catch(function (err) {
      console.error(err);
    });
  </script>
</head>

<body>
  <my-app>Loading...</my-app>
</body>

</html>
Ok, now let's bootstrap our code by adding a new file main.ts and systemjs.config.js.
main.ts
import { platformBrowserDynamic } from '@angular/platform-browser-dynamic';
import { AppModule } from './app.module';

platformBrowserDynamic().bootstrapModule(AppModule);
systemjs.config.js
System.config({
    defaultJSExtensions: true,
    map: {
        app:"applicationStartup",
        '@angular/core': 'node_modules/@angular/core/bundles/core.umd.js',
        '@angular/common': 'node_modules/@angular/common/bundles/common.umd.js',
        '@angular/compiler': 'node_modules/@angular/compiler/bundles/compiler.umd.js',
        '@angular/platform-browser':
             'node_modules/@angular/platform-browser/bundles/platform-browser.umd.js',
        '@angular/platform-browser-dynamic':
             'node_modules/@angular/platform-browser-dynamic/bundles/platform-browser-dynamic.umd.js',
        '@angular/router': 'node_modules/@angular/router/bundles/router.umd.js',
        'rxjs': 'node_modules/rxjs'
    },
    packages : {
        app : {
                main : '../../build/main.js',
                defaultJSExtensions : 'js'
            },
        rxjs :{
            defaultJSExtensions : "js"
        }
    }
});
This is how our folder structure should look like:
In command prompt / terminal window, execute the below command.
npm start
npm will read your package.json file and execute start command which we added in scripts section. Once npm start has been executed successfully, you should be able to see application page at http://localhost:3000.
Since npm start is also configured for auto load, any changes made to code file, this will automatically reload your page on code change save. For testing the same, make changes to app.component.ts, change "hello angular 2" to "My session 5 tutorial" and save. You should be able to see that the application page is now automatically updated to newer text.
Reference
I have 17 years of experience working in Microsoft Technology & Open source. Now a days I enjoy playing with Nodejs, Angular, docker, Gcloud & Kubernetes. My complete profile is available at https://in.linkedin.com/in/ashwinshetty and you can mail me at ashwin@shettygroup.com


 General
  News
News  Suggestion
  Question
  Bug
Bug  Answer
  Joke
Joke  Praise
  Rant
Rant  Admin
Admin 


