In Maser Chef Part 1, I introduced how to integrate ASP.NET Core MVC with Fluent NHibernate and Angular JS. In this article I talk about how to use ASP.NET Core MVC, Fluent NHibernate and Angular JS to implement a CRUD SPA (Single Page Application).
Use Generics in Repository
Create, read, update and delete (as an acronym CRUD) are four basic functions of persistent storage.
We need implement CRUD on a database level in our repository class first. I would like to use generics for query, add, update, delete methods to avoid redundant coding. Why use generics? The short answer is, type-safe, compile-time check, faster and applicable for many types with the same underlying behavior.
In previous data model classes, all members have the same name as database fields. Actually, the data model class member doesn’t have to be the same as the database fields. For example, Id of Recipe class doesn’t have to be RecipeId, and it can be any name, like Id. What we need to do is to tell Fluent NHibernate during the mapping as shown below.
Id(x => x.Id, "RecipeId");
This way Fluent NHibernate knows it is mapping "Id" to "RecipeId".
Because we don’t have to use the same name as the database fields, now we have a chance to change different data model classes to have some common members.
So we create a base class Entity.
    public class Entity
    {
        public virtual Guid Id { get; set; }
        public virtual Guid? ParentId { get; set; }
        public virtual Type ParentType => null;
}
Then we make Recipe, RecipeStep and RecipeItem derive Entity and replace RecipeId of Recipe with Id, replace RecipeStepId of RecipeStep with Id and ItemId of RecipeItem with Id. Also replace RecipeId of RecipeStep with ParentId and RecipeStepId of RecipeItem with ParentId.
 public class Recipe : Entity
    {
        public virtual string Name { get; set; }
        public virtual string Comments { get; set; }
        public virtual DateTime ModifyDate { get; set; }
        public virtual IList<RecipeStep> Steps { get; set; }
}

public class RecipeStep : Entity
    {
        public virtual int StepNo { get; set; }
        public virtual string Instructions { get; set; }
        public virtual IList<RecipeItem> RecipeItems { get; set; }
        public override Type ParentType => typeof(Recipe);
    }
public class RecipeItem : Entity
    {
        public virtual string Name { get; set; }
        public virtual decimal Quantity { get; set; }
        public virtual string MeasurementUnit { get; set; }
        public override Type ParentType => typeof(RecipeStep);
    }
Now we need change mapping class as well. Please note the mapping for different names.
public class RecipeMap : ClassMap<Recipe>
    {
        public RecipeMap()
        {
            Id(x => x.Id, "RecipeId");
            Map(x => x.Name);
            Map(x => x.Comments);
            Map(x => x.ModifyDate);
            HasMany(x => x.Steps).KeyColumn("RecipeId").Inverse().Cascade.DeleteOrphan().OrderBy("StepNo Asc");
            Table("Recipes");
        }
}
public class RecipeStepMap : ClassMap<RecipeStep>
    {
        public RecipeStepMap()
        {
            Id(x => x.Id, "RecipeStepId");
            Map(x => x.ParentId, "RecipeId");
            Map(x => x.StepNo);
            Map(x => x.Instructions);
            HasMany(x => x.RecipeItems).KeyColumn("RecipeStepId").Inverse().Cascade.DeleteOrphan();
            Table("RecipeSteps");
        }
    }
public class RecipeItemMap : ClassMap<RecipeItem>
    {
        public RecipeItemMap()
        {
            Id(x => x.Id, "ItemId");
            Map(x => x.Name);
            Map(x => x.Quantity);
            Map(x => x.MeasurementUnit);
            Map(x => x.ParentId, "RecipeStepId");
            Table("RecipeItems");
        }
    }
What’s "Cascade.DeleteOrphan"? This option deletes children when you delete the parent object. For our case, removing a recipe will delete all recipe steps and recipe items of this recipe and removing a step will delete all items of this step.
Then we change methods of Repository to generic methods, and put the generic constraint, which is T must be the sub class of Entity.
public T GetEntity<T>(Guid id) where T : Entity
        {
            try
            {
                return _session.Get<T>(id);
            }
            catch (Exception ex)
            {
                throw ex;
            }
        }

        public T AddEntity<T>(T entity) where T : Entity
        {
            T newOne = null;
            using (var transaction = _session.BeginTransaction())
            {
                try
                {
                    _session.SaveOrUpdate(entity);
                    Commit(transaction, entity);
                    RefreshParentObject(entity);
                    newOne = _session.Get<T>(entity.Id) as T;
                }
                catch (Exception ex)
                {
                    throw ex;
                }

                return newOne;
            }
        }

        public void UpdateEntity<T>(T entity) where T : Entity
        {
            using (var transaction = _session.BeginTransaction())
            {
                try
                {
                    _session.Update(entity);
                    Commit(transaction, entity);
                    RefreshParentObject(entity);
                }
                catch (Exception ex)
                {
                    throw ex;
                }

            }
        }

        public void DeleteEntity<T>(Guid id) where T : Entity
        {
            using (var transaction = _session.BeginTransaction())
            {
                var entity = _session.Get<T>(id);
                if (entity != null)
                {
                    try
                    {
                        _session.Delete(entity);
                        Commit(transaction, entity);
                        RefreshParentObject(entity);
                    }
                    catch (Exception ex)
                    {
                        throw ex;
                    }
                }
            }
        }
For add, update and delete methods, all calls RefreshParentObject(). What does that mean? When we change RecipeStep or RecipeItem, its parent object cache doesn’t know this change. We need to refresh the parent object cache.
void RefreshParentObject(Entity entity)
    {
        if (!entity.ParentId.HasValue)
            return;
        var parentObj = _session.Get(entity.ParentType, entity.ParentId.Value);
        if (parentObj != null)
            _session.Refresh(parentObj);
    }
Now we update web API controller.
[HttpGet("{id}")]
public IActionResult Get(Guid id)
{
    var recipe = _repository.GetEntity<Recipe>(id);
    if (recipe != null)
        return new ObjectResult(recipe);
    else
        return new NotFoundResult();

}
[HttpPost]
public IActionResult Post([FromBody]Recipe recipe)
{
    if (recipe.Id == Guid.Empty)
    {
        recipe.ModifyDate = DateTime.Now;
        return new ObjectResult(_repository.AddEntity<Recipe>(recipe));
    }
    else
    {
        var existingOne = _repository.GetEntity<Recipe>(recipe.Id);
        existingOne.Name = recipe.Name;
        existingOne.Comments = recipe.Comments;
        existingOne.ModifyDate = DateTime.Now;
        _repository.UpdateEntity<Recipe>(existingOne);
        return new ObjectResult(existingOne);
    }
}
[HttpPut("{id}")]
public IActionResult Put(Guid id, [FromBody]Recipe recipe)
{
    var existingOne = _repository.GetEntity<Recipe>(recipe.Id);
    existingOne.Name = recipe.Name;
    existingOne.Comments = recipe.Comments;
    _repository.UpdateEntity<Recipe>(recipe);
    return new ObjectResult(existingOne);
}

[HttpDelete("{id}")]
public IActionResult Delete(Guid id)
{
    _repository.DeleteEntity<Recipe>(id);
    return new StatusCodeResult(200);
}
Angular Client Routing
Now we need set up client routing in our Master Chef application so that we can have dynamic views being substituted in based on the URL that our client provides. We can get the Angular routing features from the angular-route module.
Using ngRoute module, you can navigate to different pages in your Single Page Application with no page reloading.$route is used for deep-linking URLs to controllers and views (HTML partials). It watches $location.url() and tries to map the path to an existing route definition.
There are two dependencies in $route, $location and $routeParams.
1) Inject ngRoute
Open app.js, inject ngroute in our masterChefApp module.
(function () {
'use strict';
angular.module('masterChefApp', [
'ngRoute',
'recipesService'
]);
})();
2) Configure Angular Routing
Define a configure function for our Angular app module – masterChefApp. And, in that config function, use the route provider service that is coming from the ngRoute module to define client-side routes
angular.module('masterChefApp').config(['$routeProvider', '$locationProvider', function ($routeProvider, $locationProvider) {
        $routeProvider
        .when('/', {
            templateUrl: 'partials/recipes.html',
            controller: 'recipesController'
        })
        .when('/recipes/add', {
            templateUrl: 'partials/add.html',
            controller: 'recipesAddController'
        })
        .when('/recipes/edit/:id', {
            templateUrl: 'partials/edit.html',
            controller: 'recipesEditController'
        })
        .when('/recipes/delete/:id', {
            templateUrl: 'partials/delete.html',
            controller: 'recipesDeleteController'
        });

        $locationProvider.html5Mode(true);

}]);
The first is just a default route – forward slash. The second is /recipes/add. The third is /recipes/edit/ and pass :id as route parameter, which allows us to take a dynamic ID that I can match to one of recipes. The last route /recipes/delete/:id also needs to take a dynamic ID parameter. This default route is just going to list all of the recipes. The "Add" route is going to deal with adding, the "Edit" route is going to deal with editing or updating, and the "Delete" route is going to delete or remove. The CRUD functions are represented by these four client-side routes. For each of the routes, we need to define both a template URL – which indicates some HTML that should be rendered for this route – and also a separate controller that's going to handle this route.
At the very bottom, using the $locationProvider, its html5Mode function, setting that to true to make sure that I can use friendly and natural URLs and avoid using hash bangs for client-side routing.
Angular JS Client Controller
We have configured the default route, add route, edit route, and delete route. Then we need corresponding controllers, recipesController, recipesAddController, recipesEditController and recipesDeleteController. We define all these controllers in recipesController.js.
1) Inject "Add", "Edit" and "Delete" Controllers
angular
        .module('masterChefApp')
        .controller('recipesController', recipesController)
        .controller('recipesAddController', recipesAddController)
        .controller('recipesEditController', recipesEditController)
        .controller('recipesDeleteController', recipesDeleteController);
2) Implement Recipes Add Controller
recipesAddController.$inject = ['$scope', 'Recipe', '$location'];
    function recipesAddController($scope, Recipe, $location) {
        $scope.recipe = new Recipe();
        $scope.addRecipe = function () {
            $scope.recipe.$save(function () {
                $location.path('/');
            });
        }
    }
So recipesAddController needs a $scope and the Recipe service and it also needs the $location service. recipesAddController creates or provides the functionality to allow someone to add a recipe to application. To do that, creates a new $scope variable recipe using Recipe service. It also creates a $scope function here – addRecipe, which is going to be submitting a recipe to the server by using the Recipe services save method. In its callback when the recipe has been submitted, we're just going to redirect the application to its home page.
3) Implement Recipes Edit Controller
recipesEditController.$inject = ['$scope', 'Recipe', '$location', '$routeParams'];
    function recipesEditController($scope, Recipe, $location, $routeParams) {
        $scope.recipe = Recipe.get({ id: $routeParams.id });
        $scope.editRecipe = function () {
            $scope.recipe.$save(function () {
                $location.path('/');
           });
        }
}
recipesEditController needs a $scope and the Recipe service, $location service. It also needs $routeParameter to pass id. recipesEditController creates or provides the functionality to allow someone to update a recipe to application. We're going to get the recipe to be updated by using the &routeParams service. Get ID of the recipe by getting it from the route parameter. Then we're going to reach into the server and get the appropriate recipe by calling the recipe service get function - this time it is the get method providing that ID. That's going to be provided to the front end. A user is going to be able to make any.
Finally, we submit the updated recipe record to the server.
4) Implement Recipes Delete Controller
recipesDeleteController.$inject = ['$scope', 'Recipe', '$location', '$routeParams'];
    function recipesDeleteController($scope, Recipe, $location, $routeParams) {
        $scope.recipe = Recipe.get({ id: $routeParams.id });
        $scope.deleteRecipe = function () {
            $scope.recipe.$remove({ id: $scope.recipe.id }, function () {
                $location.path('/');
            });
        };
}
recipesDeleteController uses the $routeParams to get an ID and retrieve a specific recipe. And then provides this function deleteRecipe where we can use the $remove method of Recipe service to tell the server that we want to get rid of a specific recipe.
Partial View Templates
1) Modify Index.html to use ng-view
Modify index.html to use partial views. First Add a "base" tag and its href attribute to /. This is necessary so that the $locationProvider can work properly because it needs a base to work. Now go to body content. Get rid of all of that and simply use the ng-view directive.
<!DOCTYPE html>
<html ng-app="masterChefApp">
<head>
    <base href="/">
    <meta charset="utf-8" />
    <title>Master Chef Recipes</title>
    <script src="lib/angular/angular.min.js"></script>
    <script src="lib/angular-resource/angular-resource.min.js"></script>
    <script src="lib/angular-route/angular-route.min.js"></script>
    <script src="app.js"></script>
    </head>
<body ng-cloak>
    <div>
        <ng-view></ng-view>
    </div>
</body>
</html>
Based on use of this ng-view directive and also the routes that we already set up, the ng-view is going to be able to deliver the correct partial view and also the correct controller to power that view with $routeProvider on whatever the client-side route is.
We're specifying four controllers in app.js file. These controllers give us CRUD operations. The route URL / is going to retrieve all of the recipes from the server. /recipes/add is going to create a new recipe. recipes/edit with a variable id is going to update an existing recipe and /recipes/delete also with a variable id is going to delete or remove a specific recipe from the server.
Now we create "partials" folder under wwwroot folder. Then can add templates one by one.
2) Retrieve Template – Recipes.html
Right click "partials" folder under wwwroot. Add a New Item. In the Client-side template section, select HTML Page. We give it the name "recipes.html".
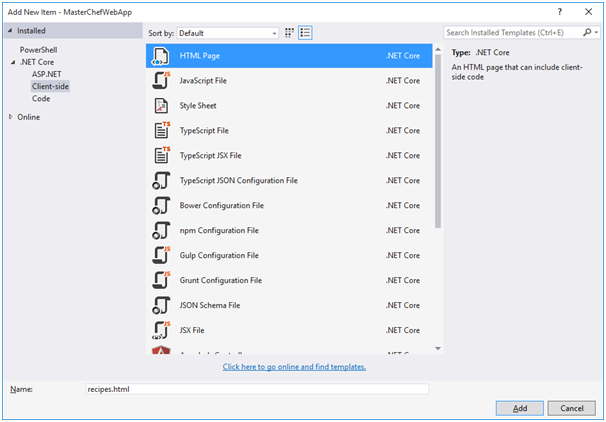
recipes.html which is going to retrieve and display a list of recipes.
<div>
    <h2>Master Chief Recipes</h2>
    <ul>
        <li ng-repeat="recipe in recipes">
            <div>
               <h5>{{recipe.name}} - {{recipe.comments}}</h5>
            </div>
            <div>
                <a href="recipes/edit/{{recipe.id}}">edit</a>
            </div>
            <div>
                <a href="recipes/delete/{{recipe.id}}">delete</a>
            </div>
            <ul>
                <li ng-repeat="step in recipe.steps">
                    <p> step {{step.stepNo}} : {{step.instructions}}</p>
                    <ul>
                        <li ng-repeat="item in step.recipeItems">
                            <p> {{item.name}}  {{item.quantity}} {{item.measurementUnit}}</p>
                        </li>
                    </ul>
                </li>
            </ul>
        </li>
    </ul>
    <p><a href="recipes/add"> Add a new recipe </a></p>
</div>
Please note this is not the full html. We’re just defining a partial view which is going to be substituted in AngularJS application.
Now if we run it, we should see all recipes.

3) Bootstrap Styles
Although it’s working, but it’s a totally plain html. So we need apply some CSS styles.
Bootstrap is a very popular front-end framework, which includes HTML and CSS based design templates for typography, forms, buttons, tables, navigation, modals, image carousels and many other, as well as optional JavaScript plugins. Applying bootstrap styles can make our master chef web application pretty.
We’ve added bootstrap package already in bower configuration.
 {
	"name": "asp.net",
	"private": true,
  "dependencies": {
    "jquery": "3.1.0",
    "bootstrap": "3.1.0",
    "angular": "1.5.8",
    "angular-route": "1.5.8",
    "angular-resource": "1.5.8"
  }
}
So bootstrap has already installed on the wwwroot\lib folder. Now we include it in index.html.
<link href="lib/bootstrap/dist/css/bootstrap.min.css" rel="stylesheet" media="screen">
We’ll apply the below bootstrap styles.
We apply the main div in index.html with .container-fluid (full-width) for proper alignment and padding.
We apply all .list-group for ui, .list-group-item for li in recipes.html. We also apply "btn-primary" for the add link, "btn-default" for the edit link, and "btn-delete" for the delete link. Also I want to show recipe as a badge, so apply .badge style as well.
Run Master Chef again, see what it’s like now.
Bootstrap includes a powerful mobile-first grid system for building layouts of all shapes and sizes. It’s based on a 12 column layout and has multiple tiers, one for each media query range. There are three major components—containers, rows, and columns. Containers—.container for fixed width or .container-fluid for full width—center your site’s contents and help align your grid content. Rows are horizontal groups of columns that ensure your columns are lined up properly. Column classes indicate the number of columns you’d like to use out of the possible 12 per row. So if you want three equal-width columns, you’d use .col-xs-4.
We use bootstrap grid system in master chef templates.
4) Using Angular JS to implement expanding/collapsing
I know there are a lot of ways to do expanding/collapsing with jQuery to change DOM. But remember we’re using MVVM pattern by AngularJS. So I am keen to implement expanding/collapsing by changing model in controller (View Model).
Add the expand() function in recipesController. In the expand() function, we set show property of recipe object.
recipesController.$inject = ['$scope', 'Recipe'];

    function recipesController($scope, Recipe) {
        $scope.recipes = Recipe.query();
        $scope.expand = function (recipe) {
            recipe.show = !recipe.show;
        }
}
We add a ng-click to call expand() function in recipesController.
 <div class="btn-group">
               <button class="btn badge pull-left" ng-click="expand(recipe)"><h5>{{recipe.name}} - {{recipe.comments}}</h5></button>
</div>
Then we use ng-show to control if show details of a recipe or not.
<ul class="list-group" ng-show="recipe.show">
                <li ng-repeat="step in recipe.steps" class="list-group-item">
Just click the recipe badge to expand whatever you want to look.
5) Create Template – add.html
Right click the "partials" folder under wwwroot. Add a New Item. In the Client-side template section, select HTML Page. We give it the name "add.html".
In add.html, use ng-submit to post data to server. We're going to bind the information that the user enters into input fields to a scope variable recipe by way of that ng-model directive. And when the user uses our form to submit by pressing on the Save button, we're going to be calling a scope function addRecipe which behind the scenes in our controller is going to submit this recipe object to the server.
<h1>Add a new recipe</h1>
<div class="container-fluid">
    <form ng-submit="addRecipe()">
        <div class="row">
            <div class="form-group col-xs-4">
                <label for="name">Name</label>
                <input ng-model="recipe.name" name="name" type="text" class="form-control" />
            </div>
        </div>
        <div class="row">
            <div class="form-group col-md-4 col-xs-8">
                <label for="comments">Comments</label>
                <input ng-model="recipe.comments" name="comments" type="text" class="form-control" />
            </div>
        </div>
        <div class="row">
            <button type="submit" class="btn btn-primary">Save</button>
            <a href="/" class="btn btn-default">Cancel</a>
        </div>
    </form>
</div>
6) Edit Template – edit.html
Right click the "partials" folder under wwwroot. Add a New Item. In the Client-side template section, select HTML Page. We give a name "edit.html".
Now we want to update a recipe. We're going to be handling this in our edit.html partial template. edit.html looks like add.html because we're going to need to provide all of the necessary fields for an end user to actually update an existing recipe. We have inputs for recipe.name and also recipe.comments. They are being bound to a scope variable – an object recipe – with the ng-model directive. Also, on edit controller, there is a scope function – editRecipe. And so, when the user presses the Save button in edit.html, that function is going to be called and it's that function's job to submit the updated recipe information to the server for persistent storage.
<h1>Edit recipe</h1>
<div class="container-fluid">
    <form ng-submit="editRecipe()">
        <div class="row">
            <div class="form-group col-xs-4">
                <label for="name">Name</label>
                <input ng-model="recipe.name" name="name" type="text" class="form-control" />
            </div>
        </div>
        <div class="row">
            <div class="form-group col-md-4 col-xs-8">
                <label for="comments">Comments</label>
                <input ng-model="recipe.comments" name="comments" type="text" class="form-control" />
            </div>
        </div>
        <div class="row">
            <button type="submit" class="btn btn-primary">Save</button>
            <a href="/" class="btn btn-default">Cancel</a>
        </div>
    </form>
</div>
7) Delete Template
Right click "partials" folder under wwwroot. Add a New Item. In the Client-side template section, select HTML Page. We give a name "delete.html".
In delete.html, we’re going to be providing a paragraph for confirmation. So do you really want to delete this recipe? We're going to bind to the recipe information that's in question the recipe that's up for deletion. And we're going to provide a button, which calls a scope function – deleteRecipe. It's going to submit a request to the server to remove a specific recipe.
<div class="alert alert-warning">
    <p>Do you really want to delete this recipe?</p>
    <p> {{recipe.name}} - {{recipe.comments}}</p>
</div>
<button ng-click="deleteRecipe()" class="btn btn-danger">Yes</button>
<a href="/" class="btn btn-default">No</a>
Multiple URL mapping to the same Web API Controller
How about the recipe step and recipe item? Generically speaking, we can make separate API controllers to handle recipe step and recipe item. But it’s too heavy. I’d like wrap all recipe related restful services in RecipesController. But it definitely needs different URLs for recipe step actions and recipe item actions. Fortunately, ASP.NET Core Web API supports different routing. Routing is how Web API matches a URI to an action. Web API supports a new type of routing, called attribute routing. As the name implies, attribute routing uses attributes to define routes. Attribute routing gives you more control over the URIs in your web API. For example, you can easily create URIs that describe hierarchies of resources.
The route attribute of web controller class is the base URI.
[Route("api/[controller]")]
    public class RecipesController : Controller
{
….
}
For RecipesController, the base URL is /api/recipes.
[HttpGet("{id}")]
        public IActionResult Get(Guid id)
        {
            var recipe = _repository.GetEntity<Recipe>(id);
            if (recipe != null)
                return new ObjectResult(recipe);
            else
                return new NotFoundResult();

        }
The above method doesn’t have route attribute, that means this method is mapped to /api/recipes/:id
But it appears we need different URL for get step method and get item method. I would like getting step URL is /api/recipes/step/:id and getting item URL is /api/recipes/item/:id. So we add [Route("step/{id}")] for get step method and [Route("item/{id}")] for get item method.
[HttpGet]
        [Route("step/{id}")]
        public IActionResult GetStep(Guid id)
        {
            var recipeStep = _repository.GetEntity<RecipeStep>(id);
            if (recipeStep != null)
                return new ObjectResult(recipeStep);
            else
                return new NotFoundResult();

        }
[HttpGet]
        [Route("item/{id}")]
        public IActionResult GetItem(Guid id)
        {
            var recipeItem = _repository.GetEntity<RecipeItem>(id);
            if (recipeItem != null)
                return new ObjectResult(recipeItem);
            else
                return new NotFoundResult();

        }
Let’s have a look if API routing works. Click IIS Express to start our web application. First we check the URL, api/recipes/step/AEE9602B-03EF-4A5F-A380-2962134ADB7E.
It’s working as expected.
Then we check api/recipes/item/862B91D5-FB60-4004-8179-0415AB900795
It’s working as well.
We need add Route attribute for post and delete as well.
[HttpGet]
[Route("step/{id}")]
public IActionResult GetStep(Guid id)
{
var recipeStep = _repository.GetEntity<RecipeStep>(id);
if (recipeStep != null)
return new ObjectResult(recipeStep);
else
return new NotFoundResult();
}
[HttpPost]
[Route("step")]
public IActionResult UpdateStep([FromBody]RecipeStep recipeStep)
{
if (recipeStep.Id == Guid.Empty)
{
return new ObjectResult(_repository.AddEntity<RecipeStep>(recipeStep));
}
else
{
var existingOne = _repository.GetEntity<RecipeStep>(recipeStep.Id);
existingOne.StepNo = recipeStep.StepNo;
existingOne.Instructions = recipeStep.Instructions;
_repository.UpdateEntity<RecipeStep>(existingOne);
return new ObjectResult(existingOne);
}
}
[HttpDelete]
[Route("step/{id}")]
public IActionResult DeleteStep(Guid id)
{
_repository.DeleteEntity<RecipeStep>(id);
return new StatusCodeResult(200);
}
[HttpGet]
[Route("item/{id}")]
public IActionResult GetItem(Guid id)
{
var recipeItem = _repository.GetEntity<RecipeItem>(id);
if (recipeItem != null)
return new ObjectResult(recipeItem);
else
return new NotFoundResult();
}
[HttpPost]
[Route("item")]
public IActionResult UpdateItem([FromBody]RecipeItem recipeItem)
{
if (recipeItem.Id == Guid.Empty)
{
if (recipeItem.MeasurementUnit == null)
recipeItem.MeasurementUnit = "";
return new ObjectResult(_repository.AddEntity<RecipeItem>(recipeItem));
}
else
{
var existingOne = _repository.GetEntity<RecipeItem>(recipeItem.Id);
existingOne.Name = recipeItem.Name;
existingOne.Quantity = recipeItem.Quantity;
existingOne.MeasurementUnit = recipeItem.MeasurementUnit;
_repository.UpdateEntity<RecipeItem>(existingOne);
return new ObjectResult(existingOne);
}
}
[HttpDelete]
[Route("item/{id}")]
public IActionResult DeleteItem(Guid id)
{
_repository.DeleteEntity<RecipeItem>(id);
return new StatusCodeResult(200);
}
Multiple Routing URLs for Single Angular Resource Service
Angular resource service supports multiple URLs as well. So far we’re only using default actions.
{
  get: {method: 'GET'},
  save: {method: 'POST'},
  query: {method: 'GET', isArray: true},
  remove: {method: 'DELETE'},
  delete: {method: 'DELETE'}
}
The above actions are built in ng resource, so we can use it directly.
recipesService.factory('Recipe', ['$resource', function ($resource) {
      return $resource('/api/recipes/:id');
  }]);
But we now need define our own customized actions, and give the action different URL with the default URL.
recipesService.factory('Recipe', ['$resource', function ($resource) {
        return $resource('/api/recipes/:id', {}, {
            getRecipeStep: { method: 'GET', url: '/api/recipes/step/:id' },
            saveRecipeStep: { method: 'POST', url: '/api/recipes/step' },
            removeRecipeStep: { method: 'DELETE', url: '/api/recipes/step/:id' },
            getRecipeItem: { method: 'GET', url: '/api/recipes/item/:id' },
            saveRecipeItem: { method: 'POST', url: '/api/recipes/item' },
            removeRecipeItem: { method: 'DELETE', url: '/api/recipes/item/:id' }
        });
}]);
We still use the default actions for recipe, and add new customized actions getRecipeStep, saveRecipeStep, removeRecipeStep, getRecipeItem, saveRecipeItem and removeRecipeItem.
All URLs match the web API URLs for recipe step and recipe item.
Add New Angular Routes for Recipe Step and Recipe Item
Now we need add our new client routes for recipe step Create, Update, Delete and recipe item Create, Update, Delete templates and controllers in app.js.
$routeProvider
  .when('/', {
      templateUrl: 'partials/recipes.html',
      controller: 'recipesController'
  })
  .when('/recipes/add', {
      templateUrl: 'partials/add.html',
      controller: 'recipesAddController'
  })
  .when('/recipes/edit/:id', {
      templateUrl: 'partials/edit.html',
      controller: 'recipesEditController'
  })
  .when('/recipes/delete/:id', {
      templateUrl: 'partials/delete.html',
      controller: 'recipesDeleteController'
  })
  .when('/recipes/addStep/:id', {
      templateUrl: 'partials/addStep.html',
      controller: 'recipesAddStepController'
  })
  .when('/recipes/editStep/:id', {
      templateUrl: 'partials/editStep.html',
      controller: 'recipesEditStepController'
  })
  .when('/recipes/deleteStep/:id', {
      templateUrl: 'partials/deleteStep.html',
      controller: 'recipesDeleteStepController'
  })
  .when('/recipes/addItem/:id', {
      templateUrl: 'partials/addItem.html',
      controller: 'recipesAddItemController'
  })
  .when('/recipes/editItem/:id', {
      templateUrl: 'partials/editItem.html',
      controller: 'recipesEditItemController'
  })
  .when('/recipes/deleteItem/:id', {
      templateUrl: 'partials/deleteItem.html',
      controller: 'recipesDeleteItemController'
  });
Add New Angular Controllers for Recipe Step and Recipe Item
Inject step and item controllers in recipesController.js.
angular
   .module('masterChefApp')
   .controller('recipesController', recipesController)
   .controller('recipesAddController', recipesAddController)
   .controller('recipesEditController', recipesEditController)
   .controller('recipesDeleteController', recipesDeleteController)
   .controller('recipesAddStepController', recipesAddStepController)
   .controller('recipesEditStepController', recipesEditStepController)
   .controller('recipesDeleteStepController', recipesDeleteStepController)
   .controller('recipesAddItemController', recipesAddItemController)
   .controller('recipesEditItemController', recipesEditItemController)
   .controller('recipesDeleteItemController', recipesDeleteItemController);
recipesAddStepController creates or provides the functionality to allow someone to add a recipe step to application. When we add recipe step, we need parent recipe Id. We're going to get the recipe step to be created by using the &routeParams service. Get ID of the recipe by getting it from the route parameter.
recipesAddStepController.$inject = ['$scope', 'Recipe', '$location', '$routeParams'];
    function recipesAddStepController($scope, Recipe, $location, $routeParams) {
        $scope.recipeStep = new Recipe();
        $scope.recipeStep.parentId = $routeParams.id;
        $scope.addRecipeStep = function () {
            $scope.recipeStep.$saveRecipeStep(function () {
                $location.path('/');
            });
        };
    }
recipesEditStepController creates or provides the functionality to allow someone to update a recipe step to application. We're going to get the recipe step to be updated by using the &routeParams service. Get ID of the recipe step by getting it from the route parameter.
recipesEditStepController.$inject = ['$scope', 'Recipe', '$location', '$routeParams'];
function recipesEditStepController($scope, Recipe, $location, $routeParams) {
    $scope.recipeStep = Recipe.getRecipeStep({ id: $routeParams.id });
    $scope.editRecipeStep = function () {
        $scope.recipeStep.$saveRecipeStep(function () {
            $location.path('/');
        });
    };
}
recipesDeleteStepController uses the $routeParams to get an ID and retrieve a specific recipe step. And then provides this function delete a recipe step to application.
    recipesDeleteStepController.$inject = ['$scope', 'Recipe', '$location', '$routeParams'];
    function recipesDeleteStepController($scope, Recipe, $location, $routeParams) {
        $scope.recipeStep = Recipe.getRecipeStep({ id: $routeParams.id });
        $scope.deleteRecipeStep = function () {
            $scope.recipeStep.$removeRecipeStep({ id: $scope.recipeStep.id }, function () {
                $location.path('/');
            });
        };
}
recipesAddItemController creates or provides the functionality to allow someone to add a recipe item to application. When we add recipe item, we need parent recipe step Id. We're going to get the recipe item to be created by using the &routeParams service. Get ID of the recipe step by getting it from the route parameter.
recipesAddItemController.$inject = ['$scope', 'Recipe', '$location', '$routeParams'];
    function recipesAddItemController($scope, Recipe, $location, $routeParams) {
        $scope.recipeItem = new Recipe();
        $scope.recipeItem.parentId = $routeParams.id;
        $scope.addRecipeItem = function () {
            $scope.recipeItem.$saveRecipeItem(function () {
                $location.path('/');
            });
        };
}
recipesEditItemController creates or provides the functionality to allow someone to update a recipe item to application. We're going to get the recipe item to be updated by using the &routeParams service. Get ID of the recipe item by getting it from the route parameter.
recipesEditItemController.$inject = ['$scope', 'Recipe', '$location', '$routeParams'];
function recipesEditItemController($scope, Recipe, $location, $routeParams) {
    $scope.recipeItem = Recipe.getRecipeItem({ id: $routeParams.id });
    $scope.editRecipeItem = function () {
        $scope.recipeItem.$saveRecipeItem(function () {
            $location.path('/');
        });
    };
}
recipesDeleteItemController uses the $routeParams to get an ID and retrieve a specific recipe item. And then provide this function delete a recipe item to application.
    recipesDeleteItemController.$inject = ['$scope', 'Recipe', '$location', '$routeParams'];
    function recipesDeleteItemController($scope, Recipe, $location, $routeParams) {
        $scope.recipeItem = Recipe.getRecipeItem({ id: $routeParams.id });
        $scope.deleteRecipeItem = function () {
            $scope.recipeItem.$removeRecipeItem({ id: $scope.recipeItem.id }, function () {
                $location.path('/');
            });
        };
}
Add All templates for Recipe Step and Recipe Item
Now we need create all template for recipe step and recipe item. Create "addStep.html", "editStep.html", "deleteStep.html","addItem.html", "editItem.html" and "deleteItem.html" in the partials folder.
1) Recipe Step Templates
In addStep.html, use ng-submit to post data to server. When the user press on the Save button, call a scope function addRecipeStep which behind the scenes in our controller is going to submit this recipe step object to the server.
<h1>Add a new recipe step</h1>
<div class="container-fluid">
    <form ng-submit="addRecipeStep()">
        <div class="row">
            <div class="form-group col-xs-1">
                <label for="stepNo">Step No.</label>
                <input ng-model="recipeStep.stepNo" name="stepNo" type="text" class="form-control" />
            </div>
        </div>

        <div class="row">
            <div class="form-group col-md-4 col-xs-8">
                <label for="instructions">Instructions</label>
                <input ng-model="recipeStep.instructions" name="instructions" type="text" class="form-control" />
            </div>
        </div>
        <div class="row">
            <button type="submit" class="btn btn-primary">Save</button>
            <a href="/" class="btn btn-default">Cancel</a>
        </div>
    </form>
</div>
editStep.html updates an existing recipe step. Input fields are being bound to a scope variable – an object recipeStep – with the ng-model directive. Also, on step edit controller, there is a scope function – editRecipeStep.
<h1>Edit Recipe Step</h1>
<div class="container-fluid">
    <form ng-submit="editRecipeStep()">
        <div class="row">
            <div class="form-group col-xs-1">
                <label for="stepNo">Step No.</label>
                <input ng-model="recipeStep.stepNo" name="stepNo" type="text" class="form-control" />
            </div>
        </div>

        <div class="row">
            <div class="form-group col-md-4 col-xs-8">
                <label for="instructions">Instructions</label>
                <input ng-model="recipeStep.instructions" name="instructions" type="text" class="form-control" />
            </div>
        </div>
        <div class="row">
            <button type="submit" class="btn btn-primary">Save</button>
            <a href="/" class="btn btn-default">Cancel</a>
        </div>
    </form>
</div>
In deleteStep.html, we’re going to be providing a paragraph for confirmation. And we're going to provide a button, which calls a scope function – deleteRecipeStep. It's going to submit a request to the server to remove a specific recipe step.
<div class="alert alert-warning">
    <p>Do you really want to delete this recipe step?</p>
    <p> {{recipeStep.stepNo}} - {{recipeStep.instructions}}</p>
</div>
<button ng-click="deleteRecipeStep()" class="btn btn-danger">Yes</button>
<a href="/" class="btn btn-default">No</a>
2) Recipe Item Templates
In addItem.html, use ng-submit to post data to server. When the user press on the Save button, call a scope function addRecipeItem which behind the scenes in our controller is going to submit this recipe item object to the server.
<h1>Add a new recipe item</h1>
<div class="container-fluid">
    <form ng-submit="addRecipeItem()">
        <div class="row">
            <div class="form-group col-xs-4">
                <label for="name">Name</label>
                <input ng-model="recipeItem.name" name="name" type="text" class="form-control" />
            </div>
        </div>
        <div class="row">
            <div class="form-group col-md-4 col-xs-4">
                <label for="quantity">Quantity</label>
                <input ng-model="recipeItem.quantity" name="quantity" type="text" class="form-control" />
            </div>
        </div>
        <div class="row">
            <div class="form-group col-md-4 col-xs-4">
                <label for="measurementUnit">Measurement Unit</label>
                <input ng-model="recipeItem.measurementUnit" name="measurementUnit" type="text" class="form-control" />
            </div>
        </div>
        <div class="row">
            <button type="submit" class="btn btn-primary">Save</button>
            <a href="/" class="btn btn-default">Cancel</a>
        </div>
    </form>
</div>
editItem.html updates an existing recipe item. Input fields are being bound to a scope variable – an object recipeItem – with the ng-model directive. Also, on item edit controller, there is a scope function – editRecipeItem.
<h1>Edit Recipe Item</h1>
<div class="container-fluid">
    <form ng-submit="editRecipeItem()">
        <div class="row">
            <div class="form-group col-xs-4">
                <label for="name">Name</label>
                <input ng-model="recipeItem.name" name="name" type="text" class="form-control" />
            </div>
        </div>
        <div class="row">
            <div class="form-group col-md-4 col-xs-4">
                <label for="quantity"></label>
                <input ng-model="recipeItem.quantity" name="quantity" type="text" class="form-control" />
            </div>
        </div>
        <div class="row">
            <div class="form-group col-md-4 col-xs-4">
                <label for="measurementUnit"></label>
                <input ng-model="recipeItem.measurementUnit" name="measurementUnit" type="text" class="form-control" />
            </div>
        </div>
        <div class="row">
            <button type="submit" class="btn btn-primary">Save</button>
            <a href="/" class="btn btn-default">Cancel</a>
        </div>
    </form>
</div>
In deleteItem.html, we’re going to be providing a paragraph for confirmation. And we're going to provide a button which calls a scope function – deleteRecipeItem. It's going to submit a request to the server to remove a specific recipe item.
<div class="alert alert-warning">
    <p>Do you really want to delete this recipe item?</p>
    <p> {{recipeItem.name}}  {{recipeItem.quantity}} {{recipeItem.measurementUnit}}</p>
</div>
<button ng-click="deleteRecipeItem()" class="btn btn-danger">Yes</button>
<a href="/" class="btn btn-default">No</a>
Everything is done. Now you can create, update or delete recipes. You become a real master chef. Not just a chef who only follows others' recipes.
IE Cache Issue
Lastly, I want to talk about a cache issue that happens on IE. If we change IIS Express to use IE, after I add a new recipe, "Roasting Duck", you cannot see the new recipe I just added immediately. Is it not inserted properly? Go to check the database, the new recipe is there. Looks like when returning to list, AngularJS didn’t send an httpget request to the server at all and just gets the result from the cache. That’s why the new update doesn’t popup. We can resolve this issue by httpProvider. Inject httpProvider in AngularJS application configure function. Then set http default cache to false, and If-Modified-Since to 0 in http get request header.
angular.module('masterChefApp').config(['$routeProvider', '$httpProvider', '$locationProvider', function ($routeProvider, $httpProvider, $locationProvider) {
$httpProvider.defaults.cache = false;
if (!$httpProvider.defaults.headers.get) {
$httpProvider.defaults.headers.get = {};
}
$httpProvider.defaults.headers.get['If-Modified-Since'] = '0';
$routeProvider
.when('/', {
templateUrl: 'partials/recipes.html',
controller: 'recipesController'
})
.when('/recipes/add', {
templateUrl: 'partials/add.html',
controller: 'recipesAddController'
})
.when('/recipes/edit/:id', {
templateUrl: 'partials/edit.html',
controller: 'recipesEditController'
})
.when('/recipes/delete/:id', {
templateUrl: 'partials/delete.html',
controller: 'recipesDeleteController'
})
.when('/recipes/addStep/:id', {
templateUrl: 'partials/addStep.html',
controller: 'recipesAddStepController'
})
.when('/recipes/editStep/:id', {
templateUrl: 'partials/editStep.html',
controller: 'recipesEditStepController'
})
.when('/recipes/deleteStep/:id', {
templateUrl: 'partials/deleteStep.html',
controller: 'recipesDeleteStepController'
})
.when('/recipes/addItem/:id', {
templateUrl: 'partials/addItem.html',
controller: 'recipesAddItemController'
})
.when('/recipes/editItem/:id', {
templateUrl: 'partials/editItem.html',
controller: 'recipesEditItemController'
})
.when('/recipes/deleteItem/:id', {
templateUrl: 'partials/deleteItem.html',
controller: 'recipesDeleteItemController'
});
$locationProvider.html5Mode(true);
}]);
Then we try again. It works like a charm. Although I don’t have this cache issue in Google Chrome, we still need fix this issue on IE, because web applications should work on all browsers.
Conclusion
In this article, I introduced how to make SPA CRUD application with angular route. We also talked how to map multiple URLs in a single server side Web API controller. And correspondingly, how to map different routes in a single client side angular resource service. From Maser Chef Part 3, we'll start a new adventure on Angular2 and EntityFramework Core.
Fred is a senior software developer who lives in Melbourne, Australia. In 1993, he started Programming using Visual C++, Visual Basic, Java, and Oracle Developer Tools. From 2003, He started with .Net using C#, and then expertise .Net development.
Fred is often working with software projects in different business domains based on different Microsoft Technologies like SQL-Server, C#, VC++, ASP.NET, ASP.Net MVC, WCF,WPF, Silverlight, .Net Core and Angular, although he also did some development works on IBM AS400.


 General
  News
News  Suggestion
  Question
  Bug
Bug  Answer
  Joke
Joke  Praise
  Rant
Rant  Admin
Admin 


