Introduction
This is one approach to giving inline editing capabilities to your web sections, as well as including the ability to choose an image from available images on server.
Background
The case study for this example is a simple product category listing. Each product category added will be given a landing page, and menu entry automatically. Our create and edit views will also implement inline editing controls, and will give the user the ability to choose an image from the already available server images, through a combination of server side and client side scripting. Gallery will be presented to the user modally using the bootbox library, and the image-picker library.
Prerequisites
Here is a brief overview of my environment, as a suggested starting point for attempting to follow along with this guide. It is by no means the only environment that will work.
When installing VS Community, be sure to install the web development packages.
Step One - Create Project
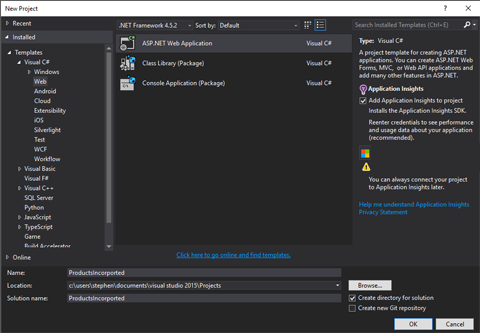
First, let's create a new project, under Web, of the type ASP.NET Web Application, and name it ProductsIncorporated
Note: If you don't have this template type available, you probably need to install the web development components for Visual Studio. Do an installation repair and be sure to choose the Web Development tools.
Next, for the ASP.NET Template select ASP.NET 5 Web Application. If this template is not available, you most likely need to install the ASP.NET 5 Framework.

Right our of the box, this template is already giving your a pretty robust shell of a site. If you're new to MVC, take a minute to look around. Run the project and see how it behaves. If you want to run through a great little MVC Tutorial to get yourself up to speed, look at this guide
http://www.asp.net/mvc/overview/getting-started/introduction/getting-started
When you're ready, let's proceed to implementing our own Model, Views, and Controller.
Step Two - Model
Let's look at the Solution Explorer. You'll see that a plethora of items have already been created. Among these, the directories Models, Views, and Controllers.
First, let's create our Model, which we will call ProductCategory. Right click on the Models directory, and choose Add -> Class. Name the new class ProductCategory.cs. Here is what our model class will look like.
using System;
using System.ComponentModel.DataAnnotations;

namespace ProductsIncorported.Models
{
    public class ProductCategory
    {
        [Key]
        public int Id { get; set; }
        [Display(Name = "Category Name")][Required]
        public String CategoryName { get; set; }
        [Required]
        public String Description { get; set; }
        [Required]
        public String CategoryImageUrl { get; set; }
    }
}
Since we'll have to do a data migration.....which we'll get to later....I wanted to go ahead with the complete model, and I'll explain the bits of it as we go. First, notice that we've included a using statement for the System.ComponentModel.DataAnnotations library. This gives us access to some powerful DataAnnotation tags that will save us a great deal of work in the long run. First, for our Id property, we've used the [Key] annotation, which tells the database that this is our primary key field. Next, the [Display] annotation we've used to define a user friendly name for this field, which will be automatically used in our controls later. Lastly, the [Required] annotation will give us quick access to data validation.
Step Three - Controller
Next let's create our controller class for ProductCategory. We can use the scaffolding power of Visual Studio to create the controller, which will also then create our associated views for us as well. In the Solution Explorer, right click on the Controllers directory, and choose Add -> Controller. Select "MVC 6 Controller with views, using Entity Framework", and click Add. The following dialog will then be displayed
For the Model Class, let's choose the ProductsCategory model we just created, and for the Data Context class, choose the only option ApplicationDbContext. Be sure Generate Views, Reference Script Libraries, and Use Layout Page options are selected, and leave the Layout page blank, this will use the default page layout scheme. Click Add, and Visual Studio will begin creating the scaffolding needed. You'll see several things added to the project. the ProductsController class, as well as the Products subdirectory in Views, and several defualt views needed for managing the database. You can now fire up the page, and browse to to http://localhost:port/Products however, you'll get an error because we haven't migrated our model changes into our database.
Now that we've created our model, views, and controller, we need to migrate it into our data schema, using the dnx utilities included with Visual Studio. There's not currently any tool bar entry for this, so we'll have to use the command prompt to achieve it, but it's fairly painless. Right click the ProductsIncorporated directory in the Solution Explorer, and choose the "Open Folder in File Explorer" option. Use Windows Explorer to move up one directory, into the "src" folder. Shift Right click the ProductsIncorporated folder and choose "Open Command Prompt Here". Now we can achieve the data migration with 2 commands, first to create the migration file
dnx ef migrations add products
This will create a migration file named "products". This could be named anything technically, but its good practice to name your migration files symbolically. Now lets update the database with the migration file
dnx ef database update
Now you can run the site, and your ProductCategory functionality should work. Just for test purposes, I've made a default image for the product categories, save it into your /wwwroot/images directory, then you can set the CategoryImageUrl to "~/images/defaultImage.png
"
Up Next - Dynamic Menu
So now let's make our Product Categories do something. Let's modify our navigation menu to be dynamic based upon our Product Categories. To do this, we will use a ViewComponent to render our Menu for us. First, in the Solution Explorer, right click the ProductsIncorporated folder, and choose Add->New Folder, and name it "ViewComponents". Next, on the new "ViewComponents" folder, right click and choose Add->Class and name it "MenuViewComponent". Here is what our MenuViewComponent class will look like
using System;
using System.Collections.Generic;
using System.Threading.Tasks;
using Microsoft.AspNet.Mvc;
using ProductsIncorported.Models;
using System.Linq;
using Microsoft.Data.Entity;

namespace ProductsIncorported.ViewComponents
{
    [ViewComponent(Name = "MenuViewComponent")]
    public class MenuViewComponent : ViewComponent
    {
        private ApplicationDbContext db;

        public MenuViewComponent(ApplicationDbContext context)
        {
            db = context;
        }

        public async Task<IViewComponentResult> InvokeAsync()
        {
            var items = await GetItemsAsync();
            return View(items);
        }

        private Task<List<ProductCategory>> GetItemsAsync()
        {
            return db.ProductCategory.Select(c => c).ToListAsync();
        }
    }
}
Next we need to make the Razor view that our ViewComponent will use to render itself. The system is going to look into Views->Shared->Components->"Component Name" directory for this view, so lets create that directory structure. Right click the Views->Shared folder and create a new folder named Components. Next click the new Components folder and create a new subfolder named MenuViewComponent. Now, right click the new MenuViewComponent folder and choose Add->New Item. In the dialog select MVC View Page and name it Default.cshtml. All our view page needs to do is step through the model list creating a list item for each. Here is what the Default.cshtml view should look like
@model IEnumerable<ProductCategory>

@foreach (var item in Model)
{
    <li><a asp-controller="Products" asp-action="Details" asp-route-id="@item.Id">@item.CategoryName</a></li>
}
Now we just need to invoke this view component in the layout. Let's open the layout view, which is Views->Shared-> _Layout.cshtml. Look for the section that looks like the following
<div class="navbar-collapse collapse">
    <ul class="nav navbar-nav">
        <li>....
        <li>....
    </ul>
    @await Html.PartialAsync("_LoginPartial")
</div>
Lets replace all the <li> lines with the following Invoke call
@await Component.InvokeAsync("MenuViewComponent")
So that the above section now looks like
<div class="navbar-collapse collapse">
    <ul class="nav navbar-nav">
        @await Component.InvokeAsync("MenuViewComponent")
    </ul>
    @await Html.PartialAsync("_LoginPartial")
</div>
Note: We added the [ViewComponent] annotation to our MenuViewComponent class and defined the name "MenuViewComponent" which is the name we call in the above InvokeAsync method. Also, our Invoke method in our component class used no arguments, however, you could pass arguments to the Invoke method if you want, and include them in the params args call to InvokeAsync above
Now you can see this in action. Run the site, and you'll see the menu is now empty. Browse to http://localhost:port/Products and create a product category, and you'll see it added to the menu, and clicking that new menu item should bring you to that category's details page.
User Freindly Links
Now let's make a tweak to how our routing works. You'll notice in the address bar, when you click a menu link, the URL for it looks like the following
http:
In other words, the Id is what we are passing to identify the category we want to see. This isn't the most user friendly way to do things. You would want your audience to be able to put in ./Produts/Details/Stuff or ./Products/Details/Things, and that looks better on marketing pieces as well. So let's tweak this a bit so that we can call a category by its name instead of its id.
To do this, we'll need to add an overloaded Details method to our Products controller, as well as add some routing annotations to both Details methods. First, to the existing Details method, lets add a couple of routing annotations, so that the MVC engine can differentiate between which method to use when processing a request. The current Details method signature needs to be changed to
[ActionName("Details")]
[Route("Products/Details/{id}")]
public IActionResult Details(int? id)
{
   .....
Now lets add an overloaded Details method that will instead take a string and return a category based on that string matching the Category Name
[ActionName("Details")]
[Route("Products/Details/{category}")]
public IActionResult Details(string category)
{
    if (category == null || category == string.Empty)
    {
        return HttpNotFound();
    }

    ProductCategory productCategory = _context.ProductCategory.Single(m => m.CategoryName == category);
    if (productCategory == null)
    {
        return HttpNotFound();
    }

    return View(productCategory);
}
Note: We had to add the routing annotations to the existing method so that it would not match the default call, so that the engine would keep looking. Also, we aren't employing any checks to ensure that each CategoryName added is unique, so it's possible that more than one category could be added with the same name, and this means that only the first one will be returned each time. You may want to consider adding safeguards to your Create section so that the categories maintain unique names.
Now all we need to do is go back into the Default.cshtml view for the MenuViewComponent, and change the <li> tag so that the
asp-route-id="@item.Id"
Should now be
asp-route-category="@item.CategoryName"
Now test this out, and you'll see that much more user friendly URLs are generated by the engine.
Now let's separate our backend from our frontend. Let's assume we don't want our audience modifying our menu structure, only our designated employees. Of course you would want to isolate editing controls behind your authentication wall, but that is beyond the scope of this tutorial. But for this guide, we will create a separate view for showing category details to a user, we'll call it "Info". So to our users we will present a URL structure ./Products/Info/category instead of .Products/Details/category.
First, let's create our new Info view. In the Solution Explorer, on the Views->Products folder, right click and choose Add->View. This will open the new View dialog
Let's name it "Info", choose the Details template, the ProductCategory model class, leave the Data context as is, and be sure the Use layout is selected and the layout is left blank. This will create our new Info view for us, which for now will basically be an identical view to Details, but we will change that shortly. But before we do, let's get it working. We need to add a method in ProductsController for returning this view.
[HttpGet]
[ActionName("Info")]
[Route("Products/Info/{category}")]
public IActionResult Info(string category)
{
    if (category == null || category == string.Empty)
    {
        return HttpNotFound();
    }

    ProductCategory productCategory = _context.ProductCategory.Single(m => m.CategoryName == category);
    if (productCategory == null)
    {
        return HttpNotFound();
    }

    return View(productCategory);
}
Lastly, let's change the MenuViewComponent view, Default.cshtml, so that it calls the correct action, change the <li> tag so that
asp-action="Details"
Now reads
asp-action="Info"
That's it, now our new View, Info, is working. Now we can proceed to modify it to suit our needs. Basically, for simplicity sake, all we want is a centered heading, which is the category name, the image, and the description. We won't need the control links provided in the Details template. Let's change the Info.cshtml to
@model ProductsIncorported.Models.ProductCategory

@{
    ViewData["Title"] = "Info";
}

<div>
    <center>
        <h2>@Model.CategoryName</h2>
        <br />
        <img src="@Model.CategoryImageUrl" alt="@Model.CategoryName" />
        <br />
        <p>@Model.Description</p>
    </center>
</div>
Inline Editing
Next, let's add a bit of flair, and usability to our create and edit views. Rather than the default views we were given by the scaffolding, let's change them to mimic the Info page. This allows the administrator of the page to have an immediate idea of what the page will look like at the time of the edit, and provides a fairly clean moderation experience. First, lets change the markup in our Views->Products->Create.cshtml view
<form asp-action="Create">
    <div class="form-horizontal">
        <center>
            <br />
            <input id="categoryName" asp-for="CategoryName" class="form-control" placeholder="Caption" />
            <br />
            <img src="@Model.CategoryImageUrl" alt="@Model.CategoryName" />
            <br />
            <textarea id="description" asp-for="Description" class="form-control" rows="3" placeholder="Category description text"></textarea>
            <br /><br />
            <a class="btn btn-default" asp-action="Index">Cancel</a>
            <button class="btn btn-default" type="submit">Save</button>
        </center>
    </div>
</form>
The css classes used here are defined in the boostrap css. This is a great starting point, and for normal forms is all you need. However, lets tweak the styling of our 2 text controls a bit, so that they look like the original page, only editable. Add the following style section
<style>

    #categoryName {
        border: 0;
        box-shadow: none;
        text-align: center;
        font-size: 18pt;
        min-width: 500px;
    }

    #description {
        border: 0;
        box-shadow: none;
        text-align: left;
        font-size: 12pt;
        min-width: 800px;
    }

</style>
Depending on the style of your page you may need to make other changes to the styles to make it match.
Image Gallery
Now the last thing we need to do is give the administrator a way to change the image. For this we will employ a couple of third party utilities. Bootbox will allow us to pop up a modal dialog, which we can populate with some custom HTML. Here we will use the Image-Picker utility to place an image gallery into the bootbox modal, allowing the user to select an image already contained on the server. For reference, here are the websites for the two utilities we will be using
Bootbox
http://bootboxjs.com/
Image-Picker
https://rvera.github.io/image-picker/
First, we need to give the user a way to launch our image gallery control, which could be done several ways, you could create another button for instance, but that detracts from the "inline" appearance, so for this example we'll actually make the image display a button that will launch our bootbox dialog when clicked. To do this, we'll wrap the <img> tag in a <a> tag, and use jQuery to handle the click event. So let's change the <img> to this
<a id="imageSelectButton"><img src="@Model.CategoryImageUrl" alt="@Model.CategoryName" /></a>
And let's add a script section at the bottom of the view page to handle our click
<script>

   $(document).on('click', '#imageSelectButton', function(e) {

   });

</script>
Lets leave this empty for now. You could just do alert('Working'); inside the function to test if you want to be sure jQuery is working. Let's switch gears for a minute. In order for our image gallery to work, we need to have a list of images in the directory that we want to populate our image-picker with. To do this, we will have our Controller pass us a list of file names that we will use to populate a hidden <select> control. First let's get the file list passed over to our View. Open up the ProductsController class. The first thing we need to do is add an instance of IApplicationEnvironment, which we will use to map our image directory to a server directory. Basically, this is the new way to achieve the old Server.MapPath() call from before. Add a using statement for Microsoft.Extensions.PlatformAbstractions, which is the library that contains the IApplicationEnvironment we need. Create a private instance, and change the ProductsController constructor to include a parameter of IApplicationEnvironment, and set the instance to it. The engine will know to pass this parameter when calling the constructor
private IApplicationEnvironment _environment;

public ProductsController(IApplicationEnvironment env, ApplicationContext context)
{
   _environment = env;
   .....
Now lets modify our Create() method as follows
public IActionResult Create()
{
    List<SelectListItem> imageList = new List<SelectListItem>();
    string path = _environment.ApplicationBasePath + "\\wwwroot\\images";
    DirectoryInfo pathDir = new DirectoryInfo(path);
    foreach(FileInfo f in pathDir.GetFiles("*.jpg"))
    {
        SelectListItem newItem = new SelectListItem();
        newItem.Text = f.Name;
        newItem.Value = f.FullName.Replace(path, "/images").Replace("\\", "/");
        imageList.Add(newItem);
    }
    foreach(FileInfo f in pathDir.GetFiles("*.png"))
    {
        SelectListItem newItem = new SelectListItem();
        newItem.Text = f.Name;
        newItem.Value = f.FullName.Replace(path, "/images").Replace("\\", "/");
        imageList.Add(newItem);
    }
    ViewData["ImageList"] = imageList;
    ProductCategory newCat = new ProductCategory();
    newCat.ProductImageUrl = "~/images/imagePlaceholder.png";
    return View(newCat);
}
Note: Be sure to add a using statement for System.IO
What we're doing here is creating a SelectListItem list of all the files contained in the ~/images directory. We then add this object to our ViewData container, which is an object container used for storing things that we need to pass to our View. Now that we have our file list passing to our view, let's use it to populate a hidden <select> tag. We will then use jQuery to pass these options into the image gallery we populate our dialog with. Lets go ahead and make this hidden <select> now. You could really put it anywhere, but lets add it in right above our <img>, here is what it needs to look like
<select id="imageList" asp-for="@empty" asp-items="@(ViewData["ImageList"] as List<SelectListItem>)"></select>
Notice the @empty. This is a work around to let us use the asp-items tag helper. You can't use asp-items without specifying an asp-for, even though the asp-for doesn't have to be anything. At the top of the document, we just need to declare a null int named "empty", do this right under the ViewData["Title"] line
ViewData["Title"] = "Create";
int? empty = null;
Lastly for this, we need to hide the <select> which we'll do by adjusting its style, so in the <style> section add the following
#imageList {
    display: none;
}
You can test this now if you like, run the site, and browse to the /Products/Create page, and view its page source. You'll see in the source that there is a <select> set with an option for each filename in the directory we specified. Now let's move back to our jQuery click handler, where we will add our bootbox dialog, and populate it with an image-picker. First, lets make sure we've downloaded the bootbox and image-picker files. Place them in your /wwwroot/js folder, and add the script imports to the @section Scripts{} block at the bottom of the page. You'll also need to import the bootstrap.js library, as bootbox depends on it. This import should be done ahead of the bootbox import
<script src="~/lib/boostrap/dist/js/bootstrap.js"></script>
<script src="~/js/image-picker.js"></script>
<script src="~/js/bootbox.js"></script>
Explore the bootbox website to see what all it can do, we will be using the bootbox.dialog() method, to which we will pass in a title, message (the html of the dialog), and an OK button. First, let's generate a string to pass as the "message" parameter, this will be a <select> tag that will become our image-picker
var selectTag = '<div style="height: 500px; overflow-y: scroll;"><select id="imageSelectList" class="image-picker show-labels show-html">';
var index = 1;
$('#imageList').find('option').each(function () {

    selectTag = selectTag + '<option data-img-label="' + $(this).text() + '" data-img-src="' + $(this).val() + '" value="' + index + '">' + $(this).text() + '</option>';
    index++;

});
selectTag = selectTag + '</select></div>';
Take a minute to look over the image-picker site to see how it works, what we've done above is to step through the list items of the hidden <select> tag, and use them to populate the new <select> that we'll place in our dialog. The image-picker specific parameters we need to use are data-img-label, which is the label that will show on each thumbnail, and for these labels we just use the filenames. Then we need data-img-src, which is the URL of the image, and then the value needs to be an incrementing index, starting with 1. The <div> we've inclosed it in allows us to place a scroll bar on the dialog, so if the file list is pretty big, the user can scroll it. So now let's make our bootbox.dialog() call in the click function
$(document).on('click', '#imageSelectButton', function (e) {

    bootbox.dialog({

        title: 'Available Images',
        message: selectTag,
        buttons: {
            success: {
                label: "Select",
                className: "btn-success",
                callback: function () {
                    $('#imageSelectionControl').attr('src', "/images/" + $('#imageSelectList option:selected').text());
                    $('#imageUrlField').val("~/images/" + $('#imageSelectList option:selected').text());
                }
            }
        }

    }).find('div.modal-dialog').addClass('imageGalleryContainer');

    $('#imageSelectList').imagepicker();

});
Now go to the _Layout.cshtml and import the image-picker.css style sheet. Be sure to download this file from image-picker, and place it into the /wwwroot/css folder
<link rel="stylesheet" type="text/css" href="~/css/image-picker.css" />
Now if you notice, in the bootbox button callback we've instructed the selected image URL to be set to a couple of things. One is the "src" attribute of the image on the page, so for this to work we need to add the "id" imageSelectionControl to the <img> tag
<img id="imageSelectionControl" src="@Model.CategoryImageUrl" alt="@Model.CategoryName" />
Lastly, we need one more hidden control, and <input> that will keep up with the selected image url, this is the other control, imageUrlField, that we are setting the val() for in the dialog button callback. Let's create it now, again its going to remain hidden so no need to really worry about where you put it, we'll put it right underneath the <a><img> tags
<input asp-for="CategoryImageUrl" id="imageUrlField" readonly="readonly" />
And then lets style it so that it's hidden, add the style tag
#imageUrlField {
   display: none;
}
One last thing to mention, if you notice, we tagged onto the end of the bootbox.dialog() call with a call to .find().addClass(). This is a workaround to set the width of the bootbox dialog, in which case we are setting it to 85%, so let's add the style tag
.imageGalleryContainer {
   width: 85%;
}
And let's also add a style to show a link cursor when the image is hovered over, to the user knows its clickable
#imageSelectionControl:hover {
   cursor: pointer;
}
And that's it. Test out the controls, you can see the image change whenever you select a new image and click the Select dialog button. And indeed when you save the Category it saves to the new image URL.
Taking It Further
Now you can take it further, change the Edit view to do the same thing as the Create view. You'll have to update the Edit method in the Controller the same way as we did the Create method, setting the ViewData to contain the file list.
Also, we can tweak the image-picker a bit so that the image thumbnails stay within certain sizing requirements. You can add these two styles
.thumbnails li {
    text-align: center;
    vertical-align: middle;
}

.thumbnails li img {
    max-width: 128px;
    max-height: 128px;
    width: 128px;
}
This will center align the labels, and constrain the thumbnails to 128 pixels wide.
Points of Interest
- Image Picker
- Bootbox
- Inline editing
- MVC
- Routing
This member has not yet provided a Biography. Assume it's interesting and varied, and probably something to do with programming.


 General
  News
News  Suggestion
  Question
  Bug
Bug  Answer
  Joke
Joke  Praise
  Rant
Rant  Admin
Admin 


