Like it or not JavaScript is everywhere. It can be found in front end applications on the client, it can be found in a variety of frameworks and libraries, and it can be found in backend applications in server environments.
The popularity of JavaScript has certainly increased in recent years, and that seems to be because the JavaScript Ecosystem is helping to improve productivity and to reduced the time it takes to get an application through the door. So after my first post, in which I blogged about doing Gigabit File uploads using an ASP. NET Web API backend, I decided to see if I could achieve the same thing using Node.js. This means that I will be implementing the "UploadChunk"and the "MergeAll" methods that I spoke about in my last post in Node.js.
The Development Environment
We will be using Visual Studio Express 2013 for Web as the development environment, however it can't be used as is to do Node.js development. In order to do that we have to install the Node.js Tools for Visual Studio. Once this plugin is installed it will turn Visual Studio Express 2013 for Web into a Node.js IDE that provides everything we need to create the application. So based on the instructions we need to:
- Download and install Node.js for Windows. Chose the version that is the appropriate one for your platform and this is either Node.js (x86) or Node.js (x64).
- Download and install Node.js Tools for Visual Studio.
Once the installation is completed we will launch Visual Studio Express 2013 for Web, and use the Node.js Interactive Window to validate the installation. The Node.js Interactive Window can be found at View->Other Windows->Node.js Interactive Window. Once the Node.js Interactive Window is launched we will type a few commands to check that all is OK.
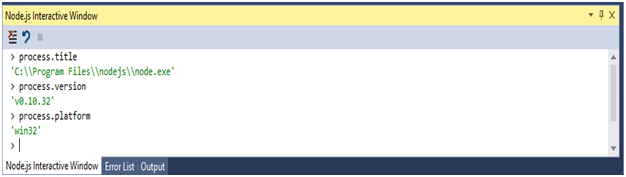
Figure 1 Node.js Interactive Window
Now that we have validated the installation we are now ready to create the Node.js backend that supports Gigabit File Uploads. We start by creating a new project and selecting a Blank Node.js Web Application template.
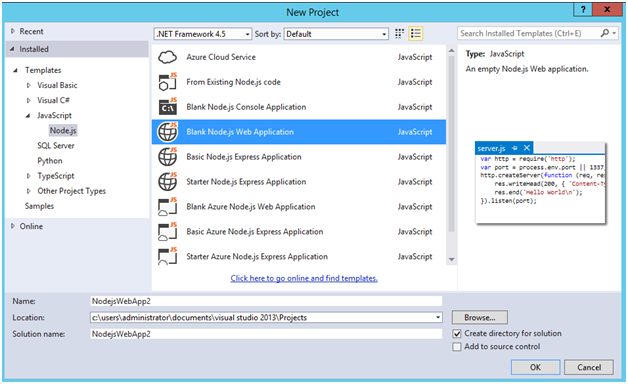
Figure 2 New project using the Blank Node.js Web Application template
Once the project is created we should see a file named server.js and the Node Package Manager (npm) in the Solution Explorer.
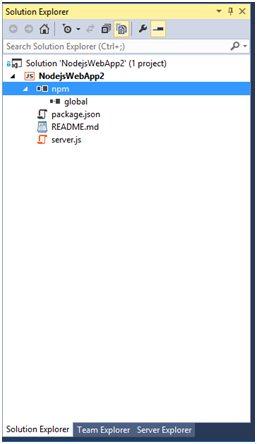
Figure 3 The Node.js application in the Solution Explorer
The server.js file has all code that is needed to create a basic hello world application in Node.js.
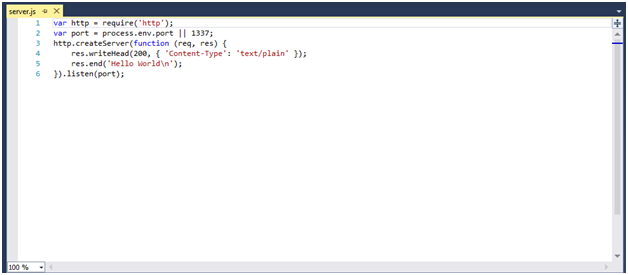
Figure 4 The Hello World application
I am going to go ahead and delete the code in the server.js file, and start to write the code to create Gigabit File Upload backend in Node.js. However I need to use the npm to install a few dependencies for this project and those are:
- Express - This is a Node.js web application framework, designed for building single-page, multi-page, and hybrid web applications
- Formidable - This is Node.js module for parsing form data, especially file uploads.
- fs-extra - This is a Node.js module for interacting with the file system.
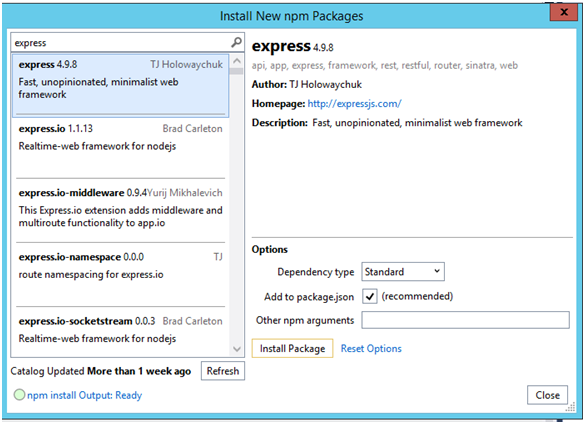
Figure 5 Using NPM to install the required modules
Once the installation of the modules is completed we should see them listed in the Solution Explorer.

Figure 6 Solution Explorer showing the installed modules
The next thing that we will do is to create a "Scripts" folder in the Solution Explorer and add the "workeruploadchunk.js" and the "workerprocessfile.js" scripts to that folder. We also need to download the jQuery 2.x and the SparkMD5 libraries and add them to the "Scripts" folder. The final thing that we need to do is to add the "Default.html" page. All of this is described in my previous post.
Creating the Node.js Backend
To get started we are going to use the Node.js "require()" function to import the modules that we need for the Gigabit File Upload backend. You will notice that I am also importing the "path" and the "crypto" modules as well. The "path" module provides the methods that we will need to use to generate the file names for the uploaded file chunks. The "crypto" module provides the methods that we will need to use to create the MD5 checksum for the uploaded file.
var express = require('express');
var formidable = require('formidable');
var fs = require('fs-extra');
var path = require('path');
var crypto = require('crypto');
The magic happens in the next line of code.
var app = express();
What this line of code is doing is to create the express application. The express application is a middleware that wraps up all of the underlying functionality of Node.js. If you remember the "Hello World" application that was created by the Blank Node.js Web Application template you will see that we had to import the "http"module and then call the "http.CreateServer()"method to create our "Hello World" web application. The express application that we have created already has all of that functionality built into it.
Now that we have created the express application we will tell it to serve up the "Default.html" page that we created in the previous post and then we will wait for incoming connections to our application.
app.use(express.static(__dirname, { index: 'Default.html' }));
app.listen(process.env.PORT || 1337);
var uploadpath = 'C:/Uploads/CelerFT/';
The express application has an app.VERB()method that provides the routing functionality in Express.js. We will use the app.post() method to process the "UploadChunk" requests. In the app.post() method the first thing that we do is to check that we are processing a HTTP POST request. The next thing that is checked is to see if the Content-Type is multipart/form-data, and the other check is to ensure that we are not uploading a file chunk that is greater than 51 MB.
app.post('*/api/CelerFTFileUpload/UploadChunk*', function (request, response) {
if (request.method === 'POST') {
if (!(request.is('multipart/form-data'))) {
response.status(415).send('Unsupported media type');
return;
}
var maxuploadsize = 51 * 1024 * 1024;
if (request.headers['content-length'] > maxuploadsize) {
response.status(413).send('Maximum upload chunk size exceeded');
return;
}
Once we have successfully passed all of these checks we will attempt to save the uploaded file chunk as a separate file and pad the name with a sequential number. The most important part of the code below is the call to the fs.ensureDirSync() method that is used to check if the temporary directory exists. If the directory does not exit it is created. Note that we are using the synchronous version of the method.
var extension = path.extname(request.param('filename'));
var baseFilename = path.basename(request.param('filename'), extension);
var tempfilename = baseFilename + '.' +
request.param('chunkNumber').toString().padLeft('0', 16) + extension + ".tmp";
var tempdir = uploadpath + request.param('directoryname') + '/' + baseFilename;
var localfilepath = tempdir + '/' + tempfilename;
if (fs.ensureDirSync(tempdir)) {
console.log('Created directory ' + tempdir);
}
As I had indicated in the previous postwe can upload the file chunk in one of two ways to the backend server. The first way is to use the FormData object in the web browser and to send the file chunk as binary data, the other way is to convert the file chunk to a base64 encoded string and create a hand crafted multipart/form-data encoded request and to send that to the backend server.
So we need to check to see if we are uploading a hand crafted multipart/form-data encoded request. This is done by checking for the presence of the "CelerFT-Encoded" header. If this header is present we create a buffer and use the request ondata event to copy all of the data into the buffer.
The request onend event is used to extract the base64 encoded string from the multipart/form-data encoded request. This is done by splitting the string representation of the buffer using CRLF. The actual base64 encoded file chunk is found in the 4th index of the array.
The base64 encoded data is converted back to binary by creating a new buffer. This buffer is then written to the file using the fs.outputFileSync () method.
if (request.headers['celerft-encoded'] === 'base64') {
var fileSlice = new Buffer(+request.headers['content-length']);
var bufferOffset = 0;
request.on('data', function (chunk) {
chunk.copy(fileSlice , bufferOffset);
bufferOffset += chunk.length;
}).on('end', function () {
var base64data = fileSlice.toString().split('\r\n');
var fileData = new Buffer(base64data[4].toString(), 'base64');
fs.outputFileSync(localfilepath, fileData);
console.log('Saved file to ' + localfilepath);
response.status(200).send(localfilepath);
response.end();
});
}
The binary file chunk upload will be handled by using the formidable module. We use the formidable.IncomingForm()method to get access to the multipart/form-data encoded request. The formidable module will save the uploaded file chunk to the temporary directory using a unique name that it has assigned to the file. All that we will do is to use the formidable onend event to save the uploaded file chunk to another name.
else {
var form = new formidable.IncomingForm();
form.keepExtensions = true;
form.uploadDir = tempdir;
form.parse(request, function (err, fields, files) {
if (err) {
response.status(500).send(err);
return;
}
});
form.on('error', function (err) {
if (err) {
response.status(500).send(err);
return;
}
});
form.on('end', function (fields, files) {
var temp_path = this.openedFiles[0].path;
fs.move(temp_path , localfilepath, function (err) {
if (err) {
response.status(500).send(err);
return;
}
else {
response.status(200).send(localfilepath);
response.end();
}
});
});
}
}
The app.get() method is used to process the "MergeAll" request. This method implements the same functionality as described in the previous post.
app.get('*/api/CelerFTFileUpload/MergeAll*', function (request, response) {
if (request.method === 'GET') {
var extension = path.extname(request.param('filename'));
var baseFilename = path.basename(request.param('filename'), extension);
var localFilePath = uploadpath + request.param('directoryname') + '/' + baseFilename;
var files = getfilesWithExtensionName(localFilePath, 'tmp')
if (files.length != request.param('numberOfChunks')) {
response.status(400).send('Number of file chunks less than total count');
return;
}
var filename = localFilePath + '/' + baseFilename + extension;
var outputFile = fs.createWriteStream(filename);
outputFile.on('finish', function () {
console.log('file has been written');
var newfilename = uploadpath + request.param('directoryname') + '/' + baseFilename
+ extension;
fs.removeSync(newfilename);
fs.move(filename, newfilename , function (err) {
if (err) {
response.status(500).send(err);
return;
}
else {
fs.removeSync(localFilePath);
var hash = crypto.createHash('md5'),
hashstream = fs.createReadStream(newfilename);
hashstream.on('data', function (data) {
hash.update(data)
});
hashstream.on('end', function () {
var md5results = hash.digest('hex');
response.status(200).send('Sucessfully merged file ' + filename + ", "
+ md5results.toUpperCase());
response.end();
});
}
});
});
for (var index in files) {
console.log(files[index]);
var data = fs.readFileSync(localFilePath + '/' + files[index]);
outputFile.write(data);
fs.removeSync(localFilePath + '/' + files[index]);
}
outputFile.end();
}
});
I should note that Node.js does not provide a String().padLeft () method, and this is implemented by extending the String() function.
String.prototype.padLeft = function (paddingChar, length) {
var s = new String(this);
if ((this.length < length) && (paddingChar.toString().length > 0)) {
for (var i = 0; i < (length - this.length) ; i++) {
s = paddingChar.toString().charAt(0).concat(s);
}
}
return s;
};
Some Other Things
One of things that I wanted to work on after the last post was to add parallel uploading to CelerFT, by doing domain sharding. The idea behind domain sharding is to trick web browsers into opening more simultaneous connections to a web site than is normally allowed. Domain sharding can be implemented by either hosting the web site using different domain names (e.g web1.example.com, web2.example.com) or by hosting the web site using different port numbers (e.g 8000, 8001).
In this case we will be hosting the web site on different ports.
We are going to do this by integrating Node.js into Microsoft Internet Information Services (IIS) using iisnode. Download the appropriate version for your platform either iisnode (x86) or iisnode (x64). Download the URL Rewrite Module for IIS.
Once the installation is complete ( I am assuming that Node.js for Windows has been installed) go into the IIS Manager and create six new web sites. I named the first web site CelerFTJS and configured it to listen on port 8000.
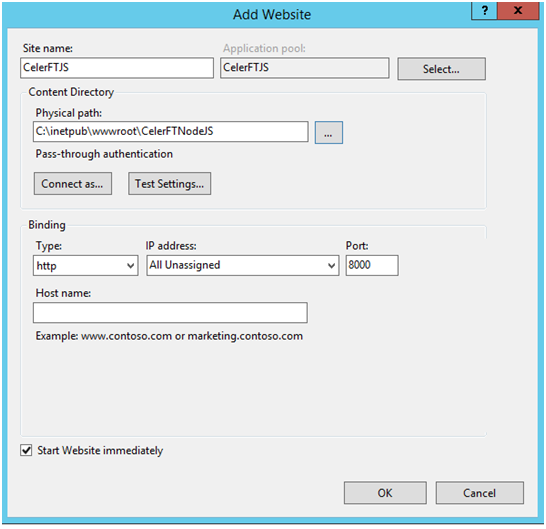
Figure 7 Creating a web site in IIS Manager
Create the additional web sites. I created an application pool for each web site and gave the application pool "LocalSystem" privileges". The local path for all of the web sites is C:\inetpub\wwwroot\CelerFTNodeJS.

Figure 8 The folder layout
I complied the Node.js application in Release mode and I then copied the server.js file , the Scripts folder, and the node_modules folder to the directory.
To get the Node.js application to work with iisnode we will have to create a web.config file and add the following to it.
 <defaultDocument>
  <files>
    <add value="server.js" />
  </files>
</defaultDocument>

<handlers>
  <!-- indicates that the server.js file is a node.js application to be handled by the
  iisnode module -->
  <add name="iisnode" path="*.js" verb="*" modules="iisnode" />
</handlers>

<rewrite>
  <rules>
    <rule name="CelerFTJS">
      <match url="/*" />
      <action type="Rewrite" url="server.js" />
    </rule>

    <!-- Don't interfere with requests for node-inspector debugging -->
    <rule name="NodeInspector" patternSyntax="ECMAScript" stopProcessing="true">
      <match url="^server.js\/debug[\/]?" />
    </rule>
  </rules>
</rewrite>
This web.config entries are saying that we want all *.js files to be handled by iisnode, and that any URL that matches "/*" will be handled by server.js.
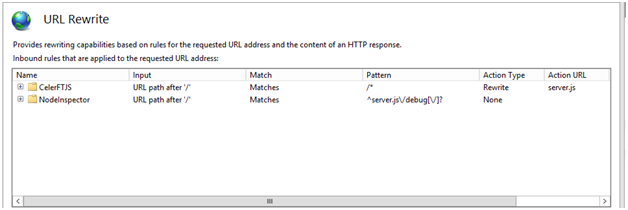
Figure 9 URL Rewrite Rules
If you did everything right you should be able to browse to http://localhost:8000 and bring up the CelerFT "Default.html" page.
The web.config file was modified to support the upload of large files as was explained in the previous post, and so I won't explain those entries here. However the web.config entry below is to improve the performance of Node.js in iisnode.
<iisnode node_env="production" debuggingEnabled="false" devErrorsEnabled="false" nodeProcessCountPerApplication="0" maxRequestBufferSize="52428800" />
The Parallel Upload
To get the parallel uploads to work using domain sharding I had to make a few changes to the Node.js application. The first change that I had to make was to support Cross-Origin Request Sharing (CORS) in the Node.js application. I had to do this because with domain sharding I am actually making a request to a different domain and the same origin-request policy is going to restrict me from making this request.
The good news is that the XMLttPRequest Level 2 specification allows me to do this if the web site has CORS enabled, and even better I don't have to change the upload function in the "workeruploadchunk.js" file to achieve this.
var enableCORS = function (request, response, next) {
response.header('Access-Control-Allow-Origin', '*');
response.header('Access-Control-Allow-Methods', 'GET,POST,OPTIONS');
response.header('Access-Control-Allow-Headers', 'Content-Type, Authorization, Content-
Length, X-Requested-With');
if ('OPTIONS' == request.method) {
response.send(204);
}
else {
next();
}
};
app.use(enableCORS);
To enable CORS in the server.js file I created a function that would create the necessary headers that indicated that the Node.js application supported CORS. The other thing that I should indicate that CORS supports two kinds of request and these are:
- Simple Requests : -
- Only uses GET, HEAD or POST. If POST is used to send data to the server, the Content-Type of the data sent to the server with the HTTP POST request is one of application/x-www-form-urlencoded, multipart/form-data, or text/plain.
- Does not set custom headers with the HTTP Request (such as X-Modified, etc.)
- Prefilghted Requests: -
- It uses methods other than GET, HEAD or POST. Also, if POST is used to send request data with a Content-Type other than application/x-www-form-urlencoded, multipart/form-data, or text/plain, e.g. if the POST request sends an XML payload to the server using application/xml or text/xml, then the request is preflighted.
- It sets custom headers in the request (e.g. the request uses a header such as X-PINGOTHER)
In our case we are doing a Simple Request and so we didn't need to do much else to get it to work.
In the "workeruploadchunk.js" file I added support to do the parallel file chunk upload in the self.onmessage event.
else if (workerdata.chunk != null && workerdata.paralleluploads == true) {
if (urlnumber >= 6) {
urlnumber = 0;
}
if (urlcount >= 6) {
urlcount = 0;
}
if (urlcount == 0) {
uploadurl = workerdata.currentlocation + webapiUrl + urlnumber;
}
else {
uploadurl = workerdata.currentlocation.slice(0, -1) + urlcount + webapiUrl +
urlnumber;
}
upload(workerdata.chunk, workerdata.filename, workerdata.chunkCount, uploadurl,
workerdata.asyncstate);
urlcount++;
urlnumber++;
}
In the Default.html page I saved the current URL, because I am going to pass this information to the file upload web worker. I have to do this because:
- I am going to use this information to increment the port number
- In doing a CORS request I need to pass the complete URL to the XMLHttpRequest object.
protocol and host for parallel uploads
var currentProtocol = window.location.protocol;
var currentHostandPort = window.location.host;
var currentLocation = currentProtocol + "//" + currentHostandPort;
The code below shows the modification made to the upload message.
case 'upload':
var paralleluploads = false;
if ($('#select_parallelupload').prop('checked')) {
paralleluploads = true;
}
uploadworkers[data.id].postMessage({ 'chunk': data.blob, 'filename':data.filename,
'directory': $("#select_directory").val(), 'chunkCount': data.chunkCount,
'asyncstate': data.asyncstate, 'paralleluploads': paralleluploads, 'currentlocation':
currentLocation, 'id': data.id });
break;
The final modified CelerFT interface to support parallel uploads.

Figure 10 CelerFT with parallel uploads
The code for this project can be found at my github repository
I have worked in the Information Technology field for over 15 years and I create tools to automate day-to-day tasks such as to move information from SharePoint lists to SQL Server databases, to manipulate SSIS packages, to inventory servers, to conduct security checks of Servers and workstations, and just about anything else that needs automating. The tools that I create are based on technologies such as Powershell, JavaScript (browser and some node.js), and C# code.
Along with this I manage IT Infrastructure and I am keenly interested in server and application performance tuning. This has caused me to learn how to troubleshoot network related issues using network packet capture traces, to be able to use wait states to understand what is happening on a database server, and to do server side performance monitoring.


 General
  News
News  Suggestion
  Question
  Bug
Bug  Answer
  Joke
Joke  Praise
  Rant
Rant  Admin
Admin 


