Introduction
This article is dedicated in understanding and learning more about laying out the web page with visual appearances. We will be focusing on the below topics with examples. By the end of the article, you should be able to learn and apply the same in your day to day work.
Background
If you are a beginner, it's highly recommended to read through the following articles to understand more about the HTML and CSS.
1. Beginner's Guide to HTML5 and CSS3 - Writing Your First Code (Series 1 of 12)
2. Beginner's Guide to HTML5/CSS3 - Styling Your First Web Page (Series 3 of 12)
Let us see in detail about CSS box model with an example. Every HTML elements in a document has box model. The content is the inner most component of the box which is a required part of the box and all others are optional.
Below is the pictorial representation of a CSS Box model.
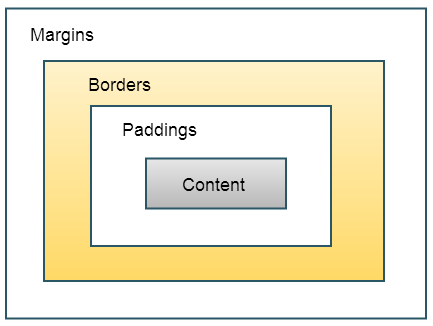
Margin – It's an outer most area of the box model; which is an area around the border. Please Note - The margin is completely transparent and does not have any background color.
Border - A border is nothing but an area between the padding and margin. There are provision in controlling the the border area by using border-width, border-style, border-color or simply by setting the border.
Padding – Padding is an area around the content. The padding between the content can be controlled by setting the appropriate padding styles such as padding-top, padding-right, padding-bottom, padding-left.
Content - The content in a box model is the inner most area where the text, images etc appears..
Here's an example of a box model.
<!DOCTYPE HTML>
<HTML>
<HEAD>
<TITLE>Box model example to demonstrate margins, padding, and borders</TITLE>
<STYLE type="text/css">
UL
{
    background: gray;

    margin: 10px 10px 10px 10px;

    padding: 2px 2px 2px 2px;
}
LI
{
    color: white;

    background: blue;

    margin: 12px 12px 12px 12px;

    padding: 12px 12px 12px 12px;
}
LI.border
{
    border-style: dashed;

    border-width: medium;

    border-color: orange;

    background: red;
}
</STYLE>
</HEAD>
<BODY>
  <UL>
       <LI>Blue</LI>
       <LI class="border">Red</LI>
  </UL>
</BODY>
</HTML>

We will see little more about the box model. The below picture shows a CSS Box model with margin, border, padding and content.
Note when the margin is set to 15. The left, right, top and bottom margins will be respectively set to 15px. We can explicitly control each edges of the box model based on our requirement.
Here's our CSS class selector style for the above box model
.CssBoxModel {
  width: 300px;
  height: 200px;
  padding: 10px;
  border: 1px solid;
  margin: 15px;
}
Note: The actual content width is set to 300px and height is set to 200px but as have the box model properties set, the whole box width and height will be calculated as below by summing up the surrounding padding, border and margin width and height.
Total width = 15px + 1px + 10px + 300px + 10px + 1px + 15px = 352px
Total height = 15px + 1px + 10px + 200px + 10px + 1px + 15px = 252px
The Box margin example
Let us define a paragraph style by setting the margin and background related properties. Later, we will be making use of this style in HTML document.
Note – We are explicitly setting the margin properties but you don't have to.
p {
    margin-top: 2px;
    margin-right: 1px;
    margin-bottom: 1px;
    margin-left: 2px;
    background: orange
}
Here's our HTML document with the style applied.
<!DOCTYPE HTML>
<HTML>
  <HEAD>
    <TITLE>Box model example to demonstrate margins</TITLE>

    <STYLE type="text/css">

    p
    {
        margin-top: 2px;
        margin-right: 1px;
        margin-bottom: 1px;
        margin-left: 2px;
        background: orange
    }

    </STYLE>
  </HEAD>
  <BODY>
   <p>
    Paragraph with margins.
   </p>
   <p style = "border: solid black 5px;">Normal paragraph with 5px border</p>
  </BODY>
</HTML>
The CSS Dimension
The CSS dimensions allow us to set the dimension across our HTML elements. Below are the properties of dimension that we can set.
Quote: The CSS Dimension properties are based on
[1]height : Used to set the height of a box.
width : Used to set the width of a box.
line-height : Used to set the height of a line of text.
max-height : Used to set a maximum height that a box can be.
min-height : Used to set the minimum height that a box can be.
max-width : Used to set the maximum width that a box can be.
min-width : Used to set the minimum width that a box can be.
Here's an example
<html>

<body>

<p style="width:170px; ;border:3px solid green;

padding:5px; margin:3px;">

CodeProject Paragraph Example With Width - 170px

</p>

<p style="max-width:200px; height:100px;border:10px solid red;

padding:8px; ">

This paragraph max width is 100px and 50px height.</p>

</body>

</html>
CSS Display
The CSS display property indicates whether or not the element should be displayed. The display property can be set to inline, block or none etc. The default value of the display is always inline.
Quote: The CSS Display properties are based on
[2]
- display : inline – We can use display as inline when the element need to be displayed on the same line in side the same current block.
- display : block – When the element needs to be displayed as a Block like a paragraph we can make use of display block. Note – You can always see some white spaces surrounding the element.
- display : none – When you wish to hide some element and not to be displayed while your page is being rendered, we can make use of display none.
- display : list – The display list is used to display the element as a list item. The element is display exactly as it's displayed using ul (un-ordered list).
- display : table – Used to display an element as a <table> element.
- display : inline-table – Used to Specify when the element needs be displayed as inline-level table.
- display : table-row-group – Used to display like a table <tbody> element.
- display : table-header-group – Used to display like a table <thead> element.
- display : table-footer-group – Used to display like a <tfoot> element.
- display : table-row – Used to display like a table <tr> element.
- display : table-column-group – Used to display like a <colgroup> element.
- display : table-column – Used to display like a <col> element.
- display : table-cell – Used to display like a table <td> element.
- display : table-caption – Used to display like a <caption> element.
We will see an example of the display property usage shortly in building a table using CSS.
CSS Positioning
The CSS positioning allows us to position the elements. One can set the position to top, left, right, bottom.
We will be seeing in brief about various types of positioning.
Static positioning : The static position does not alter the position of the HTML element, meaning it has no effect at all. The default the position property value is always set to static.
Relative positioning : The relative position is used to alter the positioning of the element from it's default position (where the element would be displayed) by setting the appropriate offsets like top,bottom,left, right properties so that you can change the positioning of an HTMLelement within the document.
Here's an example. Note the position of the element where this style is being applied will change the elements position from it's normal position by 10px left and -10px top.
.relativePosition {
  position: relative;
  top: -10px;
  left: 10px;
  background-color: red;
  width: 200px;
}
Fixed positioning : The element position will always be fixed. The top, right, left and bottom properties are used. The element position will never be altered even if you are scrolling the page.
Here's an example
.fixedPosition {
  position: fixed;
  bottom: 0;
  right: 0;
  width: 100px;
  background-color: red;
}
Absolute positioning : The absolute positioning lets us to place any element exactly the place where we want. We can position the element by setting it's top, left, right, bottom properties. Please note the absolute positioning of an element is based upon it's parent and if there's no parent, it will default to the root <html> element itself.
Here's an example
.absolute {
  position: absolute;
  top: 50px;
  right: 0;
  width: 200px;
  height: 100px;
}
Let us see with an example how to set the absolute and relative positioning for HTML Elements. First let us define few styles that are required.
You can see below the Join and Sign In button styles are defined with absolute position. The paragraph , fieldset are set with relative positioning and the Bob Image position is set to Fixed with let as 30px.
body
{
    font-family: 'Tangerine', serif;
    font-size: 14px;
    background: orange;
}

#bogImage             { position: fixed; left: 30px; }

p                     { font-size: 30px; line-height: 1.3em; }

div#page-wrap         { width: 500px; margin: 20px auto; }

p                     { margin-left: 600px; position: relative;}

form                  { padding-right: 80px; margin-bottom: 20px; }

fieldset              { padding: 10px; position: relative; }

label                 { display: block; float: left; width: 120px; }

input, textarea       { margin-bottom: 5px; }

legend                { font-size: 1.8em; }

#signInButton         { position: absolute; top: 70px; left: 350px; }

#joinButton           { position: absolute; top: 150px; left: 350px; }

#LinksDiv
{
    width: 416px;
    position: absolute;
    right: 100px;
    top: 100px;
    font: 16px "Lucida Grande", Sans-Serif !important;
}
Below is the HTML Document where we are making use of the above absolute and relative positioning styles.
<!DOCTYPE html>
<html>
<head>
        <meta http-equiv="Content-Type" content="text/html; charset=UTF-8" />

        <title>Absolute and Relative Positioning Example</title>

        <link rel="stylesheet" type="text/css" href="style.css" />
</head>

<body>

  <div id="LinksDiv">
     <div>
          <a class="header-button" href="http://www.codeproject.com/script/Articles/Latest.aspx">Latest Articles</a>
          <a class="header-button" href="http://www.codeproject.com/script/Answers/List.aspx?tab=active">Question Answers</a>
     </div>
  </div>

</div>

    <img id="bogImage" title="CodeProject" src="http://s.codeproject.com/App_Themes/CodeProject/Img/logo250x135.gif" alt="Home" style="height:135px;width:250px;border-width:0px;">

    <p> Welcome to CodeProject !</p>

        <div id="page-wrap">

                <h1>Absolute and Relative Positioning</h1>

                <form action="" method="post" id="signIn" name="signIn">
                    <fieldset>
                        <legend>Sign In</legend>

                        <label for="name">Username</label>
                        <input type="text" id="username" name="username" />

                <br />
                        <label for="email">Password</label>
                        <input type="text" id="password" name="password" />

                                <br />
                        <button type="submit" id="signInButton" name="send">Sign In</button>

                        </fieldset>
                </form>

                <form action="" method="post" id="signUp" name="signUp">
                    <fieldset>
                        <legend>Sign Up!</legend>

                        <label for="name">Real Name</label>
                        <input type="text" id="name" name="name" />

                <br />
                        <label for="city">City</label>
                        <input type="text" id="city" name="city" />

                <br />
                        <label for="email">Email</label>
                        <input type="text" id="email" name="email" />

                <br />
                                <label for="email">Username</label>
                        <input type="text" id="username" name="username" />

                <br />
                                <label for="email">Password</label>
                        <input type="text" id="password" name="password" />

                                <br />
                        <button type="submit" id="joinButton" name="send">Join!</button>

                  </fieldset>
                </form>

        </div>

</body>

</html>
Here's how it looks like when the page gets rendered in web browser.
CSS Floating
In a HTML document we can apply the float property can be used to set an element to float left, right or none.
Below are the possible float properties that one can set.
Quote: The float definitions are based on
[3]
- left - Indicates that the element must float on the left side of its containing block.
- right - Indicates that the element must float on the right side of its containing block.
- none - Indicates that the element must not float.
- clear - The clear property is set with a value left,right or both. It's basically used to clear the floating of an element to the left, right etc. When applied with a the appropriate value to an HTML element, it pushes the element one position down where it is generally displayed.
There exists another property named clear, which is a part of the CSS Float Property and can be used to clear the float settings. The clear property can be set with either of these values left, right, both, none, inherit
A very good example where we can use float property is while creating a page layout using CSS. You can notice the content style is set to float left and the navigation with float right. By setting the clear property to “both” we can easily clear off the float settings (left and right).
.container {
    width: 960px;
    margin: 0 auto;
}

.content {
    float: left;
    width: 660px;
    background: white;
}

.navigation {
    float: right;
    width: 300px;
    background: blue;
}

.footer {
    clear: both;
    background: gray;
    padding: 10px;
}
CSS Align
In CSS we can align texts horizontally to the left, center, right or vertically to the top, bottom, center, text top, text bottom, subscript, and superscript. Following are the properties of align
text-align – We can apply the text align property to any of the block level elements like text, data, inline elements. The text align property can be any of these values - right, left, center, and justify.
Here's an example where we setting the paragraph tag with right alignment.
p { text-align: right; }
Quote: The CSS verticle align properties are based on
[4]
- vertical-align - Specifies the vertical alignment of an inline or a table cell box. The following are the allowed values.
- baseline – It's by default. Align the baseline of the element with the baseline of the parent.
- sub – Raises the baseline of the box so that the element is displayed as subscript.
- super – Aligns the element as superscript.
- top - Aligns the top of the element with the tallest element on the line.
- text-top - Aligns the top of the element with the parent element's font.
- middle - Aligns the vertical midpoint of the element with the baseline plus half the x-height of the parent.
- bottom - Aligns the bottom of the element with the lowest element on the line.
- text-bottom - Aligns the bottom of the element with the bottom of the parent element's font.
- percentage – The percentage refers to the value of the line-height property of the element. It raises the baseline of the element by the specified amount above the baseline of the parent. Example - 20%
- length - A specific length ex: 10px
- Inherit - The element should have the same vertical-align setting as the parent.
Example:
<style type="text/css">
   img.bogImage {vertical-align:text-top;}
</style>

<img id="bogImage" class=" bogImage" title="CodeProject" src="http://s.codeproject.com/App_Themes/CodeProject/Img/logo250x135.gif" alt="Home" style="height:135px;width:250px;border-width:0px;">
The CSS border style properties are used for displaying the border around an HTML element. One can set the border style, width, color etc.
Let us see various border-style settings with an example. Here's a sample HTML document with border style applied.
The border style can be any of these values – none, dotted, dashed, solid, double, groove, ridge, inset, outset, hidden.
<!DOCTYPE html>
<html>
<head>
<style type="text/css">
body {
    background: orange;
}
p.borderNone {border-style:none;}
p.borderDotted {border-style:dotted;}
p.borderDashed {border-style:dashed;}
p.borderSolid {border-style:solid;}
p.borderDouble {border-style:double;}
p.borderGroove {border-style:groove;}
p.borderRidge {border-style:ridge;}
p.borderInset {border-style:inset;}
p.borderOutset {border-style:outset;}
p.borderHidden {border-style:hidden;}
</style>
</head>

<body>
<p class="borderNone">No border.</p>
<p class="borderDotted">Dotted border.</p>
<p class="borderDashed">Dashed border.</p>
<p class="borderSolid">Solid border.</p>
<p class="borderDouble">Double border.</p>
<p class="borderGroove">Groove border.</p>
<p class="borderRidge">Ridge border.</p>
<p class="borderInset">Inset border.</p>
<p class="borderOutset">Outset border.</p>
<p class="borderHidden">Hidden border.</p>
</body>

</html>
CSS 3 supports the following additional border properties.
- border-radius – When set , adds the rounded borders to the element.
- box-shadow – Drops shadows to the box.
- border-image – Specify an image around the border element.Here's an example where the border radius is set to 20px to create a rounded corners. Also the border style is set to 2px solid with red color.
<style type="text/css">
div
{
   border:2px solid red;
   padding:10px 40px;
   background:orange;
   width:300px;
   border-radius:20px;
}
</style>

<div>The border-radius set to 20px. Allows us to add rounded corners to elements.</div>
Let us see an example of border shadow by defining styles and coding the HTML document.
Here's the style that we are making use of. Notice the border shadow is being set with the horizontal, vertical offset to 10px and the blur radius to 5px with color as gray.
<!DOCTYPE html>
<html>
<head>
<style type="text/css">

div
{
    width:300px;
    height:200px;
    background-color:orange;
    box-shadow: 10px 10px 5px gray;
}
p
{
    font-size: 20px;
}
img
{
    padding:5px;
}

</style>
</head>
<body>

<div>
 <p>Welcome to Code Project</p>
<img id="bogImage" class=" bogImage" title="CodeProject" src="http://s.codeproject.com/App_Themes/CodeProject/Img/logo250x135.gif" alt="Home" style="height:135px;width:250px;border-width:0px;">
</div>

</body>
</html>
The CSS list properties are mainly used for styling the ordered and unordered lists in HTML. We will see how we can style lists in CSS with examples.
- list-style-type – The list style type determines the shape of the list marker. ex: disc, square, circle etc. The overall apperance of a list item is determined based on this property.
- list-style-image – The list style image is used when you wish to display an image instead of a numbered list or a bullet point.
- list-style-position – The list style position says whether the marker should be displayed inside or outside of the box.
- list-style – The list style property allows you to specify all the list styles in a single property.
Now let us see some examples.
Example 1:
We will define a simple list style with none but with list element display as “inline”.
#list1 { background: orange; }
#list1 ul { list-style:none; text-align:center; border-top:1px solid #eee; border-bottom:1px solid #eee; padding:10px 0; }
#list1 ul li { display:inline; padding:0 10px; letter-spacing:10px; }
#list1 ul li a { text-decoration:none; color:#eee; }
#list1 ul li a:hover { text-decoration:underline; }
Here's how we use list style in our HTML.
<p>Welcome to CodeProject</p>

<div id="list1">
        <ul>
            <li><a href="http://www.codeproject.com/">Home</a></li>
            <li><a href="http://www.codeproject.com/script/Articles/Latest.aspx">Articles</a></li>
            <li><a href="http://www.codeproject.com/script/Answers/List.aspx?tab=active">Question Answers</a></li>
            <li><a href="http://www.codeproject.com/script/Forums/List.aspx">Discussions</a></li>
        </ul>
</div>
Now we will define a list style with image. Each item of the list will be displayed with arrow in front of them rather than a bullet point.
#list2    { background: orange; }
#list2 ul { list-style-image: url("../images/arrow.png"); font-size:18px; }
We will now learn how to apply CSS transformation for our list. Below is the list defined with transformation and list styles.
<html>
<head>

<style type="text/css">
 body
 {
    font-family: 'Tangerine', serif;
    font-size: 24px;
 }

#list3         { background: orange; }
#list3 ul      { list-style:none; }
#list3 ul li   {  font-family:Georgia,serif,Times; font-size:18px; }
#list3 ul li a { display:block; width:300px; height:80px;
    text-decoration:underline; }

#list3 ul li a:hover {  -moz-transform:rotate(-3deg); -moz-box-shadow:10px 10px 10px;
    -webkit-transform:rotate(-3deg); -webkit-box-shadow:10px 10px 10px #000000;
    transform:rotate(-3deg); box-shadow:10px 10px 10px #000000; }

p
{
  font-size:35px;
  background: orange;
}

</style>
</head>
<body>

<p>Welcome to CodeProject - CSS List With Transformation</p>

<div id="list3">
        <ul>
            <li><a href="http://www.codeproject.com/">Home</a></li>
            <li><a href="http://www.codeproject.com/script/Articles/Latest.aspx">Articles</a></li>
            <li><a href="http://www.codeproject.com/script/Answers/List.aspx?tab=active">Question Answers</a></li>
            <li><a href="http://www.codeproject.com/script/Forums/List.aspx">Discussions</a></li>
        </ul>
    </div>
</body>
</html>
Tables
We shall see how we can style a HTML table with CSS styles. With CSS we can control the table border, text alignment with in the cell, table color, height, width and many more.
Here's an example of a simple CSS Styling for a HTML Table.
<html>
<head>

<style type="text/css">

table {
        margin: 1em; border-collapse: collapse;
        font-family: 'Tangerine', serif;
        font-size: 24px;
 }

td, th { padding: .3em; border: 1px #ccc solid; }
thead { background: orange; }
tbody { background: white; }

</style>
</head>
<body>

<table class="hilite" id="highlight">
<thead>
<tr><th>Week</th><th>Article</th></tr>
</thead>
<tbody>
<tr><td>Article 1</td><td> Writing Your First Code </td></tr>
<tr><td>Article 2</td><td>Building on the Basics</td></tr>
<tr><td>Article 3</td><td>Styling Your First Web Page</td></tr>
<tr><td>Article 4</td><td>Laying Out Your First Web Page</td></tr>
</tbody>
</table>

</body>
</html>
In the above example we have seen how to create and apply styles for a HTML table. Now we will see how we can create a table using CSS. We can easily create a CSS table using div , span and few styles.
Here's the CSS styles for required in creating a table.
table { display: table }
tr    { display: table-row }
thead { display: table-header-group }
tbody { display: table-row-group }
tfoot { display: table-footer-group }
col   { display: table-column }
colgroup { display: table-column-group }
td, th   { display: table-cell }
caption  { display: table-caption }
Using display: table we shall create a simple table display.
<style type="text/css">

.Table{
  display: table;
}

.TableRow{
  display: table-row;
}

.TableCell{
  display: table-cell;
}

div {
  background: orange;
  width: 200px;
  font: 24px;
}

body
{
  font-family: 'Tangerine', serif;
  font-size: 28px;
}

</style>
We will be using the above style in HTML as below.
<div class="Table">
  <div class="TableRow">
    <div class="TableCell">
      <div class="value">47,291</div><div class="title"><a href="https://workspaces.codeproject.com">Workspaces</a></div>
    </div>

<div class="TableCell">
      <div class="value">10.5 Million</div><div class="title"><a href="http://www.codeproject.com/lounge.aspx">Members</a></div>
    </div>

<div class="TableCell">
     <div class="value">3 Billion</div><div class="title"><a href="http://www.codeproject.com/script/Articles/Latest.aspx">Article views</a></div>
  </div>
</div>
Here's how the CSS Table display will look like.
Advantages of using CSS based table
Quote: The following contents are inspired and complied by referencing
[5]
- Faster page loading as the HTML won't be having any huge or junk markups associated with the HTML Table and also some of the code associated with the visual appearances of a table.
- The search engines can easily crawl through the HTML. Smaller file size and less junk content makes it easier for search engine crawlers to easily identify content.
- Clear separation of content and the formatting. When it comes to CSS based tables , the actual data will be stored within the HTML and the formatting is independent and will be stored as a CSS styles. You can essentially define styles in one file and include them in multiple documents.
- Visual consistency is maintained also we don't have to dig up the HTML page and modify the table styles. The visual appearances can be easily modified with less effort.
Div or divisions is a block level container (has a line feed after the end div tag) which divides the content into individual sections. The Div is used as a container for holding one or more block level elements. With Div we can define sections within a HTML document so that we can access the same from CSS and Javascript.
Example:
<style type="text/css">
#demo
{
   background: orange;
}
</style>

<div id="demo">
<ul>
    <li>Article 1 : Writing Your First Code </li>
    <li>Article 2 : Building on the Basics</li>
    <li>Article 3 : Styling Your First Web Page</li>
    <li>Article 4 : Laying Out Your First Web Page</li>
</ul>
</div>
A span is used to add visual appearances in a HTML document. A span by itself does not add value or will not do anything in a HTML document. We have to include a class for the space in order add visual appearances. The main difference between the Div and Span is the span does not by default adds formatting on it's own. Whereas the Div adds a link break as a paragraph does.
Example of a Span element with CSS style is as below
<h2><span style="color : orange;">Welcome to CodeProject!</span></h3>
Points of Interest
Although CSS is easy to learn and apply there are tons of stuffs you can explore , learn and share. I personally enjoyed writing this article. I hope this article would help any begineers to get started in laying out the web page and apply styles. The interesting thing that I liked about is the CSS3 support for shadows, radius, transformation etc.
References
[1] http://www.w3schools.com/css/css_dimension.asp
[2] http://www.w3schools.com/cssref/pr_class_display.asp
[3] https://developer.mozilla.org/en-US/docs/Web/CSS/float
[4] http://www.w3schools.com/cssref/pr_pos_vertical-align.asp
[5] http://www.itegritygroup.com/css-vs-tables/
History
Version 1.0 - Laying our the web document with styles - 04/06/2014
Version 1.1 - Updated article with appropriate references - 08/31/2015


 General
  News
News  Suggestion
  Question
  Bug
Bug  Answer
  Joke
Joke  Praise
  Rant
Rant  Admin
Admin 


