Let’s build something
The purpose of this article is to:
- Provide a working guidance on building AngularJS applications using TypeScript and powered by ASP.NET vNext backend.
- Experiment with building web applications using facilities provided by and mindset required by Visual Studio Code.
What are we building?
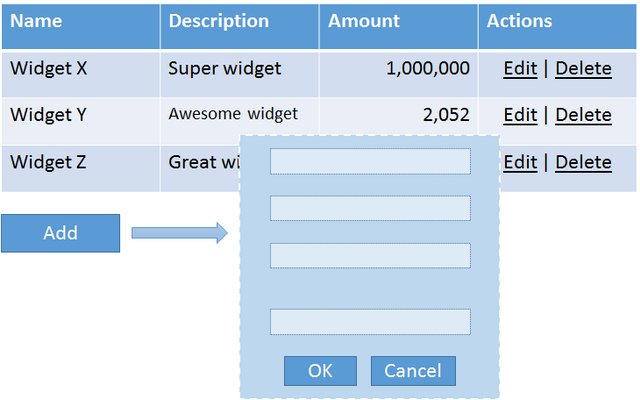
In order to showcase a few things possible with AngularJS and how these things translate into TypeScript, we’ll be building a simple, yet not too simple application for managing widgets. Our application will showcase a list of widgets and users will be able to add, edit and delete widgets, all that possible while staying on the same page. The application is pretty simple, yet it has enough features to show many parts on AngularJS in one app, working together, instead of focusing only one thing like most tutorials do.
At the same time we’ll be building all that in Visual Studio Code and we’ll touch a lot of tooling questions and issues around it.
A quick note about the sample code
The sample code attached to this article contains fully developed applications described in this article. In order to run this application:
- Make sure you have Visual Studio Code and all necessary components installed. I recommend 0-to-code installer to get started quickly.
- Unzip the contents of the attachment.
- In the command prompt change the directory to the unzipped location and then execute
dnu restore & bower install & npm install followed by gulp build. - Run
code ., press Ctrl-Shift-P and type dnx web to start the server.
Development environment configuration
Coming from fully featured Visual Studio IDE, it’s very easy to get lost in all the multiple ways you can approach your development environment configuration. There’s no installer package that will allow you to select a bunch of options and then watch a progress bar going through the installation progress. Each part of your toolchain is coming from a different source, has its own way of configuration, running, etc. This configuration needs to be done only once and you will be able to use it over and over again for other projects.
Tools that we need:
- NodeJS
- NPM and following modules installed globally:
- bower
- gulp
- gulp-watch
- gulp-cli
- gulp-typescript
- yo
- generator-aspnet
- typescript
- tsd
- DNX
- Visual Studio Code
You may download/install them manually, or — as I prefer it — use 0-to-code installer that installs these and a better console and git, thus giving you pretty much all you need when you’re developing with Visual Studio Code. In addition to installing all the tools, this installer will configure your user environment properly, putting all commands that you need in proper places.
If you are not familiar with package management aside from NuGet, you may find article "Package Managers: An Introductory Guide for the Uninitiated Front-End Developer" educational.
Minimal ASP.NET application
In regular Visual Studio the process of creating a new project was as easy as selecting File -> New command in the menu. After initial development environment configuration, you’ll be able to do that pretty much as easy as that, except using the command line.
yo aspnet --gulp
The command above will prompt you for a type of application (choose "Web Application Basic") and the location of said application. After completing the prompt, you’ll be presented with the cookie-cutter ASP.NET vNext application. Since --gulp argument was specified, our project will be using Gulp as a build system.
Your next steps:
dnu restore & bower install & npm install

dnu build
Now, if you type code . in your command prompt, you should be able to edit your code with Visual Studio. In order to run your application, press Ctrl-Shift-P and type dnx web. This will start a local web server and you’ll be able to navigate to http://localhost:5000 and use your application.
Simulating different environments
If you look into Views\Shared\_Layout.cshtml file, you’ll notice that some of the scripts are being included conditionally on the type of the environment — Development, Staging or Production. In order to simulate different environment during development, modify commands in your project.json file as follows:
"commands": {
  "kestrel": "Microsoft.AspNet.Hosting --server Kestrel --config hosting.ini /ASPNET_ENV=Production",
  "kestrel-dev": "Microsoft.AspNet.Hosting --server Kestrel --config hosting.ini /ASPNET_ENV=Development",
  "web": "Microsoft.AspNet.Hosting --server Microsoft.AspNet.Server.WebListener --config hosting.ini /ASPNET_ENV=Production",
  "web-dev": "Microsoft.AspNet.Hosting --server Microsoft.AspNet.Server.WebListener --config hosting.ini /ASPNET_ENV=Development"
}
Now, depending on which command you select, the application will change its behaviors accordingly.
Add AngularJS to application
When a web application is developed in a Visual Studio IDE, all details of how it is served when you run it via F5, are hidden from you by the IDE. Usually you start dealing with all these questions when you are ready to deploy. When you develop with Visual Studio Code, the acquisition and deployment of assets questions are posed right from the beginning of the project. In order to get started with AngularJS we’ll need to specify where to get it, and, more importantly, where to put it.
- Edit
bower.json and add:
- "angular": "1.4.0"
- "angular-ui-router": "0.2.15"
- "angular-bootstrap": "0.13.0"
- Run
bower install command and observe that it downloads three packages you’ve just added to bower.json. - Include Angular code in your page by adding links to the Angular scripts in
Views\Shared\_Layout.cshtml:
<script src="~/lib/angular/angular.min.js"></script>
<script src="~/lib/angular-ui-router/release/angular-ui-router.min.js"></script>
<script src="~/lib/angular-bootstrap/ui-bootstrap-tpls.min.js"></script>
- Start your application and observe that Angular code is being downloaded to client.
Add TypeScript support to application
We will be using exclusively TypeScript for further application development. Following steps will configure our build pipeline to compile all our TypeScript code to one output JavaScript file, using type definition files for external libraries like jQuery and Angular. The build pipeline will also generate sourcemap files to make our debugging easier.
- Create folder
scripts. This will be an input folder for our TypeScript compilation task. - Edit
package.json and add:
- "gulp-typescript": "2.8.0"
- "gulp-sourcemaps": "1.5.2"
- Run
npm install and observe that newly added packages are downloaded locally. -
Edit gulpfile.js:
- At the start of the file add:
- tsc = require("gulp-typescript")
- sourcemaps = require("gulp-sourcemaps")
- Find the "paths" structure definition and add following folders there:
- appScripts: "./scripts/"
- typings: "./typings/"
- Under the "paths" structure make following changes
paths.appOut = paths.webroot + "js/";
paths.appSources = paths.appScripts + "**/*.ts";
paths.js = paths.appOut + "**/*.js";
-
Create new task "compile-app":
gulp.task("compile-app", function () {
var tscResult = gulp.src([paths.appSources, paths.typings + "**/*.d.ts"])
.pipe(sourcemaps.init())
.pipe(tsc({
target: "ES5",
removeComments: true,
noImplicitAny: true,
noEmitOnError: true,
noExternalResolve: true,
out: "app.js"
}));
return tscResult.js
.pipe(sourcemaps.write("maps/"))
.pipe(gulp.dest(paths.appOut));
});
- Create
scripts\app.ts:
let hello = "world";
alert(hello);
- Include link to app.js in Views\Home\Index.cshtml:
@section scripts
{
<script src="~/js/app.js"></script>
}
- In order to prevent VSCode from interpreting TypeScript files and generated JavaScript files together, create jsconfig.json in the root folder of the project.
{
  "exclude": [
      "wwwroot"
      , "node_modules"
  ]
}
After you did that, you should be able to successfully execute gulp compile-app from the command prompt and then run the application.
Implement barebones AngularJS application
Now that we have all building blocks in place, we can easily implement a barebones AngularJS application that does nothing.
- Under the scripts folder create controllers, directives, services and templates folders. Our application’s implementation will be spread around these folders.
- From the command line run
tsd install jquery angular angular-ui-bootstrap angular-ui-router. This will install TypeScript type definitions for jQuery and Angular. - Edit gulpfile.js:
- Find the "paths" structure definition and add following folders there:
- templates: "./scripts/templates/"
- Under the "paths" structure define a new variable
paths.templatesOut = paths.webroot + "templates/"
paths.templateFiles = paths.templates + "**/*.html";
- Create new task "copy-templates":
gulp.task("copy-templates", function () {
  gulp.src(paths.templateFiles)
    .pipe(gulp.dest(paths.templatesOut));
});
- Create scripts\appTypes.d.ts (see below).
- Create scripts\app.ts (see below).
- Create scripts\Templates\index.html that has some placeholder text.
- Find
body-content container in Views\Shared\_Layout.cshtml and add our app declaration as shown below:
<div class="container body-content" ng-app="widgetRegistryApp">
    @RenderBody()
</div>
- Modify Views\Home\Index.cshtml to bootstrap the application (see below).
- Run
gulp compile-app to compile the application, then gulp copy-templates to copy templates from their original location to the output folder under wwwroot. - You should be able to start your application and see the placeholder text displayed on the webpage.
Application types
To keep things simple, we’ll keep all type definitions related to our application in one file. All our modules will have to reference only this file and maybe some other modules that are specific only for the module in question.
Create scripts\appTypes.d.ts with the contents below.
declare namespace WidgetRegistry {
var appModuleName: string;
interface AppConfig {
apiEndpoint: string;
templateRoot: string;
}
}
declare module angular {
interface IScope {
pathToTemplate: (fileName: string) => string;
}
}
Our type definitions include general Angular type definitions and declare our application’s module name and configuration interface. We also add our utility method on Angular’s scope definition.
Application module
Application module defines and configures our application. Things like routing configuration are happening there.
Modify scripts\app.ts as follows:
namespace WidgetRegistry {
appModuleName = "widgetRegistryApp";
var app = angular.module(appModuleName, ["widgetRegistryData", "ui.router", "ui.bootstrap"]);
app.config(["appConfig", "$stateProvider", "$urlRouterProvider", function (appConfig: AppConfig, $stateProvider: ng.ui.IStateProvider, $urlRouterProvider: ng.ui.IUrlRouterProvider) {
$stateProvider
.state("root", {
url: "/",
templateUrl: getPathToTemplate(appConfig, "index.html")
});
$urlRouterProvider.otherwise("/");
}]);
app.run(["appConfig", "$rootScope", function(appConfig: AppConfig, $rootScope: ng.IRootScopeService) {
(<ng.IScope>$rootScope).pathToTemplate = (fileName: string) => getPathToTemplate(appConfig, fileName);
}]);
function getPathToTemplate(appConfig: AppConfig, fileName: string): string {
return appConfig.templateRoot + fileName;
}
}
Note that our application explicitly refers to Angular UI router’s type definitions. This is because UI router is not used anywhere else and it’s not useful to have its definitions visible in other places.
The application configures its global module name, declares dependencies to our data module (below) and configures routing to show our dummy template.
Bootstrap application module on the webpage
One final step is to actually bootstrap our application. Modify Views\Home\Index.cshtml as follows:
@{
    ViewBag.Title = "Home Page";
}

@section scripts
{

<script type="text/javascript">

    var appData = angular.module("widgetRegistryData", []);

    var appConfig = {
        apiEndpoint: "/api/widgets/",
        templateRoot: "/templates/"
    };
    appData.constant("appConfig", appConfig);

</script>

<script src="~/js/app.js"></script>

}

<div ui-view></div>
All this view does is it declares our data module that contains actual application configuration (you might want to pass current values from the model instead of hardcoding them), refers to an application script bundle and declares where the application view will be located.
Building blocks
Before we move on to implementation, let’s take a high-level look at which blocks our toy application consists of.

The main view of our application lists all widgets, allows user to modify widgets on the list and add new widgets. This functionality will be orchestrated by the widgetManagerController.ts controller that will power index.html template.
As you can see from the diagram, each line item on the list not just displays the information about the widget, but also allows editing or deleting a widget. It makes more sense to extract all that functionality into a separate class, which we’ll do by introducing widgetLineItem.html template backed by the widgetLineItemDirective.ts directive.
Finally, whenever the user clicks Add button or Edit link on the widget line item, an editor opens. This functionality is implemented in the widgetEditorController.ts controller and exposed to user via the widgetEditor.html template.
We will provide communication with the backend via the widgetService.ts service.
Implementation details
All our functionality will be speaking in terms of "widgets". Since we’re working in TypeScript universe, let’s describe widget types.
First, create scripts\widgetState.ts:
namespace WidgetRegistry {
export enum WidgetState {
existing = 0,
new = 1,
deleting = 2,
deleted = 3,
undeleting = 4
}
}
Then modify scripts\appTypes.d.ts:
interface Widget {
id: string;
name: string;
amount: number;
description?: string;
$state?: WidgetState;
}
type WidgetList = Array<Widget>;
The types are self-explanatory. WidgetState is a way for us to keep track of the widget state on client. The $state member will never be taken to account by the server side.
Service stub
Pretty much all our functionality will be calling the backend to perform some kind of operation on the widget. AngularJS provides AJAX functionality via $http service. You may choose to make all controllers to be dependent on this service and perform HTTP operations, that correspond to backend calls, directly, however, the more elegant way would be to define our own service that exposes backend functionality in terms that make sense for our application problem domain. This way you may change the actual service implementation later on, or mock specific service operations instead of handling generic GET/POST/etc. verbs in unit tests.
First off, let’s define the service interface (appTypes.d.ts).
interface IWidgetService {
getWidgets(): ng.IPromise<WidgetList>;
createWidget(widget: Widget): ng.IPromise<any>;
updateWidget(widget: Widget): ng.IPromise<any>;
deleteWidget(widget: Widget): ng.IPromise<any>;
undoWidgetDelete(widget: Widget): ng.IPromise<any>;
}
At this stage of our app development, it’s too early to provide an actual implementation of the service, so let’s fake it by using Angular’s $q service in scripts\services\widgetService.ts.
namespace WidgetRegistry {
export class WidgetService implements IWidgetService {
public static $inject = ["appConfig", "$q"];
constructor(
private appConfig: AppConfig,
private promise: ng.IQService) {
}
public getWidgets = (): ng.IPromise<WidgetList> => {
var operation = this.promise.defer();
operation.resolve([{
id: "widget_1",
name: "Some widget",
amount: 100,
description: "This is the best widget ever"
}]);
return operation.promise;
}
public createWidget = (widget: Widget): ng.IPromise<any> => {
var operation = this.promise.defer();
operation.resolve();
return operation.promise;
}
public updateWidget = (widget: Widget): ng.IPromise<any> => {
var operation = this.promise.defer();
operation.resolve();
return operation.promise;
}
public deleteWidget = (widget: Widget): ng.IPromise<any> => {
var operation = this.promise.defer();
operation.resolve();
return operation.promise;
}
public undoWidgetDelete = (widget: Widget): ng.IPromise<any> => {
var operation = this.promise.defer();
operation.resolve();
return operation.promise;
}
}
angular.module(appModuleName).service("widgetService", WidgetService);
}
Later, once we’re ready, we’ll replace stubs with actual calls to the backend.
Controllers in Angular power actual functionality exposed to users through templates. Each controller has its scope. Different people approach controller scopes differently. I prefer to split scope members into the model and operations, and make controllers expose both explicitly, as opposed to treating the controller itself as a view-model and accessing it directly from the view. Here’s how I define the widget manager controller (appTypes.d.ts).
type EventCallback = (e?: ng.IAngularEvent) => void;
interface WidgetManagerScope extends ng.IScope {
model: {
widgets: WidgetList;
operationInProgress: boolean;
errorMessage?: string;
}
addWidget: EventCallback;
editWidget(widget: Widget): void;
deleteWidget(widget: Widget): void;
undeleteWidget(widget: Widget): void;
}
The implementation of the controller will live in scripts\controllers\widgetManagerController.ts and look like this.
namespace WidgetRegistry {
export class WidgetManagerController {
public static $inject = ["appConfig", "$scope", "widgetService"];
constructor(
private appConfig: AppConfig,
private $scope: WidgetManagerScope,
private widgetService: IWidgetService) {
$scope.model = {
widgets: [],
operationInProgress: false
};
$scope.addWidget = this.addWidget;
$scope.editWidget = this.editWidget;
$scope.deleteWidget = this.deleteWidget;
$scope.undeleteWidget = this.undeleteWidget;
this.performOperation(this.widgetService.getWidgets()
.then((widgets: WidgetList) => this.$scope.model.widgets = widgets)
.catch(() => this.$scope.model.errorMessage = "Cannot get list of widgets. Please try again later."));
}
private performOperation = (operationPromise: ng.IPromise<any>): void => {
this.$scope.model.operationInProgress = true;
this.$scope.model.errorMessage = "";
operationPromise.finally(() => this.$scope.model.operationInProgress = false);
}
private addWidget = (): void => {
}
private editWidget = (widget: Widget): void => {
}
private deleteWidget = (widget: Widget): void => {
}
private undeleteWidget = (widget: Widget): void => {
}
}
angular.module(appModuleName).controller("widgetManagerController", WidgetManagerController);
}
The constructor of our controller initializes the scope with an empty model, exposes widget operations that user will invoke by clicking the elements of our user interface, and schedules an operation to retrieve the list of widgets from the backend. Since our service implementation is stubbed, it will return immediately, but due to us stubbing it through the $q service, the controller logic that receives the list of widgets will not change later, when we move on to a proper implementation.
Now we can replace our dummy index.html template with markup like shown below.
<div class="alert alert-danger" ng-if="model.errorMessage">
{{model.errorMessage}}
</div>
<div class="table-responsive">
<table class="table table-striped">
<thead>
<tr>
<th>ID</th>
<th>Name</th>
<th>Amount</th>
<th>Description</th>
<th> </th>
</tr>
</thead>
<tbody>
<tr ng-repeat="widget in model.widgets">
<td>{{widget.id}}</td>
<td>{{widget.name}}</td>
<td>{{widget.amount}}</td>
<td>{{widget.description}}</td>
<td>Edit | Delete</td>
</tr>
</tbody>
</table>
</div>
<div class="row">
<div class="col-xs-12">
<button id="add-widget"
ng-click="addWidget()"
ng-disabled="model.operationInProgress">Add</button>
</div>
</div>
Finally, modify our app configuration in app.ts to invoke constructor whenever user navigates to the home page:
app.config(["appConfig", "$stateProvider", "$urlRouterProvider", function (appConfig: AppConfig, $stateProvider: ng.ui.IStateProvider, $urlRouterProvider: ng.ui.IUrlRouterProvider) {
$stateProvider
.state("root", {
url: "/",
controller: "widgetManagerController",
templateUrl: getPathToTemplate(appConfig, "index.html")
});
$urlRouterProvider.otherwise("/");
}]);
Now, if you run gulp compile-app, then gulp copy-templates and then start the application, you should be able to see the list of widgets consisting of one line.
Our line item for widget list is not static: the user can edit or delete/restore the widget by clicking links on the line. At the same time, the links are shown or hidden based on the widget status. To make things more interesting for the user, we’ll be showing a message that conveys which operation is currently active for the widget and show the widget in a special way, if it was deleted.
While it is possible to implement all this functionality in widgetManagerController.ts, doing so will saddle the controller with more responsibilities than necessary and will make both code and template cumbersome and unnecessarily complicated.
Instead, we’ll extract the widget line item into its own template and implement the business logic via directive.
Let’s define widget line item scope in appTypes.d.ts.
interface WidgetLineItemScope {
model: Widget;
canEditOrDelete(widget: Widget): boolean;
isDeleting(widget: Widget): boolean;
isDeleted(widget: Widget): boolean;
isUndoingDelete(widget: Widget): boolean;
}
In order to do that, we’ll move <tr> from index.html to widgetLineItem.html and add more markup to help us with the functionality we want. Note that markup uses functionality we described earlier in WidgetLineItemScope.
<tr ng-class="{deleted: isDeleted(model) || isUndoingDelete(model) }">
<td>{{model.id}}</td>
<td>{{model.name}}</td>
<td>{{model.amount}}</td>
<td>{{model.description}}</td>
<td>
<span ng-if="canEditOrDelete(model)">
<a href="#" ng-click="onEditWidget({ widget: model })">Edit</a>
|
<a href="#" ng-click="onDeleteWidget({ widget: model })">Delete</a>
</span>
<span ng-if="isDeleting(model)">
deleting...
</span>
<span ng-if="isUndoingDelete(model)">
restoring...
</span>
<span ng-if="isDeleted(model)">
<a href="#" ng-click="onUndeleteWidget({ widget: model })">Undo</a>
</span>
</td>
</tr>
Directive code will be placed to directives\widgetLineItemDirective.ts.
namespace WidgetRegistry {
export class WidgetLineItemDirective implements ng.IDirective {
public static Factory = (): ng.IDirectiveFactory => {
var factory = (...args: any[]): WidgetLineItemDirective => {
var instance = <WidgetLineItemDirective>{};
WidgetLineItemDirective.apply(instance, args);
return instance;
}
factory.$inject = ["appConfig"];
return factory;
}
constructor(
private appConfig: AppConfig) {
this.templateUrl = appConfig.templateRoot + this.templateUrl;
}
public scope = {
model: "=widget",
onEditWidget: "&",
onDeleteWidget: "&",
onUndeleteWidget: "&"
};
public templateUrl = "widgetLineItem.html";
public restrict = "A";
public replace = true;
public link = (scope: WidgetLineItemScope, element: ng.IAugmentedJQuery, attrs: ng.IAttributes): void => {
scope.canEditOrDelete = this.canEditOrDelete;
scope.isDeleted = this.isDeleted;
scope.isDeleting = this.isDeleting;
scope.isUndoingDelete = this.isUndoingDelete;
}
private canEditOrDelete = (widget: Widget): boolean => {
return !widget.$state || WidgetState.existing == widget.$state || WidgetState.new == widget.$state;
}
private isDeleting = (widget: Widget): boolean => {
return !!widget.$state && WidgetState.deleting == widget.$state;
}
private isUndoingDelete = (widget: Widget): boolean => {
return !!widget.$state && WidgetState.undeleting == widget.$state;
}
private isDeleted = (widget: Widget): boolean => {
return !!widget.$state && WidgetState.deleted == widget.$state;
}
}
angular.module(appModuleName).directive("widgetLineItem", WidgetLineItemDirective.Factory());
}
Notice the static Factory method and how it’s being used in Angular’s directive declaration at the bottom of the file. In TypeScript/Angular world this is probably the most bizarre construction that differs from any other Angular concept.
Also notice that this directive creates its own scope with model and several callbacks. This will be wired in index.html like shown below.
<tr ng-repeat="widget in model.widgets"
    data-widget-line-item
    data-widget="widget"
    data-on-edit-widget="editWidget(widget)"
    data-on-delete-widget="deleteWidget(widget)"
    data-on-undelete-widget="undeleteWidget(widget)"></tr>
All this line item markup does is, it instantiates the widgetLineItem directive (see data-widget-line-item attribute) and provides all data (data-widget) and callbacks (data-on-*-widget) required by the directive to configure its scope. The widget is current iterator of the widgets list value. All callbacks are pointing to methods placed on scope by the widgetManagerController in its constructor. The directive also indicates that it will replace whatever HTML element it’s being associated with, and indeed, as you can see in widgetLineItem.html, we provide all markup necessary to create HTML table row.
Finally, modify widgetManagerController.ts with the code that simulates requested activity. We will re-implement real logic later in the development cycle.
private addWidget = (): void => {
alert("add");
}
private editWidget = (widget: Widget): void => {
alert("edit");
}
private deleteWidget = (widget: Widget): void => {
alert("delete");
widget.$state = WidgetState.deleted;
}
private undeleteWidget = (widget: Widget): void => {
alert("undelete");
widget.$state = WidgetState.existing;
}
The only UI part that is left to implement is a widget editor. In this particular application I decided to go with a modal popup editor. You may choose to go with a UI state that will replace widget list view instead. For all intents and purposes it doesn’t matter for the editor implementation: what will change is how editor accesses the item it is supposed to edit. In case of modal popup, we’ll have widgetManagerController providing an instance of widget to edit. If you go with the UI state, you may create "add" and "edit" states: the latter will have an ID as a parameter and editor will select an item from the shared data module, while the former will mean that editor should create a new instance and then add it to the shared data module for the manager to consume.
As usual, we’ll start by adding editor types to appTypes.d.ts:
type WidgetOperationCallback = (widget: Widget) => ng.IPromise<any>;
interface WidgetEditorModel {
widget: Widget;
performWidgetOperation: WidgetOperationCallback;
isValid?: boolean;
operationInProgress?: boolean;
errorMessage?: string;
}
interface WidgetEditorScope extends ng.IScope{
model: WidgetEditorModel;
ok(): void;
cancel(): void;
}
Editor template templates\widgetEditor.html will look like below.
<div class="alert alert-danger" ng-if="model.errorMessage">
    {{model.errorMessage}}
</div>

<form>

    <div class="modal-header">
        <h3 class="modal-title">Add/edit widget</h3>
    </div>

    <div class="modal-body">

      <div class="form-group" ng-if="!model.isValid">
          <span class="text-danger">Please check your input.</span>
      </div>

      <div class="form-group">
        <label for="widget-name">Name:</label>
        <input type="text" class="form-control" id="widget-name" placeholder="Widget name" ng-model="model.widget.name">
      </div>

      <div class="form-group">
        <label for="widget-amount">Amount:</label>
        <input type="range" class="form-control" id="widget-amount" min="0" max="1000" step="50" ng-model="model.widget.amount">
      </div>

      <div class="form-group">
        <label for="widget-description">Description:</label>
        <textarea class="form-control" id="widget-description" rows="5" ng-model="model.widget.description"></textarea>
      </div>

    </div>

    <div class="modal-footer">
        <button type="submit" class="btn btn-default" ng-click="ok()">OK</button>
        <button class="btn" ng-click="cancel()">Cancel</button>
    </div>

</form>
And finally, implement the controller in widgetEditorController.ts.
namespace WidgetRegistry {
export class WidgetEditorController {
public static $inject = ["model", "appConfig", "$scope", "$modalInstance"];
constructor(
model: WidgetEditorModel,
private appConfig: AppConfig,
private $scope: WidgetEditorScope,
private $modalInstance: ng.ui.bootstrap.IModalServiceInstance) {
$scope.model = model;
$scope.model.isValid = true;
$scope.model.operationInProgress = false;
$scope.ok = this.ok;
$scope.cancel = () => $modalInstance.dismiss();
}
private ok = (): void => {
if (!this.isValid()) {
this.$scope.model.isValid = false;
return;
}
this.$scope.model.isValid = true;
this.performOperation(
this.$scope.model.performWidgetOperation(this.$scope.model.widget)
.then(() => this.$modalInstance.close())
.catch(() => this.$scope.model.errorMessage = "We cannot save your changes now. Please try again later."));
}
private isValid = (): boolean => {
return !!this.$scope.model.widget.name;
}
private performOperation = (operationPromise: ng.IPromise<any>): void => {
this.$scope.model.operationInProgress = true;
this.$scope.model.errorMessage = "";
operationPromise.finally(() => this.$scope.model.operationInProgress = false);
}
}
angular.module(appModuleName).controller("widgetEditorController", WidgetEditorController);
}
Note that the editor doesn’t really perform any operations on widget list (neither adding nor modifying). Instead, the widgetManagerController owns the list and delegates operations via the performWidgetOperation callback that it configures as part of the model when invoking the widgetEditorController.
Let’s implement add/edit functionality in widgetManagerController.
public static $inject = ["appConfig", "$scope", "widgetService", "$modal"];
constructor(
private appConfig: AppConfig,
private $scope: WidgetManagerScope,
private widgetService: IWidgetService,
private $modal: ng.ui.bootstrap.IModalService) {
...
}
private addWidget = (): void => {
var widget: Widget = {
$state: WidgetState.new,
id: (Math.random() * 100).toFixed(0),
name: "",
amount: Math.floor(Math.random() * 1000),
description: ""
};
this.editWidgetImpl(widget, this.widgetService.createWidget).then(() => {
this.$scope.model.widgets.push(widget);
});
}
private editWidget = (widget: Widget): void => {
var selectedWidget = angular.copy(widget);
this.editWidgetImpl(selectedWidget, this.widgetService.updateWidget).then(() => {
angular.copy(selectedWidget, widget);
});
}
private editWidgetImpl = (widget: Widget, callback: WidgetOperationCallback): ng.IPromise<any> => {
return this.$modal.open({
resolve: {
model: (): WidgetEditorModel => {
return {
widget: widget,
performWidgetOperation: callback
};
}
},
templateUrl: this.$scope.pathToTemplate("widgetEditor.html"),
controller: "widgetEditorController"
}).result;
}
We added a dependency on $modal and implemented addWidget and editWidget via editWidgetImpl. Take a look at the resolve member of the call to $modal.open: it provides the model value that widgetEditorController depends on (see its $inject and constructor).
Another point of interest here is that editWidget makes a copy of the line that is being edited. If we’d pass the widget instance as is, any change in the editor would be reflected in this instance, even though the user could’ve canceled the editing operation. By making a copy, we ensure that the instance, that is being edited, will make it to the list only if the user commits the change.
Real service implementation
We’re finally ready to implement our backend service.
First, create Models\Widget.cs that will maintain server-side model:
using System;
using System.Collections.Generic;
using System.Linq;
using System.Threading.Tasks;
using Microsoft.AspNet.Mvc;

namespace WidgetRegistry.Models
{
    public class Widget
    {
        public string id { get; set; }

        public string name { get; set; }

        public double amount { get; set; }

        public string description { get; set; }
    }
}
Then, create Controllers\WidgetsController.cs with code as shown below. ASP.NET’s default routing will pick up our service without us doing anything special.
using System;
using System.Collections.Generic;
using System.Linq;
using System.Threading.Tasks;
using Microsoft.AspNet.Mvc;
using WidgetRegistry.Models;

namespace WidgetRegistry.Controllers
{
    [Route("api/[controller]")]
    public class WidgetsController : Controller
    {
        [Route("all")]
        [HttpGet]
        public IActionResult GetWidgets()
        {
            return new ObjectResult(new[]
            {
                new Widget() { id = "1", name = "qwe", amount = 123, description = "asd" },
                new Widget() { id = "2", name = "asd", amount = 456, description = "zxc" },
                new Widget() { id = "3", name = "zxc", amount = 789, description = "qwe" }
            });
        }

        [HttpPut]
        public IActionResult CreateWidget([FromBody] Widget widget)
        {
            return ResultFromWidget(widget);
        }

        [HttpPost]
        public IActionResult UpdateWidget([FromBody] Widget widget)
        {
            return ResultFromWidget(widget);
        }

        [HttpDelete]
        public IActionResult DeleteWidget(int id)
        {
            return new EmptyResult();
        }

        [HttpPatch]
        public IActionResult UndeleteWidget(int id)
        {
            return new EmptyResult();
        }

        private IActionResult ResultFromWidget(Widget widget)
        {
            if (null == widget || string.IsNullOrEmpty(widget.name) || "error" == widget.name)
            {
                return new HttpStatusCodeResult(500);
            }

            return new EmptyResult();
        }
    }
}
Make sure to run dnu build and restart your application.
After finishing the backend part of our service, let’s make sure our frontend’s Angular service talks to the backend. We can now remove the dependency on $q and re-implement IWidgetService using $http instead.
namespace WidgetRegistry {
export class WidgetService implements IWidgetService {
public static $inject = ["appConfig", "$q", "$http"];
constructor(
private appConfig: AppConfig,
private $q: ng.IQService,
private $http: ng.IHttpService) {
}
public getWidgets = (): ng.IPromise<WidgetList> => {
return this.httpPromiseAsPromise(this.$http.get(this.appConfig.apiEndpoint + "all"));
}
public createWidget = (widget: Widget): ng.IPromise<any> => {
return this.httpPromiseAsPromise(this.$http.put(this.appConfig.apiEndpoint, widget));
}
public updateWidget = (widget: Widget): ng.IPromise<any> => {
return this.httpPromiseAsPromise(this.$http.post(this.appConfig.apiEndpoint, widget));
}
public deleteWidget = (widget: Widget): ng.IPromise<any> => {
return this.httpPromiseAsPromise(this.$http.delete(this.appConfig.apiEndpoint, { params: widget }));
}
public undoWidgetDelete = (widget: Widget): ng.IPromise<any> => {
return this.httpPromiseAsPromise(this.$http.patch(this.appConfig.apiEndpoint, { params: widget }));
}
private httpPromiseAsPromise = <T>(httpPromise: ng.IHttpPromise<T>): ng.IPromise<T> => {
var deferred = this.$q.defer();
httpPromise
.success(response => deferred.resolve(response))
.error((data: any, status: number) => deferred.reject(status));
return deferred.promise;
}
}
angular.module(appModuleName).service("widgetService", WidgetService);
}
Going back to our decision to use a service instead of calling $http directly from the controller, you may see why this was a good idea: right now we were able to completely replace fake functionality with the real one; in future it’ll be possible for us to add, for example, telemetry for each call to the backend, again, transparently for the calling code. If we had unit tests for our controller at this point, we wouldn’t need to change any of the test implementations, because we’d be stubbing IWidgetService implementation, not $q or $http.
In retrospect, however, we should’ve used IHttpPromise<T> on result types to avoid converting the promises. If we omit the conversion step in the current implementation, we’ll have to modify our calling code to use response.data to access the data instead. This defeats our promise of having a transparent replacement of WidgetService implementation. If you plan to use data that comes as part of failure response, you should definitely switch to using IHttpPromise<T>.
As a final touch, let’s make delete and restore features of widgetManagerController.ts call the actual service and change widget statuses.
private deleteWidget = (widget: Widget): void => {
var widgetWasNew = (widget.$state && WidgetState.new == widget.$state);
widget.$state = WidgetState.deleting;
this.performOperation(
this.widgetService.deleteWidget(widget)
.then(() => {
if (widgetWasNew) {
var idx = this.$scope.model.widgets.indexOf(widget);
if (idx > -1) {
this.$scope.model.widgets.splice(idx, 1);
}
}
else {
widget.$state = WidgetState.deleted;
}
})
.catch(() => {
widget.$state = (widgetWasNew) ? WidgetState.new : WidgetState.existing;
this.$scope.model.errorMessage = "Cannot delete widget. Please try again later.";
}));
}
private undeleteWidget = (widget: Widget): void => {
widget.$state = WidgetState.undeleting;
this.performOperation(
this.widgetService.undoWidgetDelete(widget)
.then(() => {
widget.$state = WidgetState.existing;
})
.catch(() => {
widget.$state = WidgetState.deleted;
this.$scope.model.errorMessage = "Cannot restore deleted widget. Please try again later.";
}));
}
Unit testing
Backend unit tests
We will use Xunit for backend unit tests.
Add following dependencies to project.json:
"dependencies": {
    ...
    "xunit": "2.1.0-beta4-build3109",
    "xunit.runner.dnx": "2.1.0-beta4-build134"
}
Add a command to run tests:
"commands": {
    ...
    "test": "xunit.runner.dnx"
}
Run dnu restore to download and install Xunit locally. After the command is done, we’re ready to create our first unit tests for the backend service — Tests\Backend\WidgetsControllerTests.cs:
using System;
using Microsoft.AspNet.Mvc;
using WidgetRegistry.Controllers;
using WidgetRegistry.Models;
using Xunit;

namespace WidgetRegistry.Tests
{
    public class WidgetsControllerTests
    {
        private readonly WidgetsController controller = new WidgetsController();

        [Fact]
        public void GetWidgets_CorrectResponse()
        {
            var result = controller.GetWidgets() as ObjectResult;
            Assert.NotNull(result);

            var widgets = result.Value as Widget[];
            Assert.NotNull(widgets);
            Assert.Equal(3, widgets.Length);
        }

        [Fact]
        public void CreateWidget_CorrectResponse()
        {
            var result = controller.CreateWidget(CreateValidWidget()) as EmptyResult;
            Assert.NotNull(result);
        }

        [Fact]
        public void CreateWidget_ErrorResponse()
        {
            var result = controller.CreateWidget(CreateWidgetWithError()) as HttpStatusCodeResult;
            Assert.NotNull(result);
            Assert.Equal(500, result.StatusCode);
        }

        [Fact]
        public void UpdateWidget_CorrectResponse()
        {
            var result = controller.UpdateWidget(CreateValidWidget()) as EmptyResult;
            Assert.NotNull(result);
        }

        [Fact]
        public void UpdateWidget_ErrorResponse()
        {
            var result = controller.UpdateWidget(CreateWidgetWithError()) as HttpStatusCodeResult;
            Assert.NotNull(result);
            Assert.Equal(500, result.StatusCode);
        }

        [Fact]
        public void DeleteWidget_CorrectResponse()
        {
            var result = controller.DeleteWidget(1) as EmptyResult;
            Assert.NotNull(result);
        }

        [Fact]
        public void UndeleteWidget_CorrectResponse()
        {
            var result = controller.UndeleteWidget(1) as EmptyResult;
            Assert.NotNull(result);
        }

        private Widget CreateValidWidget()
        {
            return new Widget()
            {
                id = "1",
                name = "test",
                amount = 123
            };
        }

        private Widget CreateWidgetWithError()
        {
            return new Widget()
            {
                id = "1",
                name = "error",
                amount = 123
            };
        }
    }
}
Notice that this is the first time we simulate and test error handling in our service.
In order to run backend tests, press Ctrl-Shift-P and type test, then pick the DNX command that appears in the search results.
Frontend unit tests
For frontend tests we’ll also need a test execution engine and a test framework. For this project we’ll use karma and jasmine respectively.
Add new dependencies to package.json:
"devDependencies": {
    ...
  "karma": "0.13.9",
  "karma-jasmine": "0.3.6",
  "karma-phantomjs-launcher": "0.2.1",
  "karma-coverage": "0.5.0",
  "angular-mocks": "1.4.0",
  "jasmine-jquery": "2.1.0"
}
Execute npm install to download dependencies locally. Note that we’re using NPM to retrieve angular-mocks, even though angularjs itself is managed by Bower.
We will be writing our tests in TypeScript, so we’ll need to download typings for jasmine, add a couple of tasks in our gulpfile and create karma configuration.
Run tsd install jasmine angular-mocks & tsd install jasmine-jquery in order to download typings for our test infrastructure.
Modify gulpfile.js with following tasks:
var karma = require("karma").server;
var paths = {
...
appTests: "./tests/frontend/",
};
paths.testsOut = paths.webroot + "/tests/"
paths.testSources = paths.appTests + "**/*.ts";
function runTests(doneCallback) {
karma.start({
configFile: __dirname + "/karma.conf.js",
singleRun: true
}, doneCallback);
}
gulp.task("run-tests", ["build-tests"], function (done) {
runTests(done);
});
gulp.task("build-tests", function () {
var tscResult = gulp.src([paths.testSources, paths.appSources, paths.typings + "**/*.d.ts"])
.pipe(sourcemaps.init())
.pipe(tsc({
target: "ES5",
removeComments: false,
noImplicitAny: true,
noEmitOnError: true,
noExternalResolve: true
}));
return tscResult.js
.pipe(sourcemaps.write("maps/"))
.pipe(gulp.dest(paths.testsOut));
});
Notice that on the contrary to app compilation, the task that compiles tests, doesn’t use a single output file and compiles code 1:1 instead. This decision makes debugging tests much easier.
In order for karma to run, create karma.conf.js next to the gulpfile.js. Our configuration file will include all files necessary to execute unit tests and will instruct karma to collect coverage data.
module.exports = function(config) {
  config.set({
    frameworks: ["jasmine"],
    browsers: ["PhantomJS"],
    phantomjsLauncher: {
      exitOnResourceError: true
    },

    files: [
      "./wwwroot/lib/angular/angular.min.js",
      "./wwwroot/lib/angular-bootstrap/ui-bootstrap-tpls.min.js",
      "./wwwroot/lib/angular-ui-router/release/angular-ui-router.min.js",
      "./wwwroot/lib/jquery/dist/jquery.min.js",
      "./node_modules/angular-mocks/angular-mocks.js",
      "./node_modules/jasmine-jquery/lib/jasmine-jquery.js",
      "./wwwroot/js/**/*.js",
      "./wwwroot/tests/setup.js",
      "./wwwroot/tests/tests/**/*.js"
    ],
    exclude: [
      "./wwwroot/js/templates.js",
    ],

    reporters: ["progress", "coverage"],

    preprocessors: {
      "./wwwroot/js/**/*.js": ["coverage"]
    },

    coverageReporter: {
      type: "html",
      dir: "./wwwroot/tests/coverage/"
    }
  });
};
After completing all changes listed above, you’ll be able to run gulp run-tests in order to execute unit tests (the run will fail due to missing tests, obviously).
Developing frontend unit tests
The minimal unit test might look like this:
describe("foo", function() {
it("bar", function() {
});
});
However, since we’re dealing with Angular, we’ll need to provide enough of infrastructure and mocks in order to be able to execute code under test in our services, controllers and directives. The good news is that if application architectured well, it’s very easy to do so, because Angular code is testable by design.
This is how we’ll organize our frontend tests:
- Tests\Frontend\_references.d.ts will contain references to all typings our unit tests will need.
- Tests\Frontend\setup.ts will define all types specific for unit tests along with mock infrastructure that is required by Angular.
- All test code will live under Tests\Frontend\tests folder.
The easiest part is Tests\Frontend\_references.d.ts — this file should include your application and mock infrastructure types, enough to compile your tests.
Tests\Frontend\setup.ts is handling all heavy lifting required to mock and fake Angular infrastructure. We will fake the data module (widgetRegistryData), mock the application module (widgetRegistryApp) and use mock.inject() to gain access to dependencies of our controllers and services. Once we have this access, it’s very easy to mock required dependencies in order to simulate behaviors we want to verify.
interface WidgetRegistryAppMock {
config: WidgetRegistry.AppConfig;
}
interface WidgetRegistryControllerMock {
factory: ng.IControllerService;
rootScope: ng.IRootScopeService;
modal: ng.ui.bootstrap.IModalService;
promises: ng.IQService;
}
interface WidgetServiceMock {
httpMock: ng.IHttpBackendService;
instance: WidgetRegistry.IWidgetService;
}
function startApplication(): WidgetRegistryAppMock {
var result = {
config: {
apiEndpoint: "/api/widgets/",
templateRoot: "/templates/"
}
};
var appData = angular.module("widgetRegistryData", []);
appData.constant("appConfig", result.config);
angular.mock.module("widgetRegistryApp");
angular.mock.inject(($httpBackend: ng.IHttpBackendService) => {
$httpBackend.whenGET(/templates\/.+/).respond(200);
});
return result;
}
function mockWidgetRegistryController(): WidgetRegistryControllerMock {
var result = <WidgetRegistryControllerMock>{};
angular.mock.inject(($controller: ng.IControllerService, $rootScope: ng.IRootScopeService, $modal: ng.ui.bootstrap.IModalService, $q: ng.IQService) => {
result.factory = $controller;
result.rootScope = $rootScope;
result.modal = $modal;
result.promises = $q;
});
return result;
}
function mockWidgetService(): WidgetServiceMock {
var result = <WidgetServiceMock>{};
angular.mock.inject((widgetService: WidgetRegistry.IWidgetService, $httpBackend: ng.IHttpBackendService) => {
result.httpMock = $httpBackend;
result.instance = widgetService;
});
return result;
}
function createFakeWidgetInstance(): WidgetRegistry.Widget {
return {
id: "123",
name: "some widget",
amount: 5
};
}
function getEndpointWithQueryStringRegexp(config: WidgetRegistry.AppConfig): RegExp {
return new RegExp(config.apiEndpoint + "\?.*");
}
Do not be surprised by the following limitations:
startApplication() can be called only once per test case execution.mockWidgetRegistryController(), mockWidgetService() and in general anything that uses angular.mock.inject() can be called until Angular constructs an instance of controller, service or directive.
Each function here returns an object that provides access to various dependencies. We may use WidgetRegistryAppMock members to modify application configuration or data on the fly, and WidgetRegistryControllerMock or WidgetServiceMock members to control controller or service instances.
Once we done with our infrastructure code, we can finally write a proper unit test.
describe("widgetManagerController", function() {
var controllerName = "widgetManagerController";
var app = <WidgetRegistryAppMock>{};
var controller = <WidgetRegistryControllerMock>{};
var service = <WidgetServiceMock>{};
beforeEach(function() {
app = startApplication();
controller = mockWidgetRegistryController();
service = mockWidgetService();
});
afterEach(function() {
service.httpMock.verifyNoOutstandingExpectation();
service.httpMock.verifyNoOutstandingRequest();
});
it("shows error if get all widgets operation fails", function() {
service.httpMock.expectGET(app.config.apiEndpoint + "all").respond(500);
var scope = <WidgetRegistry.WidgetManagerScope>controller.rootScope.$new();
controller.factory(controllerName, {
appConfig: app.config,
$scope: scope,
widgetService: service.instance,
$modal: controller.modal
});
expect(scope.model).toBeDefined();
expect(scope.model.errorMessage).toBeFalsy();
expect(scope.model.operationInProgress).toBe(true);
service.httpMock.flush();
expect(scope.model.widgets).toEqual([]);
expect(scope.model.operationInProgress).toBe(false);
expect(scope.model.errorMessage).toBeTruthy();
});
it("adds a new widget to list if operation completes successfully", function() {
var data = [
createFakeWidgetInstance(),
createFakeWidgetInstance(),
createFakeWidgetInstance()
];
service.httpMock.expectGET(app.config.apiEndpoint + "all").respond(200, data);
var scope = <WidgetRegistry.WidgetManagerScope>controller.rootScope.$new();
controller.factory(controllerName, {
appConfig: app.config,
$scope: scope,
widgetService: service.instance,
$modal: controller.modal
});
service.httpMock.flush();
var deferred = controller.promises.defer();
spyOn(controller.modal, "open").and.returnValue({ result: deferred.promise });
scope.addWidget();
deferred.resolve();
deferred.promise.finally(() => {
expect(scope.model.widgets.length).toBe(data.length + 1);
expect(scope.model.errorMessage).toBeFalsy();
});
});
});
You can execute these tests by running gulp run-tests. Resulting test coverage data will be saved under wwwroot\tests\coverage.
This is how the tests will run:
- [1] -> [2] -> [4], then [1] -> [3] -> [4]
- [1] starts an application and gets access to
widgetManagerController‘s and widgetService‘s dependencies. - [2]:
- Configures service’s GET endpoint to return 500.
- Creates new controller instance.
- Ensures that no error is displayed and the overall initial state is what is expected.
- Completes pending GET request by flushing HTTP mock.
- Ensures the outcome of the error on initial GET operation.
- [3]:
- Configures service’s GET endpoint to successfully return fake data.
- Creates new controller instance and completes pending GET request by flushing HTTP mock.
- Mocks
$modal.open() method by shortcutting it to a locally-controlled promise, so no actual widget editor code is executed at all. - Simulates user’s click on Add Widget button by directly calling the button click handler. Note that there’s no HTML or DOM manipulation happening at this point.
- Successfully resolves local promise.
- On promise’s
finally clause ensures the outcome of the successful add operation.
- [4] is a code that will be automatically executed by the framework after [2] or [3] (actual unit test). In our case it’s a safeguard that ensures that we didn’t miss any possible call to any of HTTP endpoints our code might call.
Improving code and process
Caching Angular templates
As it is implemented now, you will notice that application downloads templates every time you access a feature for the first time. While it is convenient during development, it’s a performance hit for a regular usage pattern. We can fix this by putting all templates into the cache upfront and downloading all of them once.
- Add following dependencies to
devDependencies in package.json:
"gulp-angular-templatecache": "1.7.0",
"gulp-minify-html": "1.0.4"
- Run
npm install. -
Change copy-templates task in your gulpfile.js to be a bit more sophisticated:
var minifyHtml = require("gulp-minify-html"),
templateCache = require("gulp-angular-templatecache");
gulp.task("copy-templates", function () {
gulp.src(templateFiles)
.pipe(minifyHtml())
.pipe(templateCache("templates.js", {
root: "/templates",
module: "widgetRegistryData"
}))
.pipe(gulp.dest(paths.appOut));
});
- Include link to templates.js in Views\Home\Index.cshtml:
<script src="~/app/templates.js"></script>
<script src="~/app/app.js"></script>
After running gulp copy-templates and refreshing the page in the browser, you should see templates.js to be downloaded and no more roundtrips to the backend to fetch template files.
Styling with SASS
So far we’ve been using TypeScript to boost our productivity while developing the application. We can improve our productivity even further by switching from developing styles in CSS to doing so SASS. SASS offers very impressive way of maintaining and sharing styles without copying and pasting same CSS code all over the place.
- Add a new entry in
devDependencies in package.json:
"gulp-sass": "2.0.4",
- Run
npm install. -
Add a new task to gulpfile.js:
var sass = require("gulp-sass");
var paths = {
...
appStyles: "./styles/",
};
paths.styleSources = paths.appStyles + "**/*.scss";
paths.stylesOut = project.webroot + "/css/";
gulp.task("compile-styles", function () {
gulp.src(styleSources)
.pipe(sourcemaps.init())
.pipe(sass({
includePaths: [],
outputStyle: "compressed"
}))
.pipe(sourcemaps.write("maps/"))
.pipe(gulp.dest(paths.stylesOut));
});
Start by creating styles\site.scss and running gulp compile-styles command. You are all set to use SASS going forward.
One build task to rule them all
So far we were creating disjointed tasks focused on very specific parts of development process. It’s very inconvenient to run these tasks one-by-one in a certain order every time we want to produce an application. It’s time to create uber-tasks that will orchestrate all our existing tasks the way we want it.
- Add new dependencies to
package.json and run npm install:
"gulp-start-process": "1.1.1",
"run-sequence": "1.1.2",
"del": "1.2.1",
-
Add new tasks to gulpfile.js: var del = require("del"),
start = require("gulp-start-process"),
runSequence = require("run-sequence");
gulp.task("clean", function (cb) {
del([paths.appOut, paths.testsOut, paths.templatesOut, paths.stylesOut], cb);
});
gulp.task("build", function (cb) {
runSequence("clean", ["build-backend", "build-app"], ["run-tests", "run-tests-backend"]);
});
gulp.task("run-tests", ["build-tests"], function (done) {
runTests(done);
});
gulp.task("run-tests-backend", function (cb) {
start("dnx . test", cb);
});
gulp.task("build-app", ["copy-templates", "compile-styles", "compile-app"], function () {
});
gulp.task("build-backend", function (cb) {
start("dnu build", cb);
});
After these changes you should be able to:
- Run
gulp build in order to clean output folders, build both back- end frontend, tests, then run both front- and backend tests. - Run
gulp run-tests in order to rebuild and run frontend tests. - Run
gulp clean in order to only clean output folders.
Automatic compilation and unit testing
We were able to greatly improve our code-run-fix cycle by carefully orchestrating our gulp tasks, but we can do better. We can instruct gulp to run in background and watch for file changes, then run build or tests for us.
Final additions to gulpfile.js:
gulp.task("watch-app", ["build-app"], function () {
gulp.watch(appSources, ["compile-app"]);
gulp.watch(styleSources, ["compile-styles"]);
gulp.watch(templateFiles, ["copy-templates"]);
});
gulp.task("watch-tests", ["run-tests"], function (done) {
gulp.watch(appSources, ["compile-app-run-tests"]);
gulp.watch(testSources, ["run-tests"]);
});
gulp.task("compile-app-run-tests", ["compile-app"], function (done) {
runTests(done);
});
You can run gulp watch-app, then return to your IDE, make changes in application source code, then refresh page in the browser and see your changes go live without you triggering the build manually. Ditto for frontend unit tests after running gulp watch-tests.
One caveat you should keep in mind: gulp will watch for only changes in existing files, not for addition of new files.
Minimizing application scripts
Right now our application is compiled down to a single JavaScript file that contains all code. We can still minify this file in order to save on load time and size.
- Modify min:js task in gulpfile.js to look like this:
gulp.task("min:js", function() {
    gulp.src([paths.appOut + "templates.js", paths.appOut + "app.js"], { base: "." })
        .pipe(concat(paths.appOut + "app.min.js"))
        .pipe(uglify())
        .pipe(gulp.dest("."));
});
-
Modify Index.cshtml to include minified script:
 @section scripts
 {

 <script type="text/javascript">

     var appData = angular.module("widgetRegistryData", []);

     var appConfig = {
         apiEndpoint: "/api/widgets/",
         templateRoot: "/templates/"
     };
     appData.constant("appConfig", appConfig);

 </script>

  <environment names="Development">
    <script src="~/js/templates.js"></script>
    <script src="~/js/app.js"></script>
  </environment>
  <environment names="Staging,Production">
    <script src="~/js/app.min.js"></script>
  </environment>

 }
- Exclude minified bundle from unit testing by adding a new exclusion to karma.conf.js:
exclude: [
  "./wwwroot/js/app.min.js",
  "./wwwroot/js/templates.js",
]
Application will use unminified version during development and minified otherwise. Unit tests will run against unminified version, so the code coverage results would be useful for us.
Keyboard shortcuts
One last change we could make to improve our workflow is to assign watch-app and watch-tests to a keyboard shortcut.
Assuming you didn’t configure keyboard shortcuts for the project yet, while in IDE press Ctrl-Shift-T and choose to edit tasks.json file when prompted. Add following configuration to the file and you’re good to go.
{
"version": "0.1.0",
"command": "gulp",
"args": [
"--gulpfile",
"gulpfile.js"
],
"isShellCommand": true,
"tasks": [
{
"taskName": "watch-app",
"isBuildCommand": true,
"showOutput": "silent",
"isWatching": true,
"problemMatcher": ["$gulp-tsc", "$tsc"]
},
{
"taskName": "watch-tests",
"isTestCommand": true,
"showOutput": "silent",
"isWatching": true,
"problemMatcher": ["$gulp-tsc", "$tsc"]
}
]
}
After making this change Ctrl-Shift-B will start continuous application compilation; Ctrl-Shift-T will both compile an app and run unit tests.
The End
Development with Visual Studio Code is different and requires some time to get in. With this article you should get a good starting point for your future endeavors.
History
Fixed TypeScript output configuration for application in gulpfile.
Started professional career in software development back in 2000, in Ukraine. Founder and owner of a boutique software company called ByteGems.com Software. Worked for 6 years at w2bi, Inc in New Jersey USA, currently work in a large multinational company based in Redmond, WA.
My buzzwords at the moment: .NET, C#, ASP.NET, MVC, LINQ, TypeScript, JavaScript, AngularJS, HTML, JSON, services.
Still buzzing: C++, Win32, ATL, MFC, SQL, WinForms, WebForms, EF, Sockets, TCP/IP, Remoting.


 General
  News
News  Suggestion
  Question
  Bug
Bug  Answer
  Joke
Joke  Praise
  Rant
Rant  Admin
Admin 


 .
.
