Introduction
Welcome to day 5 of “Learn MVC Project in 7 days” series. Hope you had a nice time reading day 1 to day 4. Completing previous days is must prior to day 5.
Complete Series
We are pleased to announce that this article is now available as hard copy book you can get the same from www.amazon.com and www.flipkart.com
Agenda
- Lab 22 - Add Footer
- Talk on Lab 22
- Lab 23 – Implementing Role based security
- Part 1
- Part 2
- Talk on Lab 23
- Lab 24 - Assignment Lab – Handle CSRF attack
- Lab 25 – Implement Consistent look across project
- Talk on Lab 25
- Lab 26 – Making Header and FooterData code more efficient with Action Filter
- Conclusion
In this lab we will add Footer to our Employee Screen.
Main objective of this lab is understanding Partial Views.
What are “Partial Views”?
Logically, Partial View is a reusable view which will never get displayed directly. It will be included inside other views and get displayed as a part of that view. It resembles user controls in Asp.Net web forms, but without Code behind.
Step 1 – Create ViewModel for Partial View
Right click the ViewModel folder and create a class called FooterViewModel as follows.
public class FooterViewModel
{
   public string CompanyName { get; set; }
   public string Year { get; set; }
}
Step 2 – Create Partial View
Right click the “~/Views/Shared” folder. Select Add>>View.
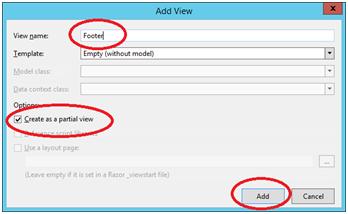
Put View name as Footer, Check “Create as a partial view” checkbox and click “Add”.
Note: We already spoke about shared folder in Day 1. Shared folder contains views which will not be specific to a particular controller. Views inside Shared folder will be available to all the controllers.
Step 3 – Display data in the Partial View
Open Footer.cshtml and put following HTML in it.
@using WebApplication1.ViewModels

@model FooterViewModel

<div style="text-align:right;background-color: silver;color: darkcyan;border: 1px solid gray;margin-top:2px;padding-right:10px;">

   @Model.CompanyName © @Model.Year

</div>
Step 3 – Include Footer data in Main ViewModel
Open EmployeeListViewModel class and add a new property to hold Footer data as follows.
public class EmployeeListViewModel
{
public List<EmployeeViewModel> Employees { get; set; }
public string UserName { get; set; }
public FooterViewModel FooterData { get; set; }
}
In our example Footer (Partial View) is going to be displayed as a part of Index View.
We will pass necessary data to Footer from Index View.
Index View is a strongly typed view of type EmployeeListViewModel and hence all the data required for Footer view should be encapsulated in EmployeeListViewModel.
Step 4 – Set Footer Data
Open EmployeeController and in Index action method set value to FooterData property as follows.
public ActionResult Index()
{
   ...
   ...
    employeeListViewModel.FooterData = new FooterViewModel();
    employeeListViewModel.FooterData.CompanyName = "StepByStepSchools";//Can be set to dynamic value
    employeeListViewModel.FooterData.Year = DateTime.Now.Year.ToString();
    return View("Index", employeeListViewModel);
}
Step 5 – Display Footer
Open Index.cshtml and display Footer Partial View after table tag as follows.
       </table>
        @{
            Html.RenderPartial("Footer", Model.FooterData);
        }
    </div>
</body>
</html>
Step 6 – Execute and Test
Press F5. Navigate to Index view. (I believe, you know how to do it now.)

What does Html.Partial do?
Just like Html.RenderPartial, Html.Partial will be used to display Partial View in the View.
This is the syntax
@Html.Partial("Footer", Model.FooterData);
Syntax is much simpler than earlier one.
What’s the difference between two?
Html.RenderPartial will write result of the Partial View directly to the HTTP response stream whereas Html.Partial will return result as MvcHtmlString.
What is MvcHtmlString and why does Html.Partial return MvcHtmlString instead of string?
First let’s understand what is MvcHtmlString?
As per MSDN “MvcHtmlString represents a HTML-encoded string that should not be encoded again”.
Let’s make this definition easier.
Look at the following code.
@{
   string MyString = "My Simple String";
}
@MyString
It will generate following output
As you can see, razor displayed whole content as it is. Many people might have thought of seeing a bold string but Razor Html encoded the content before displaying and that’s why instead of bold string we got pure content.
We use MvcHtmlString when we don’t want razor to do the encoding. MvcHtmlString is an indication to razor that “string is already encoded, no more encoding is required”.
For example look at the following code.
@{
   string MyString = "My Simple String";
}
@MvcHtmlString.Create(MyString)
It will generate following output
Why does Html.Partial return MvcHtmlString instead of string?
We already understood a fact that “razor will always encode strings but it never encodes MvcHtmlString”. It doesn’t make sense if Partial View contents are considered as pure string gets displayed as it is. We want it to be considered as a HTML content and for that we have to stop razor from encoding thus Partial method is designed to return MvcHtmlString.
What is recommended Html.RenderPartial or Html.Partial?
Html.RenderPartial is recommended because it is faster.
When Html.Partial will be preferred?
It is recommended when we want to change the result returned by Partial View before displaying.
Open Index.cshtml and open Footer code to below code and test.
@{
    MvcHtmlString result = Html.Partial ("Footer", Model.FooterData);
    string finalResult = result.ToHtmlString().Replace("2015", "20000");
}
@MvcHtmlString.Create(finalResult)
Now footer will look like below.
Why Partial View is placed inside Shared Folder?
Partial Views are meant for reusability hence the best place for them is Shared folder.
Can’t we place Partial Views inside a specific controller folder, like Employee or Authentication?
We can do that but in that case it won’t be available to only specific controller.
Example: When we keep Partial View inside Employee folder it won’t be available for AuthenticationController or to Views related to AuthenticationController.
Why definition of Partial View contains word “Logically”?
In definition we have said that Partial View is a reusable view but it won’t get executed by its own. It has to be placed in some other view and then displayed as a part of the view.
What we said about reusability is completely true but what we said about execution is only true logically. Technically it’s not a correct statement. We can create an action method which will return a ViewResult as bellow.
public ActionResult MyFooter()
{
    FooterViewModel FooterData = new FooterViewModel();
    FooterData.CompanyName = "StepByStepSchools";//Can be set to dynamic value
    FooterData.Year = DateTime.Now.Year.ToString();
    return View("Footer", FooterData);
}
It will display following output
Although logically it doesn’t make sense, technically it’s possible. Footer.cshtml won’t contain properly structured HTML. It meant to be displayed as a part of some other view. Hence I said “Logically it doesn’t make sense”.
Why Partial View is created instead of putting footer contents directly in the view?
Two advantages
- Reusability – we can reuse the same Partial View in some other View.
- Code Maintenance – Putting it in a separate file makes it easy to manage and manipulate.
Why Header is not created as Partial View?
As a best practice we must create Partial View for header also but to keep Initial labs simpler we had kept it inline.
In this lab we will implement Admin and Non-Admin login feature.
Requirement is very simple.
“Non Admin user won’t be able to create new Employees”.
With this lab we will understand two more topics in MVC.
Let’s start with our lab. 1
To make it simple lets break it into 2 parts.
Part 1 – Hide AddNew link from Non-Admin User
Step 1 – Create Enum for identifying UserStatus
Right click the Models folder and select “Add New Item”.
Select “Code File” option from the dialog box.
Put Name as “UserStatus” and click Add.
“Code File” option will create a blank “.cs” file.
Create an enum called UserStatus inside it as follows.
namespace WebApplication1.Models
{
    public enum UserStatus
    {
        AuthenticatedAdmin,
        AuthentucatedUser,
        NonAuthenticatedUser
    }
}
Step 2 – Change business layer functionality
Delete IsValidUser function and create a new function called GetUserValidity as follows.
public UserStatus GetUserValidity(UserDetails u)
{
    if (u.UserName == "Admin" && u.Password == "Admin")
    {
        return UserStatus.AuthenticatedAdmin;
    }
    else if (u.UserName == "Sukesh" && u.Password == "Sukesh")
    {
        return UserStatus.AuthentucatedUser;
    }
    else
    {
        return UserStatus.NonAuthenticatedUser;
    }
}
Step 3 – Change DoLogin action method
Open AuthenticationController and change DoLogin action method as follows.
[HttpPost]
public ActionResult DoLogin(UserDetails u)
{
if (ModelState.IsValid)
{
EmployeeBusinessLayer bal = new EmployeeBusinessLayer();
UserStatus status = bal.GetUserValidity(u);
bool IsAdmin = false;
if (status==UserStatus.AuthenticatedAdmin)
{
IsAdmin = true;
}
else if (status == UserStatus.AuthentucatedUser)
{
IsAdmin = false;
}
else
{
ModelState.AddModelError("CredentialError", "Invalid Username or Password");
return View("Login");
}
FormsAuthentication.SetAuthCookie(u.UserName, false);
Session["IsAdmin"] = IsAdmin;
return RedirectToAction("Index", "Employee");
}
else
{
return View("Login");
}
}
As you can see, we are using session variable for identifying whether the user is a admin user or non admin user.
Don’t know Session?
Session is the feature of Asp.Net which is reused in Asp.Net MVC.
We use Session variables to hold user related data. Life of session variable is going to be life of a user. It will be available until current session ends.
Step 4 – Remove Existing AddNew link
Open Index.cshtml view from “~/Views/Employee” folder and remove “Add New” hyperlink completely.
<!-- Remove following line from Index.cshtml -->

<a  href="/Employee/AddNew">Add New</a>
Step 5 – Crete partial view
Right click the “~/Views/Employee” folder and select Add>>View. Set View Name to “AddNewLink” and make sure to check “Create a partial View” checkbox.
Step 6 – Put contents in Partial View
Simply put following contents inside newly created Partial View.
<a href="/Employee/AddNew">Add New</a>
Step 7 – Create Action Method
Open EmployeeController and create a new action method called “GetAddNewLink” as follows.
public ActionResult GetAddNewLink()
{
    if (Convert.ToBoolean(Session["IsAdmin"]))
    {
        return Partial View("AddNewLink");
    }
    else
    {
        return new EmptyResult();
    }
}
Step 8 – Display AddNew link
Open Index.html and simply put following code inside it.
<a href="/Authentication/Logout">Logout</a>
</div>
<hr />
@{
  Html.RenderAction("GetAddNewLink");
}
<div>
<table border="1">
<tr>
Html.RenderAction executes the Action Method and writes result directly to response stream.
Step 9 – Execute and Test
Press F5 and execute the application.
Test 1
Test 2
Part 2 – Direct URL security
With above logic one thing is guaranteed. Now a Non-Admin User won’t be able to navigate to AddNew action via hyperlink.
Is it enough?
No, It not enough. What if a Non-Admin user directly try to navigate to AddNew action via URL.
As you can see in the above example, a Non-Admin user is able to access the AddNew action.
To solve this problem we will use MVC ActionFilters. Action Filters let us add some pre-processing and post-processing logic to our action methods. In this lab we will look after pre-processing support of ActionFilters and in coming up lab we will look into post-processing functionality as well.
Step 1 – Setup Filter.
Create a new folder called Filters in Project and create a new class called AdminFilter.
Step 2 – Create Filter
Upgrade simple AdminFilter class to ActionFilter by inheriting it from ActionFilterAttribute class as follows.
public class AdminFilter:ActionFilterAttribute
{

}
Note: To use ActionFilterAttribute you have to put using System.Web.Mvc in the top.
Step 3 – Add Security validation logic
Inside ActionFilter override OnActionExecuting as follows.
public override void OnActionExecuting(ActionExecutingContext filterContext)
{
    if (!Convert.ToBoolean(filterContext.HttpContext.Session["IsAdmin"]))
    {
        filterContext.Result = new ContentResult()
        {
            Content="Unauthorized to access specified resource."
        };
    }
}
Step 4 – Attach Filter
Attach filter to both AddNew and SaveEmployee Action Method as follows.
[AdminFilter]
public ActionResult AddNew()
{
    return View("CreateEmployee",new Employee());
}
...
...
[AdminFilter]
public ActionResult SaveEmployee(Employee e, string BtnSubmit)
{
    switch (BtnSubmit)
    {
        case "Save Employee":
            if (ModelState.IsValid)
            {
                EmployeeBusinessLayer empBal = new EmployeeBusinessLayer();
....
....
Step 5 – Execute and Test
Press F5 and execute the application. Login using Non-Admin credentials and try to navigate to AddNew action method by putting URL of AddNew action.
As you can see, now your Action methods are completely secured.
Note: Whatever strategy and logic we have used in this lab for implementing Role based security may not be the best solution. You may have some better logic to implement such behaviour. It’s just one of the way to achieve it.
Can we invoke GetAddNewLink directly via browser Address bar?
Yes, we already spoke about such behaviour in “Talk on Lab 22” section.
Is it possible to stop direct execution of GetAddNewLink?
For that decorate GetAddNewLink with ChildActionOnly attribute.
[ChildActionOnly]
public ActionResult GetAddNewLink()
{
    if (Convert.ToBoolean(Session["IsAdmin"]))
    {
What does Html.Action do?
Just like Html.RenderAction, Html.Action will execute the action method and display the result in View.
This is the syntax
@Html.Action("GetAddNewLink");
Syntax is much simpler than earlier one.
What’s the difference between two?
Html.RenderAction will write result of the action method execution directly to the HTTP response stream whereas Html.Action will return result as MvcHtmlString.
What is recommended Html.RenderAction or Html.Action?
Html.RenderAction is recommended because it is faster.
When Html.Action will be preferred?
It is recommended when we want to change the result returned by action method execution before displaying.
What is ActionFilter?
Just like AuthorizationFilter ActionFilter is kind of Filter in Asp.Net MVC. It allows us to add pre-processing and post-processing logic to action method execution.
Note: After each lab we are trying our best to cover each and every question a developer may come up. In case you believe some more questions need to be included please free to send your questions to SukeshMarla@Gmail.com
From safety point of view we must also handle CSRF attacks to the project. This one I will leave to you guys.
I recommend you to read this article and implement same to our SaveEmployee action method.
http://www.codeproject.com/Articles/994759/What-is-CSRF-attack-and-how-can-we-prevent-the-sam
In ASP.NET world consistent layout means MasterPage.
ASP.NET MVC is not different from it. In Razor Master Pages are called as Layout Pages.
Before we go and start with our lab, first let’s discuss what all things we have to place in Layout Page
- Header with Welcome Message
- Footer with Footer Data
Biggest problem?
Data for Footer and Header is passed to view from Controller as a part of ViewModel.
Now the big question is, how data will be passed from View to Layout Page after header and footer are moved to Layout Page.
Solution – Inheritance
We can simply follow the Object oriented Inheritance principle here. Let’s understand it with a lab.
Step 1 – Create Base class ViewModel
Create a new ViewModel called BaseViewModel class in ViewModel folder as follows.
public class BaseViewModel
{
public string UserName { get; set; }
public FooterViewModel FooterData { get; set; }
}
As you can see BaseViewModel encapsulates everything required for Layout Page
Step 2 – Prepare EmployeeListViewModel
Remove UserName and FooterData properties from EmployeeListViewModel class and inherit it from BaseViewModel.
public class EmployeeListViewModel:BaseViewModel
{
    public List<EmployeeViewModel> Employees { get; set; }
}
Step 3 – Create Layout Page
Right click shared folder. Select Add>>MVC 5 Layout Page. Put name as MyLayout and click ok.
It will create a structure like below.
<!DOCTYPE html>

<html>
<head>
    <meta name="viewport" content="width=device-width" />
    <title>@ViewBag.Title</title>
</head>
<body>
    <div>
        @RenderBody()
    </div>
</body>
</html>
Step 4 – Convert Layout to strongly typed Layout
Simply put following statements in the top of the layout page and make it strongly typed layout.
@using WebApplication1.ViewModels
@model BaseViewModel
Step 5 – Design Layout Page
In the layout page add header, footer and three sections for contents as below.
<html>
<head>
    <meta name="viewport" content="width=device-width" />
    <title>@RenderSection("TitleSection")</title>
    @RenderSection("HeaderSection",false)
</head>
<body>
    <div style="text-align:right">
        Hello, @Model.UserName
        <a href="/Authentication/Logout">Logout</a>
    </div>
    <hr />
    <div>
    @RenderSection("ContentBody")
    </div>
    @Html.Partial("Footer",Model.FooterData)
</body>
</html>
As you can see we have created three sections in the layout page. TitleSection, HeaderSection and ContentBody. Content pages will use these sections for defining appropriate contents.
Note: While defining HeaderSection second parameter is passed. This parameter decides whether it’s the optional section or compulsory section. False indicates it’s an optional section.
Step 6 – Attach Layout Page to Index View
Open Index.cshtml and in the top you will find following code.
@{
    Layout = null;
}
Change it to below code.
@{
    Layout = "~/Views/Shared/MyLayout.cshtml";
}
Step 7 – Design Index View
- Take out Headers and Footers from Index View.
- Copy remaining contents in the body tag and keep it somewhere
- Now copy contents of title tag.
- Remove all the HTML contents from the view. Make sure you just remove HTML, @model and layout statement shouldn’t be touched.
- Define TitleSection and Contentbody with the contents copied earlier.
Complete View will look like below.
@using WebApplication1.ViewModels
@model EmployeeListViewModel
@{
    Layout = "~/Views/Shared/MyLayout.cshtml";
}

@section TitleSection{
    MyView
}
@section ContentBody{
    <div>
        @{
            Html.RenderAction("GetAddNewLink");
        }
        <table border="1">
            <tr>
                <th>Employee Name</th>
                <th>Salary</th>
            </tr>
            @foreach (EmployeeViewModel item in Model.Employees)
            {
                <tr>
                    <td>@item.EmployeeName</td>
                    <td style="background-color:@item.SalaryColor">@item.Salary</td>
                </tr>
            }
        </table>
    </div>
}
As you can see, everything in the view is defined inside some section.
Step 8 – Execute and Test
Press F5 and execute the application. Navigate to Index action.
Step 9 – Attach Layout Page to CreateEmployee View
Open Index.cshtml and in the top you will find following code.
@{
    Layout = null;
}
Change it to below code.
@{
    Layout = "~/Views/Shared/MyLayout.cshtml";
}
Step 10 – Design CreateEmployee View
Follow the same Step 7 procedure and define sections in CreateEmployee View. This time there will be one addition. We will also define HeaderSection.
Complete HTML look like below.
@using WebApplication1.Models
@model Employee
@{
    Layout = "~/Views/Shared/MyLayout.cshtml";
}

@section TitleSection{
    CreateEmployee
}

@section HeaderSection{
<script src="~/Scripts/Validations.js"></script>
<script>
    function ResetForm() {
        document.getElementById('TxtFName').value = "";
        document.getElementById('TxtLName').value = "";
        document.getElementById('TxtSalary').value = "";
    }
</script>
}
@section ContentBody{
    <div>
        <form action="/Employee/SaveEmployee" method="post" id="EmployeeForm">
            <table>
            <tr>
                <td>
                    First Name:
                </td>
                <td>
                    <input type="text" id="TxtFName" name="FirstName" value="@Model.FirstName" />
                </td>
            </tr>
            <tr>
                <td colspan="2" align="right">
                    @Html.ValidationMessage("FirstName")
                </td>
            </tr>
            <tr>
                <td>
                    Last Name:
                </td>
                <td>
                    <input type="text" id="TxtLName" name="LastName" value="@Model.LastName" />
                </td>
            </tr>
            <tr>
                <td colspan="2" align="right">
                    @Html.ValidationMessage("LastName")
                </td>
            </tr>

            <tr>
                <td>
                    Salary:
                </td>
                <td>
                    <input type="text" id="TxtSalary" name="Salary" value="@Model.Salary" />
                </td>
            </tr>
            <tr>
                <td colspan="2" align="right">
                    @Html.ValidationMessage("Salary")
                </td>
            </tr>

            <tr>
                <td colspan="2">

                    <input type="submit" name="BtnSubmit" value="Save Employee" onclick="return IsValid();" />
                    <input type="submit" name="BtnSubmit" value="Cancel" />
                    <input type="button" name="BtnReset" value="Reset" onclick="ResetForm();" />
                </td>
            </tr>
            </table>
    </div>
}
Step 11 – Execute and Test
Press F5 and execute the application and then try to navigate to AddNew Action via hyperlink.
Index View was a strongly typed view of type EmployeeListViewModel which is a child of BaseViewModel and that’s why it’s worked. CreateEmployee View is a strongly typed view of type CreateEmployeeViewModel and it’s not the child of BaseViewModel and hence such error occurred.
Step 12– Prepare CreateEmployeeViewModel
Inherit CreateEmployeeViewModel from BaseViewModel as follow
public class CreateEmployeeViewModel:BaseViewModel
{
...
Step 13 – Execute and Test
Do the testing once again.
This error looks very different than it is really J
Real reason for such error is, we have not initialized Header and FooterData in AddNew action.
Step 14 – Initialize Header and Footer Data
Change AddNew action method code to following.
public ActionResult AddNew()
{
    CreateEmployeeViewModel employeeListViewModel = new CreateEmployeeViewModel();
    employeeListViewModel.FooterData = new FooterViewModel();
    employeeListViewModel.FooterData.CompanyName = "StepByStepSchools";//Can be set to dynamic value
    employeeListViewModel.FooterData.Year = DateTime.Now.Year.ToString();
    employeeListViewModel.UserName = User.Identity.Name; //New Line
    return View("CreateEmployee", employeeListViewModel);
}
Step 15 – Initialize Header and FooterData in SaveEmployee
Do the same thing in SaveEmployee action method.
public ActionResult SaveEmployee(Employee e, string BtnSubmit)
{
    switch (BtnSubmit)
    {
        case "Save Employee":
            if (ModelState.IsValid)
            {
                ...
            }
            else
            {
                CreateEmployeeViewModel vm = new CreateEmployeeViewModel();
                ...
                vm.FooterData = new FooterViewModel();
                vm.FooterData.CompanyName = "StepByStepSchools";//Can be set to dynamic value
                vm.FooterData.Year = DateTime.Now.Year.ToString();
                vm.UserName = User.Identity.Name; //New Line
                return View("CreateEmployee", vm); // Day 4 Change - Passing e here
            }
        case "Cancel":
            return RedirectToAction("Index");
    }
    return new EmptyResult();
}
Step 16 – Execute and Test
Press F5 and execute the application.
What does RenderBody do?
When we first created in the Layout page it had one razor stamen something like below.
@Html.RenderBody()
Let’s understand what does it do?
In content pages we normally define sections which are declared in the Layout Page.
But a strange thing is, Razor allow us to define some contents outside the section too.
All the non-section contents in content page will be rendered by RenderBody function
Below image explains it better.
.
Can we have nested layouts?
Yes we can. We can create a layout page which will use some other layout page. Syntax will be same.
Is it required to specify layout page in each and every view?
You will find a special view called __ViewStart.cshtml inside Views folder. Setting defined inside this will get applied to all Views.
Example – simply put following code in __ViewStart.cshtml and it will set layout page to all other views.
@{
    Layout = "~/Views/Shared/_Layout.cshtml";
}
Is it required to put Header and FooterData code in each and every Action Method?
No, it’s not required. We can remove this repetition with the help of Action Filter. This is going to be our next lab.
Is it compulsory to define all the sections in child view?
Yes if section is declared as a required section. Default value will be true.
@RenderSection("HeaderSection",false) // Not required
@RenderSection("HeaderSection",true) // required
@RenderSection("HeaderSection") // required
In Lab 23 we had seen one advantage of ActionFilter now it’s time for second.
Step 1 – Remove redundant code from Action Methods
Remove Header and FooterData code from Index, AddNew and SaveEmployee methods (in the Employee Controller).
For the reference, Header Code will look like this
bvm.UserName = HttpContext.Current.User.Identity.Name;
Footer Code will look like this
bvm.FooterData = new FooterViewModel();
bvm.FooterData.CompanyName = "StepByStepSchools";//Can be set to dynamic value
bvm.FooterData.Year = DateTime.Now.Year.ToString();
Step 2 – Create HeaderFooterFilter
Create a new class called HeaderFooterFilter in Filters folder and upgrade it to Action filter by inheriting it from ActionFilterAttribute class
Step 2 - Upgrade ViewModel
Override OnActionExecuted in HeaderFooterFilter class. In this method get the current view model and attach Header and Footer Data.
public class HeaderFooterFilter : ActionFilterAttribute
{
    public override void OnActionExecuted(ActionExecutedContext filterContext)
    {
        ViewResult v = filterContext.Result as ViewResult;
        if(v!=null) // v will null when v is not a ViewResult
        {
                BaseViewModel bvm = v.Model as BaseViewModel;
                if(bvm!=null)//bvm will be null when we want a view without Header and footer
                {
                        bvm.UserName = HttpContext.Current.User.Identity.Name;
                        bvm.FooterData = new FooterViewModel();
                        bvm.FooterData.CompanyName = "StepByStepSchools";//Can be set to dynamic value
                        bvm.FooterData.Year = DateTime.Now.Year.ToString();
                }
        }
    }
}
OnActionExecuted will be used to add post processing logic to action method execution.
Step 4 – Attach Filter
Attach HeaderFooterFilter to Index, AddNew and SaveEmployee action methods.
[HeaderFooterFilter]
public ActionResult Index()
{
    EmployeeListViewModel employeeListViewModel = new EmployeeListViewModel();
...
}
...
[AdminFilter]
[HeaderFooterFilter]
public ActionResult AddNew()
{
    CreateEmployeeViewModel employeeListViewModel = new CreateEmployeeViewModel();
    //employeeListViewModel.FooterData = new FooterViewModel();
    //employeeListViewModel.FooterData.CompanyName = "StepByStepSchools";
...
}
...
[AdminFilter]
[HeaderFooterFilter]
public ActionResult SaveEmployee(Employee e, string BtnSubmit)
{
    switch (BtnSubmit)
    {
        ...
Step 5 – Execute and Test
Press F5 and execute the application.
Here we complete our day 5. Day 6 will be the toughest and most interesting one. stay tuned J
Your comments, Mails always motivates us do more. Put your thoughts and comments below or send mail to SukeshMarla@Gmail.com
Connect us on Facebook, LinkedIn or twitter to stay updated about new releases.
For Offline Technical trainings in Mumbai visit StepByStepSchools.Net
For Online Trainings visit JustCompile.com or www.Sukesh-Marla.com
In case you want to start with MVC 5 start with the below video Learn MVC 5 in 2 days.


 General
  News
News  Suggestion
  Question
  Bug
Bug  Answer
  Joke
Joke  Praise
  Rant
Rant  Admin
Admin 


