Introduction
EF Power tools can be used to to autogenerate POCO classes in Visual Studio from an existing database. The tool also produces the DBContext and Code First mapping files.
Background
It can be time consuming to write POCO classes and the EF Code First mappings for a large database. During the development phase the database schema is likely to change on a regular basis. Demonstrating a quick way of producing the initial POCO class libary, and refreshing this library when the schema has changed, is the objective of this article.
Installation
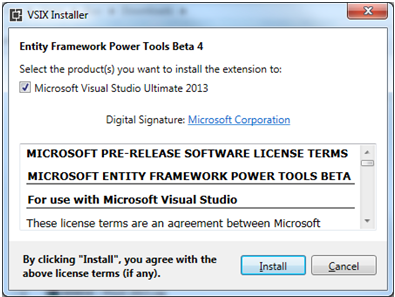
Download the tool and install by clicking on the EFPowerTools.vsix file. The installer window is shown as below. Click the Install button.
Once the installation is completed the window below instructs the user to close all instances of Visual Studio for the changes to take effect.

First Things
In order to demonstrate how to use the tool, I have created a solution in Visual Studio consisting of two projects.
The Client project is a console application which will be used to test the autogenerated code. The Models project is where the POCO classes and mapping files will be created. The Client project has a reference to the Models project.
The completed VS2013 Solution can be downloaded from the attached Zip file. , however for the purpose of this article we will create the two projects as shown in the screenshot above.
The following SQL Server database will be used, from which the POCO classes will be derived. The schema represents a list of users, groups, and permissions.
The table relationship is as follows:
- A User can belong to more than one Group
- A Group can have more than one User
- A Group can have more than one Permisson.
- A Permisson can be associated with more than one Group
In simple terms there is a many-to-many relationship between a User and a Group, which is implemented here using a linking table named UserGroup. Similarly, The GroupPermisison table is used to establish a mana-to-many relationship between the Group and Permisson tables.
The script for the creating this schema and the assoicated sample data is attached in the Zip file.
Running the EF power tool
In order to run the EF Power tool right-click on the Models project. Select Entity Framework. Select Reverse Engineer Code First.
Enter the name of Sql Server where the database has been created. Then key in the login information, and select the Users database from the dropdownlist. Click the Test Connection button. This should display a message to confirm the connection succeeded.
Finally, click the OK Button. This will start the process of generating the POCO classes within the Models project. Once it has completed, the Models project should contain the following files:
The POCO classes, DbContext, and Code First Mappings have been created in the project. The Class1.cs file is not required and can be deleted.
The Models project will fail to complile as it is missing some vital references for Entity Framework. Right-Click on the Models project and select Manage NuGet Packages. This will show the following window.
Using this window, install Entity Framework. If it does not appear on the list, please use the search text box on the right side to locate the NuGet package, and click Install. Once the files have installed, right click on the Models project and select the Build option. This should compile the class library without error.
The Models class library can now be used in the Client project for testing.
Using the code
In this section we will use the POCO library in the Client project in order to retrieve, update, and delete user data.
In order to use the POCO library it is necessary to install the Entity Framework in the Client Project. Right-click the project in Solution Explorer and select Manage NuGet Packages. Install Entity Framework as shown earlier for the Models project.
Next, return to the Models project and open the App.config file and locate the ConnectionString element shown below:
<connectionStrings>
	<add name="UsersContext" connectionString="Data Source=KUV-DESKTOP1\DEVSQL1;Initial Catalog=Users;
	Integrated Security=True;MultipleActiveResultSets=True" providerName="System.Data.SqlClient" />
</connectionStrings>
The Data Source should be poiting to your database. Copy this connectionstring to the App.config file of the Client project and place it after the configSections element. The App.config file in the Client Project should now resemble the xml below.
<?xml version="1.0" encoding="utf-8"?>
<configuration>
<configSections>
<!-- For more information on Entity Framework configuration,
visit http:
<section name="entityFramework"
type="System.Data.Entity.Internal.ConfigFile.EntityFrameworkSection,EntityFramework,
Version=6.0.0.0, Culture=neutral,
PublicKeyToken=b77a5c561934e089" requirePermission="false" />
</configSections>
<connectionStrings>
<add name="UsersContext" connectionString="Data Source=KUV-DESKTOP1\DEVSQL1;Initial
Catalog=Users;Integrated Security=True;MultipleActiveResultSets=True"providerName="System.Data.SqlClient" />
</connectionStrings>
<startup>
<supportedRuntime version="v4.0" sku=".NETFramework,Version=v4.5" />
</startup>
<entityFramework>
<defaultConnectionFactory type="System.Data.Entity.Infrastructure.SqlConnectionFactory,EntityFramework" />
<providers>
<provider invariantName="System.Data.SqlClient"
type="System.Data.Entity.SqlServer.SqlProviderServices, EntityFramework.SqlServer" />
</providers>
</entityFramework>
</configuration>
In order to use the POCO library we will create repositories for each of the models. The repository will be used to perform CRUD operations.
Create Repositories
This interface provides the methods for the CRUD operations and is created in the Client Project.
public interface IUserRepository
{
	bool Add(User user);
	void Delete(int ID);
	IEnumerable<User> GetAll();
	IEnumerable<User> GetAll(int? cuurentPage, int pageSize);
	User GetUser(int ID);
	void Save();
	bool Update(User user);
}
The code below implements the IUserRepository interface.
using System;
using System.Collections.Generic;
using System.Linq;
using System.Web;
using Models.Models;

namespace Client
{
    public class UserRepository : IUserRepository
    {
        private UsersContext dbContext = new UsersContext();

        public IEnumerable<User> GetAll()
        {
            var Users = from g in dbContext.Users
                             select g;
            return Users;
        }

        public IEnumerable<User> GetAll(int? currentPage, int pageSize)
        {
            var Users = dbContext.Users
                .OrderBy(u => u.Firstname)
                .Skip(((currentPage.HasValue ? currentPage.Value : 1) - 1) * pageSize)
                .Take(pageSize);
            return Users;
        }

        public User GetUser(int ID)
        {

            return dbContext.Users.FirstOrDefault(f => f.ID == ID);
        }

        public bool Add(User User)
        {
            dbContext.Users.Add(User);
            Save();
            return true;
        }

        public bool Update(User user)
        {
            var ExistingUser = dbContext.Users.FirstOrDefault(g => g.ID == user.ID);
            ExistingUser.Active = user.Active;
            ExistingUser.DateCreated = user.DateCreated;
            ExistingUser.Email = user.Email;
            ExistingUser.Firstname = user.Firstname;
            ExistingUser.Password = user.Password;
            ExistingUser.Surname = user.Surname;
            ExistingUser.Username = user.Username;

            Save();

            return true;
        }

        public void Delete(int ID)
        {
            dbContext.Users.Remove(dbContext.Users.Single(g => g.ID == ID));
            Save();
        }

        public void Save()
        {
            dbContext.SaveChanges();
        }
    }
}
The above class creates a dbContext object of type UserContext which is used to perform the CRUD operations.
The same pattern can be followed for creating repository classes for the remaining models i.e. UserGroup, Group, GroupPermisson, Permisson. In the attached code an additional property of GetByName has been added to the Group and Permission repositories.
Use Repositories
In the
program.cs file write the following code:
static void Main(string[] args)
{

    CreateUserAndAddToGroup_Test();
    ShowUserDetails();

    CreateGroup_Test();
    ShowGroupDetails();

    UpdateUser_Test();
    ShowUserDetails();

    Console.ReadKey();
}
Create a User and Add to an existing Group
The method implementation for CreateUserAndAddToGroup_Test is shown below:
private static void CreateUserAndAddToGroup_Test()
{
            IUserRepository userRep = new UserRepository();
            IGroupRepository groupRep = new GroupRepository();
            IUserGroupRepository userGroupRep = new UserGroupRepository();
 User newUser = new User()
            {
                Firstname = "Samuel",
                Surname = "Beckett",
                Username = "S.Becket",
                Email = "SBecket@hotmail.com",
                Password = "changeme",
                DateCreated = DateTime.Now,
                Active = true
            };
            userRep.Add(newUser);
Group adminGroup = groupRep.GetByName("Admin");
UserGroup userGroup1 = new UserGroup()
{
UserID = newUser.ID,
GroupID = adminGroup.ID,
DateCreated = DateTime.Now,
Active = true
};
userGroupRep.Add(userGroup1);
Group managerGroup = groupRep.GetByName("Manager");
UserGroup userGroup2 = new UserGroup()
{
UserID = newUser.ID,
GroupID = managerGroup.ID,
DateCreated = DateTime.Now,
Active = true
};
userGroupRep.Add(userGroup2);
}
The above code creates a new user and adds the user to the Admin and Manager groups.
We start by creating an object instance of the required repositories i.e. User, Group and UserGroup
IUserRepository userRep = new UserRepository();
IGroupRepository groupRep = new GroupRepository();
IUserGroupRepository userGroupRep = new UserGroupRepository();
Next, we create the user and save to the database.
User newUser = new User()
{
Firstname = "Samuel",
Surname = "Beckett",
Username = "S.Becket",
Email = "SBecket@hotmail.com",
Password = "changeme",
DateCreated = DateTime.Now,
Active = true
};
userRep.Add(newUser);
The new user is then added to the Admin Group. This is achieved by fetching the Group object for the Admin group in order to determine it's ID. A UserGroup
object instance is created, and the ID of the Admin Group, and the ID of the new user, are applied to the foreign key properties as show below.
Group adminGroup = groupRep.GetByName("Admin");
UserGroup userGroup1 = new UserGroup()
{
UserID = newUser.ID,
GroupID = adminGroup.ID,
DateCreated = DateTime.Now,
Active = true
};
userGroupRep.Add(userGroup1);
Similarly we add the new user to another group i..e Manager
Group managerGroup = groupRep.GetByName("Manager");
UserGroup userGroup2 = new UserGroup()
{
UserID = newUser.ID,
GroupID = managerGroup.ID,
DateCreated = DateTime.Now,
Active = true
};
userGroupRep.Add(userGroup2);
Get Users, Groups, and Permissons
In order to check that Samuel Beckett is created as a new user and belongs to the Admin and Manager groups, the ShowUserDetails method below has been written to display all users, the groups they belong to, and the permissons for each group.
private static void ShowUserDetails()
{
IUserRepository userRep = new UserRepository();
var users = userRep.GetAll();
foreach (User u in users)
{
Console.WriteLine("User: " + u.ID.ToString() + ',' + u.Firstname + ',' + u.Surname + ',' + u.Username + ',' + u.Password + ',' + u.Email);
foreach (UserGroup ug in u.UserGroups)
{
Console.WriteLine("\tGroup: " + ug.Group.Name);
foreach (GroupPermission gp in ug.Group.GroupPermissions)
{
Console.WriteLine("\t\tPermisson: " + gp.Permission.Name);
}
}
Console.WriteLine();
}
userRep = null;
}
Create a Group and Permisson
The CreateGroup_Test method below creates a new Group called HelpDesk. It then create a new permission named Search Users and applies this to the HelpDesk group. The code then obtains the permission object of an existing permission called View Users. It applies this permisson to the HelpDesk group. Therefore the new HelpDesk group is expected to have one new permission and one existing permission.
private static void CreateGroup_Test()
{
IPermissionRepository permRep = new PermissionRepository();
IGroupRepository groupRepository = new GroupRepository();
Group group = new Group()
{
Name = "HelpDesk",
Active = true,
DateCreated = DateTime.Now
};
groupRepository.Add(group);
IPermissionRepository permissionRepository = new PermissionRepository();
Permission perm = new Permission()
{
Name = "Search users",
Active = true,
DateCreated = DateTime.Now
};
permissionRepository.Add(perm);
IGroupPermissionRepository groupPermissionRepository = new GroupPermissionRepository();
GroupPermission groupPerm = new GroupPermission()
{
PermissionID = perm.ID,
GroupID = group.ID,
Active = true,
DateCreated = DateTime.Now
};
groupPermissionRepository.Add(groupPerm);
Permission viewUserPerm = permRep.GetByName("View users");
GroupPermission viewUserGroupPerm = new GroupPermission()
{
PermissionID = viewUserPerm.ID,
GroupID = group.ID,
Active = true,
DateCreated = DateTime.Now
};
groupPermissionRepository.Add(viewUserGroupPerm);
}
Get Group and Pemission Details
The GetGroupDetailsMethod lists all groups and the permisisons for each group. It can be used to check if the HelpDesk Group has been created with the correct permissions.
private static void ShowGroupDetails()
{
IGroupRepository groupRep = new GroupRepository();
IEnumerable<Group> groups = groupRep.GetAll();
foreach (Group g in groups)
{
Console.WriteLine("Group: " + g.ID.ToString() + ',' + g.Name + ',' + g.Active + ',' + g.DateCreated);
foreach (GroupPermission gp in g.GroupPermissions)
{
Console.WriteLine("\tPermission: " + gp.Permission.Name);
}
Console.WriteLine();
}
}
The relationship shown in the schema earlier is mapped as expected i.e. u.UserGroups provides a list of UserGroup objects foreach user. Each UserGroup object provides the Group object
and User object. From the Group object we can determine the actual name of the Group. The Group object also provides the GroupPermissions list, and from this we can determine the
details of each permisson for a group.
Update a User
In this example we shall change the password of an existing user.
        private static void UpdateUser_Test()
        {
            IUserRepository userRep = new UserRepository();
            User user = userRep.GetUser(8);
            user.Password = "iamchanged";
            userRep.Save();
        }
The above code gets an existing user with an ID of 8 i.e. Kuv Patel, and changes the password from changeme to iamchanged. When the method is executed, the outpout is:
Schema Change
During project development and subsequent maintenance the database schema is likely to change. More tables may be added, removed or renamed. Similarly a given table may have columns added, removed or renamed. New relationships may be created between tables, and existing ones dropped. Such changes to the schema will require the POCO library and mappings to be generated again.
This can be acheived by following these steps.
- Right-click on the Models project
- Select EntityFramework -> Revere Engineer Code First
- Select a Server where the Users database is
located - Select Log on Credentials
- Select Users Database
- Click OK
The existing files will be overwritten and any new files for new tables will also be added. This highlights the fact that the Models project in this example is purely for autogenerating code. If specific changes are made to the POCO classes by the developer, these will be overwritten the next time the library is regenerated. Therefore any bespoke changes to a POCO class should be placed in a partial class outside the Models folder of the Models project. If the client project is an MVC project a ViewModel class can be used to inherit from a POCO class,
which then adds additional Properties according to the needs of the View.
Points of Interest
1. When running the tool the following error may be shown:
System.Data.ProviderIncompatibleException: The provider did not return
a ProviderManifestToken string. --->
System.InvalidOperationException: This operation requires a connection
to the 'master' database. Unable to create a connection to the 'master'
database because the original database connection has been opened and
credentials have been removed from the connection string. Supply an
unopened connection. ---> System.Data.SqlClient.SqlException:
Login failed for user 'sa
This can be resolved by trying one of these methods:
- closing all open connections to the Users database i.e. close any open windows in SQL Server Management Studio
- select the Use Windows Authentication option in the connection properties window, and try again.
- select he advanced tab when connecting to the database and set
Perist Security Info to True as shown below:
2. POCO class not being created for a table.
The table must have a primary key otherwise the EF Power tool will not produce a POCO class.
History
v 1.0 - 11:44GMT 2015-07-23
Kuv Patel is a Senior Software Developer and Solutions Architect, specializing in .NET and Javascript frameworks development using MVC, ASP.NET, C#, WCF, Web API, Entity Framework, React, Angular.


 General
  News
News  Suggestion
  Question
  Bug
Bug  Answer
  Joke
Joke  Praise
  Rant
Rant  Admin
Admin 


