Introduction
This article is about a HID USB Stack for Microchip PIC 16F1455 and the way of communicating with it on Windows Platform.
Background
This is an expansion to my first Article: C# USB HID Interface with slight improvement on both the USB Stack and C# USB HID Device Classes.
The main inspiration for this was this post on Codewrite: USB interface using PIC16F1455 which makes entire problem of USB-ing with 16F1455 look easy, However it is based on a stack provided by Microchip which as we know is not free, it is tedious to read and takes by far too much memory (almost half of device).
This stack is free to use, as I wrote it mainly for educational purpose and it is by no means complete. It contains only whatever is necessary for communication as per examples further down in this article, and a lot of call-backs and other unnecessary bumf have been removed to improve the readability of the code for those, who are willing to learn about USB.
The major improvement is made to the Stack where entire functionality of the management of USB has been moved to work via Interrupts, leaving the actual program space to the programmer, without having to worry about the USB. In other words, you just do what you need to with your device as USB has been taken care of in the background.
This article covers the following:
- Creation of an USB HID Device based on PIC 16f1455
- Connecting to the device from windows via C#
- Sending Commands to the device
- Parsing those commands by the device and acting on them
- Sending Status or status changes by the device back to the host
- Parsing those statuses by the host and reflecting them on form in C#
Essentially we will create a device, a program in c# under visual studio and get those talking to each other.
This stack has been written under MPLAB-X 2.10 for Compiler XC8 v1.30 which was the latest at the time.
Without any further Ado, Download the following files
- 16F1455GenericHid.zip -> This is the MPLABX Project that you can build yourself
- 16F1455GenericHidHex.zip -> In case the build of above fails for some reason this is a built Hex
- USB16F1455HidTest.zip -> This is a Visual Studio Project for the Windows Side.
Using the code
First we will need a device to work with so I will start with the schematic:
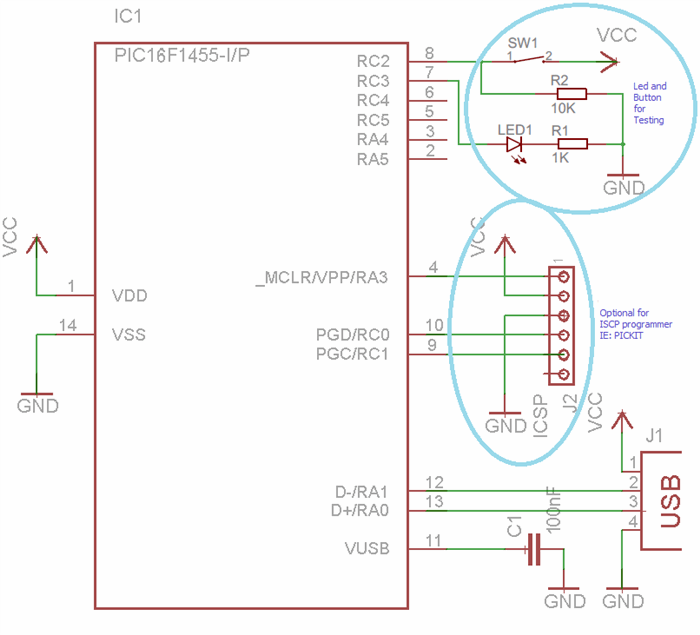
And the built prototype:

Apparently there should be a resistor between RA3 and VCC for programming but I have discovered that with PICKIT3 it actually works better without it.
Once you have it made it is time to build our stack and program it to the chip.
This is when I would like to point out that this Stack takes very little resources from the chip, compared to what Microchip has to offer:
When I first built it with microchip, both memory consumption indicators were at almost half...
After programming connect the USB cable to the computer.
Here are some screenshots of what happened on mine:
After having a look into the properties under device manager I have discovered this:
At this stage I knew we are ready to start talking to it.
Now on the host side fire up visual studio (express version is enough), load the project and build it. It only requires .net 2.0 so it is safe to assume that the framework is already installed on your machine, and it will build just fine. Once it is built, start it.
The two indicators on top left of the form show current status of the button and the led. If you press the button the status gets updated pretty much immediately. The "Get Status" button sends the first command to the device for it to resend its current status, like a manual refresh. The second button on the form toggles the led on or off depending on the current state. The "Clear" button clears the raw data boxes.
One thing I would like to point is that none of the buttons on this form have any control over the indicators. Those are driven purely by the PIC.
When you click the first button a "Get Status" command message is sent to the chip and the chip executes that command by reporting its current status back to the host, by sending a status message. Host upon reception of the status message updates both indicators on top left accordingly to the third and fourth byte in the received message.
The second button sends the "Toggle Led" command message to the PIC, which processes it in a similar way to the above with the difference of changing the state of the led before reporting status back to the host.
At this stage we have just went through a full cycle of communication between our device and the computer.
This is just a Generic device and thanks to HID this chip can become pretty much whatever we want like a Keyboard or Mouse. I have written the stack with this in mind, so it is time to demonstrate how to build Hybrid devices like a HID, Mouse and Keyboard on a single chip with proper implementation on both sides.
Continue to Part 2
Points of Interest
A small Tip...
As we know in today's environment a single 8 Byte message may not be enough for what we want to send in one go, so here is a tip:
In MPLABX open File "UsbDescriptors.h" and change the following line:
To:
This will increase the length of messages from 8 Bytes to 64. Bear in mind that longer message means bigger buffers and therefore more memory consumption:
Rebuild the MPLAB project and burn it to the chip. You don't need to do anything on the Visual studio side, as the message length is taken from the device, and the windows side automatically adjusts itself to what it is given.
Once burned start everything again and here is what I had:
From now on the messages flying between will be 64 Bytes Long and we achieved it by changing a single variable in the code.
So to wrap it up I hope you will find this useful, perhaps learn something from it and who knows what happens after.... Your imagination is the only limit :)
History
Not much in history but this is a second article of a kind. To have a look at the first one click here:
C# USB HID Interface
Thanks.
This member has not yet provided a Biography. Assume it's interesting and varied, and probably something to do with programming.


 General
  News
News  Suggestion
  Question
  Bug
Bug  Answer
  Joke
Joke  Praise
  Rant
Rant  Admin
Admin 


 .thanks for sharing your valuable article.


