Introduction
Note - Starting with a note about this article. Not too long ago, when David Hunt came up with a PiPhone, A GSM Phone built on Raspberry PI has inspired me in doing several things including a full blown VOIP communication. This article is not to mimic what he has done but instead we are building something that can be used for various purposes which you are going to see next.
http://techcrunch.com/2014/04/28/the-piphone-is-a-diy-cellphone-powered-by-raspberry-pi/
We are not going to reinvent the wheel but instead make use of suitable services for building a VOIP and SMS enabled service for IOT devices. I am going to consider Twilio provider but you may go with its competitors like Plivo and others. They should all work in a similar way.
In this article, I will be walking through the application completely developed using JavaFX on Windows platform and further optimized to run on Raspberry PI. Underlying, the VOIP communication happens completely behind the scene by utilizing Twilio API.
Here’s a little background on the need for implementing a Twilio client app. I was looking into and trying to understand Twilio, so that I can integrate the Voice and SMS capabilities to Internet of things application. Although, Twilio has provided enough information and libraries that one can use and simply build application, I had some difficulty in understanding the way it works without having hands on experience. I do agree the use cases mentioned in their website were useful and meaningful. However, it took me some time to dig into their documentation to know about the voice calling capabilities.
Twilio's documentation did some walkthrough about the application that one can develop and there were few code samples which were built using client-server side technologies like ASP.NET MVC, PHP, and Node JS etc. However there weren’t any standalone apps that were built for IOT devices.
As there is an increasing need and a rapid IOT development going on, I always used to think about building IOT apps that can interact with humans in various ways like messaging, voice. Companies like Twilio, are so dedicated in providing the backend solution which helps the IOT developers in building application by simply integrating the SDKs that Twilio is providing us.
Tools and Technologies
Let us discuss about the tools and technologies that we will be making use of in implementing the app.
The application is designed and developed using Java technology. Below are the tools that you need to install in order to build and deploy application on to Raspberry PI.
- NetBeans IDE 8.0 – An open source IDE for developing application. You can download from https://netbeans.org/downloads/ (Java SE should be sufficient)
- JavaFX Scene Builder 2.0 – Provides a graphical user interface for designing application UI. You can download the same from http://www.oracle.com/technetwork/java/javase/downloads/javafxscenebuilder-info-2157684.html
- Windows Azure Table storage.
- WebAPI hosted on Windows Azure.
Background
Here’s something that you may have to read through to understand the technologies that I will be making use of in implementing the Twilio Client App.
For JavaFX tutorials, I strongly recommend going through the below links
http://code.makery.ch/java/javafx-8-tutorial-intro/
http://code.makery.ch/blog/update-to-javafx-8-whats-new/
Here’s a useful utility that you can make use of to view contact details stored in Azure table storage.
https://azurestorageexplorer.codeplex.com
I would recommend going through the below link to understand how one can easily develop and deploy the application remotely on to Raspberry PI from NetBeans IDE 8.0.
https://www.youtube.com/watch?v=ebHbDlTnV-I#t=10
Let us have some basic understanding about Twilio. Twilio is a cloud communication company located at San Francisco, California. It allows one to programmatically make voice calls or send or receive SMS (also includes multimedia SMS) by simply using their libraries for various technologies.
You can make your web page as a phone and talk to your friends or order pizza or communication with IOT devices. The SMS feature can be built easily so that the IOT devices can either send or receive SMS to registered users. There is so much about Twilio and we will shortly see the real implementation of the same.
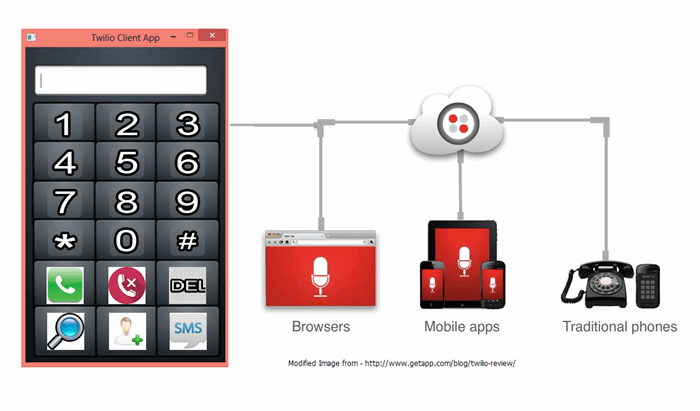
Below is the snapshot about the Twilio communication. It doesn’t matter what devices or platform with which you are making use of Twilio. Everything works right away because of the technology they are making use of. Twilio makes use of WebRTC technology when it comes to web browser for making or receiving calls.

Image source - http://www.getapp.com/blog/twilio-review/
As you think about it, as a developer or a client who implements solution doesn’t have to bother about how it internally works. But we as a developer must have some understanding in using their libraries.
Before getting started, one has to register with Twilio. Have an account loaded with money for Voice/SMS communication. Twilio provides a phone number that one can use for making or receiving phone calls or if you have one you can readily verify your number and can also use the same. But for SMS communication, it doesn’t work that way. The "from" number for sending SMS cannot be your phone number, so you need the Twilio phone number. More information about the Twilio vs verified number can be found in the below link
https://www.twilio.com/help/faq/phone-numbers/whats-the-difference-between-a-verified-phone-number-and-a-twilio-phone-number
When it comes with handling incoming calls or SMS, Twilio makes use of something called TwiML which is nothing but a markup language much similar to HTML which gets rendered in browsers. But with Twilio, it’s the TwiML gets rendered to the calling device. For more understanding about TwiML, you can refer the below link
https://www.twilio.com/docs/api/2008-08-01/twiml
Why NetBeans IDE?
One of the strong reasons, why I am using NetBeans than any other IDE’s is its light weight and easy to use. Also NetBeans 8.0 has a remote deployment feature, allows one to directly deploy the application executables to IOT devices. You could even use Eclipse, if you feel comfortable in working with it.
Why Java Technology?
When I was researching on how to use Azure services in Raspberry PI running on a Linux operating system, I could hardly find Mono C# based Azure libraries or SDKs. I was thinking of implementing something in Mono C# using Azure REST API, which was the last resort. When it comes developing something that can work in multiplatform, with a SOLID library and easy to use programming, I went ahead in building application using Java technology. That doesn’t mean I’m getting rid of other technology but I just thought to build something on my choice of programming.
I have to say one thing; the Azure support for Java is good to an extent that there is an official Azure Java library from Microsoft. You could even use other technologies like PHP or Node JS. However those were not my area of expertise and I did not want to take risk on those.
Setting up the development environment
Let us now install necessary software required for development.
Download and install NetBeans IDE 8.0 from the below link. For now, you can just select the Java SE option.
https://netbeans.org/downloads/
Download and install Oracle Screen Builder, We need the screen builder for designing user interfaces for our app.
http://www.oracle.com/technetwork/java/javase/downloads/javafxscenebuilder-info-2157684.html
We are using Raspberry PI as IOT device. Here’s the link helps in setting up Raspberry PI with Raspbian Wheezy Image.
http://www.oracle.com/webfolder/technetwork/tutorials/obe/java/RaspberryPiFX/raspberryfx.html
Let us now walk through the code sample so that you can have a real feel of how the voice and SMS communication can be done easily integrated into your application.
Our Twilio client app is a JavaFX based application developed purely using Java technology and Twilio Java library.
If you are new to JavaFX, you can read through the articles mentioned in the background section so that you can easily grasp through the code.
Here’s the snapshot of the application main screen. You can see below, the screen lets you key in the phone number and make a call or hang up the same. In addition to that, you can Search/Add contacts, send SMS etc.
At high level, the application consists of three packages. By default, the application follows the MVC (Model View and Controller) Architecture.
- TwilioClientRaspberryPI – This package has the most of the logic built in and covers majority of the application functionality.
- TwilioClientRaspberryPI.Graphics – This package holds all the graphics (PNG images) that we are using in our app.
- TwilioClientRaspberryPI.Config – This package has the config.properties, which is nothing but an application level configuration setting that we are using it for holding various information such as Twilio and Azure account key information. Also we have helper classes for reading the property file and returning an entity consisting of the application configuration settings.
Reading Application Configuration
Here’s the application configuration setting for our app.
# Application configuration settings

ACCOUNT_SID = <account_sid>
AUTH_TOKEN = <account_token>
VerifiedPhoneNumber = <verified_phone_number>
SMSFromNumber = <sms_from_number>
AccountName = <account_name>
AccountKey = <account_key>
VoiceURL = <voice_url>
Let us try to understand the mechanism of reading the config.properties application configuration file.
Below is the code snippet, contains logic for reading the config file as an Input stream and then use Properties class to load the same and iterate through and gather all the configuration information into a PropertyEntity so that we can return the same.
public class PropertyFileHelper {

    public PropertyEntity Read() {
        PropertyEntity propertyEntity = new PropertyEntity();
    Properties prop = new Properties();
    InputStream inputStream = null;

    try {

        String filename = "/twilioclientraspberrypi/config/Config.properties";
        inputStream = getClass().getResourceAsStream(filename);
        if (inputStream == null) {
            return propertyEntity;
        }

        prop.load(inputStream);

        Enumeration<?> e = prop.propertyNames();
        while (e.hasMoreElements()) {
            String key = (String) e.nextElement();
                        switch(key){
                            case "ACCOUNT_SID":
                                propertyEntity.setAccount_sid(prop.getProperty(key));
                                break;
                            case "AUTH_TOKEN":
                                propertyEntity.setAuth_token(prop.getProperty(key));
                                break;
                            case "AccountName":
                                propertyEntity.setAccount_name(prop.getProperty(key));
                                break;
                            case "AccountKey":
                                propertyEntity.setAccount_key(prop.getProperty(key));
                                break;
                            case "VerifiedPhoneNumber":
                                propertyEntity.setVerified_phone(prop.getProperty(key));
                                break;
                            case "VoiceURL":
                                propertyEntity.setVoice_url(prop.getProperty(key));
                                break;
                            case "SMSFromNumber":
                                propertyEntity.setSmsfrom_number(prop.getProperty(key));
                                break;
                            default: break;
                        }
        }

    } catch (IOException ex) {
        ex.printStackTrace();
    }
        return propertyEntity;
  }
}
Dial and Hang calls
Let us walk through the code to see how we can easily implement dialing and hanging the phone call.
Below is the code snippet for the same.
We are going to handle the call and hang up button click event and write some logic. Before we dive in, there’s something to understand. That is, the call gets initiated only if we implement and set the voice URL. The URL parameter that we are setting provides instructions for making the call. This is where TwiML comes into picture. When we are trying to initiate a call by making a call to create method of CallFactory, passing in the parameters To, From and the URL, will further make a web request passing in the source and target query string parameters.
We will be shortly seeing the WebAPI implementation which is responsible for initiating calls etc. Note – It doesn’t matter whether it’s a web service or anything else, all that matters is the URL that we are setting must provide a TwiML so that the Twilio parser can parse the same and take necessary actions.
Notice below, the CallFactory instance gets created based on the Account instance. The Account instance is created based on the TwilioRestClient instance; which requires a valid Twilio Account SID and Token values.
The call gets hung up by just making a one line call to hungup method of Call instance.
client = new TwilioRestClient(ACCOUNT_SID, AUTH_TOKEN);
mainAccount = client.getAccount();

btnCall.setGraphic(new ImageView(CallImg));
btnCall.setOnAction((ActionEvent e) -> {
final CallFactory callFactory = mainAccount.getCallFactory();
final Map<String, String> callParams = new HashMap<String, String>();

String number = String.format("%s%s", "+", txtPhoneNumber.getText());
String voiceUrl = String.format("%s?source=%s&target=%s",
                        propertyEntity.getVoice_url(), VerifiedPhoneNumber,
                        number);

callParams.put("To", number);
callParams.put("From", VerifiedPhoneNumber);
callParams.put("Url", voiceUrl);
try {
   call = callFactory.create(callParams);
} catch (TwilioRestException ex) {
   Logger.getLogger(MainScreenController.class.getName()).log(Level.SEVERE, null, ex);
}
});


btnEndCall.setGraphic(new ImageView(DeclineImg));
btnEndCall.setOnAction((ActionEvent e) -> {
     if(call != null)
         try
         {
            call.hangup();
         }
         catch (TwilioRestException ex) {

                Logger.getLogger(MainScreenController.class.getName()).log(Level.SEVERE, null, ex);

         }
});
Adding Contact Information
Here’s the snapshot of the application screen for adding contacts.
It’s time to see how to add contact information so that later on, it helps one to search and select phone number for making calls or view contact info etc.
In order to access the Azure table storage, we need to build a connection string with the protocol, account name and key so that the application can connect to the table storage and perform CRUD operation on the same.
storageConnectionString =
            "DefaultEndpointsProtocol=https;" +
            "AccountName=" + propertyEntity.getAccount_name() + ";" +
            "AccountKey=" + propertyEntity.getAccount_key();
Here we are using Windows Azure Table storage for managing contact details. First thing we have to do is make sure to create a table if not exists.
- Create a cloud storage account instance.
- Get the cloud table client instance based on the storage account instance.
- Create a new instance of cloud table with the table name and table client.
- Make a call to createIfNotExists method, which will either create a new cloud storage table if we don’t have one.
private void CreateTableIfNotExist()
{
try
{
CloudStorageAccount storageAccount =
CloudStorageAccount.parse(storageConnectionString);
CloudTableClient tableClient = storageAccount.createCloudTableClient();
CloudTable cloudTable = new CloudTable(tableName,tableClient);
cloudTable.createIfNotExists();
}
catch (Exception e)
{
e.printStackTrace();
}
}
Below is the code snippet which adds contact information. Here’s what we do.
- Create a cloud storage account instance.
- Get the cloud table client instance based on the storage account instance.
- Create a new instance of cloud table based on the specified table name.
- Create a new instance of ContactEntity by specifying "FirstName", "LastName" and then later set the email address and phone number.
- Get the TableOperation instance to either insert or replace the contact info.
- Finally make a call to execute method of CloudTable instance for inserting or replacing the contact details.
private void Add(){
try
{
CloudStorageAccount storageAccount =
CloudStorageAccount.parse(storageConnectionString);
CloudTableClient tableClient = storageAccount.createCloudTableClient();
CloudTable cloudTable = tableClient.getTableReference(tableName);
ContactEntity contact = new ContactEntity(txtFirstName.getText().toUpperCase(),
txtLastName.getText().toUpperCase());
contact.setEmail(txtEmail.getText());
contact.setPhoneNumber(txtPhoneNumber.getText());
TableOperation insertContact = TableOperation.insertOrReplace(contact);
cloudTable.execute(insertContact);
SetObservableCollection(contact);
lblInfo.setText("Saved Sucessfully!");
}
catch (Exception e)
{
e.printStackTrace();
lblInfo.setText(e.getMessage());
}
}
Fetch All Contact Information
Now let us walk through the code to fetch all contacts stored in Azure storage. Below is the code snippet for the same.
Here’s how it works.
- Create a cloud storage account instance.
- Get the cloud table client instance based on the storage account instance.
- Create a new instance of cloud table based on the specified table name.
- Next we will be constructing a table query without applying any filtering so that we gather all contacts.
- Then we execute the table query by making a call to execute method of CloudTable instance.
- Loop through and build an array list of contact entities to return.
private ArrayList<ContactEntity> FetchAll(){
ArrayList<ContactEntity> allContacts = new ArrayList<ContactEntity>();
try
{
CloudStorageAccount storageAccount =
CloudStorageAccount.parse(storageConnectionString);
CloudTableClient tableClient = storageAccount.createCloudTableClient();
CloudTable cloudTable = tableClient.getTableReference(tableName);
TableQuery<ContactEntity> partitionQuery = TableQuery.from(ContactEntity.class);
for (ContactEntity entity : cloudTable.execute(partitionQuery)) {
allContacts.add(entity);
}
}
catch (Exception e)
{
e.printStackTrace();
}
return allContacts;
}
Binding data to TableView
Now it’s time to see how the data binding is done. Below is the code snippet for reference. You can notice below, we are holding all the contacts in an ObservableList of type ContactEntityTableView.
ObservableList<ContactEntityTableView> contactData;
contactData = FXCollections.observableArrayList();
ArrayList<ContactEntity> allContacts = FetchAll();
allContacts.stream().forEach((contact) -> {
         SetObservableCollection(contact);
});
tableView.setItems(contactData);
The ContactEntityTableView is a specialized entity that we are using it to bind all contacts to Tableview control. Below is the code snippet for the same. Notice the usage of SimpleStringProperty that we are making use of. All the properties that we use with ObservableList must be defined with this type.
public class ContactEntityTableView {
    public SimpleStringProperty firstName = new SimpleStringProperty();
    public SimpleStringProperty lastName = new SimpleStringProperty();
    public SimpleStringProperty email = new SimpleStringProperty();
    public SimpleStringProperty phoneNumber = new SimpleStringProperty();

    public String getEmail() {
        return this.email.get();
    }

    public String getPhoneNumber() {
        return this.phoneNumber.get();
    }

    public String getFirstName() {
        return this.firstName.get();
    }

    public String getLastName() {
        return this.lastName.get();
    }
}
In the below code snippet, you can see how the ObservableList in built based on the ContactEntity.
private void SetObservableCollection(ContactEntity contact){
        ContactEntityTableView tableViewEntity = new ContactEntityTableView();
        tableViewEntity.firstName.set(contact.getFirstName());
        tableViewEntity.lastName.set(contact.getLastName());
        tableViewEntity.email.set(contact.getEmail());
        tableViewEntity.phoneNumber.set(contact.getPhoneNumber());
        contactData.add(tableViewEntity);
}
Sending SMS
There’s one important thing to understand when it comes to sending SMS using Twilio. You can only send SMS if you own a Twilio number or have to port one. That’s being said, you can’t use your Twilio verified number the way how we used for voice calling.
Getting a Twilio number is so easy but you they do charge minimum of 1$ per month.
Here’s the snapshot of the Send SMS screen.
Let us take a look into how to send an SMS. Below is the code snippet for the same.
- The first thing we need to do is create an instance of TwilioRestClient.
- Get an Account instance based on the above client instance.
- Get the SmsFactory instance based on the account instance.
- Create a list of NameValuePair type and add an instance of BasicNameValuePair type with the name as "To" and value as to phone number. Similarly we do the same for "from" phone number.
- By making a call to create method of SmsFactory instance with the list of NameValuePair instance, will trigger an SMS.
private void SendSMS(String from, String to, String message) {
if( !"".equals(from) && !"".equals(to) && !"".equals(message)){
TwilioRestClient client = new TwilioRestClient(ACCOUNT_SID, AUTH_TOKEN);
Account mainAccount = client.getAccount();
final SmsFactory messageFactory = mainAccount.getSmsFactory();
final List<NameValuePair> messageParams = new ArrayList<>();
messageParams.add(new BasicNameValuePair("To", from));
messageParams.add(new BasicNameValuePair("From", to));
messageParams.add(new BasicNameValuePair("Body", message));
try {
messageFactory.create((Map<String, String>) messageParams);
} catch (TwilioRestException ex) {
Logger.getLogger(SMSController.class.getName()).log(Level.SEVERE, null, ex);
}
}
}
Searching the saved contacts
Now we will be walking through the search contacts functionality. Previously, we have seen how the contacts are getting saved in Azure table storage. We are going to search contacts by Firstname and/or Lastname.
Here’s the snapshot of our search screen.
Below is the code snippet, were you can see the Search function accepting two parameters for firstname, lastname.
If you see the below code, there is a lot of similarity in what we did previously in fetching all contacts. But we are adding conditional filters for firstname, lastname and filter the same by executing the partition query against our table storage.
Notice below how we are building the search filter for PARTITION_KEY and ROW_KEY with the exact match for the names.
private ArrayList<ContactEntity> Search(String firstName, String lastName){
ArrayList<ContactEntity> allContacts = new ArrayList<>();
final String PARTITION_KEY = "PartitionKey";
final String ROW_KEY = "RowKey";
try
{
CloudStorageAccount storageAccount =
CloudStorageAccount.parse(storageConnectionString);
CloudTableClient tableClient = storageAccount.createCloudTableClient();
CloudTable cloudTable = tableClient.getTableReference(tableName);
String partitionFirstNameFilter = TableQuery.generateFilterCondition(
PARTITION_KEY,
TableQuery.QueryComparisons.EQUAL,
firstName);
String partitionLastNameFilter = TableQuery.generateFilterCondition(
ROW_KEY,
TableQuery.QueryComparisons.EQUAL,
lastName);
String sCombinedFilters = TableQuery.combineFilters(partitionFirstNameFilter,
Operators.AND, partitionLastNameFilter);
if(!"".equals(firstName) && "".equals(lastName)){
partitionQuery = TableQuery.from(ContactEntity.class)
.where(partitionFirstNameFilter);
}else if("".equals(firstName) && !"".equals(lastName)){
partitionQuery = TableQuery.from(ContactEntity.class)
.where(partitionLastNameFilter);
}
else{
partitionQuery = TableQuery.from(ContactEntity.class)
.where(sCombinedFilters);
}
if(partitionQuery != null){
for (ContactEntity entity : cloudTable.execute(partitionQuery)) {
allContacts.add(entity);
}
}
}
catch (Exception e)
{
e.printStackTrace();
}
return allContacts;
}
Coding the WebAPI
Note – Before we start, let me make it clear. It doesn’t have to be a WebAPI but I’m choosing because I could easily code with it. You could have gone with HTTP Handlers or any other service side technologies to return Twilio response.
As I have previously mentioned, when you are trying to initiate a call either by using Twilio verified number or an owned number, there is a URL parameter that we are setting. This URL is nothing but an address of the service which returns instructions to Twilio on what exactly it has to perform. Twilio has a parser for parsing the TwiML instructions. You can think about these instructions as command for Twilio.
Let us go one step at a time. We will be coding a very simple set of instruction. Below is the code snippet of an ApiController which implements an HTTP Post method, were you can see how we are building a TwilioResponse.
Note – You will have to Twilio libraries from Nuget package manager. Search for "Twilio" and install Twilio.Mvc and Twilio.TwiML.
public class CodeProjectDemoController : ApiController
{
        public HttpResponseMessage Post(VoiceRequest request)
        {
            var response = new TwilioResponse();

            response.Say("Welcome to CodeProject Twilio App. Please enter your 5 digit ID.");
            response.Gather(new { numDigits = 5 });

            return this.Request.CreateResponse(HttpStatusCode.OK, response.Element, new XmlMediaTypeFormatter());
        }
}
Twilio provides handful of useful instructions/commands that we can make use of. Here is the command set from Twilio documentation. For more details, you can refer the below link https://www.twilio.com/docs/api/twiml
- Say - Read text to the caller
- Play - Play an audio file for the caller
- Dial - Add another party to the call
- Record - Record the caller's voice
- Gather - Collect digits the caller types on their keypad
- Sms - Send an SMS message during a phone call
- Hangup - Hang up the call
- Queue - Add the caller to a queue of callers
- Redirect - Redirect call flow to a different TwiML document.
- Pause - Wait before executing more instructions
- Reject - Decline an incoming call without being billed.
You can see from the above code, we have used the "Say" and "Gather" commands and built a TwilioResponse. If we ever set the URL parameter to make use of CodeProjectDemoController, and try to make a call say with the "To" number as one of your phone number for testing then here’s what you would here.
"Welcome to CodeProject Twilio App. Please enter your 5 digit ID". It comes from the Say command. There is one more instruction for gathering the digits; it will take up to five digits as specified in the numDigits attribute of Gather command.
Now lets us see how to initiate a call when you wish to connect a phone with the source as your number as destination or target as your friends number. Below is the code snippet for the same.
Notice below, the usage of "Dial" command, we are going to dial the target phone number with the caller Id specified as a source phone number so that whoever receives the call will know exactly the person who is calling him/her.
We don’t have to worry about how the call gets connected from source to target, it’s all taken care by Twilio.
public class InitiateCallController : ApiController
{
        public HttpResponseMessage Get(string source, string target)
        {
            var response = new TwilioResponse();
            response.Dial(target, new { callerId = source });
            return this.Request.CreateResponse(HttpStatusCode.OK, response.Element,
                new XmlMediaTypeFormatter());
        }
}
Points of Interest
I was aware of Twilio and other service providers which work somewhat similar. But never got an opportunity to explore to an extent to integrate and build some useful stuff.
When I was working on this article, I happened to realize the full potential of using API’s for VOIP communication. It’s not about connecting calls between two or more peoples, there is much more than that say when it comes to application making a call back or even we can initiate a call and perform some operation as per the voice instructions and receive feedback based on the what we speak or key in the numbers. When I learnt that using Twilio, one could make the browser not just to make calls but also to receive, that is something amazing and you can think of the potential use cases where these API’s could be integrated in building applications that can interact with humans.
In Summary, all IOT devices should and must be capable of communicating and interacting with us.
References
This project reuses phone number icons from PiPhone project.
https://github.com/climberhunt/PiPhone/tree/master/icons
History
V1.0 - Published Initial version of the article dated 18 Feb 2015.


 General
  News
News  Suggestion
  Question
  Bug
Bug  Answer
  Joke
Joke  Praise
  Rant
Rant  Admin
Admin 


 Does it need any third-party library (omg, that is used by many people for implementing VoIP programs, e.g. a

