Introduction
This article is based on how to customize the Pager User Interface:
- In this article, I have tried to explain how to customize the Pager User Interface using some of the server controls.
- As per my experience, I have worked on the following scenarios while customizing the pager:
I will take a look at a few controls step by step, and see the difference in customizing the pager using each of them:
- CheckBoxList
- DropDownList
- Menu
- Buttons
- DataPager
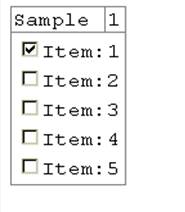
Checkbox List
- I have populated the checkbox list with the page indexes.
- On checking any of the items in the checkbox list, that corresponding page will be rendered showing the data item.
- In this example, I will be using a details view control.
- The code is as follows:
<asp:DetailsView ID="dv" AllowPaging="true" runat="server"
DataSourceID="sql"  OnDataBound="databound">
  <PagerTemplate>
           <asp:CheckBoxList ID="cbl" runat="server"  AutoPostBack="true"
           OnSelectedIndexChanged="changed" />
  </PagerTemplate>
</asp:DetailsView>

<asp:SqlDataSource ID="sql" runat="server"
ConnectionString="Data Source=.\SQLEXPRESS;
AttachDbFilename=E:\visual_projects\WebSite39\App_Data\Database.mdf;
Integrated Security=True;User Instance=True" SelectCommand="select * from Table2" />
The code behind is given below:
public void databound(object sender, EventArgs e)
{
    CheckBoxList cbl = (CheckBoxList)dv.BottomPagerRow.Cells[0].FindControl("cbl");

    for (int i = 0; i < dv.PageCount; i++)
    {
        ListItem item = new ListItem(string.Format("Item:{0}",i+1),i.ToString());
        if (dv.PageIndex == i)
          cbl.Items[i].Selected = true;
        cbl.Items.Add(item);
    }
}

public void changed(object sender, EventArgs e)
{
    CheckBoxList cbl = (CheckBoxList)dv.BottomPagerRow.Cells[0].FindControl("cbl");

    dv.PageIndex = cbl.SelectedIndex;
}
Output
- Please note that sample is the column.
- Item :1 etc. are the check box list items that you select to traverse to the desired page.
Dropdown List
- Now I will be using a
FormView control. - In this, please note the difference with the
DetailsView control. - There is not much difference in
PageCustomization, because in the previous I used a check box list and now I am using a Dropdownlist. - The only difference is the way we are rendering the items.
Here an item template is being used here:
Look at the code:
<asp:FormView ID="fv" runat="server"
DataSourceID="sql" OnDataBound="databound" AllowPaging="true">
 <ItemTemplate>
   <h1><%# Eval("Sample")%></h1>
 </ItemTemplate>
 <PagerTemplate>
     <asp:DropDownList ID="ddl" OnSelectedIndexChanged="changed" AutoPostBack="true" runat="server" />
 </PagerTemplate>
</asp:FormView>

<asp:SqlDataSource ID="sql" runat="server"
ConnectionString="Data Source=.\SQLEXPRESS;AttachDbFilename=E:\visual_projects\WebSite39\App_Data\Database.mdf;
Integrated Security=True;User Instance=True" SelectCommand="select * from Table2" />
The code behind is given below:
public void databound(object sender, EventArgs e)
{
    DropDownList ddl = (DropDownList)fv.BottomPagerRow.Cells[0].FindControl("ddl");

    for (int i = 0; i < fv.PageCount; i++)
    {
        ListItem item = new ListItem(string.Format("Item:{0}",i+1),i.ToString());
        if (fv.PageIndex == i)
            ddl.Items[i].Selected = true;
        ddl.Items.Add(item);
    }
}

public void changed(object sender, EventArgs e)
{
    DropDownList ddl = (DropDownList)fv.BottomPagerRow.Cells[0].FindControl("ddl");

    fv.PageIndex = ddl.SelectedIndex;
}
OUTPUT

- If you look at the above output, you will notice that I selected an item from the
dropdownlist. - That item got selected and is displayed.
- If you will see the code, you will notice that the "
autopostback" property is set to true. - If I don't set it to
true, the results won't be reflected.
If you notice, the code which I used for both the list controls to populate them with page number indexes is the same.
I am loading the list controls with page number indexes in the "RowDataBound" event.
If I select an item from the list, the item corresponding to that index is shown, why is that so?, because if you see the "changed" method(method corresponding to OnSelectedItemChanged event handler), you will observe that I am setting the pageindex of the formview to the selected item index.
DataPager
This control is used to provide paging to Listview. This is because list view inherently does not provide paging.
DataPager can be used with any control which implements the IPAGEABLEITEMCONTAINER interface. ListView is the one which implements this interface.
In the below section, I have defined a template pager where I have used 2 link buttons to traverse through the pages.
Please look at the code below:
<asp:ListView DataSourceID="sql" ID="lv" runat="server" >
      <LayoutTemplate>
        <ul>
          <asp:PlaceHolder ID="itemPlaceHolder" runat="server" />
        </ul>

          <asp:DataPager ID="pg" PageSize="1" runat="server">
           <Fields>
              <asp:TemplatePagerField Visible="true" OnPagerCommand="pager">
               <PagerTemplate>
                 <asp:LinkButton ID="lb1" Text="Previous" CommandName="Previous" runat="server" />
                 <asp:LinkButton ID="lb2" Text="Next" CommandName="Next" runat="server" />
               </PagerTemplate>
              </asp:TemplatePagerField>

           </Fields>
          </asp:DataPager>
      </LayoutTemplate>
      <ItemTemplate>
       <%# Eval("Column")%>
      </ItemTemplate>
    </asp:ListView>
The code behind is as follows:
This contains the event handler which handles the OnPagerCommands.
protected void pager(object sender, DataPagerCommandEventArgs e)
{
    e.NewMaximumRows = e.Item.Pager.MaximumRows;

    switch(e.CommandName)
    {
        case "Previous":
            if (e.Item.Pager.StartRowIndex > 0)
                e.NewStartRowIndex = e.Item.Pager.StartRowIndex - 1;
            break;

        case "Next":
            e.NewStartRowIndex = e.Item.Pager.StartRowIndex + 1;
            break;
    }
}
In the above code, I have:
- Every time when paging occurs, I have set the maximum rows to the pagers maximum rows. Hence the rows will always remain updated.
- Now if I select the previous page command, then I decrement
PagerRowIndex by 1.
Why by 1? Ok because if you notice that the page size set by me is = 1.
So every time I traverse by 1. If I give some random value, then an exception will occur.
- Similarly for the next page, I increment by 1.
Output

- In this, the numeric data being displayed is the database data.
- Here, I have placed two link buttons. These buttons help to navigate back and forth.
Finally, we will take a look into Menu Pager control:
Menu
I will do a customized paging in the gridview control.
Look at the code below:
<asp:GridView ID="gv" PageSize="3" OnDataBound="databound"
    runat="server" AllowPaging="true" DataSourceID="sql">
    <PagerTemplate>
       <table>
          <tr>
             <td>
                 <asp:LinkButton ID="lb1" Text="Previous"
                 CommandName="Page" CommandArgument="Prev" runat="server" />
              </td>
              <td>
               <asp:Menu ID="menupager" runat="server"
               Orientation="Horizontal"  OnMenuItemClick="menuclick" />
              </td>
              <td>
                 <asp:LinkButton ID="lb2" Text="Next" CommandName="Page"
                 CommandArgument="Next" runat="server" />
               </td>
          </tr>
       </table>
    </PagerTemplate>
   </asp:GridView>
Also look at the code behind:
protected void databound(object sender, EventArgs e)
{
    Menu menuPager = (Menu)gv.BottomPagerRow.FindControl("menuPager");
    for (int i = 0; i < gv.PageCount; i++)
    {

        MenuItem item = new MenuItem();
        item.Text = string.Format("", i + 1);
        item.Value = i.ToString();
        if (gv.PageIndex == i)
            item.Selected = true;
        menuPager.Items.Add(item);
    }
}

protected void menuclick(object sender, MenuEventArgs e)
{
    gv.PageIndex = Int32.Parse(e.Item.Value);
}
- If you take a note on the Data Bound event handler of the grid view, you will notice that the handling is the same as that of other list controls.
- When I click any menu item, I set the page index of the
GridView to that, which is current.
Output

Summary
From the above discussion, I have tried to cover a few things:
- How to customize the pager using list controls: For that, you need to do the following things:
- In the
RowDataBound of the control, fill the list control with the page numbers. - Then you need to set the index of the control to the current updated index.
- How to customize the pager using button controls:
- Above I have used
linkbutton, but you can do the same using any kind of button. - You can either specify the functionality of paging in the event handler of the button control or simply use the in-built commands.
- Customizing using a
DataPager control:
- The
listview control basically implements IPageableItemContainer interface, hence it can use a Datapager control, because inherently it does not support paging, you need to implement paging.
- Importance of
OnDataBound event:
- This event is raised when the database data is bound to the data control.
- If you notice in the
OnDataBound event of any control we have filled the page index in the list controls. - So I can say that during paging,
OnDatabound event can be used to load page index into the list control.
References
- ASP.NET unleashed by Stephen Walther
Born in India, have almost traveled around the country at an interval of every 2-3 years.
Now settled in a place where i am currently designated as a Senior Engineer :laugh.
My work experience lies in :
-> OS: VxWorks, WinCe, Windows
-> Languages : C,C#,Python
-> Application Development, Framework designing, Automation
_______________________________________________________________________________________
The real trouble with reality is that there's no background music.


 General
  News
News  Suggestion
  Question
  Bug
Bug  Answer
  Joke
Joke  Praise
  Rant
Rant  Admin
Admin 


 . The content is good. Helpful. For a beginner its a good article
 .
.