Contents
Introduction and Background
There is a plethora of resources that deal with auto incrementing build numbers and a wealth of plugins and other gizmos that manage assembly versioning. So why yet another article. The truth is that none of those options solved my problem. I needed something simple, easy to maintain and most importantly flexible with a local .NET flavour. So, naturally, I had to write my own humble solution.
One of the daunting tasks we often face when deploying assemblies is managing assembly and product versions. In any “decent” .NET solution, there is a need to auto-increment the version with every successful build. For example, incrementing the build part of the assembly version in this default scheme:
Major.Minor.Build.Revision
Sometimes, versioning requirements are more elaborate and demanding, we might want to append the build date as well as incrementing the build number, the version scheme might look like:
Major.Minor.Build.YYMMDD
For that purpose, I prefer using the AssemblyFileVersion instead of the AssemblyVersion. The former has an open format and can accommodate virtually any additional information, whereas the latter, AssmeblyVersion is intended for use by the .NET framework and enforces a strict numbering scheme that yields compiler errors if infracted.
[assembly: AssemblyVersion("4.0.*")]
[assembly: AssemblyFileVersion("4.0.20.110708")]
This article describes how to leverage MSBUILD to automate this process and include it in the continuous integration pipeline.
Tips for Managing Multiple assembly.cs Files
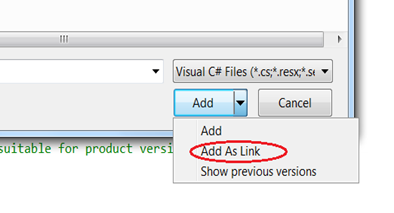
In a solution with multiple projects and corresponding multiple assembly.cs files where AssemblyVersion and AssemblyFileVersion are kept, it is better to have one such file shared amongst all assemblies. To achieve this, we use a very useful visual studio feature which is Adding Existing Items as Links.
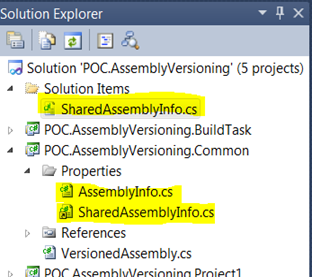
We use this technique to create one assembly information file to be shared amongst all the projects in the solution. This shared file will contain the AssemblyVersion and AssemblyFileVersion assembly attributes as well as any solution wide values, whereas the individual project level assembly.cs will contain project specific information such as:
using System.Reflection;
using System.Runtime.InteropServices;

[assembly: AssemblyTitle("POC.AssemblyVersioning.Common")]
[assembly: AssemblyCulture("")]

[assembly: Guid("bdf2e8b4-41aa-4569-b093-987439090dea")]
And here is how the solution structure will look like with the proposed scheme implemented... all for the sole purpose of facilitating modifying assembly version automatically.
And now to the more interesting part.
Building Custom MSBUILD Tasks
The reason why I prefer to use custom tasks in build automation as opposed to other scripting solutions is the glaring fact that Build Tasks are plain C# classes, where you can use the goodies that the .NET framework offers. To create a Build Task, all you have to do is:
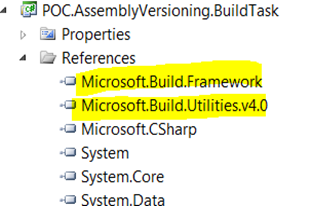
- Add references to the required .NET assemblies
Create a class that extends Microsoft.Build.Utilities.Task:
public class MyTask : Task
{
public override bool Execute()
{
throw new NotImplementedException();
}
}
Add a reference to the custom task inside a msbuild compliant file. Any XML file that references the following namespace http://schemas.microsoft.com/developer/msbuild/2003 is a valid msbuild file. Here is a sample file that references a custom task:
="1.0"="utf-8"
<Project ToolsVersion="4.0" DefaultTargets="IncrementBuild"
xmlns="http://schemas.microsoft.com/developer/msbuild/2003">
<UsingTask AssemblyFile="bin\debug\POC.AssemblyVersioning.BuildTask.dll"
TaskName="AutoIncrementTask" />
<Target Name="IncrementBuild">
<AutoIncrementTask AssemblyInfoPath="..\SharedAssemblyInfo.cs" />
</Target>
</Project>
And to simply invoke this task from a command line, we use this familiar syntax, assuming that the msbuild file was saved as sample.proj.
msbuild sample.proj /t:AutoIncrement
Putting It All Together!
After having acquainted ourselves with MSBUILD tasks and thought about having one shared assembly file info that hosts the AssemblyVersion and AssemblyFileVersion attributes, I introduce here a simple way to go about updating those attributes through this simple custom task.
The task is based on file I/O where the contents of the shared assembly info will be parsed, the attributes updated and incremented (or transformed to the desired format) and the content re-written back to the file.
Here is the source code for the simple build tasks that will perform the file manipulation. This is for illustration purposes and intended only as a guide to creating your own build task.
I encourage you to.
public class AutoIncrementTask : Task
{
    private const string VersionPattern =
	@"\[assembly: AssemblyFileVersion\(\""(\d{1}).(\d{1}).(\d{1,}).(\d{6})""\)\]";
    public string AssemblyInfoPath { get; set; }

    public override bool Execute()
    {
        try
        {
            if (String.IsNullOrEmpty(AssemblyInfoPath))
                throw new ArgumentException("AssemblyInfoPath must have a value");

            string[] content = File.ReadAllLines(AssemblyInfoPath, Encoding.Default);
            var rx = new Regex(VersionPattern);

            var newContent = new List<string>();
            content.ToList().ForEach(line =>
                                            {
                                                if (rx.IsMatch(line))
                                                    line = VersionMatcher(rx.Match(line));
                                                newContent.Add(line);
                                            });

            File.WriteAllLines(AssemblyInfoPath, newContent);

        }
        catch(Exception ex)
        {
            Console.Out.WriteLine(ex);
            return false;
        }

        return true;
    }

    private string VersionMatcher(Match match)
    {
        int major = int.Parse(match.Groups[1].Value);
        int minor = int.Parse(match.Groups[2].Value);
        int build = int.Parse(match.Groups[3].Value);
        string revision = match.Groups[4].Value;

        Console.WriteLine("AutoIncrement Assembly {0}",
			Path.GetFileName(AssemblyInfoPath));
        Console.WriteLine("Current matched version: {0}.{1}.{2}.{3}",
			major, minor, build, revision);

        ++build;
        revision = String.Format("{0}{1:d2}{2:d2}",
            DateTime.Now.Year.ToString().Substring(2),
            DateTime.Today.Month,
            DateTime.Today.Day);
        Console.WriteLine("Incremented to version: {0}.{1}.{2}.{3}",
			major, minor, build, revision);

        string result = match.Result
			("[assembly: AssemblyFileVersion(\"$1.$2.{0}.{1}\")]");
        return String.Format(result, build, revision);
    }
}
And here is the corresponding XML MSBUILD file:
="1.0"="utf-8"
<Project ToolsVersion="4.0" DefaultTargets="IncrementBuild"
xmlns="http://schemas.microsoft.com/developer/msbuild/2003">
<UsingTask AssemblyFile="PATH_TO_TASK_DLL" TaskName="AutoIncrementTask" />
<Target Name="IncrementBuild">
<AutoIncrementTask AssemblyInfoPath="..\SharedAssemblyInfo.cs" />
</Target>
</Project>
As you can see, I chose the AssemblyFileVersion as the target for custom product and assembly versioning because there are no compile time checks on the format of the version and because a product version is more end-user and business-stakeholder friendly than the automatic build numbers used internally by the .NET framework.
You can include the previous build task as a step in the build process capitalizing on the MSBUILD command line capabilities.
Sample Code
I include a sample Visual Studio 2010 solution (.NET 4.0) that contains the code for the custom build task, and dummy projects to demonstrate the solution structure when implementing the shared assembly file:
History
- Aug 7th, 2011, Originally published on my blog C# | B# | Stay#
- Oct 22nd, 2011, Revised for CodeProject


 General
  News
News  Suggestion
  Question
  Bug
Bug  Answer
  Joke
Joke  Praise
  Rant
Rant  Admin
Admin 


