Introduction
This article explains how we can do automated penetration testing in the Microsoft stack using OWASP ZAP in combination with Team Foundation Server (TFS) and C#. As a final result will have TFS builds running penetration tests against websites of our choice.
Background
In a project I'm involved with there was the idea to create a night build that runs penetration tests across a range of sites. I started investigating penetration testing tools and found a large number of them, free and commercial. You can get an idea of what's out there in this page.
I decided to use ZAP because it's open source, it's being actively maintained, it finds the majority of problems we may encounter and it has an API we can hook into. For sure is better than what we started with, which was nothing.
10.000 feet view
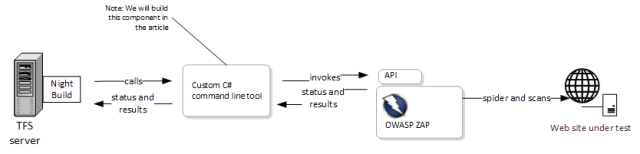
At a high level the idea is to create a command line tool that interacts with ZAP and reports the result of the interaction to the build server. The main steps are:
- The TFS build server calls the command line tool providing the URL to be scanned
- The command line tool connects to the ZAP API and starts the scan
- The command line tool queries the status of the scan process until it is finished
- The command line tool queries the scan results, aggregates them and returns them to the build, so that the build can output them.
Setting it up
There are a couple of things needed to get this going:
- ZAP. You can download it from the official page
- The command line tool. It can be downloaded from this article or it can be obtained from GitHub
- A TFS server, that we'll assume is already in place. If it's not, there is plenty of information out there about how to install and configure TFS. When it's installed and running we'll need to customize a build definition to make it invoke the command line tool
ZAP
"The OWASP Zed Attack Proxy (ZAP) is an easy to use integrated penetration testing tool for finding vulnerabilities in web applications.
It is designed to be used by people with a wide range of security experience and as such is ideal for developers and functional testers who are new to penetration testing as well as being a useful addition to an experienced pen testers toolbox." (source)
You can download it from the official page. You should take some time familiarizing yourself with the tool. The website contains helpful information that should be enough to get you going. After you have read and understood how ZAP works, you are ready to do the only configuration change needed for this project.
The first thing to do is to install ZAP. I installed it in the build server but it can be installed separately.
In ZAP, go to Tools -> Options -> Local proxy and set the address and port you want the proxy to be set up in. In my case I configured it to run in address localhost (because I want ZAP and TFS to run in the same server, otherwise I would have specified myServerName) and in port 8090.

When this is done you should be able to access the ZAP Proxy through your browser by accessing http://localhost:8090. If the proxy is running you should see a page that resembles the following:
And that is it. ZAP is running and its API is accessible to our command line tool.
Command line tool
You should deploy this tool somewhere in your build server so that TFS can reach it. You can get the source code from the file ZAPPenTester.zip attached to this article, which also includes the compiled files that you can copy into a directory on the TFS server.
Before you can run the tool you should edit the file ZAPPenTester.exe.config. This file contains the configuration settings that are needed in order to run the application.
Special attention for the following settings:
- ZapStartFile: This should point at the exe file of ZAP. The command line tool will use this file path to open ZAP before connecting to the API
- ZapWorkingDirectory: This should point at the folder where the ZAP exe file is located
- ZapProxy: This should point to the proxy URL that you configured in the previous step. The command line tool will use it when making requests to the site you want to scan.
The remaining settings can be left untouched. They specify the endpoints in which the API is running.
With the command line tool deployed and the settings adjusted you should able to run it and get your first results. Exciting! Open a command line window and run the tool passing in the URL you want to scan as a parameter. Example: "c:\<SomeFolderPath>\ZAPPenTester.exe http://www.mysitetotest.com".
As you can see the tool reports the progress of the scan. It first starts the ZAP spider, which tries to find all the pages of the website and, when that has completed, starts the scan of the pages identified by the spider. When the scan completes it shows a summary of the problems found.
The output of the tool, as seen in the image above, is going to be displayed in the TFS build log.
Next up, we have to connect a TFS build to this tool.
TFS Server
In my scenario I just want the build to run the penetration tests of a specific site, nothing else. I don't want it to do code compilation neither I want it to do deployments because we already have continuous integration builds that do compilation and deployment. We then schedule the new penetration testing build(s) to run every night.
Assuming you already have a TFS Server in place you just have to create a new build (you can also reuse an existing build) and assign to it a build definition that runs the command line tool.
I started by creating a copy of an existing Build Definition as the starting point for my new definition. After that I edited the newly created build definition, using Visual Studio 2013. As I don't want to compile code, run tests, deploy, ..., I deleted all content of the build template except the main Sequence step.
For now ignore the inner activity, adding it will be our next action.
Having an empty build we want to add an activity that calls the command line tool. For this, go to the Visual Studio Toolbox and drag an InvokeProcess activity into the main Sequence activity. You should also drag a WriteBuildMessage activity into the Handle Standard Output section of the InvokeProcess activity and a WriteBuildError activity into the Handle Error Output section. Your definition should look similar to the one in the image below.
Next, we want to create a way to pass the URL to scan from the build to the command line tool. This way we can create one build per site to be tested and we have a command line tool that is generic and can scan whatever site it's instructed to scan.
In the bottom of the build definition you can see there tabs: Variables, Arguments and Imports. We are going to create a new argument called UrlToScan, with direction In and of type String. This will enable us to share this template among all the penetration testing builds by having the build itself providing the value for this argument. We'll get to this part. For now just create a new argument.
Now we have to tell the InvokeProcess activity what to do. Right-click the activity and go to the properties. The following properties should be set:
- Arguments: [UrlToScan], which is the name of the custom argument we created above
- Display Name: You can give a nicer name to the InvokeProcess activity
- Filename: "FilePath\ZAPPenTester.exe", basically the file system path of the command line tool in your TFS server
To finalize our changes to the build definition we need to change the properties of the WriteBuildMessage activity and of the WriteBuildError. Open the properties of WriteBuildMessage and set the property Message to value stdOutput. Open the properties of WriteBuildError and set the property Message to value errOutput.
And we are ready with the Build Definition! Just save it and check it in to TFS. This is important, if you don't check in the build definition it won't be picked up by the build server.
To finalize the build, two small steps still have to be taken. First make sure your build is using the new Build Definition. And finally, make sure to pass the web site URL to be scanned in the argument UrlToScan created above.
At this point the build should be ready and we can run it. As a result we get a nice log of what the tool did during the scan.
And that's it. We managed to create a TFS build that reports security problems found in a website.
Implementation of the command line tool
The source code can be downloaded from this article and is also in GitHub.
The command line tool created to connect to the ZAP API is a C# application developed using Visual Studio 2013. Its goal is to connect to the ZAP API, instruct ZAP to run the scan and report the alerts detected.
When ZAP starts it also starts the API. We can then do operations such as starting the spider, checking the spider status, start the scanner, check the scanner status, get the list of alerts reported. We can choose to get responses from the API in three different formats: Json, which is the one the tool uses; Xml and Html. You can check the full API by accessing http://zap, provided ZAP is running and configured. You can get more information about the API in the official website.
The Visual Studio 2013 solution contains two projects: one is the tool itself, the other is a set of unit tests.
There are several objects that make the core of the application. The diagram below shows how the system is composed and which input/output is expected for each component.
Main application's functionality
The application works in 5 stages:
- Open ZAP;
- Instruct ZAP to scan the target website. This is internally a two stage process, first spidering the website and then scanning the pages found during the spider stage;
- Request the alerts found during the scan;
- Close ZAP;
- Aggregate the alert data and output it.
var zap = ZapFactory.Create();

zap.Open();
zap.Scan(urlToScan);
Report report = zap.GetReport(urlToScan);
zap.Close();

new CommandLineReportPrinter().Print(report);
Opening ZAP
Opening ZAP means launching the zap.exe application. When the application starts the proxy is also started and our tool can start making requests.
public void Open()
{
    logger.Log("Opening ZAP");
    process = new Process
    {
        StartInfo =
        {
            FileName = settings.ZapStartFile,
            WorkingDirectory = settings.ZapWorkingDirectory,
            Arguments = "-daemon"
        }
    };

    process.Start();
    process.WaitForExit();

    Thread.Sleep(sleepTimeBetweenRequests);
}
There is nothing special going on here. We just launch a new process that will run ZAP and we give it some time to let ZAP open, which usually takes 5-10 seconds.
Two remarks though:
- It's important to set the WorkingDirectory property, otherwise ZAP won't run. I set it to the path where the zap .exe is located;
- The argument -daemon instructs ZAP to run without the UI. If we look into the task manager we can see a process named javaw when ZAP is running.
Making requests to the API
The console application makes requests to the API's Json endpoints.
public string MakeHttpRequest(string url, HttpResponseType requestResponseType)
{
    HttpClient client = PrepareHttpClient(requestResponseType);
    HttpResponseMessage response = client.GetAsync(url).Result;

    if (response.IsSuccessStatusCode)
    {
        return response.Content.ReadAsStringAsync().Result;
    }

    return null;
}

private HttpClient PrepareHttpClient(HttpResponseType httpResponseType)
{
    var httpClientHandler = new HttpClientHandler
    {
        Proxy = new WebProxy(settings.ZapProxy, false, new string[] { }),
        UseProxy = true
    };

    var client = new HttpClient(httpClientHandler);
    client.DefaultRequestHeaders.Accept.Add(new MediaTypeWithQualityHeaderValue("application/" + httpResponseType.ToString()));

    return client;
}
We start by preparing an HttpClient object that is configured to use ZAP's proxy and expects responses of a certain type, in the case of this implementation Json. Then we use that object to make the request and return the result.
Scanning
As mentioned above, scanning is a two stage process. First we have to start ZAP's spider and, when that completes, we start the scanner.
public void Scan(string urlToScan)
{
    if (!spider.Start(urlToScan))
    {
        return;
    }

    do
    {
        Thread.Sleep(sleepTimeBetweenRequests);
    }
    while (!spider.HasCompleted());

    if (!scanner.Scan(urlToScan))
    {
        return;
    }

    do
    {
        Thread.Sleep(sleepTimeBetweenRequests);
    }
    while (!scanner.HasCompleted());

    logger.Log("Scan complete");
}
We start the spider and while it's not completed, we keep checking the status. When the spider completes we start the scanner and wait until it completes. When this operation is concluded ZAP should have finished scanning and a list of alerts is then available for retrieval.
Reporting
When the scan has completed we can request the list of alerts from ZAP.
public Report GetReport(string url)
{
    logger.Log("Preparing report");

    string response = httpClientHelper.MakeHttpRequest(settings.ZapReportUrl, HttpResponseType.xml);

    if (response != null)
    {
        XDocument document = XDocument.Parse(response);

        IEnumerable<XElement> elements = document.Element("OWASPZAPReport").Elements("site").Where(e => e.Attribute("host").Value == new Uri(url).Host);

        var issues = new List<Issue>();
        foreach(XElement element in elements)
        {
            issues.AddRange(
                from e in element.Descendants("alertitem")
                select new Issue
                {
                    IssueDescription = e.Element("alert").Value,
                    RiskDescription = e.Element("riskdesc").Value,
                    TargetUrl = e.Element("uri").Value,
                    OriginalSiteUrl = element.Attribute("name").Value
                });
        }

        return new Report { Issues = issues };
    }

    return null;
}
This method looks a bit more complex but its responsibility is simple. It makes a request to the API, gets the list of alerts in XML format (I didn't see an endpoint for Json) and converts those alerts into C# objects. When the method completes we have a list of errors that will be subsequently aggregated.
public IEnumerable<IssueGrouped> AggregateReport(Report report)
{
    if (report != null)
    {
        return from issue in report.Issues
                group issue by new { issue.IssueDescription, issue.RiskDescription } into groupedIssue
                select new IssueGrouped
                {
                    IssueDescription = groupedIssue.Key.IssueDescription,
                    RiskDescription = groupedIssue.Key.RiskDescription,
                    IssueCount = groupedIssue.Count()
                };
    }

    return null;
}
This method aggregates all the occurrences of the same problem into one item with the count of times the problem occurred.
At this point the alert data is ready to be printed to the console.
Future enhancements
At the moment the console application cannot spider areas of websites that have Forms Authentication enabled. ZAP supports it and the API also supports it therefore it should be possible to automate the authentication and let the spider find pages inside secured areas. More information on this topic can be found in the official website.
Conclusion
ZAP has a small learning curve that is easy to take by reading the documentation in the website.
The API is also straightforward and gives access to most of the functionality ZAP provides. For the purpose of this article there was no functionality missing in the API.
Our goal of having TFS running penetration tests on our websites was achieved.
I hope ZAP continues to grow and I'm looking forward to add more functionality to this tool.
Acknowledgements
I would like to thank Patrick Kalkman (code project profile, twitter) for the code reviews performed and for helping overcoming some obstacles.
I would also like to thank Simon Bennetts (twitter) for the time he took to help me with a problem and for his contribution to open source community, particularly for leading the ZAP project.
I'm a Portuguese software engineer living in The Netherlands and working for HintTech BV


 General
  News
News  Suggestion
  Question
  Bug
Bug  Answer
  Joke
Joke  Praise
  Rant
Rant  Admin
Admin 


