Introduction
In this article, we will learn how to achieve CRUD operations in ASP.NET MVC4 using Partial Views and jQueryUI. We will make Ajax call to the server to access partial view which are used for creating, editing and deleting training. We will call controller action methods with the help of jQuery $.ajax(). For the sake of convenience, XML file is used as a database. In this article series, you will learn:
- What is Partial View
- How to use jQueryUI methods to create controls
- How to access data from XML files
- How to create Partial View
- How to use Partial View
- How to use jQueryUI methods
- How to use jQuery Ajax method to call the appropriate action method
Note: I have tested code using Google Chrome as browser, for other browsers Edit popup (explained in part 2 of this article) may not work pleasantly.
To keep the size of article reasonable, this article is divided into two parts.
Part 1 Outline
- Overview of Partial View and jQueryUI
- Creating ASP.NET MVC 4 Application
- Creating XML File as DB and Training Repository
- Implement Action method and View
- Implement Create Operation
- Implement Edit Operation
- Implement Delete Operation
Let’s start with Part 1 here. First a few basics...
Overview of Partial View and jQueryUI
Partial View
Partial view allows us to use the same code using Razor and HTML tags in multiple pages in the application. Partial view is good to use where you need to use the same code on more than one view. We know if we need to display something in all pages, it is better to put it in layout pages of MVC application. In ASP.NET Web Form, we have master page to define the core layout shared by all other pages. But if you want to add some functionality not to all, but only to few pages, then partial view is the right option. For example, functionalities like create product, edit product, etc.
Here in the code example, we are using partial views for create, edit and delete forms for training. In standard ASP.NET MVC project templates, partial view can be added to any folder inside the Views folder but those partial views cannot be used by the views outside the folder. For example, if you add a partial view to Home folder, it can be used only by the views inside the Home folder. If we add partial view to Shared folder which is not associated to any controller and those can be used in any view in the whole application, it increases the reusability of code to a great extent.
jQueryUI
jQueryUI extends the underlying jQuery library to provide a collection of rich and interactive widgets built to enhance the user interfaces of web applications. It's the official UI library for jQuery. By default, jQueryUI comes with Visual Studio 2012. If you are using Visual Studio 2012, you will get all required jQueryUI libraries in Scripts folder and required CSS files in content folder. If you are not using Visual Studio 2012, you have to add jQueryUI libraries and CSS file by yourself. You can download jQueryUI package from here.
Note: We assume you have downloaded the attached sample code having the running project. If not, please do so as we are not providing the screen shots for all code here. Let us start with creating a demo application to achieve CRUD operations for training.
Creating ASP.NET MVC 4 Application
- Let us create a sample application by selecting ASP.NET MVC4 Web Application template and give it project name as
CRUDWithAjax and click ok.
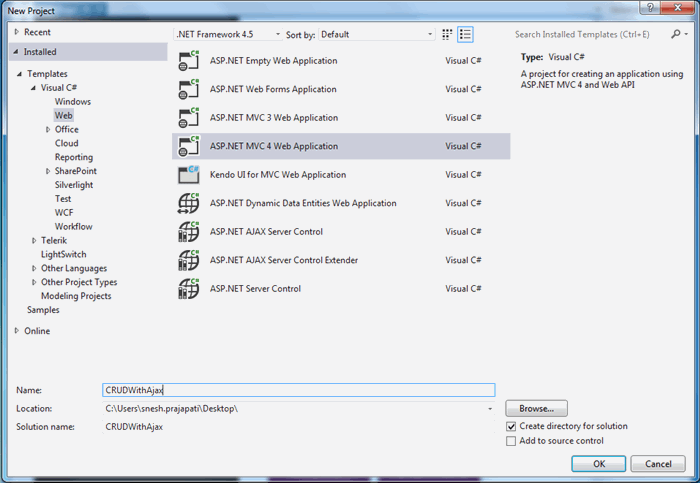
- Select a template as Basic Application. Visual Studio 2012 adds a
CRUDWithAjax project in the solution as shown below in the screenshot:

- Expand Content and Scripts folder. You will get all required jQuery, jQueryUI libraries and all CSS files in Content folder as shown below:
As a good practice, we should not include the files which we are not using in the application. So let’s remove unnecessary files from Scripts and Content folder. Look into the below screenshot what we need and remove all other files in Scripts and Content folder.
- Open App_Start folder. Remove WebApiConfig.cs from this folder since we are not doing anything related with WebApi in this application.
- Open BundleConfig.cs file and remove unnecessary code from this file. Now code looks as given below:
public static void RegisterBundles(BundleCollection bundles)
{
    bundles.Add(new ScriptBundle("~/bundles/jquery").Include(
                "~/Scripts/jquery-{version}.js"));

    bundles.Add(new ScriptBundle("~/bundles/jqueryui").Include(
                "~/Scripts/jquery-ui-{version}.js"));

    bundles.Add(new StyleBundle("~/Content/css").Include("~/Content/site.css"));
    bundles.Add(new StyleBundle("~/Content/themes/base/css").Include(
                "~/Content/themes/base/jquery-ui.css"
                ));
}
Creating XML File as DB and Training Repository
- Add Training.cs, ITrainingRepository.cs and TrainingRepository.cs file under Models folder. Write code as written in downloaded files.
Training.cs file has the properties of Training entity.
ITrainingRepository is an interface that has methods which we will need to perform CRUD operation.
We need to implement those methods in TrainingRepository.cs file. Inside the constructor of TrainingRepository.cs file, path is given to Trainings.xml physical location. Here, Trainings.xml is working as a database. - Add Trainings.xml file to App_Data folder as shown below:
Add data to Tranings.xml file as given in the downloaded code. Sample data is shown below:
Implement Action Method and View
- Add a controller by right clicking on Controller folder, give it name as
Home. Create the instance of TrainingRepository class and use this object to perform CRUD operations. - In HomeController.cs file, add the following code in
Index action method to return Index view filled with trainings.
public ActionResult Index()
{
    List<Training> allTrainings = _trainingRepository.GetTrainings().ToList();
    return View(alltrainings);
}
- Add a view by right clicking on
Index() action method, Index.cshtml file is being added to Views -> Home folder. To display our trainings on Index.cshtml file, write the following code:
@model <IEnumerable<CRUDWithAjax.Models.Training>

<html>
<head>
    <title></title>
    <script src="~/Scripts/appjs/jquery.timepicker.min.js"></script>
    <link href="~/Content/appcss/custom-style.css" rel="stylesheet" />
    <link href="~/Content/appcss/jquery.timepicker.css" rel="stylesheet" />
</head>
<body>
    <div  class="pageHeader" >
       <h2>Manage Trainings</h2>
    </div>
    <table id="tbltraining" class="tblStyle">
        <tr  class="tblHearerRow">
            <th class="tblHearerCell" >Name
            </th>
            <th class="tblHearerCell">Instructor
            </th>
            <th class="tblHearerCell">Star tDate
            </th>
            <th class="tblHearerCell">End Date
            </th>
            <th class="tblHearerCell">Start Time
            </th>
            <th class="tblHearerCell">Duration
            </th>
            <th class="tblHearerCell">Actions
            </th>
        </tr>
        @foreach (var item in Model)
        {
            <tr class="tblRow">
                <td id="itemId" class="itemIdClass tblColumn">
                    @Html.TextBoxFor(modelItem => item.ID)
                </td>
                <td class="tblColumn">
                    @Html.DisplayFor(modelItem => item.Name)
                </td>

                <td class="tblColumn">
                    @Html.DisplayFor(modelItem => item.Instructor)
                </td>
                <td class="tblColumn">
                    @Html.DisplayFor(modelItem => item.StartDate)
                </td>
                <td class="tblColumn">
                    @Html.DisplayFor(modelItem => item.EndDate)
                </td>
                <td class="tblColumn">
                    @Html.DisplayFor(modelItem => item.Time)
                </td>
                <td class="tblColumn">
                    @Html.DisplayFor(modelItem => item.Duration)
                </td>
                <td class="tblColumn">
                    <input type="button" value="Edit"
                    class="buttonEdit btnStyleOne" />
                    <input type="button" value="Delete"
                    class="buttonDelete btnStyleOne" />
                <td>
            </tr>
        }
    </table>
        <div class="btnStyleTwo">
    <input type="button" value="Create new Training"
    class="buttonCreate btnStyleOne" />
    </div>
</body>
</html>
Here, using foreach function, we are iterating over the Model which is a list of trainings to display the data in a tabular form.
- Content folder has two files, custom-style.css and jquery.timepicker.css. Those files are having all styles related information. As of now, Index.cshtml is using only custom-style.css file. jquery.timepicker.css will use them later.
- Now run the application. Hope you will get a similar screen as shown below:
Here, you will get all trainings available in your XML database. But Create, Edit and Delete button is not working. In the next part, we will implement functionalities to achieve Create, Edit and Delete operations.
Conclusion
In this article, we had a walkthrough to display trainings on Webpage. We understood how to use ASP.NET MVC 4 templates. To get training list, we used an XML file as database. We were reading data from XML file through a repository class which is used in the controller to serve the requests. In Part 2 of this article, we see how to do create, edit and delete operations using AJAX calls and Partial Views.
I am a Software Developer working on Microsoft technologies. My interest is exploring and sharing the awesomeness of emerging technologies.


 General
  News
News  Suggestion
  Question
  Bug
Bug  Answer
  Joke
Joke  Praise
  Rant
Rant  Admin
Admin 


