Introduction
Back when dinosaurs roamed the earrh I started my career as a computer programmer
for a company that gave me the opportunity to work in many different areas of interest.
One area that particularly interested me was the up and comming field of robotics
and some of the projects we worked on for the automotive industry afforded me the
opportuity to develop firmware for various machines that had a bit of intelligence
build into them. At this time I also became interested in electronics and asked
some of the electrical engineers I worked with if they would tutor me in electronics
and in return I would tutor them in programming. Well it worked out very well and
I learned a lot but when I left the company I took a job in Florida and the new
job did not afford me the opportunity to pursue my new found interests so it laid
dormant for many years. But a few years ago I retired and the interest in electronics
and robotics has risen to the surface and I have decided to once again pursure this
interest.
My plan is to create an autonomous roving vehicle and have given the creation the
name of Robbie after the lovable robot from the old TV series Lost in space, you
know the one...danger Will Robinson... Along the way I intend to document the effort
in a series of articles of which this is the first. I will discuss the basic chassis
design, design decisions and parts used to bring Robbie to life, where to find them
and cost. The design and parts I use in this project are just the way I did it and
should only be taken as a point of reference.
In the beginning
I started my research about a month prior to doing any design and then another couple
of weeks before I started ordering parts. I started by purchasing a book that I
would highly recommend before doing anything else, Robot Builders Bonanza by Gordon
McComb now in it's 4th edition, it is a must have reference for every roboteer that
covers every facet of the robot building process. The book helped me greatly when
it cam time to order the parts I needed such as; the type motor, correct gear ratio,
what material to use for the chassis, etc.. Get the book you won't regret it!
So now I've read the book and ordered the parts and I'm ready to start designing
the chassis. Years ago I used a CAD program called TurboCAD for a couple of personel
projects and so I knew a little about how to use it. I still had an old version
(TurboCAD 6.0 they are now up to Version 20.0) but it wouldn't run on windows 7
and I didn't want to shell out another $100 for the newest version so I searched
ebay and found an older verion 18.0 for around $16 with shipping. For the price
difference and what I wanted to do with it I decided the older version would work
just fine. If you don't know CAD or don't want to shell out the money the design
can be done any way that suits you including on a napkin if that's all you've got,
it just doesn't matter. The images below are what I came up with.
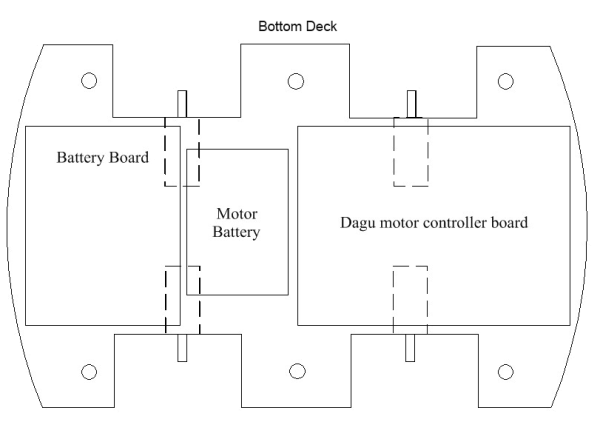

The anatomy
I reworked the drawings several times before I got what I think will work, but the
plastic could only be bought in 24"X48" sheets so I've got plenty of material to
work with if I find it doesn't suit my needs.
The Brains
I had originally planned on using only one Microcontroller for this project, an
ATMega2560 running at 16MHz but I found a Dagu motor controller that handles 4 DC
motors with encoding for $22 and ordered it because the controllers that I had made
myself only handeled 2 motors without encoding so at the very least I would have
had to put together another board and it wouldn't have been nearly as compact and
didn't include the encoding. Since the encoders are so CPU intensive I decided to
dedicate an ATMega28P to the task and will use a modified form of SPI to communicate
between the uControllers. I worked on the SPI communications while I was waiting
for the parts to come and just about got it finished but not tested so will include
it in the next series download.
A short diversion to explain encoding and why it's useful may be in order here.
Encoding is comprised of two parts; a moving component with a set number of slots,
holes or special reflective material and a sensor to detect them. Each time one
of the slots are detected 2 interrupts occur; one when it detects the beginning
of the slot and the other when the opening is no longer detected thus producing
a waveform similar to "Encoder Input A" and "Encoder Input B" shown in the following
image taken from the Dagu manual. The wheel decoders I bought have two encoders
for each wheel that are approximately 90 degrees out of phase and the logic on the
board mixes the two waeforms to produce one waveform as the image illustrates. The
reason that the sensors are put out of phase is so that the direction of the device
may be determined from the encoder information. Although encoding is a great way
to help determine distance there are inherent problems such as when the wheels are
turning and the rover is not moving such as when driving on ice or if the rovers
movement is restricted somehow.
Locomotion
There are two main ways that can be used to move your rover around; tracks or wheels
and both have there pros and cons but I chose wheels because I thought it would
be a simpler setup and figured the 4 wheel drive system would provide more power
and be easier to operate on different surfaces.
Deciding what type of motor to use is next step in our design stage and there are
several types to chose from; continuous servo, DC or stepper.
- Continuous servo - is just a special type of servo that doesn't have the constraint
of limited rotation. A servo is just a geared DC motor with feedback circuitry in
a sealed package. They are controlled by a 50Hz signal and varying the pulse width
to determine the angular position.
- DC motor - A geared DC motor is a continuous rotating device without any feedback and
when you apply power it moves, apply power in reverse and the motor rotates the
opposite way. If you want to find out more about DC and Stepper motors check out my
article Motor Primer and the
L293D Quad Half-H Driver.
- Stepper motor - also a contnuous rotating device but when you apply power it moves
only a few degrees then stops, to keep it rotating you pulse power to the motor.
They don't provide the torque that the other two motors do and are heavier.
Of these I chose a geared DC motor with a 100:1 gear ratio which under load provides 320RPM
and to relate this to how fast the rober will travel we can use the following calculation;
speed = Wheel Circumference * RPM

42mm = 1.65354 inches
Wheel Circumference = 5.19

speed = 5.19 * 320 RPM = 1661.48 Inches/min. or 27 inches/sec
At first glance this seems a little to fast but I will be controlling the speed
of the motor using Pulse Width Modulation (PWM) which uses a variable duty cycle
to control the power going to the device. To learn more about PWM I found a very
good video that describes it in just a couple of minutes.
find it here.
Bill of materials
I've included a list of the major parts that includes where I ordered them from and the price as
close as I can remember;
Robbie BOM | Price
| Where
| Description
|
| ~$20.00
| Lightake.com
| ATMega2560 Got it cheap because it was Ver 1)
|
| $12.00
| Adafruit.com
| ATMega328P Bareboanes AVR dev. board
|
| $21.95
| Jameco.com
| Dagu Motor Controller, 4 channel 4.5A 4.5-12V with encoder
|
| 4@$15.95 ea.
| pololu.com
| 100:1 Micro gearmotor, high power
|
| $39.95
| pololu.ocm
| Set of 42X19mm wheels with encoders
|
| $6.98
| pololu.com
| Set of 42X19mm wheels
|
| $44.01
| BatterySpace.com
| 7.2V Nattery pack with charger
|
| $39.00
| USPlastics.com
| .200" Rigid expanded PVC
|
| $247.69
| | |
So I got all the parts that I needed for the basic rover for right at $250, some
of the parts I had in stock and some I had to order but this should be just about
all I need to order as most of the other parts that I'll be needing I have stock.
There are cheaper and easier ways to build a working autonomous vehicle and to find
out how refer to the Robot Builders Bonanza book.
Most of the parts don't need an explanation, if you've done any development with
the AVR line of uConrollers you will have at least a basic knowledge of the inner
workings of these marvelous devices and if not this probably wouldn't be a good
beginners project. The one part that needs more discussion is the Dagu controller
board, the manual is very sparse and there doesn't seem to be a lot about it when
you google. I haven't worked a lot with it yet but I will say it seems to be a pretty
nice controller and I think it will do a good job driving all 4 of my motors.
I've written a C++ class that provides most of the basic functionality that the
board is capable of and provided it for download here. It probably won't be very
useful as it is written for the ATMega328P but it can be used as a reference or
modified for use with other uControllers.
One other thing I will mention here that is of importance is the use of 2 power
supplies, one for the logic and the other for the motors. This separation of power
is necessary as the motors are very power hungry and generate a lot of electrical
noise and the logic needs a stable noise free signal or as noise frree as possible.
For the logic power I took the battery out of an old phone that I had and removed
the connectors from the phones main board and mounted them on a home made board.
This was a litte tricky as the connector was surface mount, looks a little kludgy
but it works just fine.
Conclusion
Right now I'm still working with the motor controller getting the firmware tested
and adding another layer on top of the basic functionality to coordinate movement
of the 4 wheels in a more intelligent manner. In the next installment in this series
I plan on documenting my efforts to get everything mounted and the rover moving around
on it's own. At that point it will be like Mr. Magoo, for those old enough to remember
blind as a bat and no intelligence but moving on it's own none the less.
References
Currently enjoying retirement and working on projects without pressure, deadlines or any kind of management.


 General
  News
News  Suggestion
  Question
  Bug
Bug  Answer
  Joke
Joke  Praise
  Rant
Rant  Admin
Admin 


