Project website locate at http://codeproject.deaon.com
Introduction
As a developer with over 10 years experience writing VB code with web forms, it's time to step up and learn a new method of development with MVC and C#. To build on my development skills, I will develop a scalable website centered around building a community for busy gay professionals.
Challenge 1: Getting Started
I've created a new azure account. Making sure the website is highly available and fast is a priority for me. I believe that Azure and it's architecture will allow me to accomplish this goal. I plan on using some of the simplicity of Azure to deploy Umbraco, an open source CMS. The CMS will allow me to setup the website and also allow access for content development with other users. Separating the content from the development will be key to the success of the site.
The ultimate goal is to build a world app. An app that can be used by anyone, anywhere in the world with the idea that they will have the same experience. Building the website and leveraging the fast and highly available Azure website is one method. I also plan on leveraging Azure blob storage for use as a content delivery network (cdn). This will allow the images and other content within the site to load faster throughout the world.
Challenge 2: Build A Website
I've made a slight change in my plans for my website. Instead of creating a new instance of Umbraco, I will actually use my existing Umbraco instance. However, my current Umbraco instance does not support MVC so I will need to upgrade to the latest and greatest. This will be accomplished by following the upgrade process as outlined on the Umbraco blog.
- Using the ftp found on the Azure Management Portal under the selected website, I was able to login to the file structure and easily and quickly copy my whole file structure. Fortunately, I didn't have an extensive site so it moved quickly.
- The latest version can be found on the Codeplex
- Comparing the files took some time to process. I used Winmerge to compare the files found in my currently running instance with the files in the new build from Umbraco. I found the most changes to be in the web.config file. Since I already had an installation, I had to be careful that I didn't completely erase my current instance and start from scratch.
- After copying the binaries over, I copied over the new/modified config files.
- Once all files are copied, navigating to the root of my site gave me an db error.
- After investigating the error, I found that it is best to get my db connection information, and save it for input. I removed the current db connection string for Umbraco and left it blank.
- NOW after going to the root of my site, I was prompted with the installation step through.
- Stepping through the installation, when I arrived at the Database screen, I inputted my current database connection information.
- The next screen indicated it was Upgrading the Umbraco database, instead of installing as with a fresh installation.
- Viola! Upgrade complete. I am now upgraded to Umbraco 6. I now have the option for a Partial View under the Settings section.
Now it's time for the fun stuff. The ability for users to access the site from any device is a top priority. To accomplish this, I will use a responsive design. My most basic technique will be using percentages instead of fixed widths. As I hate websites that have no max width, i'll set a max width that will look perfect on my screen.
I have developed a basic design outline
Adding a subdomain to an existing Umbraco instance
- This new project site will be a subdomain of my current site. First step is to add a subdomain as a CNAME record using the DNS Manager within my domain supplier. I use godaddy so the steps are simple. After logging into the Domain Manager in godaddy, I can launch the DNS Manager. Click 'Quick Add' and add a new Alias of codeproject.
- The next step is to link my Azure account to the new sub-domain. I was able to easily follow the steps provided by the Azure team to add a new subdomain in Azure. Configure a custom domain name for a website

- Next is time to add a new site to Umbraco. Within the content node, right click 'Content' and click 'Create'. (Note: I've already created a document type and blank template to be associated with my new site).
- Once the new content section, the new subdomain can be added by right clicking on the newly created content node and selecting Manage Hostnames.
- Adding the domain and publishing the page will result in the newly created subdomain. The new domain is http://codeproject.deaon.net
First look into MVC
What is this new stuff on my template. The typical new template in Umbraco just has this code
<%@ Master Language="C#" MasterPageFile="~/umbraco/masterpages/default.master" AutoEventWireup="true" %>
However, the new template now looks like this
@inherits Umbraco.Web.Mvc.UmbracoTemplatePage
@{
    Layout = null;
}
So what's the first thing I need to do. Learn how to display Hello World. After reviewing Intro to ASP.Net MVC 4 I came to the conclusion that HTML by itself is just as simple as it was in web forms. So to add a basic Hello World to my page, I ended up with this
@inherits Umbraco.Web.Mvc.UmbracoTemplatePage
@{
    Layout = null;
}
<h1>Hello World</h1>
And that was it. Now I do need to learn how to dive more into what Layout = null means and how to more easily simplify design, but at least I now have something up and running.
Further reading on MVC in Umbraco. The basics of a webpage, meaning the HTML, are easily viewed within MVC.
Building the Homepage
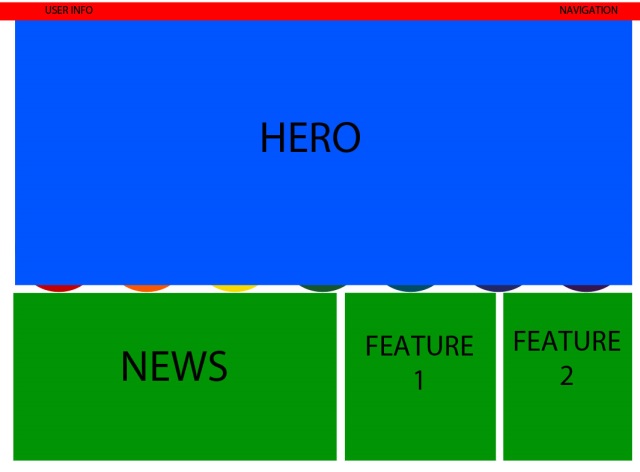
My document structure will be similar to what I've done before. The homepage will more than likely be drastically different from any other page, so that will have it's own template that will only inherit from the main blank template. The other pages as drilled down within the site, will have a very similar look and feel, so i'll create a master template and both the About page and News page will inherit from this master. After creating a few templates in a structure, I end up with the following:
Some of the common factors among ALL pages are the page name and some head information. On the 'CodeProject' Template, I've added information code to render my head and content supplied in the body.
@inherits Umbraco.Web.Mvc.UmbracoTemplatePage
<!DOCTYPE html>
<html>
    <head>
        <title>@Model.Content.Name | Windows Azure Developer Challenge</title>
        @RenderSection("head",false)
    <script src="https://ajax.googleapis.com/ajax/libs/jquery/1.9.1/jquery.min.js"></script>
    </head>
    <body>
    @RenderBody()
    </body>
</html>
Examining the code above, I find a few new techniques. The @Model.Content now replaces the <umbraco:item> tag found in web forms. This method uses the Umbraco helper to get the page content name and use it as the title. Along with the page title, I'll also add Windows Azure Developer Challenge to each page. @RenderSection("head",false) allows child templates a section to place content. The parameters for this are the name of the section and a boolean that indicates whether the child is required to implement the section, or not. The @RenderBody() will render any content from children that is not in a named section. Basically, everything else on the child template that isn't in a section, will end up in the Body section. Lastly, I know I'll be using jquery, so I've selected Google's cdn for my jquery addition using the script tags.
I typically have my navigation on every page and want it to behave the same across the whole platform. My typical outline for my navigation is:
<div class="navigation_wrapper">
    <div class="navigation_ribbon_container">
        <ul>
            <li>Navigation Link 1</li>
<span class="Apple-tab-span" style="white-space: pre;">    </span>    <li>Navigation Link 2</li>
<span class="Apple-tab-span" style="white-space: pre;">    </span>    <li>Navigation Link 3</li>
        </ul>
    </div>
</div>
Within each li, i'll include the wording as well as a graphical icon that will only be displayed on mobile devices. Media queries will be used to determine the screen size and display an image, or the wording. The navigation will have a semi-transparent background to allow some of the background to bleed through. The default CSS for my navigation will look like this:
.navigation_wrapper
{
padding: 0;
width: 100%;
font-size: 17px;
position: absolute;
top: 0;
background: rgb(0, 0, 0);
background: rgba(0, 0, 0, 0.75);
-ms-filter: "progid:DXImageTransform.Microsoft.gradient(startColorstr=#99000000, endColorstr=#99000000)";
z-index: 1000;
}
.navigation_wrapper ul
{
list-style: none;
width: 100%;
text-transform: uppercase;
display: block;
padding: 0;
margin: 0;
}
.navigation_wrapper li
{
float: left;
position: relative;
padding: 5px 0;
width: 33%;
}
.navigation_wrapper img
{
display:none;
}
.navigation_ribbon_container
{
width: auto;
}
.navigation_ribbon_container a
{
color: White;
}
This will render a navigation similar to the following:
Adding media queries is an easy way to present styles for varying screen sizes. I'll create a breakpoint at about 500px that will present images at the bottom of a device instead of having the navigation at the top. The following CSS will move the navigation from the top, to the bottom of the page and have it fixed.
@media only screen and (max-width : 701px)
{
    .feature2
    {
        background-color: yellow;
    }
    .navigation_wrapper
    {
        position: fixed;
        bottom: -5px;
        z-index: 70;
        top: inherit;
        opacity: 1;
    }

    .navigation_wrapper .navigation_item
    {
        width: 25%;
    }

    .navigation_wrapper img
    {
        display: inherit;
    }

    .navigation_ribbon_container .title
    {
        display: none;
    }

    .navigation_ribbon_container .home
    {

    }
    .navigation_ribbon_container .float_set .float_right
    {
        width: 100%;
    }

    .navigation_ribbon_container .float_set .float_left
    {
        display: none;
    }
    .news, .feature1, .feature2
    {
        width: 100%;
        float: none;
        min-height: 200px;
        margin: 0;
    }

}
For testing, I used a generic house image for all three navigation links.
For testing, I used a generic house for the image of all three links.
After adding in my selected responsive image slider, Blueberry, I end up with a page that is responsive with an image slider and navigation.
Adding a News section to my page will take some work. I've already created a section with Umbraco that will hold all my News articles. I've added this section outside of my normal site so that it may be used on various parts of the website.
I've added a content node in Umbraco named Global that will house content that can be placed in any location on the website. This will allow me to write it once, but use it everywhere.
I've used the Multinodetreepicker type as a picker to select the articles that will be on the homepage. The code used to generate a list within a div on the page is
<div class="news">
    <ul>
    @{
        var publishedNodeList = new List<string>();
        foreach (var id in CurrentPage.newsPicker)
        {
            publishedNodeList.Add(id.InnerText);
        }
        var contentCollection = Umbraco.Content(publishedNodeList);
        foreach (var item in contentCollection)
        {
            <li>@item.title - @item.summary</li>
        }
    }
    </ul>
</div>
The code is placed on the template page and will iterate through all items in the multinodetreepicker (newsPicker) and display the item.
After inserting the slider and news, I've ended up with a page like this:
Side note: Two easter eggs can be found on the homepage.
Future talking points:
The importance of viewport
This member has not yet provided a Biography. Assume it's interesting and varied, and probably something to do with programming.


 General
  News
News  Suggestion
  Question
  Bug
Bug  Answer
  Joke
Joke  Praise
  Rant
Rant  Admin
Admin 


