Introduction
This article intends to easily and clearly take a developer through the process of accessing data in a database via a WCF Web Service, and display the data inside a data grid in a Silverlight Application.
The article assumes the reader has somewhat of an understanding of the C# language, ADO.NET and the concept of web services and Silverlight - and therefore will not engage in in-depth analysis thereof.
Development Environment
- MS Visual Studio 2010 (Pro)
- MS SQL Server 2012 (Express)
- Dot Net Framework 4
Silverlight Applications Overview
A typical Silverlight project consists of 3 parts:
- The Database
- The Service
- The Application
In this article, we have an overview of each, and how they interact with each other.
The Database
The database is typically either on the same server or on the same network as the server hosting the service. It is typically a MS-SQL server, but Oracle and MySQL are common alternatives.
The Service
The service is the ASP hosted "home" of the application. It's the application's link to the server. The service sends data across the network or internet in predefined and pre-shared blueprints or objects. These objects or classes can either be as singular or in multiples of the singular, and can include native types. These predefined types or objects are exposed to the application as blueprints through the development process. Once this is done, the application and the service now have a communication standard or protocol which both understand and recognise, and can therefore now communicate seamlessly through the web service.
The service has access to the database on the server, and therefore is the entry and exit point for all communications between the application and the database.
Let's look at the layout of a typical service. Only the relavant sections are described below:
Models
See how the models relate to the table structure. If we had more tables, say, Invoices, Users, etc. we would also reflect them here by adding new folders and classes in respect to the tables.
ServiceRoutines.svc
Located inside this file is all the routines and functions we want to publish or expose over the web. Since we only have a client table this far - we would be on the right track to create the following methods and expose them by marking them as operation cpntracts. (To do this, prefix a method with the [OperationContact] tag]
The Application
The Silverlight application only holds the GUI and some other basic functions. The application has a blueprint of the service, and via the service end-point accesses the service to make service calls. Although the application is hosted on the server, it is downloaded to the client upon connection, then runs inside the client browser.
Lets have a look at the basics of the layout on the application side:

Service Reference
This shows the refference to the service section of the project. This should be automatically created if the steps are followed correctly.
How It Comes Together
The service is key to providing the application with data. With that said, it is also key in providing the database with updated data from the GUI application.
The database is typically on a private network and is not publicly accessible. The application on the other hand, runs (unlike typical websites which runs on the server, but displays in the client's browser) on the clients PC, and is merely hosted inside the client's browser (For more information on this concept, see "Running Out Of Browser"). The problem with this, is getting data from a private database, through a public network and into the application for manipulation and display.
This is where the service comes in. The service is runs and is hosted on the web server, and provides a secure tunnel through which the database and application can communicate.
From DB to Service to Application
It is a good idea to ensure a uniform structure from data through service to application. It is also easy to accommodate changes in structure if this flow is maintained. Notice in the above illustration that the structure in the database resembles the structure in the service, and in the application.
Once the data structure is implemented in a table inside the database, let say, a client table, you can start with the service calls for access this table and it's data. You will typically have three or four service calls per table, and they will generally perform the following functions:
- Get List of Items
- Get Single Item
- Update/Save Item
- Delete Item
Each of these functions are coded as methods, and hosted inside the service, and are then exposed to the application via WCF. Service calls are made through the service reference instance, and allows the circle to be completed, from the Database to the Service to the Application back to the Service and finally back to the Database.
Typical Design Flow
An easy design flow to follow in getting data from the DB to the Application is a simple 3 step process.
- Design Data Structure (DB and Tables)
Service (Typically Get_Something and Save_Something Methods and Procedures)
- Application (UI to utilise and consume the service)
Step by Step
Step 1: Create a new Silverlight Application project
*Notice in the above screenshot, we configure the basics for the service side of the application
Step 2: Open the Solution Explorer view
You will now clearly see the two different sub-projects. Notice how the service side ends with the .web extension.
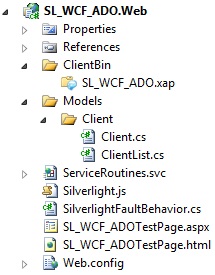
Step 3: Right-click on the web project, and create a new folder called Models
Step 4: Right-click on the Models folder, and create a new subfolder called Client
Step 5: Add a new class to the Client folder called Client.cs
public class Client
    {
        public Client()
        {
            clientId = 0;
            companyName = "";
            telephone = "";
            email = "";
        }

        private int clientId;
        public int ClientId
        {
            get { return clientId; }
            set { clientId = value; }
        }

        private string companyName;
        public string CompanyName
        {
            get { return companyName; }
            set { companyName = value; }
        }

        private string telephone;
        public string Telephone
        {
            get { return telephone; }
            set { telephone = value; }
        }

        private string email;
        public string Email
        {
            get { return email; }
            set { email = value; }
        }
    }
Step 6: Add a new class to the Client folder called ClientList.cs
public class ClientList
{
    public ClientList()
    {
        items = new List<Client>();
        errorMessage = "";
    }

    private List<Client> items;
    public List<Client> Items
    {
        get { return items; }
        set { items = value; }
    }

    private string errorMessage;
    public string ErrorMessage
    {
        get { return errorMessage; }
        set { errorMessage = value; }
    }
}
Step 7: Right-click on the web project, and add a new Silverlight Enabled WCF Service. It can be found under Visual C# \ Silverlight on the Add New Item page. Call the service ServiceRoutines.svc
This should add a new document in the project by the name provided. This is where we'll put all of the exposed service calls and methods for accessing the database.
using System;
using System.Linq;
using System.Runtime.Serialization;
using System.ServiceModel;
using System.ServiceModel.Activation;

namespace SL_WCF_ADO.Web
{
    [ServiceContract(Namespace = "")]
    [SilverlightFaultBehavior]
    [AspNetCompatibilityRequirements(RequirementsMode = AspNetCompatibilityRequirementsMode.Allowed)]
    public class ServiceRoutines
    {
        private const string connectionString = "YourSQLConnectionString";

        [OperationContract]
        public Models.Client.ClientList GetClientList(int clientId)
        {
            Models.Client.ClientList result = new Models.Client.ClientList();
            string sql = "";

            if (clientId == 0)
            {
                sql = "SELECT * FROM Clients";
            }
            else
            {
                sql = "SELECT * FROM Clients WHERE ClientId = " + clientId.ToString();
            }

            try
            {
                System.Data.SqlClient.SqlConnection conn = new System.Data.SqlClient.SqlConnection(connectionString);
                System.Data.SqlClient.SqlCommand cmd = new System.Data.SqlClient.SqlCommand(sql, conn);

                conn.Open();

                System.Data.SqlClient.SqlDataReader sqldr = cmd.ExecuteReader();

                while (sqldr.Read())
                {
                    Models.Client.Client item = new Models.Client.Client();

                    item = new Models.Client.Client();
                    item.ClientId = (int)sqldr["ClientId"];
                    item.CompanyName = sqldr["CompanyName"].ToString();
                    item.Email = sqldr["Email"].ToString();
                    item.Telephone = sqldr["Telephone"].ToString();

                    result.Items.Add(item);
                }
            }
            catch (Exception err)
            {
                result = new Models.Client.ClientList();
                result.ErrorMessage = err.Message;
            }

            return result;
        }

    }
}
Step 8: Save and build the entire solution
Step 9: Right-click on the application project (the one without the .web extension) and select Add Service Refference. Once the wizard opens, click on Discover, and change it as to resemble the following:
*Verify that a service reference has been added under the Web References folder
Step 10: Open MainPage.cs
Step 11: Add a DataGrid control from the toolbox, and set it's AutoGenerateColumns property to True
Step 12: Open the MainPage.cs code view, and edit the page to resemble the following:
public partial class MainPage : UserControl
{
    ServiceReference.ServiceRoutinesClient service;
    ServiceReference.ClientList result;

    public MainPage()
    {
        InitializeComponent();
        Loaded += new RoutedEventHandler(MainPage_Loaded);

        service = new ServiceReference.ServiceRoutinesClient();
        service.GetClientListCompleted += new EventHandler<ServiceReference.GetClientListCompletedEventArgs>(service_GetClientListCompleted);
    }

    void MainPage_Loaded(object sender, RoutedEventArgs e)
    {
        service.GetClientListAsync(0);
    }

    void service_GetClientListCompleted(object sender, ServiceReference.GetClientListCompletedEventArgs e)
    {
        if (!String.IsNullOrEmpty(e.Result.ErrorMessage))
        {
            MessageBox.Show(e.Result.ErrorMessage,"Error", MessageBoxButton.OK);
        }
        else
        {
            result = e.Result;
            dataGridMain.ItemsSource = result.Items;
        }
    }
}
Resulting View in Web Browser
I am addicted to knowledge, technology, gadgets and tinkering, and everything and anything science related. I am a real propeller-head and a geek, and proud at that.
Recently - I find myself tinkering again - back to basics! Integrating low level hardware with high level user experience. Full stack and mainframe development gets repetitive sometimes


 General
  News
News  Suggestion
  Question
  Bug
Bug  Answer
  Joke
Joke  Praise
  Rant
Rant  Admin
Admin 


