Introduction
XNA is a .NET managed framework that simplifies 3D graphics programming. It wraps the low level DirectX APIs in a set of .NET classes, hiding much of the complexity without seriously affecting run-time performance or limiting the capabilities of DirectX. XNA is much easier to program than DirectX but it is still a low-level, powerful API.
XNA was originally introduced by Microsoft in 2006 to enable independent game developers to create high performance games for Xbox and Windows PCs using C# and .NET. Later versions were also made available for Silverlight 5 and Windows Phone 7.
Microsoft currently does not provide a version of XNA for Windows 8 Store Apps, but there is a good open-source alternative available called MonoGame
This article describes the XNA support that is available on three platforms:
- Windows Phone 7
- Windows 8 Store Apps
- Windows Phone 8
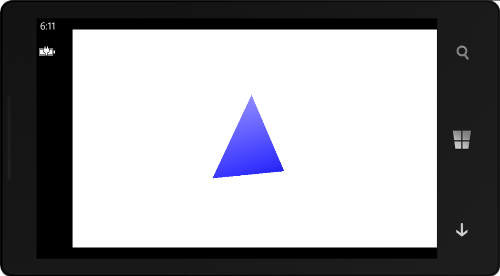
Then for two of these (Phone 7 and Windows 8 Store Apps), it presents the simplest possible XNA program: a basic spinning triangle, albeit with full 3d lighting effects. It is the 3D equivalent of the classic ‘Hello World’ program. It comprises about 50 lines of code, and the rationale behind every line is explained.
Windows Phone 7
XNA is fully supported by Microsoft for Windows Phone 7 Apps, and because Phone 7 Apps also run on Windows Phone 8, you automatically get compatibility with that platform. What you don’t get in a Phone 7 App of course, is access to the new features of Windows Phone 8.
Visual Studio provides two project templates for Phone 7 XNA Apps:
- Windows Phone Game (in the XNA Game Studio section)
- Windows Phone XAML and XNA App (in the Windows Phone section)
If your 3D application or game does not require any Phone 8 specific features, then developing it as a Phone 7 App is a good option. It gives you the broadest market coverage, and from a single code-base.
Windows 8 Store Apps
XNA is not available from Microsoft for Windows Store Apps. Instead you must use the open-source MonoGame framework. The good news is that MonoGame is easy to set-up and use, and it provides a very good level of compatibility with Microsoft’s XNA frameworks. If you’ve got existing XNA code, then porting it to MonoGame is likely to be very easy.
The other big benefit of MonoGame is that it is also available for iPhone and Android, which opens up the exciting prospect of writing high-performance, cross-platform 3D apps or games in C# and .NET
Windows Phone 8
Microsoft does not provide XNA support for Windows Phone 8, but again MonoGame fills the gap. If you need create a Phone 8 specific 3D app or game, for example if you want to make use of the new Phone 8 features, then MonoGame is the way to go.
This article does not cover this option in detail, but it is a safe bet that your MonoGame code for a Windows 8 Store App will need very few changes to work on Windows Phone 8.
The 3D Hello World Program
This article does not cover how to set up your development environment for XNA or MonoGame, there is already plenty of information available on the web covering that.
Instead, we will dive straight into the code.
Here is the full source code for the Windows 8 Store App.
using Microsoft.Xna.Framework;
using Microsoft.Xna.Framework.Graphics;

namespace Win8StoreApp_Xna_Triangle
{
  public class Game1 : Game
  {
    private float angleRadians;

    public Game1()
    {
      new GraphicsDeviceManager(this);
    }

    protected override void Update(GameTime gameTime)
    {
      angleRadians = (float)gameTime.TotalGameTime.TotalSeconds * 4;
    }

    protected override void Draw(GameTime gameTime)
    {
      GraphicsDevice gd = this.GraphicsDevice;
      gd.Clear(Color.White);
      gd.RasterizerState = RasterizerState.CullNone;

      var vertices = new VertexPositionNormalTexture[]{
        new VertexPositionNormalTexture(new Vector3(-1, -1, 0),Vector3.Forward,Vector2.Zero),
        new VertexPositionNormalTexture(new Vector3(0, 1, 0),Vector3.Forward,Vector2.Zero),
        new VertexPositionNormalTexture(new Vector3(1, -1, 0),Vector3.Forward,Vector2.Zero)};
      var vb = new VertexBuffer(gd, VertexPositionNormalTexture.VertexDeclaration, vertices.Length, BufferUsage.WriteOnly);
      vb.SetData(0, vertices, 0, vertices.Length, 0);
      gd.SetVertexBuffer(vb);

      var be = new BasicEffect(gd);
      be.EnableDefaultLighting();

      var blueTexture = new Texture2D(gd, 1, 1, false, SurfaceFormat.Color);
      blueTexture.SetData<Color>(new Color[] { Color.Blue });
      be.Texture = blueTexture;
      be.TextureEnabled = true;

      float aspectRatio = gd.Viewport.AspectRatio;
      be.World = Matrix.CreateRotationY(angleRadians);
      be.View = Matrix.CreateLookAt(new Vector3(0, 0, 5.0f), Vector3.Zero, Vector3.Up);
      be.Projection = Matrix.CreatePerspectiveFieldOfView(0.85f, aspectRatio, 0.01f, 1000.0f);

      be.CurrentTechnique.Passes[0].Apply();
      gd.DrawPrimitives(PrimitiveType.TriangleList, 0, 1);
    }
  }
}
The Windows Phone 7 version is identical except for an extra namespace:
using Microsoft.Xna.Framework.Input;
.. and a couple of lines of code to handle the hardware Back button:
protected override void Update(GameTime gameTime)
{
  if (GamePad.GetState(PlayerIndex.One).Buttons.Back == ButtonState.Pressed)
    this.Exit();
  angleRadians = (float)gameTime.TotalGameTime.TotalSeconds * 4;
}
There's not too many lines of code, but there's a lot going on so let’s break it down.
Drawing Primitives
XNA is quite a low-level framework that works directly with the graphics hardware, so the only things that it knows how to draw are triangles and lines. In our program, the code that does the drawing is:
gd.DrawPrimitives(PrimitiveType.TriangleList, 0, 1);
This instructs the GPU to draw a triangle using a pre-loaded buffer of vertices.
Vertex Buffers
XNA provides several built-in options for vertices and you can also define your own custom varieties. All vertices have a 3D position defined using a Vector3 structure, and they can have additional attributes such as color, texture coordinates and a lighting ‘normal’. We want our program to have realistic 3D lighting, so we use the
VertexPositionNormalTexture structure.
Our program has a single triangle so we create an array of three vertices. We define the 3D position coordinates so that the triangle lies on the X-Y plane, and we define the lighting ‘normals’ to be at right-angles to this, i.e. ‘forward’ along the Z-axis. We define the texture coordinates as (0,0) because we are going to use a one pixel flat colored texture bitmap.
Once we have our array of vertices, we wrap it in a
VertexBuffer class and send this to the GPU.
var vertices = new VertexPositionNormalTexture[]{
  new VertexPositionNormalTexture(new Vector3(-1, -1, 0),Vector3.Forward,Vector2.Zero),
  new VertexPositionNormalTexture(new Vector3(0, 1, 0),Vector3.Forward,Vector2.Zero),
  new VertexPositionNormalTexture(new Vector3(1, -1, 0),Vector3.Forward,Vector2.Zero)};
var vb = new VertexBuffer(gd, VertexPositionNormalTexture.VertexDeclaration, vertices.Length, BufferUsage.WriteOnly);
vb.SetData(0, vertices, 0, vertices.Length, 0);
gd.SetVertexBuffer(vb);
The GraphicsDevice Class
The
GraphicsDevice class is central to XNA, it is used to control the GPU. There is only one instance of it, which you get through a property of the Game object
The GraphicsDevice class has methods for drawing primitives and for setting up vertex buffers as covered above. It also has quite a few other properties and methods for controlling the details of the 3D rendering process. For our simple program we leave everything with its default settings, except for ‘RasterizerState’ which we change to ‘CullNone’. The default is not to draw the back side of triangles, because typically they are out of sight on the inside of 3D objects, but our 3D model is a single triangle and we want to be able to see both sides of it.
GraphicsDevice gd = this.GraphicsDevice;
gd.Clear(Color.White);
gd.RasterizerState = RasterizerState.CullNone;
Effects
XNA offers a choice of five different ‘Effect’ classes, which wrap up a lot of the low level details of talking to the
GraphicsDevice. We’ll use the ‘BasicEffect’ class, which is actually quite powerful - it includes a very nice 3D lighting set-up as standard.
var be = new BasicEffect(gd);
be.EnableDefaultLighting();
Textures
In XNA, 3D scenes are made up of triangle meshes overlaid with textures. Textures are simply 2D bitmaps – the XNA class is Texture2D. They are sent to the
GraphicsDevice using the Effect class and each triangle vertex specifies its 2D coordinates within the texture. By convention these texture coordinates are called U and V.
In many XNA applications, particularly games, textures are created offline and then loaded in at run-time. For our simple program we programmatically create a one pixel texture of a solid color.
var blueTexture = new Texture2D(gd, 1, 1, false, SurfaceFormat.Color);
blueTexture.SetData<Color>(new Color[] { Color.Blue });
be.Texture = blueTexture;
be.TextureEnabled = true;
Matrices and 3D Transformations
This is the heart of 3D programming. The vertices in our vertex buffer define the locations of the three corners of the triangle within our 3D virtual world, but these 3D coordinates need to be converted into 2D screen coordinates before anything can be displayed.
There are three stages to this process and each stage uses a 3D transformation defined using the Matrix class. The Matrix class actually represents a 4 x 4 matrix of floating point numbers, but its primary function is to transform 3D coordinates, defined by the Vector3 class, through the basic operations of translation, rotation and scaling.
float aspectRatio = gd.Viewport.AspectRatio;
be.World = Matrix.CreateRotationY(angleRadians);
be.View = Matrix.CreateLookAt(new Vector3(0, 0, 5.0f), Vector3.Zero, Vector3.Up);
be.Projection = Matrix.CreatePerspectiveFieldOfView(0.85f, aspectRatio, 0.01f, 1000.0f);
Step one is to convert from model coordinates to world coordinates. This is called the World Transform. In our program we have one model, a single triangle, and the World Transform is used to define where it is and how it is oriented in our 3D virtual world. If our 3D scene had several models, or several instances of the same model, they would each have their own World Transform. We just have one model, but it does rotate in real time. So we use a World Transform to represent a rotation based on elapsed time.
Step two is to convert from world coordinates which are
centered on the ‘origin’ of our virtual world, to view coordinates, which are
centered on our view point or camera position. This is called the View Transform. The Matrix class has a convenient method (CreateLookAt) for creating a View Transform based on the camera position and the center point of what it's looking at.
Step three is to convert from the 3D coordinates in our virtual world, to 2D screen coordinates. For consistency, this step is also done using the Matrix class, so the output is 3D coordinates, but only the X and Y values are used for creating the 2D rendered image on the screen. This step is called the Projection Transform and XNA offers two choices: orthogonal and perspective. With the orthogonal option, objects further from the camera do not appear smaller. The perspective option is the more ‘natural’ view where distant objects appear smaller. The Matrix class also provides a convenient method (CreatePerspectiveFieldOfView) for creating the Projection Transform based on the camera properties, in particular the lens angle (i.e. wide angle or telephoto) expressed as radians in the Y axis.
Once our three transformation matrices are set up, the
BasicEffect class takes care of setting up the GraphicsDevice to render our 3D scene onto the 2D screen.
Effect Passes and Techniques
All XNA’s built-in Effect classes inherit from the Effect base class, which encapsulates the concepts of ‘Techniques’ and ‘Passes’.
Techniques provide alternative rendering effects that can be selected at draw-time, maybe depending on the type of object being drawn.
Passes are used for multi-stage rendering.
The
BasicEffect class offers a single technique, which is selected by default, and which has a single pass. It is necessary to ‘Apply’ a pass before you issue any drawing commands. Our program does that with this line of code:
be.CurrentTechnique.Passes[0].Apply();
gd.DrawPrimitives(PrimitiveType.TriangleList, 0, 1);
But you will often see XNA code of this form:
foreach (EffectPass pass in effect.CurrentTechnique.Passes)
{
pass.Apply();
} We use the simpler form because we know that the BasicEffect only has one Pass. If we were using an effect with more than one pass, or if we wanted to generalise our code so that it would work with any Effect class, we would use the
foreach loop.
Optimizing the Draw Method
Our program is designed to be as short and simple as possible to illustrate the essentials of XNA.
In a real program you will want to optimise the critical Draw handler by separating out the one-time setup code. The Draw handler executes every frame, e.g. 60 time a second, so you need to keep it as light as possible. In particular, you should avoid instantiating any objects in there.
Conclusion
That completes our run through of a very simple XNA program.
Although it covers just a small fraction of what's available in XNA, a lot of the key concepts are in there and you could build quite a complex 3D program using just the classes and methods illustrated here.
Freelance software developer with a focus on Microsoft technologies and specialist experience in mapping and location-based applications.


 General
  News
News  Suggestion
  Question
  Bug
Bug  Answer
  Joke
Joke  Praise
  Rant
Rant  Admin
Admin 


