What is an Ultrabook?
Ultrabook is not a normal Laptop that you will have in your kitty. It is Lightweight
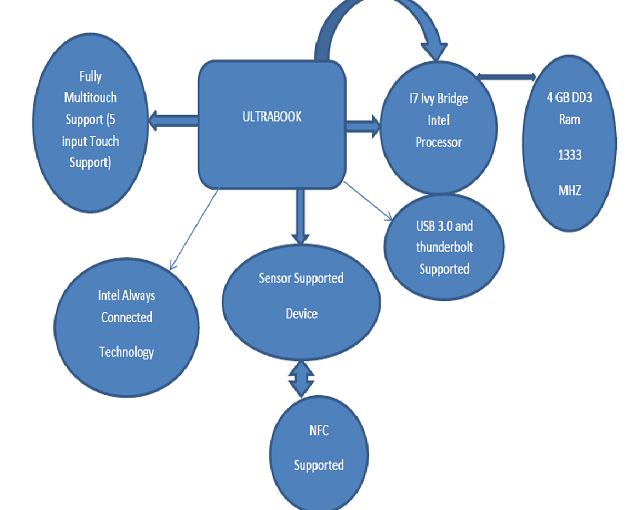
high performance oriented i7 architecture based, high battery life optimized (up
to 8hrs) advanced notebook and adding Ultra features to call it an ULtrabook. The
figure below shows the the features of an Ultrabook(Intel Prototype)
Description
I7 Intel Ivy Bridge Processor. It is the latest series of processors
of Intel which is very fast and consumes less power faster processing ability better
cache memories (starting from 3MB Cache.)
Generations of Ultrabook

Ultrabook Essential Features
Architecture includes support for Intel HD Graphics
Support for DX11, Open GL 3.1, Open CL 3.1
Full Support for Intel Perceptual SDK 2013 (additional gesture camera needed)and
Intel Parallel Computing SDK
Win8 full touch enabled support (The best OS to test the capability of Ultrabook
is Windows 8 as with OS you can use each functionality to its full potential….)
SENSORS SUPPORTED
- Accelerometer
- Magnetometer
- Gyro meter
- Orientation Sensor
- Ambient Light Sensor
- NFC (Near Field Communication)
- GPS
Special Intel Technologies
- Intel Smart Connect
- Rapid Start
- Sensor Hub
Developing for an Ultrabook
Supportive OS: In my case it is Windows 8
Designing and Development Tools: VS 2012
The next Figure shows the available stores where you can submit the app
First of all how to start development?
For Intel AppUp Store you need to have an account at Intel Developer Zone
1) How to
Setup account at Intel Developer Zone
The next figure shows how to register at IDZ
Fill up the entire details name and the required Information.
The next figure shows how it can be done.
As you register you need to add organization (Try to Register yourself as an
Individual)
details etc. And when you set up your account You need to click on the Dashboard
and then go to Intel AppUp and request for Code Signing Certificate.
The figures below show the steps.
The next two figures show how to apply for Code Signing Certificate
The second Figure takes you the Comodo Link
What is a Code Signing Certificate?
It is an authentication method by which you digitally sign the software and comprehends
that the software has not been corrupted and written by original author. It is a
mandatory step to put any app to IntelAppUp Store.
Registration process
This registration process is generally a lengthy and painstaking one,you need
to do a follow up and try contacting them(Comodo Team) when you create an ID at
Comodo keep chatting to their agents to expedite the issue. Beforehand you need
to have the documents 1) ID Proof, Address Proof 2) Bank Statement 3) Registering
yourself to any of the Yellow Pages website that they will mention and they will
confirm by calling you. (But you can have an easy workaround if you keep pushing
them in the Comodo Chat Helpdesk.)
The next figure shows the step to register at Comodo
If you get an error like member not found try it at Win XP (firstly I also got
this error but trying the process in Win XP resolved the issue)
There is already a document to show how to get the certificate ,the
link is shown below
The Video Link shows how tos to put
your app in store
Getting an account at Windows Store
1)first things first it’s a paid service
2)The link to have an account at Windows Store is given below http://msdn.microsoft.com/en-in/library/windows/apps/hh868187.aspx
Follow and study the webpage to get an account.
Its a very easy process to get an account and their are certain promo offers,
Microsoft is providing to get a free account.More Ready information is available
here.
Developing for an Ultrabook
1)Download Win 8 evaluation copy to start with(I did my development work this
way) It’s a 90 days evaluation copy
Link
2) Get a free copy of Visual Studio 2012 express
edition
Download the 90 days evaluation copy of Ultimate version
3)If you are Developing Windows Store app you need to get a Developer License(Developer
License is free and after expiry you can request again…and Developer License requirement
is prompted when you open up a windows store project template)
4) My application was Desktop based so I started this way…..Figuratively shown
below. From the Win 8 main screen select VS 2012
Intel App Up Store Validation process
Application Packaging
The packaging of the app can be done in 3 ways(as of I know) 1)InstallShield(I
used InstallShield) 2)WixToolset 3)Application Installer(The only concern using
it is you have to edit unnecessary files using ORCA)
You need to do certain things before uploading your application
1)Creating the App icon
2)Screenshots of the app
What is Intel AppUp SDK?
Intel AppUp SDK(I havenot used it but providing information of it)
Intel AppUp SDK contains Api for applications sold in Intel App Up Store.It is
not essential to use it in Windows based systems but it helps you in these areas.
1)Multiple Device Digital management
2)Crash reporting
3)instrumentation and in app purchase capabilities. It helps generally if you
want to upload an evaluation copy and then on if any full version is required upgradation
steps are easy
Intel AppUp SDK services Support shown below
Programming Languages and Platform Support for Intel AppUp SDK shown below
My App Development Process
UltraSensors 1.0
The idea behind this application was to use multi functionality testing conditions
for an Ultrabook.
I thought of checking all the sensors supported in Ultrabook embedded within
a single condition
Involving looping construct to check available sensors. Next was in my mind to
check the Battery limits of an Ultrabook (as it was said Ultrabook has great battery
Life) and thirdly a condition to check the Carbon Footprint of an Individual involving
their daily usage in Household, Transportation etc.
Creating the Application
I used win forms as frontend and C# at backend to develop my software.At the
starting of my project I had little information on how to compile and create the
package, it was a challenge to me.First of all the the full utility of Ultrabook
can be tested or showcased by the Windows 8 OS because of its ability to use Sensors
in the application.My obvious choice of IDE was VS2012 as it is very easy to use
and package the app.The Installshield Deployment packaging tool was easy enough
to put the VS 2012 solution to Intel AppUp Store.
How to Call WinRT APIs from Desktop Application
Before starting to build in the Form Requirement
1)You need to unload the project
2)Edit the properties
3)You need to add a Property Group then change the Target Platform
<propertygroup>
<targetplatformversion>8.0
The Core Windows 8 tab inside VS 2012
It allows access to the current Windows 8 platform version and use the Core UI
for the Development environment
Important Namespaces to get used to for Ultrabook Development with Win 8
- System.Runtime
- System.Runtime.InteropServices.WindowsRuntime
- Windows.Device.Sensors(The most important namespace to access the Sensors)
- Windows.UI
You can access this namespaces by adding references to this through your project
by using add references tab
The figure below shows how to access VS 2012 from the Main Window of Windows
8.As we all know that when we install any application in Win 8 the shortcut is directly
relected as a tile at Main Screen of Windows 8 because of its UI!!(New Thing).
The next figure shows how to start a new project at Visual Studio 2012
The next figure shows the default templates to develop an app for Windows Store.
The figure below shows the templates available to develop an app for Desktop
Based Application
As my Development target was .net Forms I selected the Form based application
terget to .net framework 4.5
The Consecutive figures below shows you how to add additional forms to your application
The Main Form(The Starting Form)
The Main form consists of three Buttons that access other forms of the application
and a < close button.As per my Discussion with Praveen From Intel he said that
the application should open in Full screen and closes the application with a single
click(closes al forms).
Using properties of the main form I kept the Windows to maximized state so that
the application open up in full Screen and using System.Environment.Exit button
to close the application.Accessing the next form page from the main screen :- It
is easy just in one of the buttons backend call the next form.
FormName sv= new FormName();
sv.ShowDialog();
The figure below shows the button controls used and the first page UI Form.The
back end code is updated with it.
The First form Code
using System;
using System.Collections.Generic;
using System.ComponentModel;
using System.Data;
using System.Drawing;
using System.Linq;
using System.Text;
using System.Threading.Tasks;
using System.Windows.Forms;
using System.Runtime;
using System.Runtime.InteropServices.WindowsRuntime;
using Windows.Devices.Sensors;
using Windows.UI;
namespace DeskmanGoGreen5
{
public partial class Form1 : Form
{
private Accelerometer ag;
private LightSensor la;
private SimpleOrientationSensor so;
private OrientationSensor os;
private Inclinometer ic;
private Compass cs;
private Gyrometer gy;
public Form1()
{
InitializeComponent();
}
private void button1_Click(object sender, EventArgs e)
{
ag = Accelerometer.GetDefault();
la = LightSensor.GetDefault();
so = SimpleOrientationSensor.GetDefault();
os = OrientationSensor.GetDefault();
ic = Inclinometer.GetDefault();
cs = Compass.GetDefault();
gy = Gyrometer.GetDefault();
if (ag != null)
{
MessageBox.Show("Accelerometer found");
}
else
{
MessageBox.Show("No Accelerometer not found");
}
if (la != null)
{
MessageBox.Show("Ambient Light Sensor found");
}
else
{
MessageBox.Show("No Ambient Light Sensor found");
}
if (so != null)
{
MessageBox.Show("Simple Orientation Sensor found");
}
else
{
MessageBox.Show("Simple Orientation Sensor not found");
}
if (os != null)
{
MessageBox.Show("orientation Sensor found");
}
else
{
MessageBox.Show("orientation Sensor not found");
}
if (ic != null)
{
MessageBox.Show("Inclinometer Sensor found");
}
else
{
MessageBox.Show("Inclinometer Sensor not found");
}
if (cs != null)
{
MessageBox.Show("Compass found");
}
else
{
MessageBox.Show("Compass not found");
}
if (gy != null)
{
MessageBox.Show("Gyrometer found");
}
else
{
MessageBox.Show("Gyrometer not found");
}
}
private void button2_Click(object sender, EventArgs e)
{
BatteryMonitorForm bm = new BatteryMonitorForm();
bm.ShowDialog();
}
private void button3_Click(object sender, EventArgs e)
{
System.Environment.Exit(0);
}
}
}
The Image is shown below.
The Way to maximize the windows size.
Battery Monitor Form
The battery Monitor form included a check box to indicate that the main power
is connected, a status bar to indicate the percentage of charge remaining and a
label control to access the Ambient light sensor when it goes to 35%.The form also
included timer to refresh the data periodically.
The next Figure shows the UI for the BatteryMonitorForm
using System;
using System.Collections.Generic;
using System.ComponentModel;
using System.Data;
using System.Drawing;
using System.Linq;
using System.Text;
using System.Threading.Tasks;
using System.Windows.Forms;
using System.Runtime;
using System.Runtime.InteropServices;
using Windows.Devices.Sensors;
using Windows.UI;
namespace DeskmanGoGreen5
{
public partial class BatteryMonitorForm : Form
{
private LightSensorReading _lux;
public BatteryMonitorForm()
{
InitializeComponent();
}
private void RefreshStatus()
{
PowerStatus power = SystemInformation.PowerStatus;
switch (power.PowerLineStatus)
{
case PowerLineStatus.Online:
MainsPower.Checked = true;
break;
case PowerLineStatus.Offline:
MainsPower.Checked = false;
break;
case PowerLineStatus.Unknown:
MainsPower.CheckState = CheckState.Indeterminate;
break;
}
int powerPercent = (int)(power.BatteryLifePercent * 100);
if (powerPercent <= 100)
BatteryIndicator.Value = powerPercent;
else if (powerPercent <= 35)
{
LightSensor ls = LightSensor.GetDefault();
{
if (ls != null)
{
ls.ReportInterval = 0;
ls.ReadingChanged += ls_ReadingChanged;
LightLux.Text = _lux.IlluminanceInLux.ToString("0000");
}
}
}
else
BatteryIndicator.Value = 0;
int secondsRemaining = power.BatteryLifeRemaining;
if (secondsRemaining >= 0)
{
BatteryLifeRemaining.Text = string.Format("{0} min", secondsRemaining / 60);
}
else
{
BatteryLifeRemaining.Text = string.Empty;
}
BatteryStatus.Text = power.BatteryChargeStatus.ToString();
}
void ls_ReadingChanged(LightSensor sender, LightSensorReadingChangedEventArgs args)
{
MessageBox.Show("Light Sensor enabled");
}
Carbon Footprint Calculator form
Here I used text box controls as well as labels to access the data. The tab controls
are used to package the flow accordingly. The calculations for the application is
provided by EPA and used as formulas. //
3rd form
using System;
using System.Collections.Generic;
using System.ComponentModel;
using System.Data;
using System.Drawing;
using System.Linq;
using System.Text;
using System.Threading.Tasks;
using System.Windows.Forms;
namespace DeskmanGoGreen5
{
public partial class CarbonFootPrintCalculator : Form
{
double electricitybill;
double priceperkillowatt = .20;
double electricityemissonfactor = 1.37;
int monthsinyear;
int monthsinyr1;
int monthsinyr2;
double co2emissions;
double co2emissions1;
double co2emissions2;
double co2emissions3;
double co2emissions4;
double co2emissions5;
double co2emissions6;
double amountofnaturalgasbill;
double priceperthousandcubicfeet = 14.14;
double naturalgasemissionfactor = 120.61;
double amountoffuelbill;
double pricepergallon = 2.88;
double fueloilemissionfactor = 22.37;
double amountofmilesdrvnweek;
double amountofpropanebill;
double pricepergallonp = 2.76;
double propaneemissionfactor = 12.17;
int weeksinyr;
double pondofco2emtdprgln = 19.4;
double emsnotrco2 = 1.0526;
double fuelefficncyprvcl;
double milestrvlpbprwk;
double pblctrnsprtndemsn = 19.4;
double indrtemsn = 1.052;
double grm2pndcnvrsn = .0022;
int airemisnspermile = 223;
double indwtpf = 1.2;
double iarff = 1.9;
double gram2pc = .0022;
double airmilestravld;
int monthsinyr3;
public CarbonFootPrintCalculator()
{
InitializeComponent();
}
private void button1_Click(object sender, EventArgs e)
{
electricitybill = double.Parse(textBox1.Text);
monthsinyear = int.Parse(textBox2.Text);
co2emissions = (electricitybill / priceperkillowatt) * electricityemissonfactor * monthsinyear;
}
private void button2_Click(object sender, EventArgs e)
{
MessageBox.Show(co2emissions + "Carbon emission in Pounds", "co2emissions");
}
private void button3_Click(object sender, EventArgs e)
{
amountofnaturalgasbill = double.Parse(textBox3.Text);
monthsinyr1 = int.Parse(textBox4.Text);
co2emissions1 = ((amountofnaturalgasbill / priceperthousandcubicfeet) * naturalgasemissionfactor) * monthsinyr1;
}
private void button4_Click(object sender, EventArgs e)
{
MessageBox.Show(co2emissions1 + "Carbon Emission in pounds", "co2emissions1");
}
private void button5_Click(object sender, EventArgs e)
{
amountoffuelbill = double.Parse(textBox5.Text);
monthsinyr2 = int.Parse(textBox6.Text);
co2emissions2 = ((amountoffuelbill / pricepergallon) * fueloilemissionfactor) * monthsinyr2;
}
private void button6_Click(object sender, EventArgs e)
{
MessageBox.Show(co2emissions2 + "Carbon emissions in pounds", "co2emissions2");
}
private void button7_Click(object sender, EventArgs e)
{
amountofpropanebill = double.Parse(textBox7.Text);
monthsinyr2 = int.Parse(textBox8.Text);
co2emissions3 = ((amountofpropanebill / pricepergallonp) * propaneemissionfactor) * monthsinyr2;
}
private void button8_Click(object sender, EventArgs e)
{
MessageBox.Show(co2emissions3 + "Carbon emissions in pounds", "co2emissions3");
}
private void button9_Click(object sender, EventArgs e)
{
amountofmilesdrvnweek = double.Parse(textBox9.Text);
weeksinyr = int.Parse(textBox10.Text);
fuelefficncyprvcl = double.Parse(textBox11.Text);
co2emissions4 = ((amountofmilesdrvnweek * weeksinyr) / fuelefficncyprvcl) * pondofco2emtdprgln * emsnotrco2;
}
private void button10_Click(object sender, EventArgs e)
{
MessageBox.Show(co2emissions4 + "Carbon emissions in pounds", "co2emissions4");
}
private void button11_Click(object sender, EventArgs e)
{
milestrvlpbprwk = double.Parse(textBox12.Text);
co2emissions5 = (milestrvlpbprwk * pblctrnsprtndemsn) + (pblctrnsprtndemsn * indrtemsn * grm2pndcnvrsn);
}
private void button12_Click(object sender, EventArgs e)
{
MessageBox.Show(co2emissions5 + "Carbon emission in pounds", "co2emissions5");
}
private void RefreshTimer_Tick(object sender, EventArgs e)
{
RefreshStatus();
}
private void BatteryMonitorForm_Load(object sender, EventArgs e)
{
RefreshStatus();
RefreshTimer.Enabled = true;
}
The Figure shows the the screenshot
My Next Application Ultra Knowhow features
1) Getting Default Values of Sensors and Showing it using Label controls. Here I
used four sensor Values and and the next form to get some essential knowhows of
Ultrabook.Like Home directory,windows version ,No of cores in processor,Logical
Drives,windows Directory,username & Computer name.The usage of array in the
form helped me get access to HomeDir,UserName,ComputerName and WinDir.
using System;
using System.Collections.Generic;
using System.ComponentModel;
using System.Data;
using System.Drawing;
using System.Linq;
using System.Text;
using System.Threading.Tasks;
using System.Windows.Forms;
namespace UltraKnowHow
{
public partial class UltraknowHow : Form
{
public UltraknowHow()
{
InitializeComponent();
}
private void button1_Click(object sender, EventArgs e)
{
string[] variables =
{
"%WINDIR%" ,
"%HOMEDRIVE%",
"%USERNAME%",
"%COMPUTERNAME%"
};
foreach (string v in variables)
{
string result = Environment.ExpandEnvironmentVariables(v);
MessageBox.Show(result);
}
}
private void button2_Click(object sender, EventArgs e)
{
string[] value1 = Environment.GetLogicalDrives();
MessageBox.Show(string.Join(",", value1));
}
private void button3_Click(object sender, EventArgs e)
{
OperatingSystem os = Environment.OSVersion;
MessageBox.Show("OS Version= "+Environment.OSVersion.Version.ToString() +"\n");
}
private void button4_Click(object sender, EventArgs e)
{
MessageBox.Show("No of Cores=" + Environment.ProcessorCount.ToString() + "\n");
}
private void button5_Click(object sender, EventArgs e)
{
MessageBox.Show("CLR Version=" + Environment.Version.ToString() + "\n");
}
private void button6_Click(object sender, EventArgs e)
{
MessageBox.Show("OS Major Minor=" + Environment.OSVersion.Platform);
}
private void button7_Click(object sender, EventArgs e)
{
System.Environment.Exit(0);
}
}
}
The next Code utilizes Label control to access the Sensors API
using System;
using System.Collections.Generic;
using System.ComponentModel;
using System.Data;
using System.Drawing;
using System.Linq;
using System.Text;
using System.Threading.Tasks;
using System.Windows.Forms;
using System.Runtime;
using System.Runtime.InteropServices.WindowsRuntime;
using Windows.Devices.Sensors;
using Windows.UI;
using Windows.UI.Core;
namespace UltraKnowHow
{
public partial class SensorValues : Form
{
private AccelerometerReading _acc;
private Accelerometer _accelerometer;
private LightSensor _sensor;
private LightSensorReading _senr;
private Gyrometer _gyrometer;
private GyrometerReading _gyro;
private Inclinometer _inclinometer;
private InclinometerReading _inc;
private OrientationSensor _orientationSensor;
private OrientationSensorReading _orient;
public SensorValues()
{
InitializeComponent();
}
private void button1_Click(object sender, EventArgs e)
{
if (_accelerometer != null)
{
if (_acc == null)
_acc = _accelerometer.GetCurrentReading();
else
{
AccX.Text = _acc.AccelerationX.ToString("0.000");
AccY.Text = _acc.AccelerationY.ToString("0.000");
AccZ.Text = _acc.AccelerationZ.ToString("0.000");
}
}
}
private void button2_Click(object sender, EventArgs e)
{
if (_gyrometer != null)
{
if (_gyro == null)
_gyro = _gyrometer.GetCurrentReading();
else
{
AngvX.Text = _gyro.AngularVelocityX.ToString("0.00");
AngvY.Text = _gyro.AngularVelocityY.ToString("0.00");
AngvZ.Text = _gyro.AngularVelocityZ.ToString("0.00");
}
}
}
private void button5_Click(object sender, EventArgs e)
{
if (_sensor != null)
{
if (_senr == null)
_senr = _sensor.GetCurrentReading();
else
{
Lux.Text = _senr.IlluminanceInLux.ToString("0.000");
}
}
}
private void SensorValues_Load(object sender, EventArgs e)
{
_accelerometer = Accelerometer.GetDefault();
if (_accelerometer == null)
{
MessageBox.Show("Accelerometer Currently unavailable");
}
else
{
MessageBox.Show("Accelerometer Found and Initiated");
}
_sensor = LightSensor.GetDefault();
if (_sensor == null)
{
MessageBox.Show("Ambient Light Sensor unavailable");
}
else
{
MessageBox.Show("Ambient Light Sensor Found and Initiated");
}
_gyrometer = Gyrometer.GetDefault();
if (_gyrometer == null)
{
MessageBox.Show("Gyrometer Currently unavailable");
}
else
{
MessageBox.Show("Gyrometer Found and initiated");
}
_inclinometer = Inclinometer.GetDefault();
if (_inclinometer == null)
{
MessageBox.Show("Inclinometer Currently unavailable");
}
else
{
MessageBox.Show("Inclinometer Sensor Found");
}
_orientationSensor = OrientationSensor.GetDefault();
if(_orientationSensor==null)
{
MessageBox.Show("Orientation Sensor unavailable");
}
else
{
MessageBox.Show("Orientation Sensor Found");
}
}
private void button3_Click(object sender, EventArgs e)
{
if(_inclinometer !=null)
{
if (_inc == null)
{
_inc = _inclinometer.GetCurrentReading();
}
else
{
PD.Text = _inc.PitchDegrees.ToString("0.00");
RD.Text = _inc.RollDegrees.ToString("0.00");
YawD.Text = _inc.YawDegrees.ToString("0.00");
}
}
}
private void button4_Click(object sender, EventArgs e)
{
if (_orientationSensor != null)
{
if (_orient == null)
{
_orient = _orientationSensor.GetCurrentReading();
}
else
{
label14.Text = _orient.Quaternion.W.ToString("0.00");
label15.Text = _orient.Quaternion.X.ToString("0.00");
label16.Text = _orient.Quaternion.Y.ToString("0.00");
label17.Text = _orient.Quaternion.Z.ToString("0.00");
RotM11.Text = _orient.RotationMatrix.M11.ToString("0.00");
RotM12.Text = _orient.RotationMatrix.M12.ToString("0.00");
RotM13.Text = _orient.RotationMatrix.M13.ToString("0.00");
RotM21.Text = _orient.RotationMatrix.M21.ToString("0.00");
RotM22.Text = _orient.RotationMatrix.M22.ToString("0.00");
RotM23.Text = _orient.RotationMatrix.M23.ToString("0.00");
RotM31.Text = _orient.RotationMatrix.M31.ToString("0.00");
RotM32.Text = _orient.RotationMatrix.M32.ToString("0.00");
RotM33.Text = _orient.RotationMatrix.M33.ToString("0.00");
}
}
}
private void button6_Click(object sender, EventArgs e)
{
UltraknowHow un = new UltraknowHow();
un.ShowDialog();
}
private void button7_Click(object sender, EventArgs e)
{
System.Environment.Exit(0);
}
}
}
The figures below shows the Form View
Packaging the application
I used Installshield to package my application.When you run the project for the
first time it creates a VS solution file.Now you will have to use this solution
file to create the exe or the installer.You need to click on new project and then
go to other project types,setup and deployment.Click on Install Shield Limited edition
project,give a name.Right click on solution project.add existing project,select
the VS solution file to add the project an use project assistant to complete the
wizard.Specify application information.
The figure shown below how to start InstallShield and further package the app
The Figures below shows the way to compile the exe with the InstallShield packaging
option
Just mention the application requirements to your liking.Here you can mention
the project dependency such as which framework is required?targeting which OS etc
Add project files and folders.Add the the solution file and important dpendency
files to your project susch as DLL files,then the app image that will put up when
your app is installed etc.
The next figure shows the InstallShield wizard in its final phase
You can skip the last two steps and then build the solution.A setup file will
be created, I used the exe to upload my app to Intel App Up Store. Now the most
important thing you need to digitally sign the exe before uploading.Itis the most
important step because without this your app will not be accepted.Use MSI Tool utility
to sign the app.
The next figure show how to sign the app with the MSI Tool
The figure below shows how the Digital Signature file looks like.Its a *.pfx
file
Things to remember
1) Make sure you make the initial arrangements to make the project file compatible
to use the Core Windows 8 files
2) Keep in mind the application Lifecycle of Windows 8 app.The app starts very
fast and when not in use runs at background. So the ideal way of development would
be to use a thread for the entire lifecycle so that your app is very stable(I have
not used any Thread in my Development still learning about it).
Use The new keyword ASYNC and AWAIT to its full potential.Life will be more easy
with it.Explore and Enjoy. Remember when you experiment Failure is the Key to success.
I am into software Development for less than a year and i have participated in 2 contests here at Codeproject:-Intel App Innovation Contest 2012 and Windows Azure Developer Challenge and been finalist at App Innovation contest App Submission award winner as well won two spot prizes for Azure Developer Challenge.I am also a finalist at Intel Perceptual Challenge Stage 2 with 6 entries nominated.I also won 2nd prize for Ultrabook article contest from CodeProject
Link:-
http://www.codeproject.com/Articles/523105/Ultrabook-Development-My-Way
Microsoft MVA Fast Track Challenge Global Winner.
Ocutag App Challenge 2013 Finalist.
My work at Intel AppUp Store:-
UltraSensors:-
http://www.appup.com/app-details/ultrasensors
UltraKnowHow:-
http://www.appup.com/app-details/ultraknowhow


 General
  News
News  Suggestion
  Question
  Bug
Bug  Answer
  Joke
Joke  Praise
  Rant
Rant  Admin
Admin 


