What does this Document Contain?
This document provides an overview of how LINQ can be used in creating and querying XML. This document provides the real time scenarios which we come across, while working with LINQ to XML, with pieces of code and easy to understand screenshots of output.
Who Can Read?
Everyone who is interested in exploring how to use LINQ in .NET, to play with XML.
How is this Useful to me?
This document does not discuss all the topics in depth, but will surely serve you as a quick start guide to work with LINQ to XML.
LINQ: Language Integrated Query is a Microsoft .NET Framework component that adds the native querying capabilities to .NET Languages.
What is LINQ to XML: In memory XML Programming interface that enables us to work with XML from within the .NET Framework programming languages.
Advantage of LINQ to XML: Integration with LINQ, which enables us to write queries on the in memory XML Document to retrieve collection of Elements and Attributes. These Linq queries are syntactically different from XPath but provide similar functionality.
Ease of using query results as parameters to XElement and XAttribute object constructors enabling an easy approach in creating XML Trees, which further enable easy transformation of the XML Trees from one shape to another.
Namespace which needs to be included in your code in order to work with LINQ to XML: System.Xml.Linq.
Starting from .NET 3.5, Creating XML in .NET is made easy with LINQ (Language Integrated Query). Some important syntax changes in creating a XML document are here under.
| XML in Older versions of .NET | XML Starting from .NET 3.5 |
XMLDocument | XDocument |
XMLElement | XElement |
XMLAttribute | XAttribute |
XMLNamespace | XNamespace |
XMLNode | XNode |
Creating a Simple XML
We are creating an XDocument (nothing but an XML) with Employee details like Name, Id and Designation.
XDocument document = new XDocument(
                new XElement("Employees",
                    new XElement("Name", "Krishna"),
                    new XElement("ID", "12345"),
                    new XElement("Designation", "Engineer")));
As shown in the above piece of code, it is as simple as mentioning a KEY, VALUE pair just like new XElement("Name", "Krishna").
And the output is:
Creating XML with Element Attributes
In most of the real time scenarios, we need to create XML with Element attributes. Here is the code to create an Employees XML with their designation as Element attribute.
XDocument xDocument = new XDocument(
                new XElement("Employees",
                    new XElement("Employee", "Pavan",
                        new XAttribute("Designation", "Developer")),
                        new XElement("Employee", "sudhir",
                            new XAttribute("Designation", "Tester"))));
Output:

Creating XML with Namespace
When creating an XDocument with namespace, you have to explicitly add the namespace to the child element also (new XElement(myNamespace + "Employee", "sudhir"), so that it will be inside the parent element namespace, as shown here.
XNamespace myNamespace = "https://www.microsoft.com";
XDocument xDocument = new XDocument(
                new XElement(myNamespace + "Employees",
                    new XElement(myNamespace + "Employee", "Pavan",
                        new XAttribute("Designation", "Developer")),
                        new XElement(myNamespace + "Employee", "sudhir",
                            new XAttribute("Designation", "Tester"))));
And the output will be as shown below:
If you do not mention the namespace keyword (here it is “myNamespace”) while adding child elements, the output will be as shown here under:
As spotted with a Red circle, we will get an empty attribute in all the Child Elements. So we need to append namespace for each Child Element while creating the XDocument.
Working with Multiple Namespaces
Some scenarios expect us to have multiple namespaces in the XDocument we create. One namespace is for Parent Node and the other for all the Child Nodes. In such cases, we need to use two different XNamespace variables as shown below:
XNamespace firstNamespace = "https://www.microsoft.com";
XNamespace secondNamespace = "https://www.microsoft.com/myBlogs";

XDocument myDocument = new XDocument(
                new XElement(firstNamespace + "Employees",
                    new XElement(firstNamespace + "Employee", "Senthil"),
                    new XElement(firstNamespace + "Employee", "Prabhu"),
                    new XElement(secondNamespace + "Employee", "Sampath"),
                    new XElement(secondNamespace + "Employee", "Kumar")));
Output:
Prefixing the Namespace
If we see the above example, in the output it looks messy to have the namespace URL in each and every Child Element. In order to overcome this, we can include the second namespace also in the Parent Element and assign a keyword for it and then append this keyword while creating XElements.
XDocument myDocument = new XDocument(
                new XElement(firstNamespace + "Employees",
                    new XAttribute(XNamespace.Xmlns +"secondNamespace",secondNamespace),
                    new XElement(firstNamespace + "Employee", "Senthil"),
                    new XElement(firstNamespace + "Employee", "Prabhu"),
                    new XElement(secondNamespace + "Employee", "Sampath"),
                    new XElement(secondNamespace + "Employee", "Kumar")));
Output:
Saving the XML
We can save the created XDocument to any location, as XML document:
XDocument xDoc = new XDocument(
                new XElement("Friends",
                    new XElement("Friend", "Senthil"),
                    new XElement("Friend", "Prabhu")));

            xDoc.Save(@"c:\myTest.xml");
When we go to the physical path and open the saved XML in browser, we can see as below:
Loading the Saved XML
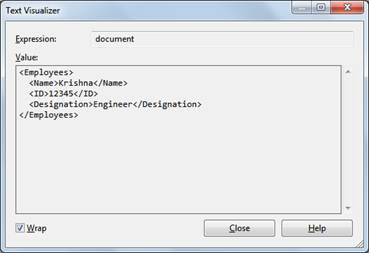
We can load the saved XML document and create XDocument using the below piece of code. Here I am loading the XML document and then binding the generated XDocument to a string variable.
XDocument myDoc = XDocument.Load(@"c:\myTest.xml");
string check = myDoc.ToString();
When we check with the string variable in Text visualizer, it looks like below:
Methods of XElement Class
Attribute, Attributes, Element, Elements, Descendants, Ancestors.
There are many methods and it’s a big list to mention here. We will see how to make use of some of the most commonly used methods like the ones mentioned above.
- Element: Gives you the immediate Child Node
- Elements: Gives the collection of Child Elements of this element or document as per the document order
- Descendants: Gives you all the Child Nodes
- Attributes: Returns a collection of Attributes of this Element
- Attribute: Returns the
XAttribute of this XElement that has the specified XName
Getting Elements with a Specific Name
XDocument myDocument = new XDocument(
                new XElement("Employees",
                    new XAttribute(XNamespace.Xmlns +"secondNamespace",secondNamespace),
                    new XElement(firstNamespace + "Employee", "Senthil"),
                    new XElement(firstNamespace + "Employee", "Prabhu"),
                    new XElement(secondNamespace + "Employee", "Sampath"),
                    new XElement(secondNamespace + "Employee", "Kumar")));

            foreach (XElement myElement in myDocument.Descendants
            (firstNamespace + "Employee"))
            {
               String sOne += (string)myElement;
            }
foreach statement is used to loop through all the values returned for Element “Employee” and then these values are assigned to a string variable. Explicit conversion is required while assigning the Element value to a string variable. And the output is:
In the same way, we can get the Element attribute values, using the below query:
foreach (XElement myElement in xdoc.Descendants("Employee"))
{
    foreach (XAttribute xAtt in myElement.Attributes())
    {
        String sTwo = (string)xAtt;
    }
}
Parsing a string to XDocument
Consider a string which contains XML, as shown below:
string myString =
                @"<?xml version=""1.0"" encoding=""utf-8""?>
                <BankDetails>
                    <AccountHolder>Sai Krishna</AccountHolder>
                    <AccountNumber>12345678912</AccountNumber>
                    <AccountType>Savings</AccountType>
                </BankDetails>";
Now, call the Parse method in order to generate XDocument from the above string:
XDocument myXDoc = XDocument.Parse(myString);
Output:
Using Query operators on XDocument
Consider we need all the Director names who direct “Action” Type movie, from the below XDocument.
XDocument xdoc = new XDocument(
               new XElement("Directors",
                   new XElement("Director", "James cameron",
                       new XAttribute("Type", "Sci-Fi")),
                       new XElement("Director", "Guy Ritchie",
                           new XAttribute("Type", "Action")),
                               new XElement("Director", "clientEastwood",
                                   new XAttribute("Type", "Action")),
                                   new XElement("Director", "ManiRatnam",
                                       new XAttribute("Type", "Sci-Fi"))));
The query which we need to write:
var myDirectors = from xE in xdoc.Descendants("Director")
                              where xE.Attribute("Type").Value == "Action"
                              orderby xE.Value
                              select xE.Value;
            foreach (var Director in myDirectors)
            {
                Console.WriteLine(Director);
            }
Output:
We get “Client Eastwood” and “Guy Ritchie” as they are having attribute type as “Action”.
Appending Elements to Already Existing XDocument
Consider there is an XDocument already created. We need to add couple of additional elements to the existing XDocument. Say, we need to add two more employees details to the already existing Employee XML tree. The code here shows you how to do that:
XDocument myDoc = new XDocument(
               new XElement("SASTeam",
                   new XElement("Employee",
                   new XElement("Designer", "Naveen"),
                   new XElement("DBA", "Shankar")
                   )));
If we check this XDocument, we will get the below XML tree.
Now, add two more employee details as shown here:
myDoc.Root.Element("Employee").Add(
                new XElement("Developer", "Kaipa"),
                new XElement("Tester", "Kartheek"));
And the output is:
You can see in the output, that two employee details “Kaipa” and “kartheek” added to the existing Employee Tree.
XDocument and String
Consider the XDocument mentioned in the previous section. We can convert this to an XML string by just calling the Tostring() method.
string myString = myDoc.ToString();
And the result string value is:
myString =
"<SASTeam>\r\n  <Employee>\r\n    <Designer>Naveen</Designer>\r\n
<DBA>Shankar</DBA>\r\n    <Developer>Kaipa</Developer>\r\n
<Tester>Kartheek</Tester>\r\n  </Employee>\r\n</SASTeam>"
I can see that this is not what we expect. In order to remove the special characters like “\r\n”, we need to do as below, while assigning the XDocument to string.
string myString = myDoc.ToString(SaveOptions.DisableFormatting);
And the result string is as shown below:
myString =
"<SASTeam><Employee><Designer>Naveen</Designer><DBA>Shankar</DBA>
<Developer>Kaipa</Developer><Tester>Kartheek</Tester></Employee></SASTeam>"
The default SaveOption will be None (SaveOptions.None). We need to switch between the options based on our requirement.
XDeclaration Issue
In the above section if we observe, there is no XDeclaration in the XDocument. We will create the same XDocument, but with XDeclaration this time:
XDocument myDoc = new XDocument(
                new XDeclaration("1.0","utf-8","yes"),
                   new XElement("SASTeam",
                       new XElement("Employee",
                       new XElement("Designer", "Naveen"),
                       new XElement("DBA", "Shankar")
                   )));
Now if we check with the myString, we will get:
In the result string, we can see that XML Declaration is missing. To overcome this, we need to explicitly append the declaration string as shown here:
string myString = myDoc.Declaration.ToString() +
myDoc.ToString(SaveOptions.DisableFormatting);
And now the string value is:
Summary
LINQ to XML is the new approach in constructing, writing, reading and querying XML data using the latest .NET framework language capabilities. This new API simplifies working with XML and provides a superior developer experience.
This member has not yet provided a Biography. Assume it's interesting and varied, and probably something to do with programming.


 General
  News
News  Suggestion
  Question
  Bug
Bug  Answer
  Joke
Joke  Praise
  Rant
Rant  Admin
Admin 


