The original post can be found here.
Introduction/Catalog
Due to limited time, synchronization cannot be guaranteed in more than one blog article. At the following address, you can view up-to-date content, hope you understand:
Download sample: JQueryElementDemo-en.zip, the directory is /timer/Default.aspx.
This article explains the function and use of a Timer:
Prepare
Be sure that you have got the latest version of JQueryElement from here.
Use the following statements to reference namespaces:
<%@ Register Assembly="zoyobar.shared.panzer.JQueryElement"
 Namespace="zoyobar.shared.panzer.ui.jqueryui"
 TagPrefix="je" %>
<%@ Register Assembly="zoyobar.shared.panzer.JQueryElement"
 Namespace="zoyobar.shared.panzer.web.jqueryui"
 TagPrefix="je" %>
In addition to the namespace, you need to reference the jQueryUI scripts and styles. There is a custom theme for jQueryUI in the compressed file downloaded from here. If you need more themes, you can get them at jqueryui.com/download:
<link type="text/css" rel="stylesheet"
 href="[style path]/jquery-ui-1.8.15.custom.css" />
<script type="text/javascript"
 src="[script path]/jquery-1.6.2.min.js"></script>
<script type="text/javascript"
 src="[script path]/jquery-ui-1.8.15.custom.min.js"></script>
Interval
Use the property Interval to set the interval, in milliseconds; the default is 1000 milliseconds.
Client Tick Event
The property Tick of the Timer represents the trigger event run on a client:
<je:Timer ID="checkTimer" runat="server" Tick="
function(pe, e){
 alert('Count ' + e.count.toString());
}
">
</je:Timer>
The property Tick is a JavaScript function; you can write code that is executed when the tick event occurs. The property Count of parameter e indicates how many times the event occurred after the timer started.
Server Tick Event
By setting the TickAsync property, you can call methods on the server side, as follows:
<je:Timer ID="checkTimer" runat="server">
 <TickAsync Url="<tick event url>" MethodName="<tick event name>"
  Success="<javascript method>">
  <ParameterList>
   <je:Parameter Name="<parameter 1>"
    Type="Expression"
    Value="<value 1>"
    Default="<default value 1>" />
   <je:Parameter Name="<parameter 2>"
    Type="Selector"
    Value="<selector 2>"
    Default="<default value 2>" />
  </ParameterList>
 </TickAsync>
</je:Timer>

<je:Timer ID="checkTimer" runat="server">
 <TickAsync Url="webservice.asmx" MethodName="NewEMailCount"
 Success="
 function(data){
 }
 ">
 </TickAsync>
</je:Timer>
Using Parameter, you can add parameters for AJAX calling. More information about Parameter can be found here: Through Parameter Object Add Ajax Request Parameter.
The JavaScript method in the property Success handles the JSON returned by the server. To learn how to return JSON, refer to Return JSON In Different .NET Version. The above code was written in .NET 2.
Start and Stop the Timer
In JavaScript, call the Start and Stop methods to start or stop the timer. The syntax is <timer variable>.__timer('start'); and <timer variable>.__timer('stop');:
<script type="text/javascript">
 $(function () {

  checkTimer.__timer('start');

 });
</script>
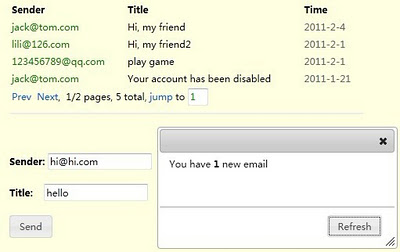
Appendix: New Email Notifications
This section describes the design concept for email notifications about this example. We use a Timer control on the page to regularly get information about new email from the WebService:
<je:Timer ID="checkTimer" runat="server" IsVariable="true"
 Interval="5000">
 <TickAsync Url="webservice.asmx" MethodName="NewEMailCount"
 Success="
 function(data){
  newEMailCount += data;

  if(newEMailCount != 0){
   $('#newcount').text(newEMailCount.toString());
   newDialog.dialog('open');
  }
 }
 ">
 </TickAsync>
</je:Timer>
The method NewEMailCount returns the number of new emails within 5 seconds. This number is cumulative to a JavaScript variable newEMailCount. If newEMailCount is not 0, then open a dialog box that displays the number of new emails. Once the dialog box closes, newEMailCount will be set to 0:
<je:Dialog ID="newDialog" runat="server" IsVariable="true"
 AutoOpen="false" Position="['right', 'bottom']"
 Html='You have <strong id="newcount"></strong> new email'
 Buttons="{'Refresh': function()
 { emailRepeater.__repeater('fill'); newDialog.dialog('close'); }}"
 Close="function(){ newEMailCount = 0; }">
</je:Dialog>
The number of new emails appear in the label newcount. In the Close property of the dialog, we write a JavaScript function to set newEMailCount to 0. The Buttons property of the dialog defines a refresh button which calls the Repeater's Fill method so you can refresh the message list. More information about the Repeater can be found here: 30 Minutes Grasp ASP.NET jQuery Repeater. The mailing list is as follows:
<table id="list">
 <je:Repeater ID="emailRepeater"
 runat="server" IsVariable="true"
  Selector="'#list'"
  PageSize="4" FillAsync-Url="webservice.asmx"
  FillAsync-MethodName="GetEMailList">
  <HeaderTemplate>
   <thead>
    <tr>
     <td>
      Sender
     </td>
     <td>
      Title
     </td>
     <td>
      Time
     </td>
    </tr>
   </thead>
  </HeaderTemplate>
  <ItemTemplate>
   <tr>
    <td class="sender">
    #{sender}
    </td>
    <td class="#{isnew,# ? 'new-mail' : ''}">
    #{title}
    </td>
    <td class="timer">
    #{time,jQuery.panzer.formatDate(#,'yyyy-M-d')}
    </td>
   </tr>
  </ItemTemplate>
  <FooterTemplate>
   <tfoot>
    <tr>
     <td colspan="2">
  <a href="#" je-onclick="prev">Prev</a>
  <a href="#" je-onclick="next">Next</a>,
  @{pageindex}/@{pagecount} pages, @{itemcount} total,
  <a href="#" je-onclick="goto,
  new Number(jQuery('#pageindex').val())">
  jump
  </a>
  to
  <input type="text" id="pageindex"
  value="@{pageindex}" />
     </td>
    </tr>
   </tfoot>
  </FooterTemplate>
 </je:Repeater>
</table>
On the page, we also add a text box and a button for sending new emails. The send button calls the SendEMail method on the server-side. This method adds a new email stored in the DataTable, and the number of new email plus 1, so that NewEMailCount can return the number of new emails:
<strong>Sender:</strong>
<input type="text" id="eSender" />
<je:Validator ID="vSender" runat="server" IsVariable="true"
 Target="#eSender"
 Need="true"
 NeedTip='<font color="red">Please input sender</font>'
 Reg="$.panzer.reg.email"
 RegTip='<font color="red">Please input a valid email address</font>'
 Checked="refreshSendButton">
</je:Validator>
<br />
<br />
<strong>Title:   </strong>
<input type="text" id="eTitle" />
<je:Validator ID="vTitle" runat="server" IsVariable="true"
 Target="#eTitle"
 Need="true"
 NeedTip='<font color="red">Please input title</font>'
 Checked="refreshSendButton">
</je:Validator>
<br />
<br />
<je:Button ID="cmdSend" runat="server" IsVariable="true"
 Label="Send" Disabled="true">
 <ClickAsync Url="webservice.asmx" MethodName="SendEMail"
 Success="
 function(data){
  alert(data);
 }
 ">
  <ParameterList>
   <je:Parameter Name="sender" Type="Expression"
    Value="vSender.__validator('option','value')" />
   <je:Parameter Name="title" Type="Selector"
    Value="'#eTitle'" />
  </ParameterList>
 </ClickAsync>
</je:Button>
In code, use the Validator control to validate the sender entered by the user and the title, which is not explained here. You can refer to jQuery Validator to Complete User Registration Validation.
Revision History
- 2011-11-26: Modifying presentation on referencing jQueryUI
This member has not yet provided a Biography. Assume it's interesting and varied, and probably something to do with programming.


 General
  News
News  Suggestion
  Question
  Bug
Bug  Answer
  Joke
Joke  Praise
  Rant
Rant  Admin
Admin 


