This article breaks down the animation process of Scattered Images step by step. It looks at Loading the Images, Creating the Polaroids, Generating Random Positions and Rotations, Positioning and Rotating the Polaroids, Dragging and Dropping Polaroids, triggering the animation functionality in our application that will bring a polaroid to the front, as well as Animating Transitions via JavaScript.
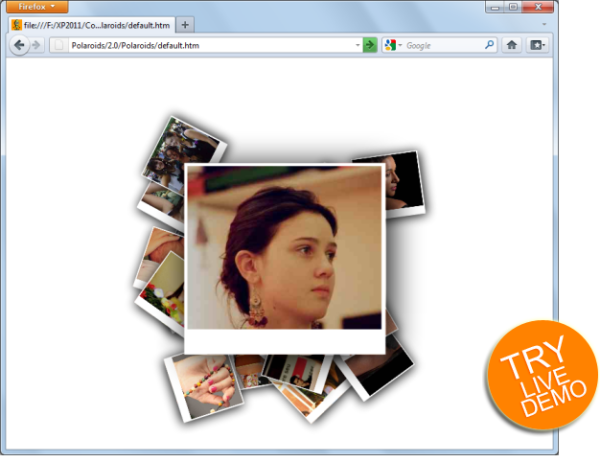
Table of Contents
Introduction
Scattered Polaroids is the first part of a project I'm developing for my friend Janaina Rossi Moreira, who works in a Brazilian theater company named "As Bárbaras do Multeatro".
The goal of the project is to publicize the work of the company, and at the same time provide the visitors with a nice audio and visual experience, relying on multimedia, videos, imagery, poems, and recollections that better capture the artistic essence of the company.
There are many ways one could develop to navigate through collections of photographs, usually in an orderly fashion. Scattered Polaroids is a different method, like when you take an old box full of pictures, drop them all on a table, and start picking them randomly. This article deals with this technique, and hopefully will be helpful for you in some way.
System Requirements
In order to run the Scattered Polaroids sample attached to this article, you must have a browser that supports CSS3 2D transforms:

- Internet Explorer 9 or superior
- Firefox
- Safari
- Chrome
The Polaroid Box
The Polaroid Box is the element that will hold the pictures and also receive some of the events needed for the mouse functionality.
It is mandatory that you have a polaroid_box div in your page, or another one that could serve as a holder for the pictures.
<body>
    <div class="polaroid_box">
    </div>
</body>
Loading the Images
The images are loaded in a simple array of strings that describes the URL path for the images:
$(document).ready(function () {
    var images = new Array();
    images[0] = 'Images/Barbaras1.jpg';
    images[1] = 'Images/Barbaras2.jpg';
    images[2] = 'Images/Barbaras3.jpg';
    images[3] = 'Images/Barbaras4.jpg';
    images[4] = 'Images/Barbaras5.jpg';
    images[5] = 'Images/Barbaras6.jpg';
    images[6] = 'Images/Barbaras7.jpg';
    images[7] = 'Images/Barbaras8.jpg';
    images[8] = 'Images/Barbaras9.jpg';
    images[9] = 'Images/Barbaras10.jpg';
    images[10] = 'Images/Barbaras11.jpg';
    images[11] = 'Images/Barbaras12.jpg';
    images[12] = 'Images/Barbaras13.jpg';
    images[13] = 'Images/Barbaras14.jpg';
    images[14] = 'Images/Barbaras15.jpg';
    images[15] = 'Images/Barbaras16.jpg';
    images[16] = 'Images/Barbaras17.jpg';
    images[17] = 'Images/Barbaras18.jpg';
    images[18] = 'Images/Barbaras19.jpg';
    images[19] = 'Images/Barbaras20.jpg';
    ...
Once the array is loaded, you can call the createPolaroids function to render all needed DOM elements inside the given parent element:
...
    maxZIndex = images.length;
    createPolaroids($('.polaroid_box'), images);
...
Creating the Polaroids
Here, the most important part is obviously creating the DOM elements that will render the polaroids in the page for us. Notice that we will rely heavily on the jQuery JavaScript framework. This will both reduce most of the boring work and also ensure that we will avoid cross-browser problems.
function createPolaroids($parentEl, images) {

    var parentWidth = $parentEl.width();
    var parentHeight = $parentEl.height();

    for (var i = 0; i < images.length; i++) {

        var polaroidHtml =
            '<div id="polaroid' + (i + 1) + '" class="polaroid">' +
            '    <img id="img' + (i + 1) + '" class="photo" />' +
            '    <img src="Images/Polaroid_2.png" class="polaroid_photo" />' +
            '</div>';

        $parentEl.append(polaroidHtml);
        var $polaroid = $('#polaroid' + (i + 1));
        var $img = $('#img' + (i + 1));

        var width = $polaroid.width();
        var height = $polaroid.height();

        $img.attr('src', images[i]);
        $polaroid.css('z-index', 1000);
    }
...
Generating Random Positions and Rotations
We need to generate random positions and rotations for each polaroid, otherwise this couldn't be called "scattered" polaroids. So, all we need to do here is generate numbers that fall between acceptable boundaries of our screen (that is, the pictures are contained in a box, so we don't want our pictures falling off the screen).
for (var i = 0; i < images.length; i++) {
    var $el = $('#polaroid' + (i + 1));
    var windowWidth = $(window).width();
    var windowHeight = $(window).height();
    var offset = (windowWidth - windowHeight) / 2;
    var width = $el.width();
    var height = $el.height();
    var rotation = Math.random() * maxRotationAngle * 2 - maxRotationAngle;
    var left = offset + Math.random() * (parentHeight - width);
    var top = Math.random() * (parentHeight - height);
    ...
}
Now that we have gathered all the data needed for a polaroid, we create a new polaroid type that hold this information. This will be useful to encapsulate data and provide methods for manipulating the polaroids.
for (var i = 0; i < images.length; i++) {
    ...
    polaroids[i] = new polaroid(i + 1, $el, $parentEl, minScale,
                   rotation, left, top, width / 2, height / 2, i);
}
The information is then provided to the polaroid function as a constructor, that will then hold the parameters in the instance:
function polaroid(id, $el, $parentEl, scale, rotation, left,
         top, xTransOrigin, yTransOrigin, zIndex) {
    this.id = id;
    this.$el = $el;
    this.$parentEl = $parentEl;
    this.scale = scale;
    this.rotation = rotation;
    this.originalScale = scale;
    this.originalRotation = rotation;
    this.originalLeft = left;
    this.originalTop = top;
    this.originalZIndex = zIndex;
    this.startRotation = rotation;
    this.left = left;
    this.top = top;
    this.xTransOrigin = xTransOrigin
    this.yTransOrigin = yTransOrigin;
    this.interval = null;
    this.isMoving = false;
    this.zIndex = zIndex;
    this.xOffset = 0;
    this.yOffset = 0;
}
Positioning and Rotating the Polaroids
Once the polaroid data is loaded, we can then call the updateLayout prototype function that will update the required CSS attributes accordingly:
polaroid.prototype.updateLayout = function () {
    this.$el.css('left', this.left + 'px');
    this.$el.css('top', this.top + 'px');
    this.$el.css('z-index', this.zIndex);
    var transform =
        'rotate(' + this.rotation + 'deg) scale(' + this.scale + ')';
    this.$el.css({ "-webkit-transform": transform,
         "-moz-transform": transform, msTransform: transform });
};
It's important to notice that the last line in the code snippet above is providing the CSS transforms for the major browsers:
- -webkit-transform: Chrome and Safari
- -moz-transform: Firefox
- msTransform: Internet Explorer
Using CSS3 Box Shadows
CSS3 box shadows provide the shadow that outlines our pictures. It's a nice feature and makes our pages visually appealing. But as happens with most of the nice things in this world, you should use it with moderation. A box shadow can require intense processing, depending on how you use it. Our polaroid CSS class defines a box shadow with an offset of (4,4) and a depth of 32 pixels:
.polaroid
{
    ...
    -moz-box-shadow: 4px 4px 32px #000;
    -webkit-box-shadow: 4px 4px 32px #000;
    box-shadow: 4px 4px 32px #000;
    ...
}
As you will see later on in this article, we remove the box shadow during the polaroid animations, for the benefit of better performance. As a tip, it could be a good idea to drop the use of box shadows at all, replacing them by a static .png image (PNG images allow transparency), thus improving the performance.
Dragging and Dropping Polaroids
The application knows which polaroid is being dragged by storing the polaroid instance in the selectedPolaroid variable. When you click on some polaroid, the mousedown event of the polaroid will be triggered and the selectedPolaroid will be stored.
$('.polaroid').mousedown(function (event) {
    var id = $(this).attr('id');
    var i = id.replace('polaroid', '');

    var polaroid = polaroids[i - 1];

    if (polaroid.scale == minScale) {
        polaroid.zIndex = maxZIndex++;
        polaroid.updateLayout();

        if (selectedPolaroid) {
            selectedPolaroid = null;
        }
        else {
            selectedPolaroid = polaroid;
            selectedPolaroid.xOffset = event.pageX - selectedPolaroid.left;
            selectedPolaroid.yOffset = event.pageY - selectedPolaroid.top;
        }
    }
    else {
        if (zoomedPolaroid.id == polaroid.id) {
            polaroid.drop();
        }
    }
});
From this point on, any mouse movement will be triggered by the mousemove event of the polaroid box, and the selected polaroid position will be updated:
$polaroid_box.mousemove(function (event) {
    if (selectedPolaroid) {
        selectedPolaroid.left = event.pageX - selectedPolaroid.xOffset;
        selectedPolaroid.top = event.pageY - selectedPolaroid.yOffset;
        selectedPolaroid.updateLayout();
    }
});
The drag-and-drop is finished when you release the mouse button. At this point, we set the selectedPolaroid variable to null.
$polaroid_box.mouseup(function (event) {
    if (selectedPolaroid) {
        selectedPolaroid.originalLeft = selectedPolaroid.left;
        selectedPolaroid.originalTop = selectedPolaroid.top;
        selectedPolaroid = null;
    }
});
Pulling a Polaroid
At some point, you find a picture interesting and want to see it closer. So you double-click it. This will trigger the animation functionality in our application that will bring a polaroid to the front. The picture will look greater and perfectly straight in the center of the screen. This is done by an animation, which is the more complex part of this application, to be explained better later on. Once a polaroid is taken, we set the zoomedPolaroid variable and wait until the user drops it or double-clicks another picture.
$('.polaroid').dblclick(function () {
    var id = $(this).attr('id');
    var i = id.replace('polaroid', '');

    var polaroid = polaroids[i - 1];

    if (zoomedPolaroid) {
        zoomedPolaroid.zIndex = maxZIndex++;
        zoomedPolaroid.updateLayout();
        zoomedPolaroid.drop(null, function () {
            zoomedPolaroid = null;
        });
    }

    if (polaroid.scale == minScale) {
        polaroid.originalZIndex = maxZIndex++;
        polaroid.zIndex = maxZIndex + 1000;
        polaroid.updateLayout();
        polaroid.pull(null, function () {
            zoomedPolaroid = polaroids[polaroid.id - 1];
            selectedPolaroid = null;
        });
    } else {
        polaroid.originalZIndex = maxZIndex++;
        polaroid.zIndex = maxZIndex++;
        polaroid.drop();
    }
});
Dropping a Polaroid
The zoomed polaroid is dropped when the user clicks on it or double-clicks another polaroid. This will start the reverse animation, and the polaroid will leave the center of the screen and go back to its previous position, scale, and rotation angle.
Animating Transitions via JavaScript
The animations are the complex part. They require the target scale, target rotation angle, and target position. Since the polaroid may be going to the center or coming back to its previous location, we avoid code duplication by encapsulating the core functionality inside the animate function.
First, we calculate the deltas (one for the angle, another one for the scale, and two deltas for the location). Then we calculate the steps (that is, the increment to be applied to the current animation value at each iteration). Then we start the setInterval function to reposition the polaroid, rotate it, and update the underlying DOM element, until the animation reaches the target values.
polaroid.prototype.animate = function (targetScale, targetRotation,
         targetLeft, targetTop, beginCallback, endCallback) {
    var pol = this;

    if (pol.isMoving)
        return;

    pol.isMoving = true;

    var parentWidth = this.$parentEl.width();
    var parentHeight = this.$parentEl.height();

    var polaroid = pol;

    if (beginCallback)
        beginCallback(polaroid);

    var angleDelta = targetRotation - polaroid.rotation;
    var scaleDelta = targetScale - polaroid.scale;
    var leftDelta = targetLeft - polaroid.left;
    var topDelta = targetTop - polaroid.top;

    var steps = animationSteps;
    var scaleStep = scaleDelta / steps;
    var rotationStep = angleDelta / steps;
    var leftStep = leftDelta / steps;
    var topStep = topDelta / steps;

    var interval;

    var rotation = polaroid.rotation;
    var scale = polaroid.scale;
    var left = polaroid.left;
    var top = polaroid.top;

    var $polaroid = $('#polaroid' + pol.id);

    $polaroid.css('z-index', 100);

    $polaroid.css({ "-moz-box-shadow": "0 0 0 #fff" });
    $polaroid.css({ "-webkit-box-shadow": "0 0 0 #fff" });
    $polaroid.css({ "box-shadow": "0 0 0 #fff" });

    var interval = setInterval(function () {
        if (
                (scaleStep > 0 && scale >= targetScale) ||
                (scaleStep < 0 && scale <= targetScale)
            ) {
            scale = targetScale;
        }

        $polaroid.css({ WebkitTransform: 'rotate(' + rotation +
                        'deg) scale(' + scale + ')' });
        $polaroid.css({ '-moz-transform': 'rotate(' + rotation +
                        'deg) scale(' + scale + ')' });
        $polaroid.css({ msTransform: 'rotate(' + rotation +
                        'deg) scale(' + scale + ')' });
        $polaroid.css('left', left + 'px');
        $polaroid.css('top', top + 'px');

        if (scale == targetScale) {
            $polaroid.css({ "-moz-box-shadow": "4px 4px 32px #000" });
            $polaroid.css({ "-webkit-box-shadow": "4px 4px 32px #000" });
            $polaroid.css({ "box-shadow": "4px 4px 32px #000" });

            pol.isMoving = false;

            clearInterval(interval);

            rotation = targetRotation;
            scale = targetScale;
            left = targetLeft;
            top = targetTop;

            pol.rotation = targetRotation;
            pol.scale = targetScale;
            pol.left = targetLeft;
            pol.top = targetTop;

            pol.updateLayout();

            if (endCallback)
                endCallback(polaroid);
        }

        rotation += rotationStep;
        scale += scaleStep;
        left += leftStep;
        top += topStep;
    }, 5);
};
Final Considerations
I hope you liked both the article and the code. I think the techniques presented here are simple and useful. Please let me know what you think about it, by leaving a comment in the section below.
History
- 2011-08-28: Initial version.


 General
  News
News  Suggestion
  Question
  Bug
Bug  Answer
  Joke
Joke  Praise
  Rant
Rant  Admin
Admin 


