Introduction
Being new to C#, I wanted to jump in with a relatively simple Windows program to get started. So for my first app, I wanted a context menu which had little icons next menu items, like most standard menus seem to always have. I thought it would be easy ....everybody does it, right? No such luck...it turned out not to be as straightforward as I assumed it would be.
I started searching the articles, forums and examples and really didn't find any tutorials or examples which showed how to do it. Well, it took a little bit of researching and playing, but I finally got it and thought I'd share it here in case other newbies to C# are struggling with this too.
Standard Menus
So, let's jump in. A menu item by itself is quite simple, and mostly automated as far as its operation. When you create a new menu item, you give it the text you wish it to display and voila, it's there when you run your program and open the menu. The only thing you have to do is add a handler to tell the program what to do when the menu item is selected.
this.menuItemSelectAll.Index = 3;
this.menuItemSelectAll.Text = "Select All";
this.menuItemSelectAll.Click +=
new System.EventHandler(this.menuItemSelectAll_Click);

The index is automatically chosen by MS Visual Studio .NET (or whichever compiler you may be using). The text property is what is displayed for that menu item, usually chosen when the menu item is graphically created (See Figure 1). The last item shown is the line of code that tells the program, when the Click() event happens, run this event handler (this.menuItemSelectAll_Click).
private void menuItemSelectAll_Click(System.Object sender,
                                     System.EventArgs e)
  {
    this.textBoxMain.SelectAll();
  }
Menu Images
Ok, that's fine you say. I can see how to do a "normal" menu item, but what about adding an image?
Owner Draw Requirements
To add an image, you now lose the ability of using the standard, normal menu drawing routines. Apparently, the menu is drawn rectangle by rectangle for each menu item. So, if you put an image in any one particular item, you need to tell the compiler not use the standard menu drawing, but that you will override the drawing routine and do it yourself. You can do this by setting the owner draw option to true.
Notice the first few lines are the same as before, just the index value (set by compiler), the text and your click event handler.
this.menuItemCopy.Index = 2;
this.menuItemCopy.Text = "Copy";
this.menuItemCopy.Click +=
new System.EventHandler(this.menuItemCopy_Click);
this.menuItemCopy.OwnerDraw = true;
But when you set OwnerDraw to true, you now have to manually draw this menu item's rectangle, image and text. To do this, you must override two more event handlers (related to drawing), the DrawItem() and MeasureItem() event handlers.
this.menuItemCopy.DrawItem +=
new System.Windows.Forms.DrawItemEventHandler(this.DrawMenuItemCopy);
this.menuItemCopy.MeasureItem +=
new System.Windows.Forms.MeasureItemEventHandler(this.MeasureItemMenuItemCopy);
The MeasureItem Event Handler
Ok, now we've told the compiler that this menu item (menuItemCopy) is going to be drawn by us. We've also told the compiler we will provide the DrawItem() and MeasureItem() event handlers.
Now, we must do just that, fill in the event handlers. First, we'll take the MeasureItem() event handler. It does the measuring of the sizes for the image and the drawn text we will need for the rectangle of the menu item.
private void MeasureItemMenuItemCopy(object obj,
MeasureItemEventArgs miea)
{
MenuItem mi = (MenuItem)obj;
Font menuFont = SystemInformation.MenuFont;
StringFormat strfmt = new StringFormat();
SizeF sizef =
miea.Graphics.MeasureString(mi.Text,
menuFont,
1000,
strfmt);
Bitmap bmMenuImage =
new Bitmap(typeof(FormMenuImages),"COPY.BMP");
miea.ItemWidth =
(int)Math.Ceiling(sizef.Width) + bmMenuImage.Width;
miea.ItemHeight =
(int)Math.Ceiling(sizef.Height) + bmMenuImage.Height;
}
I tried to explain it as best I could via the comments, but just for completeness, let me cover a few points.
- The selection of
SystemInformation.MenuFont as the menu font lets us keep the same font the menu is using. My first mistake was to miss this feature so my menu items looked funny because they were drawn in a different font than the other menu items. - The
MeasureString() method gets the size needed to draw the words for the menu item in the particular font chosen. - Next, we instantiate the image needed for this menu item to measure its dimensions below.
- Lastly, we determine the width and height as the max of the text and image width and heights.
The DrawItem Event Handler
Now the last, and arguably most complicated (thought not "that" bad) part of the equation, the DrawItem() event handler. The DrawItem() method essentially draws 3 parts. The rectangle itself, the image on the left, and then the text on the right. Let's put the code down and then examine it.
private void DrawMenuItemCopy(object sender,
System.Windows.Forms.DrawItemEventArgs e)
{
MenuItem mi = (MenuItem)sender;
Font menuFont = SystemInformation.MenuFont;
SolidBrush menuBrush = null ;
if ( mi.Enabled == false )
{
menuBrush = new SolidBrush( SystemColors.GrayText );
}
else
{
if ( (e.State & DrawItemState.Selected) != 0)
{
menuBrush =
new SolidBrush( SystemColors.HighlightText );
}
else
{
menuBrush = new SolidBrush( SystemColors.MenuText );
}
}
StringFormat strfmt = new StringFormat();
strfmt.LineAlignment = System.Drawing.StringAlignment.Center;
Bitmap bmMenuImage =
new Bitmap(typeof(FormMenuImages),"COPY.BMP");
Rectangle rectImage = e.Bounds;
rectImage.Width = bmMenuImage.Width;
rectImage.Height = bmMenuImage.Height;
Rectangle rectText = e.Bounds;
rectText.X += rectImage.Width;
if ( (e.State & DrawItemState.Selected) != 0)
{
e.Graphics.FillRectangle(SystemBrushes.Highlight,
e.Bounds);
}
else
{
e.Graphics.FillRectangle(SystemBrushes.Menu,
e.Bounds);
}
e.Graphics.DrawImage(bmMenuImage, rectImage);
e.Graphics.DrawString( mi.Text,
menuFont,
menuBrush,
e.Bounds.Left + bmMenuImage.Width,
e.Bounds.Top + ((e.Bounds.Height - menuFont.Height) / 2),
strfmt ) ;
}
Ok, let's again dissect the code.
- Get the standard menu font just as before so that it is drawn in the same font as the other items.
- Define a brush for drawing and then check the menu item. If the menu item is not enabled, we want the text to display disabled. If it is not disabled, then we need to determine at draw time if the item is the currently selected item or not (to determine background color and text color). If the menu item is selected, we display it in
HighlightText, else it is drawn in normal MenuText. - Set the
string format used to draw, same as before. Standard Operating Procedure. - Again instantiate a
Bitmap, but this time we'll actually display the bitmap. - Instantiate a rectangle for the
Image portion, then compute its height and width based on the image's height and width. - Instantiate a
Rectangle for the text font. Compute its width (height comes later). - Again check if the item is selected. If the item is selected, we will fill the rectangle background with the Highlight color, else we will use the standard Menu color.
- Background was drawn, now draw the image with
DrawImage(). - Draw the text portion. Note the arguments to the
DrawString() method. Argument mi.Text is the text of the menuitem. menuBrush is the brush (color) we determined earlier. e.Bounds.Left + bmMenuImage.Width draws the text at the left side, offset by the width of the image. e.Bounds.Top + ((e.Bounds.Height - menuFont.Height) / 2) draws the text at the top offset by rectangle height - font height divided by 2. This is only to center the text vertically based on font size. Then lastly, the strformat again (Standard Operating Procedure again).
Voila! We are done!
Conclusion
So as you can see, it's not as hard as it seems, but not as easy as one would hope either. You would think that such a common thing as adding an image into menu is so commonplace that there would be a menuitem property for it, but alas no.
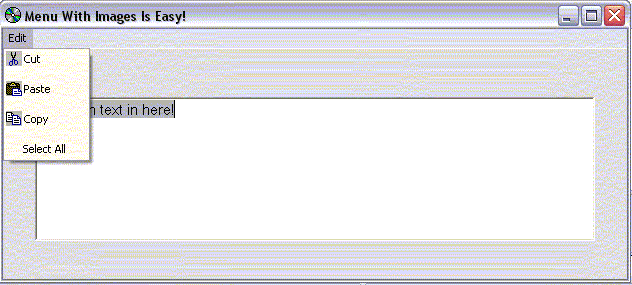
Included is a simple app which has a menu for cutting/copying and pasting within a text box. Just a simple app with images in the only menu (See Figure 2).
History
- June 1, 2003: Date posted
License
This article has no explicit license attached to it but may contain usage terms in the article text or the download files themselves. If in doubt, please contact the author via the discussion board below.
A list of licenses authors might use can be found here.
Java/C/C++ developer. Trying to push the company toward C# and .NET platform.


 General
  News
News  Suggestion
  Question
  Bug
Bug  Answer
  Joke
Joke  Praise
  Rant
Rant  Admin
Admin 


 In .Net 1.1 the Out of memory Exception is thrown
