Introduction
This article will describe how to setup a basic Sharepoint WSP solution project, build it and deploy it into Sharepoint. It includes example code and instructions on building the Sharepoint 2007 feature project, the required directory structure, code and a basic description of each part of the project.
Background
Installing Sharepoint features can have several challenges, but with a few well placed steps you can be off and running. This article will walk you through some basic steps to proper creation of a Sharepoint 2007 feature project in Visual Studio 2008 that can be built into a WSPBuilder deploy solution file, and includes some handy scripts to deploy into the Sharepoint site of your choice.
Disclaimer - Hope this helps, if it doesn't don't bother to harass me about it, you get what you pay for and you got this for free. You will need to open this project in Visual Studio 2008 or modify the project and solution files for an earlier version. If this worked for you, vote me a 5!
Getting Started
You will need to open a project in Visual Studio 2008 and have the plug in for WSPBuilder to use the example code provided and follow the article. The next step to creating a project in Visual Studio for a feature or other code on your site is to set up your Visual Studio Project correctly. Below is a typical project hierarchy for a feature with some custom pages in Visual Studio:
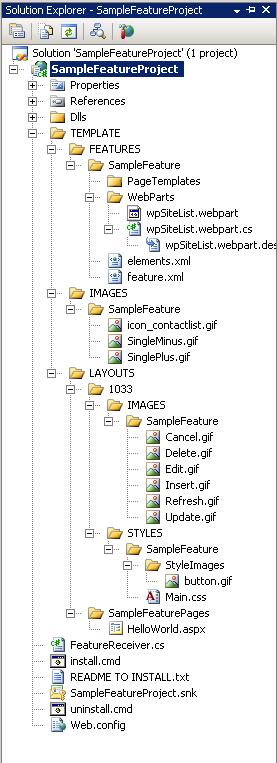
Notice the main content files in a feature deploy are located under the TEMPLATE directory. This allows WSPBuilder to build a .wsp solution file that understands once deployed where to put everything. To build your feature correctly, you need to have a few directories in place.
The main directories for this project are:
- FEATURES/SampleFeature - This is the project area where the code and meta-data files (like feature.xml and elements.xml) reside for feature setup and activation. Modifications to the site definition (ONET.XML) or web templates can also be placed here (N/A for this example)
- IMAGES - Any feature-level images can be added here
- LAYOUTS/1033/IMAGES - Global layout images
- LAYOUTS/1033/STYLES/SampleFeature - Contains feature-level styles
- LAYOUTS/SampleFeaturePages - This is an optional folder to extract functional feature controls and pages from the standard Sharepoint ones, this is where any specialized pages are located.
For this example, we will create "FEATURES/SampleFeature" to store the feature.xml and elements.xml for a feature. The feature for this example has functionality that will add a menu item to the edit control block menu (the right clicked popup menu on a document in a list in Sharepoint) and include this new menu item for all documents in site lists in the Sharepoint site collection for which this feature will be deployed.
The first part of the project we will examine is the feature.xml. This file contains the code which will tell Sharepoint what code to use for the feature, the "scope" of the code or where in the Sharepoint hierarchy the code will be available, and assign a Guid as an Id for use in installation. In the XML example below, we see several attributes:
<Feature
Id="8682CCBC-C49B-4957-ADAA-708E40C06121"
Title="SampleFeature"
Description="This is your feature description,
notice the scope is 'Site' since this example deploys on the site collection"
Scope="Site"
Hidden="false"
ImageUrl="SampleFeature\icon_contactlist.gif"
ReceiverAssembly="SampleFeatureProject, Version=1.0.0.0,
	Culture=neutral, PublicKeyToken=e30e9c1baed5c190"
ReceiverClass="SampleFeatureProject.FeatureReceiver"
xmlns="http://schemas.microsoft.com/sharepoint/">
    <ElementManifests>
        <ElementManifest Location="elements.xml"/>
    </ElementManifests>
</Feature>
Each attribute has a purpose and they are as follows:
Id - This is the feature id and will be used later in our WSP solution deployment script Title - This is a general Sharepoint attribute and doesn't matter for this example Description - Ditto, for this example it is just for reference Scope - This sets where in the site or site collection this feature will be available, since we will deploy this later to a site collection we set Scope to "Site" so all sub sites of the site collection can have this features functionality available. Hidden - N/A for this example ImageUrl - N/A for this example ReceiverAssembly - This is important, this is the assembly namespace for the FeatureReciever class ReceiverClass - The name of the feature receiver class, also important - elements.xml - This is where we can define our custom actions for the feature
The elements.xml holds specific functional actions for the feature.
The "Module" node has certain attributes like "List", "Url", and "Path" that determine what type of Sharepoint list this feature will be activated for. Since Sharepoint is a hierarchical collection of objects (or lists), these attributes determine which type and area to apply the feature to. The example below applies the feature to lists of type 113 which refers to a web part gallery. The "File" XML node gives us code that helps the solution to be deployable.
In the code below, we see the XML node "Module" and "CustomAction".
<Elements xmlns="http://schemas.microsoft.com/sharepoint/">
<Module
    Name="SampleFeature"
    List="113"
    Url="_catalogs/wp"
    Path="WebParts"
    RootWebOnly="False">
    <File
        Url="wpSiteList.webpart"
        Type="GhostableInLibrary" >
        <Property
            Name="Group"
            Value="Sample Feature Project Web Parts" />
    </File>
</Module>
<CustomAction
    Id="SampleFeatureProject.SampleItemMenu"
    RegistrationType="ContentType"
    RegistrationId="0x0101"
    ImageUrl="/_layouts/images/GORTL.GIF"
    Location="EditControlBlock"
    Sequence="120"
    Title="Send to Hello World" >
    <UrlAction
        Url="javascript:window.location='{SiteUrl}/_layouts/SampleFeaturePages/
   HelloWorld.aspx?ItemId={ItemId}&ListId={ListId}&
            Source=' + window.location" />
    </CustomAction>
</Elements>
The attributes on the "CustomAction" node have the following usage:
- "
RegistrationType" tells what type of Sharepoint list item to apply the features action to, in this case actual content. - "
Location" tells us which Sharepoint object to tie the action to, in this case the edit control block menu of a list item. - "
UrlAction" node has a URL which will open a page and feed that page the basic data to find the item in the Sharepoint web it is located in.
The "CustomAction" XML node applies the feature to some Sharepoint action. In this case, it defines a menu item in the "EditControlBlock" which is an identifier for a Sharepoint object type indicating an editing menu for a document. It defines a "UrlAction" node which gives the element an action of going to a specified URL. The URL points back to the page we defined in the project (LAYOUTS/SampleFeaturePages/HellowWorld.aspx).
Here is how it will look once deployed:

A few other parts of the solution are interesting.
The "LAYOUTS/SampleFeaturePages/HellowWorld.aspx" is the page that is called from the features CustomAction/UrlAction and displays some basic information on the list item in question passed to this page (in this case, the ItemId and ListId of the document as it is assigned in the Sharepoint site).
The FeatureReciever code contains events which programmatically sets a top link bar item on the global navigation bar on top of the site, and applies a cascading style sheet when the feature is activated. Notice the FeatureDeactivated event completely uninstalls all the feature components that the FeatureActivating event installs. This kind of cleanup is advised, since old feature components left after activation can cause issues.
public override void FeatureActivated(SPFeatureReceiverProperties properties)
{
SPWeb site = SPContext.Current.Web;
SPNavigationNodeCollection topNavigationNodes = site.Navigation.TopNavigationBar;
SPNavigationNode objItem = null;
objItem = new SPNavigationNode("MSN", "http://WWW.MSN.com", true);
topNavigationNodes.AddAsLast(objItem);
site.Update();
site.ApplyTheme("");
site.AlternateCssUrl = "/_layouts/1033/STYLES/SampleFeature/Main.css";
site.Update();
}
public override void FeatureDeactivating(SPFeatureReceiverProperties properties)
{
SPWeb site = SPContext.Current.Web;
site.AlternateCssUrl = "";
site.Update();
SPNavigationNodeCollection topNavigationNodes = site.Navigation.TopNavigationBar;
List<SPNavigationNode> nodesToDelete = new List<SPNavigationNode>();
foreach (SPNavigationNode node in topNavigationNodes)
{
if (node.Title == "MSN")
{
nodesToDelete.Add(node);
}
}
foreach (SPNavigationNode node in nodesToDelete)
{
topNavigationNodes.Delete(node);
}
site.Update();
SPFolder sitePagesFolder = site.GetFolder("SitePages");
sitePagesFolder.Delete();
}
The final component of interest is the web part feature code. For this example, the code in the wpSiteList.webpart files is a simple web part that gives a list of sites. The feature project solution build requires some feature code for deployment and I put this in the "FEATURES/SampleFeature/WebParts" directory using a basic web part with some sample code to accomplish this.
The main method in the web part is the CreateChildControls() method. In this method, the visual components and datasource for the web part are initialized. Notice that this methods' internal code is setup similar to a .aspx page_load event combined with a designer class initialize event, so that controls are created and added to the web part, and then a datasource is queried if the page is not a post back from the original page post.
protected override void CreateChildControls()
{
base.CreateChildControls();
listsView = new SPGridView();
listsView.AutoGenerateColumns = false;
this.Controls.Add(listsView);
BoundField colTitle = new BoundField();
colTitle.DataField = "Title";
colTitle.HeaderText = "Title";
listsView.Columns.Add(colTitle);
if (!this.Page.IsPostBack)
{
GetSiteList();
listsView.DataKeyNames = new string[] { "Title" };
listsView.DataSource = dt;
listsView.DataBind();
}
}
private void GetSiteList()
{
dt = new DataTable();
dt.Columns.Add("Title");
SPWeb mySite = SPContext.Current.Web;
SPWebCollection sites = mySite.Webs;
foreach (SPWeb subSite in sites)
{
DataRow dr = dt.NewRow();
dr["Title"] = subSite.Title;
dt.Rows.Add(dr);
}
}
To build your project once you have completed development, you must have installed the Visual Studio plugin for WSPBuilder (located here). To create your solution file, you will need to right click on your project, select WSPBuilder and the menu item "Build WSP". This builds a Sharepoint solution file in the root directory of your project.
Once you have built your solution file, you will need to run some sort of installation script to install it to Sharepoint. Included in the downloadable example is a handy one I created. To use it, you only need to change the variables thus:
WSPNAME - This is the name of your solution file compiled using WSPBuilder. SERVERSITEURL - This is a combination of your Sharepoint server name, port, and site collection name (if applicable) where you would like the solution deployed. FEATUREGUID - This comes from your feature.xml file, it is the feature id.
@echo off
CLS
SETLOCAL
SET StartDateTime=%DATE% at %TIME%
@SET STSADM="c:\program files\common files\microsoft shared\
		web server extensions\12\bin\stsadm"
@SET WSPNAME="SampleFeatureProject.wsp"
@SET SERVERSITEURL=[your server name: your port name]/sites/[Your Site Collection Name]
@SET FEATUREGUID="8682CCBC-C49B-4957-ADAA-708E40C06121"
ECHO --------------------------------------------
ECHO ^| %WSPNAME% deployment process ^|
ECHO ^| Started on %StartDateTime% ^|
ECHO --------------------------------------------

TITLE Deploying %WSPNAME% solution...
The FEATUREGUID variable is taken from the feature.xml id attribute:
<Feature
Id="8682CCBC-C49B-4957-ADAA-708E40C06121" ... >
Once you have changed the variables in the script, you can run this script and look in the Central Administration/Operations/Solution Management Page to see if errors occurred or if the solution was deployed correctly.
If you ever want to uninstall the solution, there is a script in the download for that as well, set the variables as you did in the install.cmd script:
@echo off
CLS
SETLOCAL
SET StartDateTime=%DATE% at %TIME%
@SET STSADM="c:\program files\common files\microsoft shared\
		web server extensions\12\bin\stsadm"
@SET WSPNAME="SampleFeatureProject.wsp"
@SET SERVERSITEURL=[your server name: your port name]/sites/[Your Site Collection Name]
@SET FEATUREGUID="8682CCBC-C49B-4957-ADAA-708E40C06121"

....
Now let's see the feature in action. Once the solution is deployed, go to the "Site Collection Features" page on the site collection you deployed the site to and deactivate and the activate the feature.
A note here - To get this to work, you have to go in after the install script has deployed and activated the feature and de-activate and re-activate the feature to get the "FeatureActivated" event to fire. Doesn't seem to work through activating the feature through the script.
Next go to any document library on the site and right-click one of the documents in the library.
Notice the "Send to Hello World" menu item. Click on this and the page HelloWorld.aspx is displayed with the path of the file:
Points of Interest
Simple, huh? It took me days and days to get just this little example...who says Sharepoint is easy, huh? Oh well, it is why we get paid the big bucks, if it was easy they would have anybody do it and we would get paid squat. Hope this helps, if it doesn't, don't bother to harass me about it, you get what you pay for and you got this for free.


 General
  News
News  Suggestion
  Question
  Bug
Bug  Answer
  Joke
Joke  Praise
  Rant
Rant  Admin
Admin 


