Introduction
The focus of this article is to introduce the readers to the concept of Windows Management Instrumentation and how it can be used to create some powerful applications using C# on .NET. Windows Management Instrumentation is Microsoft's implementation of the Web Based Enterprise Management (WBEM) standard which is in turn based off the Common Information Model (CIM). WMI provides a very consistent way for a developer or an administrator to perform several complex systems management tasks both locally or remotely on a Windows Server. In the past, such management tasks could be accomplished by using different API interfaces provided by Microsoft or the third party vendor or also by opening up specific registry entries and querying the value. With more vendors adopting WMI standards, today you can find WMI classes exposed by most device vendors that allows end users\developers\administrators to quickly write management tools without having to learn new APIs or touch the system registry. This is Part 1 of the article where I introduce you to all the basics that will help you get a good understanding of WMI. In a subsequent part, I will actually take some real life challenge and walk you through developing it completely.
Background
Windows Management Instrumentation is an implementation of the WBEM standards that are promoted by the Desktop Management Task Force (DMTF). WMI is an object oriented approach to managing your server based on the Common Information Model. CIM is an object-oriented design schema capable of representing a wide range of objects. It uses Object Oriented features such as abstraction, inheritance, dependencies, aggregation and scoping to provide an extensible base schema that's able to represent information about all the objects that form the building blocks of the Windows Server (also known as the managed entities). WMI provides a standard way for developers to write scripts and applications in order to manage several aspects of their Windows Server including the devices connected to these servers. The advantage of having such an approach is that its very standard across different sets of devices and services, which means the developer just needs to focus on using WMI methods and classes to get his or her job done. Another major advantage with using WMI is that its very accessible to all sorts of developers, since WMI methods and functions can be used right from scripting languages like VBscipt, Perl script to high level languages like C++ and C# on .NET platform. Hence the ability to develop complex manageability solution becomes easily accessible to a wide range of developers.
Basic Architectural Concepts of WMI
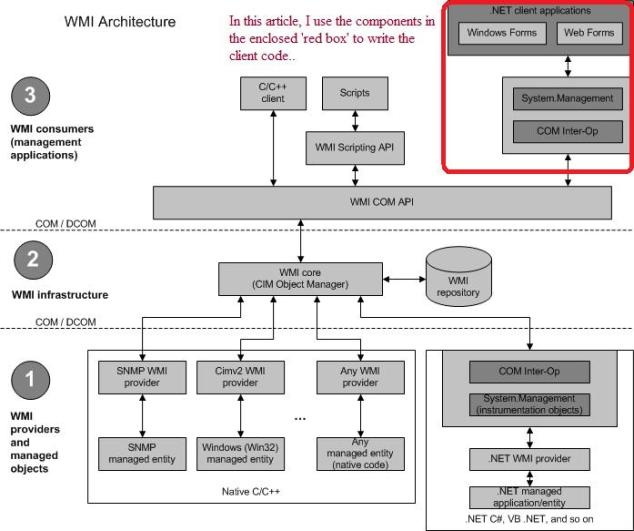
WMI architecture consists of three major layers:
Consumers - this is basically the layer that uses the exposed classes and gets the work done. This can include scripts and executables written in any of the supported languages in order to query WMI classes and get any device specific information.
WMI Infrastructure - This is basically the components that get calls from consumers delivered to the managed devices or elements. The primary component in this layer is the CIM Object Manager (CIMOM) and the CIM Namespace. The CIMOM helps in delivering the connectivity between the clients and the devices.
Managed Resources - This includes the devices, services or any other entity that provides information through a provider. This information is available in the form of classes, methods and attributes. The WMI providers basically are a layer between the managed resources and their native interfaces to the actual CIM object model.
The architecture diagram below shows the detailed architecture of WMI, I have also blocked in red, the components we are primarily dealing with in our code (The architecture diagram is from the MSDN documentation):
We will focus on consumers in this article and I will show you how to write fully functional client code in C# that can basically connect to a CIM namespace, authenticate, instantiate an object of the Win32_LogicalDisk class and then print some attributes relating to that object. This should give you a good handle on how you can try your own clients and examine other resources that expose WMI classes.
Building a Client Application for Querying the Attributes of all Logical Disks in the System using WMI
WMI classes can be instantiated and then objects can be queried using WMI Query Language(WQL). WQL usage is similar to how SQL queries are used on databases. There are specific steps that need to be followed in order to query the instantiated WMI object. This section will clearly outline all those steps.
In this section, we are interested in working with the Win32_LogicalDisks class. So the first thing is that the user becomes familiar with the Win32_LogicalDisks class and the methods and attributes it exposes. The Win32_LogicalDisk class inherits from the CIM_LogicalDisk class. The snippet below shows the definition of the Win32_LogicalDisk class from MSDN. The first thing is to understand clearly as to what your client code requires from the class.
class Win32_LogicalDisk : CIM_LogicalDisk
{
  uint16   Access;
  uint16   Availability;
  uint64   BlockSize;
  string   Caption;
  boolean  Compressed;
  uint32   ConfigManagerErrorCode;
  boolean  ConfigManagerUserConfig;
  string   CreationClassName;
  string   Description;
  string   DeviceID;
  uint32   DriveType;
  boolean  ErrorCleared;
  string   ErrorDescription;
  string   ErrorMethodology;
  string   FileSystem;
  uint64   FreeSpace;
  datetime InstallDate;
  uint32   LastErrorCode;
  uint32   MaximumComponentLength;
  uint32   MediaType;
  string   Name;
  uint64   NumberOfBlocks;
  string   PNPDeviceID;
  uint16   PowerManagementCapabilities[];
  boolean  PowerManagementSupported;
  string   ProviderName;
  string   Purpose;
  boolean  QuotasDisabled;
  boolean  QuotasIncomplete;
  boolean  QuotasRebuilding;
  uint64   Size;
  string   Status;
  uint16   StatusInfo;
  boolean  SupportsDiskQuotas;
  boolean  SupportsFileBasedCompression;
  string   SystemCreationClassName;
  string   SystemName;
  boolean  VolumeDirty;
  string   VolumeName;
  string   VolumeSerialNumber;
};
Remember that MSDN has very good documentation of all the WMI classes. So it’s a good place for you to understand what the members are of the class - both attributes as well as methods exposed by the class. Usually then the question comes up as to, how do I even know what classes exist and are exposed by the system? This is quite simple, the more complex approach would be to write a little utility that will enumerate all classes exposed on a given server, however the more simpler and quicker alternative is to use publicly available free utilities like CIM Browser which even ships with the WMI SDK (or can be downloaded separately). I will provide links to any such interesting tools at the end of this article.
I would like to elaborate on the standard steps that must be used every time you want to use a WMI class from any application. Once you understand these steps, it's almost boiler plate for you to start playing with other classes in a similar way or you can even make your code very generic in case you have to deal with several classes in your application.
Step 1 - First import "System.Management.*" into your application code. You will need all the methods exposed in this class in order to manipulate and instantiate WMI classes. The following objects will be required to perform all WMI related operations in your client code:
ConnectionOptions
ManagementScope
ObjectQuery
ManagementObjectSearcher
ManagementObjectCollection
ManagementObject
Step 2 - In this example, I show you how to connect your WMI client to a remote system, I will assume that we will always query a remote system (this step can be avoided for local systems). The case of running locally is much more easier and logical once you do remote connection and execution. So Step 2 is to basically create a ConnectionOptions object. The ConnectionObject is used to store the UserName and Password to allow your client to connect to a remote system. This is not needed if the system from which you are executing is already logged in.
ConnectionOptions oConnect = new ConnectionOptions();
oConnect.Username = "CodeProject";
oConnect.Password = "Welcome";
Step 3 - Now we need to set a namespace in which we want to execute our operation. The namespace is where the WMI classes and CIM classes are registered. All subsequent operations happen in the context of this namespace. The snippet below shows how to create and set the management scope. \Root\CimV2 is the path to the namespace in which the Win32_LogicalDisk is defined.
System.Management.ManagementScope oMgmtScope =
	new System.Management.ManagementScope(oConnect, "\\root\\cimv2");
If you notice, we create a new management scope for our client by passing the connection string to the remote system we created in Step 2 and the string for the namespace we wish to connect to, which in this case is the root\cimv2.
Step 4 - Once we have connected to our namespace and have a management scope, we must now create a query string that we can execute on our WMI class. As I mentioned earlier, WQL is similar to SQL and is used to query and select the required attributes and their values. The snippet below shows how to form a query and instantiate a query object.
System.Management.ObjectQuery oQuery =
	new System.Management.ObjectQuery("select DeviceID,
DriveType,
FileSystem, FreeSpace,Size,Name from Win32_LogicalDisk where DriveType=3");
So basically we are creating a query object that will be used subsequently to retrieve values for all logical drives in the system. As you can see, this uses standard SQL style query language to select the attributes from the class.
Step 5 - Once we have created the query object, we need to execute the query within the management scope that we have already created.
ManagementObjectSearcher oSearch = new ManagementObjectSearcher(oMgmtScope,oQuery);
Step 6 - Once we have the query executed, we need to store the result in a ManagementCollection object, which can then be used to iterate through and retrieve our result values for each logical disk in the system.
ManagementObjectCollection oCollection = oSearch.Get();
Step 7 - Now iterate through the oCollection object and retrieve the values for each of the logical drives found in the system.
foreach( ManagementObject oReturnCollection in oCollection )
{
DeviceID, DriveType, FileSystem
Console.WriteLine("Device ID : " + oReturnCollection["DeviceID"].ToString());
Console.WriteLine("Drive Type : " + oReturnCollection["DriveType"].ToString());
Console.WriteLine("File System : " + oReturnCollection["FileSystem"].ToString());
Console.WriteLine("Name : " + oReturnCollection["Name"].ToString());
Console.WriteLine("FreeSpace: " + oReturnCollection["FreeSpace"].ToString());
Console.WriteLine("Size: " + oReturnCollection["Size"].ToString());
}
This completes the introduction to WMI programming using C#. As you can see, the steps outlined above are the same no matter which class you are trying to use. All you need to know is the namespace you are connecting to and which class you need to use. MSDN provides a good amount of documentation and if you are dealing with some proprietary device, then the vendor should have provided enough documentation. In the next part, we will take a more advanced application. I am going to cover managing Hyper-V Virtual Machines using WMI classes provided in the \root\virtualization namespace. We will also learn how to execute methods.
Hopefully this article would help you get started with experimenting with different classes. If you have CIM browser installed, then you quickly browse for interesting classes that you can write client code for and extract valuable information. Maybe that would be a good exercise before you move to more advanced applications. The readers are requested to install the latest WMI SDK for their platform, the SDK comes with the required libraries and sample code.
References
- MSDN Online API Reference WMI SDK Samples and documentation
History
- 25th January, 2010: Initial post
This member has not yet provided a Biography. Assume it's interesting and varied, and probably something to do with programming.


 General
  News
News  Suggestion
  Question
  Bug
Bug  Answer
  Joke
Joke  Praise
  Rant
Rant  Admin
Admin 


