Please refer to http://www.codeplex.com/acf for the latest source code.
Overview
Creating console applications is an easy task, but it is not very easy to implement a console application that must handle various forms of command line syntax. You have no choice but to parse the syntax and get the option values from the command line arguments. Furthermore, you have to write your help message for each option that is acceptable by the console application.
If your console application becomes more complex and you are tired of dealing with various forms of command line syntax, maybe Adaptive Console Framework (ACF) can help you. With ACF, you can:
- Separate your console application implementation from the definition of the command line syntax (known as the Option Contracts).
- Simply define your command line options within the syntax (known as the Option).
- Generate help screen automatically. Once you have defined the descriptions to your contracts and the options, the help screen will be automatically generated.
- If you are not satisfied with the generated information, you can make your customization by using ACF.
Let's have a quick start on how to use ACF with our console applications.
Using the Code
The easiest way of introducing a new technology is to give a quick start tutorial. Here we assume that we are going to create a console application called catool which has the following command line syntax:
- catool.exe
- catool.exe /help | /?
- catool.exe </m | /method:<add | sub | mul | div>> <number1> <number2> [/nologo]
This catool application performs add, subtract, multiply, or division on two given numbers. If no command line argument is provided, the application will print the help text on the screen and exit. If /help or /? is provided, again the help text will be printed.
For the third syntax listed above, a /m or /method argument specifies which calculation method should be taken; both number1 and number2 are integer numbers that are used for the calculation. These three arguments are required. If the /nologo switch is turned on, no application logo and description information will be printed to the console; it is optional, and by default, the application will print the logo and description information.
Following are valid commands to use in the catool application:
- catool.exe
- catool.exe /help
- catool.exe /?
- catool.exe /m:add 10 20
- catool.exe /method:sub 20 10
- catool.exe /m:mul 20 10 /nologo
Now, let's start to use ACF to develop such a console application.
Create the Console Application Instance
The first step is to create a new console application instance. It is implemented by inheriting the AdaptiveConsole.ConsoleApplicationBase class. Follow the steps below to achieve the goal:
- Start Visual Studio 2008, and create a new blank solution named catool. On the catool solution, right click and add a new class library called Catool.Application.
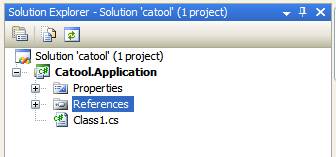
- On the References node, right click and select Add Reference Item. An Add Reference dialog box will appear. Select Adaptive Console Framework in the dialog box, and click OK to add the assembly.

- Create a new class named
Catool within the class library; make the class inherit from the AdaptiveConsole.ConsoleApplicationBase class and implement the abstract members.
using System;
using System.Collections.Generic;
using System.Linq;
using System.Text;
using AdaptiveConsole;

namespace Catool.Application
{
    public class Catool : ConsoleApplicationBase
    {
        public Catool(string[] args) : base(args) { }

        protected override string Description
        {
            get
            {
                return "The simple calculator for integer numbers.";
            }
        }

        protected override string Logo
        {
            get
            {
                StringBuilder sb = new StringBuilder();
                sb.Append("Catool v1.0\n");
                sb.Append("Copyright (C) 2007-2008, SunnyChen.ORG, " +
                          "all rights reserved.");
                return sb.ToString();
            }
        }
    }
}
Create Option Contracts
ACF defines four types of option contracts: None, Exact, Patternized, and Free.
| Type | Description |
None | The console application requires no command line argument. When no argument is provided, the contract will be executed. |
Exact | The console application requires an exactly matched argument. For example, "catool.exe /help" matches such a contract. |
Patternized | The console application requires a complex command line argument. You can define the options that are not mandatory within the contract; you can define the options that carry a list of values; and you can even define the switches in the patternized contracts. For example, "catool.exe /m:add 10 20" matches such a contract. |
Free | Any command line argument is acceptable. No argument will be considered as an option when using this type of contract. |
Note: A console application can only have one contract with types None and Free. And if the Free contract is used, you cannot define any Patternized contract within the application.
Because we can start a catool application without any command line argument, which makes the application print the help information on the screen, we must define a None contract for the application. We want the application to handle the /help or /? arguments, so an Exact contract is also required. Furthermore, a Patternized contract must be defined too.
Creating the None Contract
- Add a new class named
NoneContract to the class library, and apply the OptionContract attribute on the class as follows. The description field, although not mandatory, will be specified here for generating the help documentation.
- Make the
NoneContract class inherit from the OptionContractBase class and implement the abstract members. Here, we want to implement the Execute method so that the contract will be executed when no command line argument is provided. In the Execute method of the contract, we simply call the PrintHelpMessage method on the console application instance.
Create the Exact Contract
- Add a new class named
ExactContract to the class library, and apply the OptionContract attribute on the class as follows. Note that the Argument field must be specified on Exact contracts. The Description field, although not mandatory, will be specified here for generating the help documentation.
- Make the
ExactContract class inherit from the OptionContractBase class and implement the abstract members. Here, we also want to implement the Execute method so that the contract will be executed when no command line argument is provided. In the Execute method of the contract, we simply call the PrintHelpMessage method on the console application instance.
Create the Patternized Contract
Now we are going to create a patternized contract, which is the core executing unit in our application. The contract accepts the command line arguments as options or parameters, and ACF will populate the properties defined in the contract automatically once the contract is matched.
- Add a new class named
PatternizedContract to the class library, and apply the OptionContract attribute on the class as follows:
- Add contract options to the
PatternizedContract class. Each contract option refers to a public property within the class. And the option may have three different types: SingleValue, ValueList, and Switch.
| Type | Description | Property Type | Example |
SingleValue | The current option has a single value parameter. | System.String | /output:a.xml |
ValueList | The current option has a list of parameters. | System.Array | /input:a.xsd,b.xsd |
Switch | The current option is a switch. This means it is not mandatory, and if it is not specified in the command line arguments, the value of the property will be set to false. | System.Boolean | /verbose |
No matter which type the option is, the Name field of the option must be specified. And we also define the Description field on each option here for the documentation.
Something about command line arguments
In ACF, command line arguments are grouped into two different types: Option and Parameter. When ACF tries to match each contract within the application, it will try to populate all the public properties that are marked by OptionAttribute, and mark the matched argument as Option. Those that don't match any defined option will be considered a Parameter.
For example, in the command "catool.exe /m:add 10 20 /nologo", the arguments "/m:add" and "/nologo" will be defined within the contract and considered as options. Others don't match anything (like the integral values 10 and 20) and will be considered parameters.
- Make the
PatternizedContract class inherit from the OptionContractBase class and implement the abstract members. Now we get the full implementation of the class, which would be something like the following.
using System;
using System.Collections.Generic;
using System.Linq;
using System.Text;
using AdaptiveConsole;
namespace Catool.Application
{
[
OptionContract(
Type=ContractType.Patternized,
Description="Performs calculation on the give integer numbers.")
]
public class PatternizedContract : OptionContractBase
{
[
Option(
Type=OptionType.SingleValue,
Name="/m;/method",
Required=true,
Description="Specifies the calculation methods. \n\t" +
"'add': performs an add calculation; \n\t" +
"'sub': performs a subtraction calculation; \n\t" +
"'mul': performs a multiply calculation; \n\t" +
"'div': performs a division calculation.")
]
public string Method { get; set; }
[
Option(
Type=OptionType.Switch,
Name="/nologo",
Description="When turned on, the logo and description\n\t" +
"information will not be displayed.")
]
public bool NoLogo { get; set; }
public override void Execute(
ConsoleApplicationBase consoleApplication,
IList<ArgumentInfo> args)
{
var parameterArguments = from arg in args
where arg.Type == ArgumentType.Parameter
select arg;
if (parameterArguments.Count() != 2)
{
consoleApplication.PrintHelpMessage();
return;
}
if (!this.NoLogo)
consoleApplication.PrintLogo();
int num1, num2;
try
{
num1 = Convert.ToInt32(parameterArguments.ElementAt(0).Argument);
num2 = Convert.ToInt32(parameterArguments.ElementAt(1).Argument);
}
catch (FormatException)
{
Console.WriteLine("{0} requires two integral numbers as parameters.",
consoleApplication.ApplicationName);
return;
}
catch (OverflowException)
{
Console.WriteLine("Parameter overflow.");
return;
}
try
{
int result = 0;
switch (this.Method.ToUpper())
{
case "ADD":
result = num1 + num2;
break;
case "SUB":
result = num1 - num2;
break;
case "MUL":
result = num1 * num2;
break;
case "DIV":
result = num1 / num2;
break;
}
Console.WriteLine(result);
}
catch (Exception ex)
{
Console.WriteLine(ex.Message);
return;
}
}
}
}
Now we have finished implementing the option contracts and the console application instance. In the next step, we should create a console application host and configure the components we have created.
The host of the ACF console application is, of course, a console application. You just need to create a console application project within the solution, write a little code, and do some configuration to the host.
Create and Configure the Console Application Host
Create the Host
- Add a new console application project named catool to the solution. Also add the reference to the ACF as mentioned in the previous steps.
- In the catool console application, add a reference to the Catool.Application class library. This ensures that the generated assembly will be copied to the catool output directory once the solution is being compiled.
- Using the
AdaptiveConsole namespace in your console application, write code in the Main method as follows:
Now we have successfully created the console application host by using ACF. How easy it is to create a console application with complex command line arguments.
Configure the Console Application Host
- Add an app.config file to your catool console application project.
- Modify the configuration file as follows:
In the configuration file, first we create a configuration section named AdaptiveConsole. This name is specific to ACF and cannot be changed. For the ACF configuration, it has two attributes. The provider attribute indicates the console application provider, which is the assembly qualified name of the console application instance we have created. contractRepository refers to the assembly name in which the contracts are contained.
Run the Console Application
After compiling the solution, we can run the console application by typing its name with arguments in the command window.
- Add 10 with 20 and print the result:
- Subtract 26 from 51 and print the result without any logo and information:
- Running the application without any arguments:
- Running the application with the /help argument:
Something about the help screen
- Logo and description
Both Logo and Description are abstract properties in the ConsoleApplicationBase class. When creating a concrete class for a console application instance, you must implement the Logo and Description properties. This is done by simply returning a human readable string so that when the help screen is displayed, information about the console application will be shown properly.
Note: If no description is specified, the description line will be ignored.
- Contract syntax lines
Syntax lines are for guiding the user to use the application with valid arguments. Each contract represents a single syntax line, which will be generated automatically when the application runs. When showing the help screen, syntax lines for all the contracts will be displayed just after the logo and description information.
You can see that for mandatory options (a required field is specified in the Option attribute), the name of the option will be embraced by angular brackets; for optional options (required field is not specified in the Option attribute), the name of the option will be embraced by square brackets. These are also done by ACF, and you don't need to do anything at all.
- Detailed information about contracts
Each contract may have detailed information displayed on the help screen. The first line is defined by the Description field of the OptionContract attribute. ACF will then enumerate all the options within the contract and display their name and description.
You can also define your own help screen by overriding the Syntax and HelpText attributes that are defined within the OptionContractBase class when implementing your contracts.


 General
  News
News  Suggestion
  Question
  Bug
Bug  Answer
  Joke
Joke  Praise
  Rant
Rant  Admin
Admin 


 Please refer to http://www.codeplex.com/acf