The end result of this project is an animated navigation bar similar to the one at the top of the Silverlight.net website or at the top of my own website. You can see a working example of the end result of this tutorial by following this link.
Introduction
This article is a step-by-step tutorial on how to use Silverlight 2.0 to make an animated navigation bar. This article is the second in a series. The end result in all the tutorials in this series is a very similar navigation bar, but with each follow-on article in the series, I introduce more advanced concepts in Silverlight that allow you to accomplish this same task in more elegant and maintainable ways. In the first article, I showed you how to create the navigation bar by manually connecting up Storyboards to mouse events to create the desired animations. In this tutorial, I introduce the VisualStateManager and show you how all that manual work in the first tutorial can instead be handled by the power of the VisualStateManager system.
Background
The project in this tutorial uses Silverlight 2 beta 2, Visual Studio 2008, and the June 2008 Preview of Expression Blend 2.5.
Step-By-Step Tutorial
- In VS2008, select a new project, an empty web site. Name the website SkinnableNavbar (Note: although I’m naming the project “Skinnable”, this particular tutorial is focused on demonstrating how to use the VisualStateManager, and this Silverlight control will not be “skinnable” by the end of this tutorial; but, this tutorial is a prerequisite for the next tutorial I’m writing, and in that tutorial, we’ll continue from where we leave off here, and indeed make the control skinnable.)
- Right click on the solution, click Add Project, and add a Silverlight Application named SkinnableNavbarXap; leave checked the Add Test Page
- Click on page.xaml in SkinnableNavbarXap and open in Expression Blend 2.5.
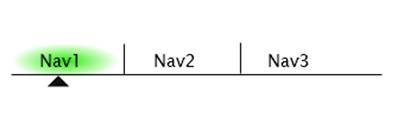
- The first step is to create all the visual aspects of this control. Create something that looks like what you see below. This is made of three lines; three boxes with radial gradients, with the left side of the gradient set to bright green and the right side to transparent. A pen path is used to make the triangle. The active parts we will be working with are the green gradient boxes, which we’ll call
Nav1Highlight to Nav3Highlight, the triangle which we’ll call the NavIndicator, and the labels which we’ll call Nav1Label through Nav3Label. The lines are there for artistic purposes, and are not active parts of the navigation bar. 
- Next, we need to define the regions that the user will click or mouse over when they interact with the Nav1, Nav2, or Nav3 navigation items. To do this, put a large box over the entire Nav1 region, make an opacity of 0, and label it
Nav1ClickTarget. We want the click targets to be seen through so the customer can see the region they want to click on; but, it’s important to accomplish this by setting the opacity to 0 instead of setting it to no fill and no stroke, because if you set it to no fill and no stroke, it doesn’t generate mouse events, and therefore is obviously not useful as a click target. Do the same for Nav2 and Nav3.
- By default, we’re going to have Nav1 selected, so let's visually set it up this way. Select
Nav2Highlight and set visibility to collapsed, and do the same for Nav3Highlight.
- Now, it’s time to add each of our states. Click on the + symbol in the state box, and add the state group
MouseOverStates. Click the + symbol in the MouseOverStates group, and add the states Nav1Highlighted, Nav2Highlighted, and Nav3Highlighted.
- Now, we’re going to define what each of these states look like. Click on the state
Nav2Highlighted. Note the red border around the workspace and the words in the upper right hand corner that says “State recording is on”. This is recording the changes from the base that are required to be in the Nav2Highlighted state. Set the visibility of Nav1Highlight to collapsed, set the visibility of Nav2Highlight to visible, and move the NavIndicator under Nav2. The results should be similar to below. Click on Nav3Highlight and treat it similarly.
- Now, we’re going to start to link the user actions to the various states. Select
Nav1ClickTarget and go to events in the Property panel (events is the little lightning bolt symbol). Under the section MouseEnter, type in Nav1MouseEnter, and hit the Enter key. This will wake up VS2008 and add a Nav1MouseEnter method to your Page.xaml.cs code-behind file. Do the same with Nav2ClickTarget and Nav3ClickTarget.
- For each of the methods, add the code below so that the VisualStateManager transitions to each of the defined states based on the mouse entering the ClickTarget regions.
private void Nav1MouseEnter(object sender, MouseEventArgs e)
{
    VisualStateManager.GoToState(this, "Nav1Highlighted", true);

}

private void Nav2MouseEnter(object sender, MouseEventArgs e)
{
    VisualStateManager.GoToState(this, "Nav2Highlighted", true);
}

private void Nav3MouseEnter(object sender, MouseEventArgs e)
{
    VisualStateManager.GoToState(this, "Nav3Highlighted", true);
}
- Build and view the test page. What you should see when you mouse over the different regions, the navbar snaps to having the
NavIndicator pointing under the moused-over item and the highlight pops on. That’s cool, and is a really nice way of demonstrating states, but isn’t very satisfying as an animated navigation bar. Let’s experiment and see if we can make it better by adding transitions between states. - Let’s add a transition between
Nav1Highlighted and Nav2Highlighted. Click on the + sign beside Nav1Highlighted, and add the transition.
- Set the transition time to .3 seconds. Save the changes.
- Do a clean project, then rebuild, and then view the test page. What you should see is that the
NavIndicator smoothly transitions from Nav1 to Nav2 when you highlight Nav2 (whereas all other transitions jump to the state as before). The problem is a smooth transition isn’t very satisfying visually. I want there to be an acceleration. So, let’s delete the transition we just created in Expression Blend. To do this, click on the – sign right next to the the Nav2Highlighted transition. - Now, let’s click on the
Nav2Highlighted state and adjust the associated storyboards to something more to our liking. If it’s not already visible, make the timeline visible by clicking on the arrow next to the state box in the Objects and Timeline panel. Move the NavIndicator keyframe to .3 seconds. Click on the key frame and set the Easing in the KeySpline graph to x1 =0, x2=1, y1=1, y2=1, as shown below. This will make the horizontal (i.e., x direction) movement start off slow and then reach full speed. Build the project and view it in a test page. What you should see is the NavIndicator transition to Nav2 should have the type of motion as described above. Note that you get the desired animation effect whether you’re starting at Nav1 or Nav3. This is so the animation storyboard for the effect is within the state and is not a separate transition between states as it was when we explicitly defined transitions between states.
- Repeat the above process for the
Nav3Highlighted state so that it too has the NavIndicator animate into place over .3 seconds with an accelerating movement. Interestingly, it doesn’t appear that you can duplicate this same method for the Nav1Highlighted state, because for some reason, I can’t bring up the easing KeySpline graph for the NavIndicator keyframe. I can’t think of any legitimate reason why this is the case, so it may well be a bug in the June 2008 Preview version of Expression Blend 2.5 that is triggered by the fact that the position of the NavIndicator is the same in the Base state as it is in the Nav1Highlighted state. To get around it, I just copied the DoubleAnimationUsingKeyFrames XAML that animated the NavIndicator in one of the other two states and pasted it as a storyboard under the Nav1Highlighted VisualState. I then changed the value of the keyframe at .3 seconds to 0 to indicate that at .3 seconds, I want the NavIndicator to be at X position 0. Note that in Silverlight animations, objects animate relative to a coordinate system whose origin is that of their original position in the base state. Another thing that should be obvious from looking at the XAML below is that states are nothing more than storyboards, even if sometimes they are one frame storyboards.
<vsm:VisualState x:Name="Nav1Highlighted">
   <Storyboard>
      <DoubleAnimationUsingKeyFrames BeginTime="00:00:00"
           Storyboard.TargetName="NavIndicator"
           Storyboard.TargetProperty="(UIElement.RenderTransform).(
                      TransformGroup.Children)[3].(TranslateTransform.X)">
         <SplineDoubleKeyFrame KeyTime="00:00:00.3000000" Value="0">
            <SplineDoubleKeyFrame.KeySpline>
               <KeySpline ControlPoint1="0,1" ControlPoint2="1,1"/>
            </SplineDoubleKeyFrame.KeySpline>
         </SplineDoubleKeyFrame>
      </DoubleAnimationUsingKeyFrames>
   </Storyboard>
</vsm:VisualState>
- Now that we have the mouse over states animating like we want, the last thing we need to do is add the functionality of navigating to an HTML page when clicked. Highlight the
Nav1ClickTarget, then go to the properties panel and select the events icon (the one with the little lightning bolt). In the MouseLeftButtonDown box, type Nav1Clicked. This will activate Visual Studio and add a Nav1Clicked method to your code-behind file. Do the same with the Nav2ClickTarget and the Nav3ClickTarget.
- In a future tutorial, I’m going to show you how to make a custom control and easily customize the destinations that you navigate to, but since this tutorial is focused on the VisualStateManager, I’m just going to hard-code that clicking on Nav1 takes you to the other tutorials at my website SilverlightWebApps.com, Nav2 takes you to yahoo.com, and Nav3 takes you to google.com. To do this, add the
System.Windows.Browser.HtmlPage.Window.Navigate calls to the the NavClicked methods, as shown below:
private void Nav1Clicked(object sender, MouseButtonEventArgs e)
{
    System.Windows.Browser.HtmlPage.Window.Navigate(
           new Uri("http://www.silverlightwebapps.com/Tutorials.aspx"));
}

private void Nav2Clicked(object sender, MouseButtonEventArgs e)
{
    System.Windows.Browser.HtmlPage.Window.Navigate(new Uri("http://www.yahoo.com"));
}

private void Nav3Clicked(object sender, MouseButtonEventArgs e)
{
    System.Windows.Browser.HtmlPage.Window.Navigate(new Uri("http://www.google.com"));
}
- Build and open the test page in a browser. What you should see is a
NavIndicator that accelerates into position whenever you mouse over a Nav area, a NavHighlight that blinks on whenever you mouse over a Nav area, and you should see yourself navigate to a different URL when you click on a Nav area. That’s it, you’re done!
History
- August 2008 -- Initial release.
Mike Dobbles is a freelance software developer specializing in Silverlight and C#. Mike has over 15 years of software development experience.


 General
  News
News  Suggestion
  Question
  Bug
Bug  Answer
  Joke
Joke  Praise
  Rant
Rant  Admin
Admin 


