Introduction
Developing applications for Windows Mobile devices is similar to developing applications for the desktop, especially if you make use of either Visual Basic .NET or Visual C#. You can use the same development tools to develop your applications, although there are differences between developing applications for Windows Mobile devices and developing desktop applications. Devices have smaller screens, limited resources, are extremely portable, and are usually powered by batteries.
This article provides information on how to develop Windows Forms based applications for Windows Mobile Devices. In this article, you will learn how to add Custom Controls to your own application, and how Custom Controls can have complete designer support. You will also learn how to make use of GPS hardware inside your own application, and how to update User Interface Controls inside a multithreaded application.
Adding Custom Controls to your own application
If you are developing applications for Windows Mobile devices, you might at some time need specific User Interface Controls that are not available in the collection of Common Controls that are part of the .NET Compact Framework. In that case, you have a number of choices:
- Create a new User Interface Control just to be used inside the application you are currently developing
- Create a new User Interface Control that can be used inside multiple applications
- Purchase User Interface Controls with your desired functionality from a third party
In this article, we identify three different types of controls that you can create, either from scratch or by re-using and combining existing controls.
User Controls
These controls typically are used to combine several existing controls to create a new control. In Visual Studio 2008, the creation of User Controls is fully supported by the provided Visual Studio 2008 project type. Once you create a new User Control, you get a designer surface that acts as a container to host additional controls. With a User Control, you can, for instance, create a Compound Control that contains a number of existing controls and behaves as a single control when you use it in an application. In figure 1, you can see a User Control inside Visual Studio 2008. The User Control contains two Labels and two TextBoxes, and can be used to enter user credentials, for instance, to logon to a database. When the project is built, this User Control is stored in its own assembly that can be reused by any Smart Device Project. In this particular User Control sample, there is hardly any need for additional code after dragging and dropping existing Custom Controls to it. The only additional code that is available inside this User Control is the declaration of two public properties to retrieve both the password and the user name inside an application and to set a user name. The Password property is read-only to force users of the application to at least provide a valid password. Password validation will be done inside an application, not inside the User Control, to make it as flexible and ready for re-use as possible.
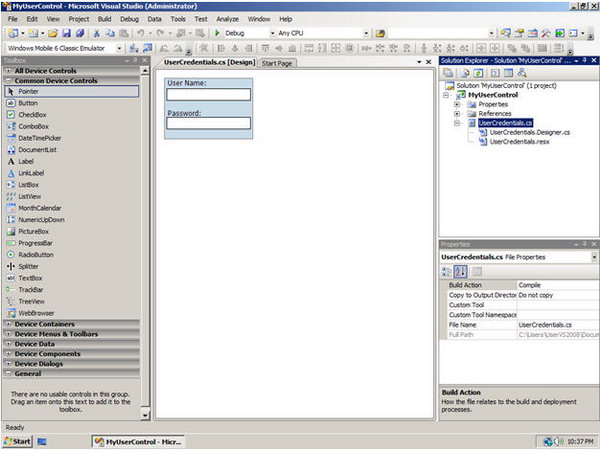
Figure 1 - User Control to enter credentials
To use the User Credentials control inside an application, it can simply be dragged and dropped from the Toolbox. The User Credentials control does not automatically appear on the Toolbox. It is, however, possible to add controls to the toolbox by right-clicking in the General area of the Toolbox and from the displayed popup menu selecting Choose Items and navigating to the assembly that stores the User Credentials control. In figure 2, you can see how the User Credentials control appears inside an application. If you look at the Toolbox, you can see the UserCredentials control in the General area from which you can drag and drop it to a form. You can also see in the Properties window that there is a UserName property defined that can be set, either from the designer, or programmatically from inside the application. You can also see that the Password property is grey in the Properties window, meaning that it is a read-only property. It cannot be set, but the application can retrieve the property once the user has entered a password.

Figure 2 - User Control inside an application
Inherited Controls
Sometimes you might want to use a control, let’s say, one of the Common Controls that are available inside the .NET Compact Framework. But maybe you want to have the control behave slightly different. For instance, if you want to make use of a TextBox but have a requirement that the TextBox should only accept numbers. Of course, you can have your user enter anything in the TextBox and validate the entered data inside your application. But, you can also create your own control, either inside your application or as a separate control that derives from a TextBox, but limit input to characters only. In that way, you have less coding to do in your application, because validation is done by the inherited Textbox. Even though the functionality of such a Textbox is limited, compared to the Common Control, the derived Textbox still has great designer support and exposes all Properties and Events that are defined for the original Textbox. Also, if you create a separate control for it, you can re-use the control in other applications as well, which increases your productivity. In order to create a numeric Textbox as a separate control, you can simply create a new Smart Device Project and select a Class Library. The amount of code necessary to convert a Textbox into a Numeric Textbox is limited, especially in this sample, because it omits the use of a decimal point, only allowing numeric data and the backspace to be entered.
public class NumericTextBox : TextBox
{
     protected override void OnKeyPress(KeyPressEventArgs e)
     {
         if ((e.KeyChar < '0' || e.KeyChar > '9') && e.KeyChar != (char)Keys.Back)
         {
              SystemSounds.Beep.Play();
              e.Handled = true;
         }


         base.OnKeyPress(e);
     }
}
When you are writing override code, it is important to determine what the base class method does in order to decide whether to remove it or to call it, and in the latter case, when to call it. Just look in the documentation, which in this case reads, "Notes to Inheritors: When overriding OnKeyPress in a derived class, be sure to call the base class' OnKeyPress method so that registered delegates receive the event." Since listeners to the TextChanged event are also expecting numeric data only, you call the base class method after having validated the entered characters. Using the Numeric Textbox inside an application is as simple as using the UserCredentials control that you saw in the previous section of this article.
Figure 3 - UserCredentials and NumericTextBox in designer mode and executing on Device Emulator
Custom Controls
If you don’t plan to re-use existing User Interface Controls, but need entirely new controls, you can create your own Custom Controls. Typically, these types of controls are written from scratch, even though you can, for instance, inherit them from the System.Windows.Forms.Control class to at least make use of the shared functionality that controls have in common. They are also frequently referred to as Owner Drawn Controls. There is no Visual Studio 2008 project template available for creating Custom Controls. The simplest thing to do is create a new User Control inside Visual Studio. Once the project is created, you can delete the User Control and manually add a new Custom Control from Visual Studio 2008.
public partial class CustomControl1 : Control
{
public CustomControl1()
{
InitializeComponent();
}
protected override void OnPaint(PaintEventArgs pe)
{
base.OnPaint(pe);
}
}
To create a Custom Control from scratch means you have the responsibility to paint the control yourself. You can override the OnPaint method for that, which already is added to your source file when you let Visual Studio 2008 create a new Custom Control. Since painting of your control might happen frequently, it is important to make your implementation efficient, both in its performance and in its use of resources. Since you are typically making use of Graphics classes inside the OnPaint method, and with Graphics classes often relying on underlying native code, it is important to clean up resources once you are done painting. In C#, it is not a bad idea to use Graphics classes that have a Dispose method implemented in combination with a using statement. The using statement ensures that Dispose is called even if an exception occurs while you are calling methods on the object, meaning you don’t have to worry about exception handling. For instance, you want to display some text; you could do so as shown in the following code snippet, and call it from inside the OnPaint method, passing the Graphics object that is part of the PaintEventArgs parameter:
private void DisplayLabelInfo(Graphics g, string labelText, int xPos, int yPos)
{
    using (Font labelFont = new Font(FontFamily.GenericSerif, 10.0F, FontStyle.Regular))
    {
        using (SolidBrush labelBrush = new SolidBrush(LabelForeground))
        {
           g.DrawString(labelText,
                        labelFont,
                        labelBrush,
                        xPos, yPos);
        }
    }
}
Even though this is just a simple method to display a text inside a control, you can already see that two different Graphics objects are needed, a Font and a SolidBrush, which will both be created each time the method DisplayLabelInfo is called. Since you embed these objects in a using statement, cleaning up these objects will be efficient because the Dispose method is called when the objects go out of scope, resulting in less activity during Garbage Collections because no Finalize method has to be executed. This is especially valuable when dealing with Graphics classes, since they rely on a limited number of native resources that should be released as soon as possible.
If you draw immediately on the screen using an instance of type Graphics, it might happen that the screen update causes flickering, especially when you are executing a lot of code in your OnPaint method. In those situations, it might help to make use of buffering. This means that you first draw everything on a separate instance of type Graphics that works on memory, and when you are done drawing, transfer the entire contents of the Graphics object that lives in memory to the Graphics object that draws on the screen.
Suppose you want to display an image, and on top of that, write some text. To make use of buffering, you would do the following:
protected override void OnPaint(PaintEventArgs pe)
{
Graphics memoryGraphics = Graphics.FromImage(memoryBitmap);
memoryGraphics.Clear(this.BackColor);
memoryGraphics.DrawImage(someImage,
destRect,
imageRect,
GraphicsUnit.Pixel);
DisplayLabelInfo(memoryGraphics, "Some text", 0, 0);
pe.Graphics.DrawImage(memoryBitmap, 0, 0);
base.OnPaint(pe);
}
In the above code snippet, it is assumed that you already created an instance of type Bitmap called memoryBitmap and that you already created and initialized an instance of type Image called someImage, as well as a destination rectangle to draw the image upon. Calling the base.OnPaint method at the end of your OnPaint method means that subscribers to the Paint event have the chance to paint on top of the contents you already displayed inside your own OnPaint method.
To add designer support to your Custom Control, you have to create a .xmta file which is a special type of XML file. Visual Studio 2008 supports you in creating this file by providing IntelliSense and the possibility to add an initial Design-Time Attribute File to your project from inside Solution Explorer. The following code snippet shows a Design-Time Attribute File sample which puts a property of your Custom Control in a particular category in the Properties window and displays some help about the property.
="1.0"="utf-16"
<classes xmlns="http://schemas.microsoft.com/VisualStudio/2004/03/SmartDevices/XMTA.xsd">
<class name="Compass.Compass">
<property name="Heading">
<category>CompassSpecific</category>
<description>Sets the travelling speed in mph</description>
</property>
</class>
</classes>
Using a Custom Control inside an application
Once you have created a Custom Control, you, of course, want to use it inside an application. If you have properly added Designer Support to your Custom Control, and if you have added the Custom Control to the Visual Studio 2008 Toolbox, adding your Custom Control will be as easy as adding a Common Control to your user interface. If you look at figure 4, you can see the User Interface for an electronic compass that makes use of a Custom Control, the Compass control. You can see that the Compass control has full designer support and that you can set a number of properties on the control. Also, you can see that all properties have default values, and contain help about the usage of the property. To create this particular User Interface, a Compass control has been dragged to the MainForm, and a Menu has been added to enable / disable retrieving data from a (built-in) GPS receiver.
Figure 4 - Electronic Compass application that uses a Custom Control
Once the application is fed with the GPS location information, the user’s direction and travel speed are displayed continuously on the Compass control. To update this information, the Compass control exposes a number of properties that can be set programmatically, that will be assigned to values that are read from the GPS receiver.
Adding location awareness to the application
Thanks to the fact that both Windows Mobile 5.0 and Windows Mobile 6 devices contain the GPS Intermediate Driver (GPSID), it is very easy for you, as a developer, to retrieve location information through GPS and to share the GPS hardware between different applications. With more and more devices having a built-in GPS receiver, it makes sense to start thinking about making your applications location aware.
Both the Windows Mobile 5.0 SDKs and the Windows Mobile 6 SDKs contain a lot of sample code. One of the samples not only shows you how to make use of GPSID, but it also contains a managed wrapper around the GPSID functionality. You can find these samples in the following folders: <Installation Folder>\<Windows Mobile SDK>\Samples\PocketPC\Cs\Gps or <Installation Folder>\<Windows Mobile SDK>\Samples\Smartphone\Cs\Gps.
Before you are able to use the managed wrapper around GPSID, you need to build the GPS solution that is stored in the above-listed folders. If you are using Visual Studio 2008 to build the GPS solution, you will be asked to convert the project before you can build it. The reason for this is that the sample code’s solution and project files were created with Visual Studio 2005, and cannot be used without conversion in Visual Studio 2008. After conversion, you can build the GPS solution. Once you have built it, you can make use of the functionality in the Microsoft.WindowsMobile.Samples.Location assembly. In order to do so, you need to import this assembly into your own solution. When you have added a reference to the managed wrapper around GPSID, you can make use of the following classes, from which the relevant properties and method for this article are displayed in figure 5.
Figure 5 - Class diagram for the managed wrappers around GPSID
The Gps class is your entry point to the GPS hardware. In this class, you find methods to synchronously retrieve GPS position information, and an event that is fired when position information is changed. You also find methods to Open and Close the GPS hardware.
Before being able to retrieve location information from the GPS receiver, you need to create a new object of type Gps and call the Open method on that object. This operation activates the GPS hardware if your application is the first application that makes use of the GPS hardware. Once your application is done using the GPS hardware, you need to call the Close method on the Gps object in order to switch off the GPS hardware if your application is the last one using it. In this way, you make sure to preserve battery power when GPS functionality is no longer needed on the Windows Mobile device. The following code snippet shows you how to open and close the connection to the GPS hardware, and is executed inside separate event handlers:
private void menuEnableGPS_Click(object sender, EventArgs e)
{
    gps.Open();
    gps.LocationChanged +=
      new LocationChangedEventHandler(gps_LocationChanged);
    menuDisableGPS.Enabled = true;
    menuEnableGPS.Enabled = false;
}
private void menuDisableGPS_Click(object sender, EventArgs e)
{
    gps.LocationChanged -= gps_LocationChanged;
    gps.Close();
    menuEnableGPS.Enabled = true;
    menuDisableGPS.Enabled = false;
}
If the user decides to terminate the application, you also have to make sure to close the GPS connection, so it makes sense to verify in the Closing event handler of the application if the user still has GPS enabled, and unsubscribe from the LocationChanged event and call the Close method on the Gps object. The ‘real’ work of the Electronic Compass application will be executed in the gps_LocationChanged event handler. Any application can subscribe to this event by providing an event handler. Each time the GPS location information changes, the event handler of the application will be called to allow the application to act on location changes. Subscribing to the LocationChanged event assures that your application always has up-to-date location information available, assuming the GPS hardware can read valid satellite data. The following code snippet shows the gps_LocationChanged event handler in its original version:
void gps_LocationChanged(object sender, LocationChangedEventArgs args)
{
GpsPosition pos = args.Position;
compass1.HeadingValid = pos.HeadingValid;
if (pos.HeadingValid)
{
compass1.Heading = pos.Heading;
}
compass1.SpeedValid = pos.SpeedValid;
if (pos.SpeedValid)
{
compass1.Speed = pos.Speed * 1.152;
}
if (pos.HeadingValid | pos.SpeedValid)
{
compass1.Invalidate();
}
}
In this event handler, you only take a look at the Heading and Speed properties, even though there are a large number of additional properties. Since the application is just an electronic compass, you are even omitting location information like Lattitude and Longitude. Since satellite readings might not be valid, you also need to check if a property you are interested in contains ‘real’ data. Finally, you call the Invalidate method to force an update of the Compass control if at least one reading has changed.
If you compile and run the application with the gps_LocationChanged event handler implemented as shown in the above code snippet, you will run into an exception. It looks like you are not able to update information on the Compass control. The description of the exception will point you to a certain direction. The exception message contains the following text: "Control.Invoke must be used to interact with controls created on a separate thread". The stack trace shows the following information:
StackTrace:
   at Microsoft.AGL.Common.MISC.HandleAr(PAL_ERROR ar)
   at System.Windows.Forms.Control.Invalidate()
   at ElectronicCompass.MainForm.gps_LocationChanged(Object sender,
      LocationChangedEventArgs args)
   at Microsoft.WindowsMobile.Samples.Location.Gps.WaitForGpsEvents()
The exception message contains the most important information to identify this problem. It seems that there is an issue with multiple threads that are active inside your application, even though you did not create additional threads. Looking at the Stack Trace, you can conclude that the Invalidate method, where the exception occurred, was called from inside your event handler, which in turn was called by a method inside the managed wrapper around the GPS Intermediate Driver. Apparently, GPSID or the managed wrapper around it makes use of multiple threads, something you have to be aware of inside your own application.
Figure 6 - Updating the Compass control results in exceptions being thrown
Updating User Interface Controls from multiple threads
A common mistake that many developers make is trying to update or access User Interface Controls directly from within worker threads. This action results in unexpected behavior; in version 1.0 of the .NET Compact Framework, the application frequently stops responding. In version 2.0 and higher of the .NET Compact Framework, the behavior is better since a NotSupportedException is thrown when you try to update a User Interface Control from inside another thread than its creator. In figure 6, you saw that particular behavior inside the Electronic Compass application.
To solve this problem, commit yourself to the following rule: Only the thread that creates a UI control can safely update that control. If you need to update a control inside a worker thread, you should always use the Control.Invoke method. This method executes a specified delegate on the thread that owns the control's underlying window handle, in other words, the thread that created the control. With this knowledge, you now can modify the gps_LocationChanged event handler. In order to do so, you first have to declare a delegate to be able to pass a method as argument to the Control.Invoke method. A delegate is simply a type that defines a method signature that can be associated with any method with a compatible signature.
private delegate void UpdateDelegate();
void gps_LocationChanged(object sender, LocationChangedEventArgs args)
{
GpsPosition pos = args.Position;
compass1.HeadingValid = pos.HeadingValid;
if (pos.HeadingValid)
{
compass1.Heading = pos.Heading;
}
compass1.SpeedValid = pos.SpeedValid;
if (pos.SpeedValid)
{
compass1.Speed = pos.Speed * 1.152;
}
if (pos.HeadingValid | pos.SpeedValid)
{
compass1.Invoke((UpdateDelegate)delegate()
{
compass1.Invalidate();
});
}
}
Inside the gps_LocationChanged event handler, you can see that compass1.Invalidate is not called directly, but it is called through another method, compass1.Invoke. The syntax used might be a bit cryptic if you are not familiar with anonymous delegates. In the gps_LocationChanged event handler, this C# 2.0 feature is used to call compass1.Invalidate through compass1.Invoke. It would also have been possible to define a separate method that just calls compass1.Invalidate and call that method through the UpdateDelegate delegate. Because the Compass control update logic is only called at one location, making use of an anonymous delegate makes the code more compact and, although a matter of taste, better readable.
With these modifications, it is now possible to run the Electronic Compass application without exceptions being thrown, and receiving GPS satellite information through the GPS Intermediate Driver.
Figure 7 - Electronic Compass running and displaying GPS information
But ... wait a moment, I hear you saying. The application is running inside Device Emulator, and yet it is receiving GPS satellite information. How does that work?
Testing location aware applications
If you write applications that make use of GPS hardware, testing those applications is a challenge. Many GPS receivers don't function well indoors, typically, the location where you develop your application. Even if the GPS receiver would receive GPS information, the information will be static, since it is not likely that you are moving much around when developing an application. In order to overcome this problem, the Windows Mobile 6 SDK ships with a utility called FakeGPS that uses text files containing GPS information to simulate the functionality of a GPS receiver. Applications that use the GPS Intermediate Driver can make use of FakeGPS, and will function exactly as they would if a GPS receiver was present, and do not need to be modified in any way. Since FakeGPS also runs on Device Emulator, you can even test your entire application using Device Emulator.
To make use of FakeGPS, you first have to install it on your target device or on Device Emulator. FakeGPS is available as a CAB file. To install FakeGPS on the Device Emulator, you can share the folder where FakeGPS is located, through the Device Emulator properties.
Figure 8 - Sharing the folder where FakeGPS is located
Inside Device Emulator, you can now use File Explorer to navigate to the Storage Card. On the Storage Card, which points to the shared folder, select the FakeGPS CAB file to install it on Device Emulator. FakeGPS comes with a number of sample text files containing GPS data. You can add your own text files containing GPS data to create test files for specific test scenarios. The contents of a FakeGPS text file look like this:
$GPGLL,4738.0173,N,12211.1874,W,191934.767,A*21
$GPGSA,A,3,08,27,10,28,13,19,,,,,,,2.6,1.4,2.3*3E
$GPGSV,3,1,9,8,71,307,43,27,78,59,41,3,21,47,0,10,26,283,40*77
$GPGSV,3,2,9,29,13,317,0,28,37,226,37,13,32,155,36,19,37,79,42*42
$GPGSV,3,3,9,134,0,0,0*46
$GPRMC,191934.767,A,4738.0173,N,12211.1874,W,0.109623,12.14,291004,,*21
$GPGGA,191935.767,4738.0172,N,12211.1874,W,1,06,1.4,32.9,M,-17.2,M,0.0,0000*75
$GPGLL,4738.0172,N,12211.1874,W,191935.767,A*21
$GPGSA,A,3,08,27,10,28,13,19,,,,,,,2.6,1.4,2.3*3E
$GPRMC,191935.767,A,4738.0172,N,12211.1874,W,0.081611,15.81,291004,,*2A
To activate the FakeGPS data feed, start the the FakeGPS utility on the Device Emulator, enable it, and select the desired GPS data file. Finally, you click on the Done softkey to start feeding GPS data to GPSID.
Figure 9 - Selecting a GPS data file inside FakeGPS
That is all you need to do to start testing GPS enabled applications, either on Device Emulator, or on a physical Windows Mobile device. After installing and setting up FakeGPS, you can start testing the Electronic Compass.
Related articles in this series
Additional resources and references
Please visit www.myrampup.com for more information.
This member has not yet provided a Biography. Assume it's interesting and varied, and probably something to do with programming.
Maarten Struys is an experienced software developer. He has been working with all Microsoft Windows Operating Systems for over 20 years both developing native applications and, since 2000, developing managed applications. He is a well known speaker at international conferences like Tech•Ed, MEDC, and Mobile Connections. Maarten created a large number of How-Do-I videos for MSDN around device development. In the past, he frequently presented MSDN Webcasts around application development for Windows Mobile devices. Earlier this year, Maarten created the RampUp program for Windows Mobile Developers. For information about how to use .NET in the embedded world, see Maarten's Web site at http://www.dotnetfordevices.com.


 General
  News
News  Suggestion
  Question
  Bug
Bug  Answer
  Joke
Joke  Praise
  Rant
Rant  Admin
Admin 


