Introduction
This is a short article that examines the implementation of a technique for drag selection of multiple items in a Canvas or ItemsControl derived class. In this article, I use a ListBox to host the drag-selectable items.
In addition, I look at how to make the selected items draggable. This felt like a natural addition as dragging the items is often what you would want to do after drag selecting them.
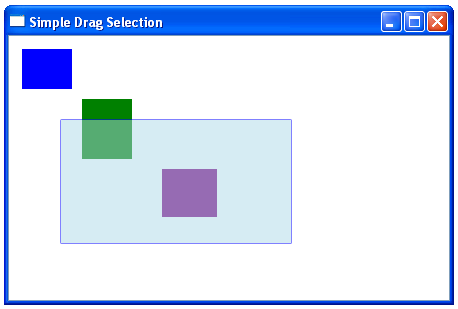
Screenshot
This is a screenshot of the sample application. It shows drag selection in progress. The transparent blue selection rectangle has been dragged out so that it fully contains the purple rectangle and partially contains the green rectangle.
Assumed Knowledge
It is assumed that you already know C# and have a basic knowledge of WPF and XAML. I'll provide links to relevant resources and information throughout the article.
Background and Aims
As I have mentioned before, I am working towards the code and article for a custom control for visualising and editing graphs, flow-charts, and networks. The control is called NetworkView. Coding NetworkView and writing the associated CodeProject article has turned out to be a mammoth task. I learnt WPF while creating NetworkView and the WPF learning curve is steep. In addition, my drive to generalize and perfect the control has tended to make for slower progress. Recently, I decided that the article-in-progress was already too large and I planned to break off some smaller articles that look at some techniques that could be examined independently. Actually, I already kind of did this implicitly for my first two articles. However, my previous article and this one have been explicitly extracted from the future NetworkView article in order to make that article smaller.
In my flow-chart editor, the nodes are placed at arbitrary locations on a Canvas and the user is free to drag the nodes where they please. I have used ListBox as it is a convenient way to present a list of selectable objects. Obviously, in these circumstances, it doesn't look much like a normal ListBox. This is because its ItemsPanel has been used to replace the default StackPanel with a Canvas. This allows each ListBoxItem to be positioned at a specific location. With a control like this, it seems natural to expect that the selectable items can be drag-selected. When multiple nodes are selected, a single action such as delete node or copy node can be applied to all nodes at once. Even a simple operation such as dragging a node can also be applied to multiple selected nodes.
Implementing Drag Selection
Open SampleCode.sln from DragSelectionSampleCode.zip in Visual Studio (I am using VS2008). Build and run the sample application. The Read me! window to the right of the main window describes the various ways you can interact with the sample application.
The view-model and presentation logic are very similar to my previous article so I won't discuss them here. The main thing we are looking at in this article is drag selection of multiple items. You can do this in the sample application by holding the left mouse-button down in empty space and dragging out the selection rectangle. This is an obvious user interface device, the selection rectangle allows you to mark out the items that you want to be selected, release the left mouse-button, and those items are then selected.
Before the walkthrough of the drag selection feature, a few words about basic item selection.
Basic Item Selection
I have used a ListBox to present the color rectangles because I wanted to reuse its item selection logic. As you can see in MainWindow.xaml, the ItemSource property is data-bound to the Rectangles property in the view-model:
<ListBox
    x:Name="listBox"
    ItemsSource="{Binding Rectangles}"
    SelectionMode="Extended"
    >
    ...
</ListBox>
SelectionMode is set to Extended to allow multiple selection of items in the ListBox. Multiple-selection, obviously, is a requirement of drag selection.
In the sample project, I have not added any code to make standard item selection work. Due to the use of ListBox, standard item selection just works. For example, you can left-click a rectangle to select it. You can control + left-click to toggle the selection of a rectangle. You can even use control + A to select all rectangles. Getting stuff for free is always nice ;)
Drag Selection
So now let's look at drag selection.
The visual for the selection rectangle is defined in MainWindow.xaml:
<Canvas
x:Name="dragSelectionCanvas"
Visibility="Collapsed"
>
<Border
x:Name="dragSelectionBorder"
BorderBrush="Blue"
BorderThickness="1"
Background="LightBlue"
CornerRadius="1"
Opacity="0.5"
/>
</Canvas>
The drag selection canvas contains the drag selection border, and both are layered over the ListBox. Visibility of the Canvas is initially set to Collapsed, which makes it invisible by default. When drag selection is initiated, the Canvas is made visible and this shows the drag selection border which visually represents the selection rectangle. The position and size of the Border are continuously updated as the user drags out the selection rectangle. When drag selection is finished, the drag selection canvas is returned to its default invisible state and the desired selection is applied.
To implement drag selection, we need to hook the mouse events of the main window. Window_MouseDown in MainWindow.xaml.cs is called when the user presses the mouse-button. Here we simply track that the mouse is held down and capture the mouse so that future mouse events are always handled by the main window:
private void Window_MouseDown(object sender, MouseButtonEventArgs e)
{
    if (e.ChangedButton == MouseButton.Left)
    {
        isLeftMouseButtonDownOnWindow = true;
        origMouseDownPoint = e.GetPosition(this);

        this.CaptureMouse();

        e.Handled = true;
    }
}
Window_MouseMove is called when the user moves the mouse cursor over the main window. It is responsible for initiating drag selection when the left mouse-button is held down and the mouse cursor has been dragged further than the threshold distance. It continues to update the selection rectangle as the user drags it.
The function is divided into two conditional sections. The first is executed only when drag selection is already in progress. The second is executed when the left mouse-button is held down but before drag selection has commenced.
Here is an overview:
private void Window_MouseMove(object sender, MouseEventArgs e)
{
if (isDraggingSelectionRect)
{
...
}
else if (isLeftMouseButtonDownOnWindow)
{
...
}
}
First up, let's take a look at the second conditional and examine the logic that initiates drag selection. The current mouse point is tested against the point recorded when the left mouse-button was pressed. When the mouse cursor has been dragged further than the threshold distance, the two points that define the initial area of the selection rectangle are passed to InitDragSelectionRect:
private void Window_MouseMove(object sender, MouseEventArgs e)
{
if (isDraggingSelectionRect)
{
...
}
else if (isLeftMouseButtonDownOnWindow)
{
Point curMouseDownPoint = e.GetPosition(this);
var dragDelta = curMouseDownPoint - origMouseDownPoint;
double dragDistance = Math.Abs(dragDelta.Length);
if (dragDistance > DragThreshold)
{
isDraggingSelectionRect = true;
listBox.SelectedItems.Clear();
InitDragSelectionRect(origMouseDownPoint, curMouseDownPoint);
}
e.Handled = true;
}
}
InitDragSelectionRect is trivial, it merely forwards to UpdateDragSelectionRect (which we will look at shortly). It also makes the drag selection canvas visible:
private void InitDragSelectionRect(Point pt1, Point pt2)
{
    UpdateDragSelectionRect(pt1, pt2);

    dragSelectionCanvas.Visibility = Visibility.Visible;
}
Jumping back to Window_MouseMove, let's look at the first conditional section. This is the logic that updates the selection rectangle while drag selection is in progress. The two points that define the updated area of the selection rectangle are passed to UpdateDragSelectionRect:
private void Window_MouseMove(object sender, MouseEventArgs e)
{
if (isDraggingSelectionRect)
{
Point curMouseDownPoint = e.GetPosition(this);
UpdateDragSelectionRect(origMouseDownPoint, curMouseDownPoint);
e.Handled = true;
}
else if (isLeftMouseButtonDownOnWindow)
{
...
}
}
UpdateDragSelectionRect is essentially simple. It computes the position and size of the selection rectangle and updates the drag selection border:
private void UpdateDragSelectionRect(Point pt1, Point pt2)
{
double x, y, width, height;
...
Canvas.SetLeft(dragSelectionBorder, x);
Canvas.SetTop(dragSelectionBorder, y);
dragSelectionBorder.Width = width;
dragSelectionBorder.Height = height;
}
I have omitted the chunk of code in the middle of UpdateDragSelectionRect that determines the position and size of the selection rectangle based on the relative positions of pt1 and pt2. That code inverts, if necessary, pt1 and pt2 to prevent us computing a negative width and height for the selection rectangle.
We have now seen both how drag selection is initiated and then how the selection rectangle is continuously updated as the user drags it. Now we will look at how drag selection is completed and applied.
Window_MouseUp is called when the user releases the mouse-button. If the user has dragged out the selection rectangle, ApplyDragSelection is called to apply the selection. It selects all the items that are contained within the selection rectangle. However, if the user hasn't invoked drag selection, for example, if they just clicked and released without dragging further than the threshold distance, then there is nothing to do except release the mouse capture and reset the state variables.
private void Window_MouseUp(object sender, MouseButtonEventArgs e)
{
if (e.ChangedButton == MouseButton.Left)
{
if (isDraggingSelectionRect)
{
isDraggingSelectionRect = false;
ApplyDragSelectionRect();
e.Handled = true;
}
if (isLeftMouseButtonDownOnWindow)
{
isLeftMouseButtonDownOnWindow = false;
this.ReleaseMouseCapture();
e.Handled = true;
}
}
}
ApplyDragSelectionRect is the real workhorse here. First it hides the drag selection canvas. This makes the selection rectangle return to its default invisible state:
private void ApplyDragSelectionRect()
{
    dragSelectionCanvas.Visibility = Visibility.Collapsed;

    ...
}
Next, the position and size of the selection rectangle are read back from the drag selection border:
private void ApplyDragSelectionRect()
{
...
double x = Canvas.GetLeft(dragSelectionBorder);
double y = Canvas.GetTop(dragSelectionBorder);
double width = dragSelectionBorder.Width;
double height = dragSelectionBorder.Height;
Rect dragRect = new Rect(x, y, width, height);
dragRect.Inflate(width / 10, height / 10);
...
}
I should explain why the selection rectangle is artificially inflated by 1/10 of its size. I could have decided to make this logic select all rectangles that overlap with the selection rectangle. If I had done that, then the rectangle inflation would not be necessary.
However, after trying out the drag selection, it was clear to me that its behavior should be to select only the rectangles that are within the selection rectangle rather than just intersecting it. For this reason, the user has to drag the selection rectangle so that it fully encloses the rectangles that they want to select.
After testing this new logic, I realised that it can be frustrating to drag out the selection rectangle and miss selecting a particular rectangle because you were a few pixels off. The rectangle inflation was added to cope with this problem and serves as a small user assist to help with their selection.
Now, in preparation for selecting new items, the current selection is cleared:
private void ApplyDragSelectionRect()
{
    ...

    listBox.SelectedItems.Clear();

    ...
}
Finally, all rectangles are compared against the selection rectangle. Rectangles that are contained within the (inflated) rectangle are added to the selection:
private void ApplyDragSelectionRect()
{
    ...

    foreach (RectangleViewModel rectangleViewModel
                      in this.ViewModel.Rectangles)
    {
        Rect itemRect = new Rect(rectangleViewModel.X,
                            rectangleViewModel.Y,
                            rectangleViewModel.Width,
                            rectangleViewModel.Height);
        if (dragRect.Contains(itemRect))
        {
            listBox.SelectedItems.Add(rectangleViewModel);
        }
    }
}
This completes our look at how to implement drag selection. Let's move on to the next sample project and look at how to implement dragging of multiple selected items.
Implementing Multiple-Item Dragging
Open SampleCode.sln from DragMultipleSampleCode.zip in Visual Studio. Build and run the sample application. As with the previous sample project, the Read me! window describes the features and interactions supported by the sample application.
In this sample, we look at how to implement dragging of multiple selected items. It seems like a waste of an opportunity to implement multiple item drag selection but not to implement multiple item dragging!
The key to this is to handle mouse events for the colored rectangles that allow the user to click and drag them. If you look at the data-template for RectangleViewModel in MainWindow.xaml, you can see where the events are hooked:
<Rectangle
    ...
    MouseDown="Rectangle_MouseDown"
    MouseUp="Rectangle_MouseUp"
    MouseMove="Rectangle_MouseMove"
    />
Before we move on, let's get one thing out of the way. At this point, you might be wondering why I am not using the WPF Thumb control. Thumb provides a convenient DragDelta event that makes it trivial in WPF to implement draggable UI elements. The problem here is that Thumb is actually too simple. Thumb handles its own mouse events and we don't get to handle those. If all you want are simple draggable UI elements, then Thumb will do the job nicely for you. Because Thumb overrides its mouse handling, the ListBox mouse handling logic is suppressed and we are deprived of the ListBox mouse-click selection logic. In order to have both selection logic and dragging logic, we need to handle the mouse events ourselves. Fortunately, as I hope you will see, implementing both dragging and selection logic isn't that much more difficult than simply using Thumb.
The code that handles the mouse events should already look familiar to you. It is rather similar to the main window's mouse event handlers that implement dragging of the selection rectangle. Rectangle_MouseDown records that the mouse-button is held down and captures the mouse. It also executes some of the selection logic, most notably when the control key is not held down. When the control key is held down, we simply track that this has happened and then leave the selection logic to be handled by Window_MouseUp.
private void Rectangle_MouseDown(object sender, MouseButtonEventArgs e)
{
if (e.ChangedButton != MouseButton.Left)
{
return;
}
var rectangle = (FrameworkElement)sender;
var rectangleViewModel = (RectangleViewModel)rectangle.DataContext;
isLeftMouseDownOnRectangle = true;
if ((Keyboard.Modifiers & ModifierKeys.Control) != 0)
{
isLeftMouseAndControlDownOnRectangle = true;
}
else
{
isLeftMouseAndControlDownOnRectangle = false;
if (this.listBox.SelectedItems.Count == 0)
{
this.listBox.SelectedItems.Add(rectangleViewModel);
}
else if (this.listBox.SelectedItems.Contains(rectangleViewModel))
{
}
else
{
this.listBox.SelectedItems.Clear();
this.listBox.SelectedItems.Add(rectangleViewModel);
}
}
rectangle.CaptureMouse();
origMouseDownPoint = e.GetPosition(this);
e.Handled = true;
}
Rectangle_MouseMove is responsible for initiating the dragging operation, and after that, it continuously updates the positions of the items that are being dragged.
Rectangle_MouseMove, like Window_MouseMove, contains two conditional sections. The first is executed when dragging is already in progress. The second executes when the left mouse-button is held down but before dragging has commenced.
Here is an overview:
private void Rectangle_MouseMove(object sender, MouseEventArgs e)
{
if (isDraggingRectangle)
{
...
}
else if (isLeftMouseDownOnRectangle)
{
...
}
}
The second conditional section initiates dragging when the mouse cursor has moved further than the threshold distance:
private void Rectangle_MouseMove(object sender, MouseEventArgs e)
{
if (isDraggingRectangle)
{
...
}
else if (isLeftMouseDownOnRectangle)
{
Point curMouseDownPoint = e.GetPosition(this);
var dragDelta = curMouseDownPoint - origMouseDownPoint;
double dragDistance = Math.Abs(dragDelta.Length);
if (dragDistance > DragThreshold)
{
isDraggingRectangle = true;
}
e.Handled = true;
}
}
The first conditional section moves the rectangles while dragging is in progress:
private void Rectangle_MouseMove(object sender, MouseEventArgs e)
{
if (isDraggingRectangle)
{
Point curMouseDownPoint = e.GetPosition(this);
var dragDelta = curMouseDownPoint - origMouseDownPoint;
origMouseDownPoint = curMouseDownPoint;
foreach (RectangleViewModel rectangle in this.listBox.SelectedItems)
{
rectangle.X += dragDelta.X;
rectangle.Y += dragDelta.Y;
}
}
else if (isLeftMouseDownOnRectangle)
{
...
}
}
During each call to Rectangle_MouseMove, the offset by which to move each rectangle is the computed delta distance between the mouse point in this invocation of Rectangle_MouseMove and the last invocation. Each time around, origMouseDownPoint is set to the current mouse point as we only ever care about the drag distance since the last invocation.
Rectangle_MouseUp is mostly about releasing mouse capture and stopping the drag operation. Part of the selection logic also happens here, but only when the user didn't actually drag anything. The rules for multiple selection used in this sample project were derived from the multiple selection rules used in Window Explorer.
private void Rectangle_MouseUp(object sender, MouseButtonEventArgs e)
{
if (isLeftMouseDownOnRectangle)
{
var rectangle = (FrameworkElement)sender;
var rectangleViewModel = (RectangleViewModel)rectangle.DataContext;
if (!isDraggingRectangle)
{
if (isLeftMouseAndControlDownOnRectangle)
{
if (this.listBox.SelectedItems.Contains(rectangleViewModel))
{
this.listBox.SelectedItems.Remove(rectangleViewModel);
}
else
{
this.listBox.SelectedItems.Add(rectangleViewModel);
}
}
else
{
if (this.listBox.SelectedItems.Count == 1 &&
this.listBox.SelectedItem == rectangleViewModel)
{
}
else
{
this.listBox.SelectedItems.Clear();
this.listBox.SelectedItems.Add(rectangleViewModel);
}
}
}
rectangle.ReleaseMouseCapture();
isLeftMouseDownOnRectangle = false;
isLeftMouseAndControlDownOnRectangle = false;
e.Handled = true;
}
isDraggingRectangle = false;
}
This is the end of our look at the second sample project, and it is also the end of the article. We looked at dragging of multiple selected items and how this is achieved by implementing selection and dragging logic in the event handlers for the Rectangle mouse events.
Conclusion
In this article, I have covered a simple technique that I use to drag select items in a Canvas or ListBox. In addition, I showed how to implement multiple item dragging.
Updates
- 20/01/2011 - Article first posted.
Software craftsman | Author | Writing rapidfullstackdevelopment.com - Posting about how to survive and flourish as a software developer
Follow on Twitter for news and updates: https://twitter.com/codecapers
I'm writing a new book: Rapid Fullstack Development. Learn from my years of experience and become a better developer.
My second book, Bootstrapping Microservices, is a practical and project-based guide to building distributed applications with microservices.
My first book Data Wrangling with JavaScript is a comprehensive overview of working with data in JavaScript.
Data-Forge Notebook is my notebook-style application for data transformation, analysis and transformation in JavaScript.
I have a long history in software development with many years in apps, web apps, backends, serious games, simulations and VR. Making technology work for business is what I do: building bespoke software solutions that span multiple platforms.
I have years of experience managing development teams, preparing technical strategies and creation of software products. I can explain complicated technology to senior management. I have delivered cutting-edge products in fast-paced and high-pressure environments. I know how to focus and prioritize to get the important things done.
Author
- Rapid Fullstack Development
- Bootstrapping Microservices
- Data Wrangling with JavaScript
Creator of Market Wizard
- https://www.market-wizard.com.au/
Creator of Data-Forge and Data-Forge Notebook
- http://www.data-forge-js.com
- http://www.data-forge-notebook.com
Web
- www.codecapers.com.au
Open source
- https://github.com/ashleydavis
- https://github.com/data-forge
- https://github.com/data-forge-notebook
Skills
- Quickly building MVPs for startups
- Understanding how to get the most out of technology for business
- Developing technical strategies
- Management and coaching of teams & projects
- Microservices, devops, mobile and fullstack software development


 General
  News
News  Suggestion
  Question
  Bug
Bug  Answer
  Joke
Joke  Praise
  Rant
Rant  Admin
Admin 


