Introduction
This is a short article that describes a technique that I use to data-bind the position of a UI element to a property on another UI element or a view-/data-model object.
Binding to the position of a UI element is not something that WPF natively supports; neither is it easy to figure out how to implement this on top of WPF.
In this article, I'll talk first about my initial implementation and then I'll talk about the epiphany I had once I was fully into the MVVM mindset and how that led to a much simpler and more elegant solution.
Screenshot
This is a screenshot of the sample application. You might recognise the content from my previous article. The colored rectangles can be left-mouse dragged by the user. The connections between them, because of the magic of data-binding, are updated as the rectangles are dragged.
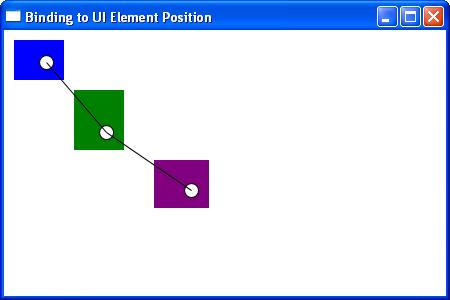
It probably doesn't look like much but I can assure you that the technique that binds the connections to the rectangles is awesome!*
*How awesome depends on how excited you get about small programming details.
Assumed Knowledge
It is assumed that you already know C# and have a basic knowledge of using WPF and XAML. Prior knowledge of MVVM will also help. If you are new to all this, then it might help if you read some of the introductory articles by Sacha Barber and Josh Smith to come up to speed, however I'll do my best to provide links to information and resources in the article.
Background and Aims
As mentioned in my previous articles, I have been building a control for visualising and editing networks, graphs and flow-charts. I have called this control NetworkView. Sometime soon, I'll be releasing the full code and article for NetworkView on codeproject.com. This article isn't about making a flow-chart control, that will come later. This article is about one particular technique I have used while implementing the flow-chart control. That technique, of course, is how to bind to the position of a UI element. In the flow-chart control, I use this to data-bind the end-points of connections to nodes in the graph. However, I think the technique is more generally applicable which is why I am presenting it in its own separate article.
At the simplest level, I need to be able to bind the position of one UI element to the position of another UI element. Of course, what I really want is to have the WPF layout system arrange my flow-chart nodes and their connectors (a.k.a. connection anchor points) and have the connection visual bind its end-points to the positions of the connectors.
Phew, that was a mouthful. Hopefully this image will make things clearer:

I want to briefly discuss my first attempt at solving this problem. If this isn't interesting, feel free to skip to the next section where I talk about my view-model solution to this problem.
My original solution relied heavily on explicitly searching the visual-tree for connectors. After a successful search and a connector was found, the center point was calculated and transformed relative to some parent control (or an ancestor control as it is known in the WPF visual-tree). It was this transformed point that was used to set the end-points of a connection.
The explicit visual-tree searching was driven by a combination of the view-model and various UI elements I had created to support the NetworkView control. The view-model objects that represent connectors are plugged into the view-model object that represents a connection. These were then data-bound into the UI element that represents a connection. The connection UI element would then search the visual-tree for the UI elements that represent the connectors. It knew how to find a particular connector UI element because its DataContext property was set to the connector view-model. To define this search in another way, I would say that the visual-tree was searched for a UI element that had its data-context set to a particular connector view-model object.
I thought this solution was great at the time. Since then, I have learned a lot more about MVVM. My instinct told me that explicitly searching the visual-tree was bad, or at least too much work. In addition, I wasn't sure of how the search would affect the performance of the application.
Ultimately, I discovered a better solution. One that uses the view-model and data-binding to communicate the connector hotspot between the connector UI elements and the connection UI element. After moving to the view-model oriented solution, I was amazed at how much code I was able to strip out of my application. My instinct is now telling me that the solution feels right.
The View-model Solution
Before reading on, you should open the sample project in Visual Studio (I am using Visual Studio 2008) and build and run the application.
You should see three colored rectangles that are connected together by some black lines. You can left-drag the colored rectangles to move them and you will see that they remain connected by the black lines. Amazing hey!
The View-model Classes
First up, I need to introduce the view-model classes that I am using in the sample code. The line that separates the view-model and the data-model in MVVM is somewhat fuzzy. I'm going to avoid the issue completely by just having a view-model. That is to say, what I call the view-model in this sample are all the classes that underlie the UI. Normally in an MVVM application, you would want to separate the classes into view-model and data-model, with the data-model classes underlying the view-model classes. For simplicity, I have combined both into the view-model and I'll leave it as an exercise to the reader, if you are at all interested to do so, to figure out what the separation between view-model and data-model should be.
If you read my previous article, you probably recognise the colored rectangles that appear again in this article. You might also remember the data-model from the previous article.
There are changes and additions, but I part-copied from the other article and renamed it as the view-model.
The view-model is initialised in MainWindow1.xaml:
<Window.DataContext>
<local:ViewModel />
</Window.DataContext>
This creates an instance of the ViewModel class and assigns it to the window's DataContext property. As you probably know already, this allows other UI properties in the XAML to be data-bound to properties of the ViewModel class.
Before we go any further, let's look at a class diagram of our simple view-model (thanks to StarUML):
The view-model consists of a list of rectangles and a list of connections. Each rectangle is represented by RectangleViewModel. Each connection is represented by ConnectionViewModel and references the two rectangles that it connects via the properties Rect1 and Rect2.
In the following sections, I'm going to explain how the rectangles and connections are presented using ItemsControl and Canvas. I'll also explain how Thumb is used to allow rectangles to be left-mouse dragged. These sections really just lay out the basics as to how the sample project works, you may want to read them to get the complete picture but if you are already a WPF expert, please feel free to skip to the heart of the article.
Presentation of Rectangles and Connections
The colored rectangles are presented by binding ItemsSource of ItemsControl to the Rectangles property of ViewModel:
<ItemsControl
    ItemsSource="{Binding Rectangles}"
    >
    ...
</ItemsControl>
Similarly, the presentation of connections is overlaid in the same space:
<ItemsControl
    ItemsSource="{Binding Connections}"
    >
    ...
</ItemsControl>
The visuals for each rectangle and connection are defined by data-templates defined in the Resources section. We will look at these data-templates soon.
Positioning the Colored Rectangles
A Canvas is used as the ItemsPanel for the rectangles ItemsControl:
<ItemsControl
    ItemsSource="{Binding Rectangles}"
    >
    <ItemsControl.ItemsPanel>
        <ItemsPanelTemplate>
            <Canvas />
        </ItemsPanelTemplate>
    </ItemsControl.ItemsPanel>
    ...
</ItemsControl>
Canvas.Left and Canvas.Top properties are set by the style assigned to ItemContainerStyle:
<ItemsControl
    ItemsSource="{Binding Rectangles}"
    >
    ... specify Canvas as the items panel ...
    <ItemsControl.ItemContainerStyle>
        <Style>
            <Setter
                Property="Canvas.Left"
                Value="{Binding X}"
                />
            <Setter
                Property="Canvas.Top"
                Value="{Binding Y}"
                />
        </Style>
    </ItemsControl.ItemContainerStyle>
</ItemsControl>
The setters in the style bind Canvas.Left and Canvas.Top to X and Y of RectangleViewModel class. This positions the colored rectangles within the Canvas.
Dragging the Colored Rectangles
A Thumb is embedded in the data-template for RectangleViewModel:
<DataTemplate
DataType="{x:Type local:RectangleViewModel}"
>
<Grid>
<Thumb
...
DragDelta="Thumb_DragDelta"
>
...
</Thumb>
...
</Grid>
</DataTemplate>
The Thumb control makes implementation of simple item dragging trivial. All we have to do is handle Thumb_DragDelta and update the position of the rectangle in the view-model:
private void Thumb_DragDelta(object sender,
System.Windows.Controls.Primitives.DragDeltaEventArgs e)
{
Thumb thumb = (Thumb)sender;
RectangleViewModel myRectangle = (RectangleViewModel)thumb.DataContext;
myRectangle.X += e.HorizontalChange;
myRectangle.Y += e.VerticalChange;
}
RectangleViewModel X and Y are bound to Canvas.Left and Canvas.Top, so changes to these properties automatically set the position of the rectangle within the Canvas and the UI is updated accordingly.
While we are here, let's take a look at the other data-bound properties in the data-template:
<DataTemplate
    DataType="{x:Type local:RectangleViewModel}"
    >
    <Grid>
        <Thumb
            Width="{Binding Width}"
            Height="{Binding Height}"
            DragDelta="Thumb_DragDelta"
            >
            <Thumb.Template>
                <ControlTemplate>
                    <Rectangle
                        Fill="{Binding Color,
			Converter={StaticResource colorToBrushConverter}}"
                        Cursor="Hand"
                        />
                </ControlTemplate>
            </Thumb.Template>

        </Thumb>

        ...

    </Grid>
</DataTemplate>
The size of the Thumb is bound to Width and Height of RectangleViewModel. This is how the size of each rectangle is set. The Fill property of Rectangle is bound to the Color property of RectangleViewModel and a custom value converter is used to convert the specified color into a brush.
Although Thumb is great to use in a simple situation like this, it is not so useful in more complicated scenarios and in the real NetworkView control, I don't actually use it. With NetworkView, I need to handle the MouseDown, MouseUp and MouseMove events to implement the flow-chart node dragging behaviour in way that integrates nicely with the other features. In this case however, using Thumb keeps things nice and simple.
Now that the basic background material is out of the way, we can look at the actual technique of binding to the position of a UI element.
In order to get the position of a connector, we have to decide which ancestor control the point will be relative to. Another way of saying this is to ask which coordinate system do we want the connector hotspot to be relative to? In this example, I use the Canvas (that contains the rectangles) as the ancestor control. That is to say that I want to express each connector hotspot in the coordinate system of the Canvas.
To make this work, I have created the custom control ConnectorItem to represent a connector:
ConnectorItem derives from ContentControl which means it can host arbitrary visual content:
public class ConnectorItem : ContentControl
{
    ...
}
If you look in the data-template for RectangleViewModel, you will see that I have used an ellipse as the ConnectorItem visual content:
<local:ConnectorItem
    ...
    >
    <Ellipse
        Stroke="Black"
        StrokeThickness="1"
        Fill="White"
        />
</local:ConnectorItem>
The Ancestor dependency property of ConnectorItem specifies the ancestor to use when calculating the connector hotspot. It is a standard WPF dependency property:
public class ConnectorItem : ContentControl
{
    ...

    public static readonly DependencyProperty AncestorProperty =
        DependencyProperty.Register("Ancestor",
		typeof(FrameworkElement), typeof(ConnectorItem),
                new FrameworkPropertyMetadata(Ancestor_PropertyChanged));

    ...

    public FrameworkElement Ancestor
    {
        get
        {
            return (FrameworkElement)GetValue(AncestorProperty);
        }
        set
        {
            SetValue(AncestorProperty, value);
        }
    }

    ...
}
Setting the Ancestor property automatically invokes the property changed event which is handled by ConnectorItem:
private static void Ancestor_PropertyChanged
	(DependencyObject d, DependencyPropertyChangedEventArgs e)
{
    ConnectorItem c = (ConnectorItem)d;
    c.UpdateHotspot();
}
The event handler calls UpdateHotspot to recompute the connector hotspot. In practice, this means that when the ancestor of the connector changes, the connector hotspot is recomputed. We will look at UpdateHotspot soon.
The Ancestor property is set in the XAML using a RelativeSource data-binding:
<local:ConnectorItem
    Ancestor="{Binding RelativeSource=
	{RelativeSource FindAncestor, AncestorType={x:Type Canvas}}}"
    ...
    >
    ... connector visuals ...
</local:ConnectorItem>
The RelativeSource binding is the replacement for the explicit visual-tree search that I used in my first attempt at a solution to this problem. The binding automatically searches up the visual-tree for an ancestor of the requested type, in this case Canvas. The binding then assigns the ancestor to the Ancestor property.
Binding Connector Hotspots to the View-model
Now let's look at how Hotspot is data-bound to the view-model:
<local:ConnectorItem
    ...
    Hotspot="{Binding ConnectorHotspot, Mode=OneWayToSource}"
    ...
    >
    ...
</local:ConnectorItem>
This binding pushes the value of ConnectorItem.Hotspot through to RectangleViewModel.ConnectorHotspot.
I decided to create ConnectorItem as a custom control so that it could monitor its own events and recalculate the connector hotspot as necessary. I could have also used attached properties for both Hotspot and Ancestor and this would have relieved me of the necessity of creating a custom control. This would have been a valid solution however I think that creating a custom control is slightly simpler and more obvious, and in addition it helps in other ways, I won't talk about them until the future NetworkView article, but for now one example is being able to override the mouse-event handling for a connector and handle those events in a custom way.
The ConnectorItem events that we are interested in are LayoutUpdated and SizeChanged. These events are hooked in the ConnectorItem constructor:
public ConnectorItem()
{
    ...

    this.LayoutUpdated += new EventHandler(ConnectorItem_LayoutUpdated);
    this.SizeChanged += new SizeChangedEventHandler(ConnectorItem_SizeChanged);
}
Each event-handler simply calls UpdateHotspot, for example:
private void ConnectorItem_LayoutUpdated(object sender, EventArgs e)
{
    UpdateHotspot();
}
I am slightly concerned that hooking UpdateLayout may not be the most efficient way of being notified that the visual-tree hierarchy has changed. If you can think of a better way, please let me know!
UpdateHotspot computes the connector hotspot by transforming the center point of the connector to the coordinate system of the ancestor:
private void UpdateHotspot()
{
if (this.Ancestor == null)
{
return;
}
var center = new Point(this.ActualWidth / 2, this.ActualHeight / 2);
var centerRelativeToAncestor =
this.TransformToAncestor(this.Ancestor).Transform(center);
this.Hotspot = centerRelativeToAncestor;
}
Hotspot is another example of a standard WPF dependency property:
public class ConnectorItem : ContentControl
{
    public static readonly DependencyProperty HotspotProperty =
        DependencyProperty.Register("Hotspot", typeof(Point), typeof(ConnectorItem));

    ...

    public Point Hotspot
    {
        get
        {
            return (Point)GetValue(HotspotProperty);
        }
        set
        {
            SetValue(HotspotProperty, value);
        }
    }

    ...
}
When the value of Hotspot changes, the WPF dependency property system automatically raises property changed events and we don't need to explicitly raise these events. These events cause the data-bindings to be re-evaluated which in turn causes our view-model to be updated.
You may have noticed that ConnectorItem is similar to Josh Smith's centered content control and I must admit that Josh's code and articles are some of my many sources of inspiration.
Now, back to the data-binding. Earlier, we looked at the Hotspot data-binding:
Hotspot="{Binding ConnectorHotspot, Mode=OneWayToSource}"
This data-binding causes the value of Hotspot to be propagated through to ConnectorHotspot in the view-model. The data-binding Mode is set to OneWayToSource. This means that ConnectorHotspot is updated whenever Hotspot is updated, but not the other way around. Usually when we think of data-binding, we think of the view-model being the source of the data with the UI then displaying that data. Here, though that concept is reversed with the UI generating the data (using the WPF visual-tree and WPF layout system), that is pushed through to the view-model.
ConnectorHotspot in the view-model is a standard C# property. It is backed by a private field and setting the property results in a PropertyChanged event being raised:
public class RectangleViewModel : INotifyPropertyChanged
{
    ...

    private Point connectorHotspot;

    ...

    public Point ConnectorHotspot
    {
        get
        {
            return connectorHotspot;
        }
        set
        {
            if (connectorHotspot == value)
            {
                return;
            }

            connectorHotspot = value;

            OnPropertyChanged("ConnectorHotspot");
         }
    }

    ...
}
RectangleViewModel and other view-model classes derive from INotifyPropertyChanged. This interface is part of the protocol by which the UI and data-binding system are aware of changes to the view-model.
Binding Connection End-points to Connector Hotspots
Now it is time to look at how the visual for a connection is actually data-bound to the connection hotspot at each of its two end-points. At this point the hard stuff, the binding of the ancestor, the binding and transformation of the connector hotspot, is out of the way.
The definition of the Connection data-template and binding the connection end-points is now trivial:
<DataTemplate
    DataType="{x:Type local:Connection}"
    >
    <Line
        Stroke="Black"
        StrokeThickness="1"
        X1="{Binding Rect1.ConnectorHotspot.X}"
        Y1="{Binding Rect1.ConnectorHotspot.Y}"
        X2="{Binding Rect2.ConnectorHotspot.X}"
        Y2="{Binding Rect2.ConnectorHotspot.Y}"
        />
</DataTemplate>
I have used a standard WPF Line as the visual for a connection. The line end-points are bound to the connector hotspots for each of Rect1 and Rect2 that specify which rectangles are connected.
I can now summarize the whole sequence of computation and data-binding: ConnectorItem (in response to an event) computes its center point and transforms it the coordinate system of its ancestor (the Canvas); it then updates the Hotspot property and data-binding takes care of pushing that value through to the ConnectorHotspot property of RectangleViewModel; in turn this raises the property changed event for ConnectorHotspot and data-binding takes care of updating the end-points of the Line that visually represents the connection.
Conclusion
This article has demonstrated a technique that I am using to data-bind the position of a UI element (the connector) to another UI element (the connection) via the view-model (the RectangleViewModel and ConnectionViewModel classes).
If you have any ideas that would improve on this technique, please let me know and I'll integrate them and update the article (giving full credit of course).
If you like sound of the NetworkView control, please stay tuned. Sometime soon, I'll be releasing it on CodeProject.
Updates
- 23/12/2010 - Article first posted
Software craftsman | Author | Writing rapidfullstackdevelopment.com - Posting about how to survive and flourish as a software developer
Follow on Twitter for news and updates: https://twitter.com/codecapers
I'm writing a new book: Rapid Fullstack Development. Learn from my years of experience and become a better developer.
My second book, Bootstrapping Microservices, is a practical and project-based guide to building distributed applications with microservices.
My first book Data Wrangling with JavaScript is a comprehensive overview of working with data in JavaScript.
Data-Forge Notebook is my notebook-style application for data transformation, analysis and transformation in JavaScript.
I have a long history in software development with many years in apps, web apps, backends, serious games, simulations and VR. Making technology work for business is what I do: building bespoke software solutions that span multiple platforms.
I have years of experience managing development teams, preparing technical strategies and creation of software products. I can explain complicated technology to senior management. I have delivered cutting-edge products in fast-paced and high-pressure environments. I know how to focus and prioritize to get the important things done.
Author
- Rapid Fullstack Development
- Bootstrapping Microservices
- Data Wrangling with JavaScript
Creator of Market Wizard
- https://www.market-wizard.com.au/
Creator of Data-Forge and Data-Forge Notebook
- http://www.data-forge-js.com
- http://www.data-forge-notebook.com
Web
- www.codecapers.com.au
Open source
- https://github.com/ashleydavis
- https://github.com/data-forge
- https://github.com/data-forge-notebook
Skills
- Quickly building MVPs for startups
- Understanding how to get the most out of technology for business
- Developing technical strategies
- Management and coaching of teams & projects
- Microservices, devops, mobile and fullstack software development


 General
  News
News  Suggestion
  Question
  Bug
Bug  Answer
  Joke
Joke  Praise
  Rant
Rant  Admin
Admin 


