This Node.js tutorial series will help you build a Node.js powered real-time chatroom web app fully deployed in the cloud. Throughout the series, you will learn how to setup Node.js on your Windows machine, how to develop a web frontend with Express, how to deploy a Node Express-based app to Microsoft Azure, how to use Socket.IO to add a real-time layer, and how to deploy it all together.
Level: Beginner to Intermediate--you are expected to know HTML5 and JavaScript
Part 1 - Introduction to Node.js
Part 2 - Welcome to Express with Node.js and Azure
Part 3 - Building a Backend with Node, Mongo and Socket.IO
Part 4 – Building a Chatroom UI with Bootstrap
Part 5 - Connecting the Chatroom with WebSockets
Part 6 – The Finale and Debugging Remote Node Apps
Part 4 – Building a Chatroom UI with Bootstrap
Welcome to Part 4 of the hands-on Node.js tutorial series: Build a Node.js-powered chatroom web app.
In this installment, I will show you how to add a Twitter Bootstrap-styled frontend to the chatroom backend you built in Part 2 and Part 3.
What is Bootstrap?
Bootstrap is a wildly popular HTML and CSS framework for building websites and web applications. It is the number one project on GitHub. Bootstrap supports responsive web design, allowing the layout of your page to adapt to the device (desktop, tablet, mobile).
Adding Bootstrap to Our Project
To add Bootstrap to our project, we have to download the minified CSS and JS files for Bootstrap. You can download Bootstrap from this link. After you have downloaded Bootstrap, unzip the file and copy over the folders "css", "js", and "fonts" to the "public" folder in your project.
You will notice a few inconsistencies with the existing folder structure. We will unify the stylesheets and JavaScript folders. I prefer the Bootstrap nomenclature of "css" for "stylesheets" and "js" for "javascripts" as that is shared with other third-party libraries. Copy the files in "stylesheets" into "css" and delete the "javascripts" folder as it should be empty. Next go to layout.jade and change the following line:
link(rel='stylesheet' href='/stylesheets/style.css')
to:
link(rel='stylesheet' href='/css/style.css')
Next, we want to add the Bootstrap CSS file links to the header and the appropriate meta tags for HTML5 apps in the layout.jade file. You have to add the following lines right before the line containing the style.css link.
meta(charset="utf-8")
meta(http-equiv="X-UA-Compatible" content="IE=edge")
link(rel='stylesheet' href='/css/bootstrap.min.css')
link(rel='stylesheet' href='/css/bootstrap-theme.min.css')
Next, we want to add the JavaScript file that Bootstrap needs for its components and plugins. Add the following line to the end of layout.jade:
script(type='text/javascript' src='/js/bootstrap.min.js')
Completed layout.jade
doctype html
html
  head
    title= title
    meta(charset="utf-8")
    meta(http-equiv="X-UA-Compatible" content="IE=edge")
    link(rel='stylesheet' href='/css/bootstrap.min.css')
    link(rel='stylesheet' href='/css/bootstrap-theme.min.css')
    link(rel='stylesheet' href='/css/style.css')

  body
    block content

    script(type='text/javascript' src='/js/bootstrap.min.js')
Creating the Chat UI Layout
It is time to develop the chat user interface layout. First, you might want to read about Bootstrap and take a look at this long tutorial. All chat engines have an area for the recently received messages and an area for a user to write and send a message. Historically, the layout was to have the editing area attached to the bottom and the messages at the top.
It is not easy to fix elements on an HTML page to the bottom of the viewport without a bit of work. I will be following this sample to fix a footer to the bottom. We want to modify the index.jade file, and remove all the lines of code under the content block.
First, we add the area of the page that will contain messages received. Let’s start by adding a div with the class wrap. In Jade, all you need to write is wrap to generate a <div class="wrap"></div>. By using the indentation, we can signal to the jade templating engine that more indented elements will go within the less indented elements. Take a look at this Jade tutorial if you missed it in the other tutorials.
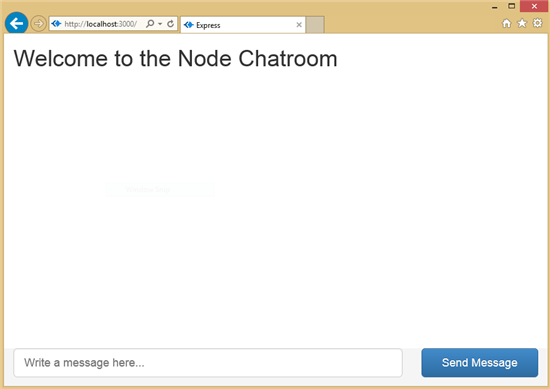
Next, we want to add another div with the class container-fluid to add a fluid width to the page. Inside, I will create an h1 element that says "Welcome to the Node Chatroom" and a div with an id messages and a final div with the class push that we will use to push down the message editing area of the chatroom to the bottom of the viewport.
.wrap
  .container-fluid
      h1 Welcome to the Node Chatroom
      #messages

      .push
Next, we are going to develop the message editing area. We want to capture the textbox and send button within a div called footer and a div called container-fluid. The footer div will have the same indentation as the wrap div.
Next, I will use the Bootstrap grid system (read about it here) to split the message editing area into two. One of the columns will take the majority of the space and will contain the textbox for writing the message, the second column will contain a block-level button for sending the message. Note how Jade lets us specify the attributes of an element using the paragraph notation. The code will look like this:
.footer
  .container-fluid
    .row
      .col-xs-8.col-sm-9
        input(type="text" id="message-box" class="form-control input-lg" placeholder="Write a message here..." rows="3")
      .col-xs-4.col-sm-3
        button#send-message-btn.btn.btn-primary.btn-lg.btn-block Send Message
Completed index.jade
extends layout

block content
  .wrap
    .container-fluid
        h1 Welcome to the Node Chatroom
        #messages

        .push
  .footer
    .container-fluid
      .row
        .col-xs-8.col-sm-9
          input(type="text" id="message-box" class="form-control input-lg" placeholder="Write a message here..." rows="3")
        .col-xs-4.col-sm-3
          button#send-message-btn.btn.btn-primary.btn-lg.btn-block Send Message
Adding CSS to Force Message Editing Area to Bottom of Viewport
We want to force the message editing area to the bottom of the viewport, we will want to add a few custom CSS in the public/css/style.styl page. This file uses the Stylus CSS preprocessor but you can also paste verbatim CSS that will be recopied into the generated CSS file.
First, we will want to ensure the whole page takes up 100% of the height.
html, body
  height: 100%
Second, we want to ensure the wrap area takes up the maximum height it can but leaves a 60px margin at the bottom for our footer and message editing area.
.wrap
  min-height: 100%
  height: auto !important
  height: 100%
  margin: 0 auto -60px
Third, we want to ensure that this space for the editing area is respected and to assign it to the footer.
.push, .footer
  height: 60px
Finally, for stylistic reasons, let’s a subtle background color to the footer.
.footer
  background-color: #f5f5f5
Completed Style.styl File
html, body
  height: 100%

.wrap
  min-height: 100%
  height: auto !important
  height: 100%
  margin: 0 auto -60px

.push, .footer
  height: 60px

.footer
  background-color: #f5f5f5
Screenshot
Conclusion
Voila! We have used Bootstrap and the Jade/Stylus preprocessors to add a nice UI layout for our chatroom that is served by Node. In the next installment, I will show you how to connect the UI and the node backend via WebSockets.
Stay Tuned for Part 5!
Part 5— Connecting the Chatroom with WebSockets —will be posted to CodeProject soon, and is also located on my blog here. You can stay up-to-date on this and other articles by following my twitter account: @ramisayar.
More learning for node on Azure
For more in-depth learning on node, my course is available here on Microsoft Virtual Academy.
Or some shorter-format videos on similar node subjects:
This article is part of the web dev tech series from Microsoft. We’re excited to share Microsoft Edge and its new rendering engine with you. Get free virtual machines or test remotely on your Mac, iOS, Android, or Windows device @ modern.IE.


