Introduction
You may have also already faced the problem of how to localize an application.
Well, basically accomplishing this task is quite easy, as all modern programming lanugages come with the necessary tools to do right this.
This article will guide you through setting up your Java project, creating a small dummy SWT application and enables the application being localized at runtime.
A word in a personal matter:
The source code, attached to this article, does not contain a project file, you can directly open within your Java IDE. It only contains the .java source code files in the directory/package structure, we are using in this article. The reason is the platform independency of Java, the different IDEs (and with them their project definition files), the heterogenous installation locations of the Java libraries, etc. So I decided to only include the source files, without the project definition overhead. Anyway: It should be a very simple task to put it all together in your favorite IDE to make it a working project.
Background
What is "Localization"? Well, in fact it is nothing more than displaying all texts to the user in the language he is able to choose. Pretty simple task, isn't it? At least one should think this. But why are so many applications out there, that need to be restarted after only the user interface's language has been changed? I am honest: I hate these kind of applications!
When we are done with this article we will have a small application, which allows the user to switch the current language as often as he wants without restarting. Far from it! He will only mention that the language has been changed, because the texts look different now - everything else, like form inputs, currently opened windows, toolbars, what ever, will be left untouched; the user can continue working with the software immediately.
General considerations
Now we know what we are aiming at. How can this be accomplished? Let us have a look at the program logic we are going to implement.
Task: When the user selects a language the application shall translate all texts it currently displays on the screen.
The problem we are facing is that in complex user interfaces the user may have opened several windows and toolboxes. The part of our application where we can set the current language may not know all of these user interface parts - usually every part should only take care of itself and leave the others alone. Otherwise the code quickly gets nearly unreadable and really hard to maintain or extend.
Step 1: Keep track of what needs to be translated
As said before, every single part of our user interface shall only care about itself. Example: The toolbox does not care about the "Network Status" window - floating around, which does not care about what happens on the main window's status bar, which does not know anything about the form the user is currently entering data to.
To keep track of what needs to be translated we have to create a kind of Headquarter which tells the single parts of the user interface that they shall translate themselves.
At this Headquarter the single parts subscribe to be told when the language has been changed and unsubscribe from when this announcement is not longer needed - e.g. the window has been closed.
Not rocket science, is it?
Example UI: For further thinking, let us define our application's user interface. It shall contain of a main window with a menu bar, holding several menus and sub-menus, and a second window with some status information. The language can be selected by selecting the appropriate menu item in the main window. The status window can be opened and closed and shall also be localized on the fly when the user switches the language.
Step 2: Invoking the translations
When our Headquater calls, all subscribed parts of the application shall respond. So, when the user switches the language in the application's main window this triggers the Headquater to announce all subscribers.
You see, the main window does not take care about the status window; it does not take care whether this window is currently displayed or not, it even does not have to know about the existence of the status window. The main window only has to know that there is our Headquater that cares about the rest, as our status window also only has to know this fact.
Using the code
When we have a look at the steps we recently thought about and bring them together it will make it really easy to create our application.
- Our previously described Headquarter literally begs for the Singleton design pattern, as it shall only exist once through out the whole application.
- The fact that any kind of code element shall be able to subscribe to this Headquarter can easily be handled by creating an interface, the single parts of our application can implement.
Implementation
Okay, let us start creating an empty project in your favorite IDE and call it "LocalizationExample". Since our sampe application will use SWT for the GUI add a reference to the SWT library on your machine. Now we are going to create the following packages in the project's source folder (commonly "src"):
- com.hidensity.example
- com.hidensity.example.localize
- com.hidensity.example.ui
In the ".localize" package we are going to implement our localization logic. First let us start with the previously mentioned interface.
Interface ILocalizable
Go on and create a new interface and call it "ILocalizable" in the "com.hidensity.example.localize" package. The advantage of an interface is, we can refer to classes deriving from this interface and are absolutely sure that they have implemented the methods described in the interface. So we do not need to know, whether it is a window, a toolbox, or whatever. We know it is an instance of ILocalizable and so we use it. Let the instance care about what it does with our Headquater's "call to arms".
The interface only describes one method: doLocalize. So our interface looks as follows:
package com.hidensity.example.localize;
public interface ILocalizable {
void doLocalize();
}
Localizer Class
The next thing we have to do is to implement our Headquater. From now on we will call it Localizer. So let us create a class called "Localizer" in the same package as the interface. Mainly our Localizer contains a HashMap with references to instances of ILocalizable. Further it contains methods to register and unregister these instances and calling the doLocalize method of one or more of this registered instances.
Let us implement the class and have a look on its implementation.
package com.hidensity.example.localize;
import java.util.HashMap;
import java.util.Locale;
import java.util.ResourceBundle;
public class Localizer {
private static Localizer instance = null;
private HashMap<String, ILocalizable> localizeObjects = null;
private ResourceBundle resources = null;
private Localizer() {
localizeObjects = new HashMap<>();
}
public static synchronized Localizer getInstance() {
if (Localizer.instance == null)
Localizer.instance = new Localizer();
return Localizer.instance;
}
I think that these first lines of code are more or less self-explaining. We have our private class members - especially our previously mentioned HashMap, acting like a catalogue for objects that need to be localized, and our single Localizer instance. This instance can be accessed through the getInstance method, that also calls the class' private constructor, if the instance has not been created yet. Beyond that our Localizer instance also holds the ResourceBundle which contains the localized texts for each language.
We go further and implement the methods for registering and unregistering ILocalizable instances to our Localizer.
public void register(String localizeObjKey, ILocalizable localizeObj) {
if (!localizeObjects.containsKey(localizeObjKey))
localizeObjects.put(localizeObjKey, localizeObj);
else
localizeObjects.replace(localizeObjKey, localizeObj);
}
public void register(ILocalizable localizeObj) {
register(localizeObj.getClass().getName(), localizeObj);
}
public void unregister(String localizeObjKey) {
if (localizeObjects.containsKey(localizeObjKey))
localizeObjects.remove(localizeObjKey);
}
public void unregister(ILocalizable localizeObj) {
unregister(localizeObj.getClass().getName());
}
As you can see, we have two method signatures for registering and unregistering our ILocalizable instances. That makes it pretty simple for us to have multiple instances of a single ILocalizable implementation in our HashMap at one time, due they are identified by different strings. When registering is done only with the ILocalizable instance, it is registered using its fully qualified class' name. Otherwise you can assign any string you want to use. Important: Just make sure it is a unique string, since otherwise an existing registration would be overwritten. Unregistering ILocalizable instances is done in a similar way.
The next methods of our Localizer class we are going to implement, are the methods that invoke the localization of the single ILocalizable instances, registered to the Localizer.
public void localizeAll() {
localizeObjects.keySet().forEach((key) -> {
if (localizeObjects.get(key) != null)
localizeObjects.get(key).doLocalize();
});
}
public void localize(String localizeObjKey) {
if (localizeObjects.containsKey(localizeObjKey) && localizeObjects.get(localizeObjKey) != null)
localizeObjects.get(localizeObjKey).doLocalize();
}
public void localize(ILocalizable localizeObj) {
localize(localizeObj.getClass().getName());
}
You can see, we have a method localizeAll, which does exaclty what its name tells: it localizes all registered ILocalizable instances, by calling each of this instances doLocalize method. Furthermore we have two more localize methods, which take a String or ILocalizable instance as parameter and calling the appropriate instance's doLocalize method.
No we are going to implement our last methods in the Localizer class.
public void setLocale(String languageTag) {
getResources(Locale.forLanguageTag(languageTag));
}
public void setLocale(Locale locale) {
setLocale(locale.toLanguageTag());
}
public Locale getLocale() {
return resources.getLocale();
}
public String getString(String key) {
return resources.getString(key);
}
private void getResources(Locale locale) {
resources = ResourceBundle.getBundle("LocalizationExample", locale);
}
}
Here we have our methods to set the Localizer's locale (its language). When setting the language with the setLocale method the getResources method is called, which loads the resources from the appopriate resource file. Actually these files do not yet exist, so we are going to create them now.
Resource files
In our sources root folder (commonly "src") we will now create three .properties files, named
- LocalizationExample.properties
- LocalizationExample_de_DE.properties
- LocalizationExample_es_ES.properties
These files build the ResourceBundle for our localization and are referenced in our Localizer class in the getResources method. With these ResourceBundle we are going to support the languages German, Spanish and "default", which might be every language - in our case we will put in the English localization in our default resource file. The naming convention for the resource file, to make them automatically being accessed by the Java's ResourceBundle.getBundle method is: "nameOfYourChoice_[language in ISO 639-1]_[country in ISO 3166-1a2].properties".
For now we are going to insert only a single line in each of these three files.
- (default):
application.title=LocalizeExample - de-DE:
application.title=LocalizeExample de-DE - es-ES:
application.title=LocalizeExample es-ES
The core for our localization mechanism is ready. Now we have to implement something to test and demonstrate it.
Sample GUI
Main User Interface
As stated at the beginning of this article we are up to implement a small SWT application to demonstrate the localization we have just implemented. For this purpose we first create a new class "MainUI" in the package "com.hidensity.example.ui".
package com.hidensity.example.ui;
import com.hidensity.example.localize.ILocalizable;
import com.hidensity.example.localize.Localizer;
import org.eclipse.swt.SWT;
import org.eclipse.swt.widgets.Display;
import org.eclipse.swt.widgets.Menu;
import org.eclipse.swt.widgets.MenuItem;
import org.eclipse.swt.widgets.Shell;
import java.util.Locale;
public class MainUI implements ILocalizable {
private Display display = new Display();
private Shell shell = new Shell(display);
Menu menuBar = null;
Menu fileMenu = null;
Menu extrasMenu = null;
Menu extrasLanguageMenu = null;
MenuItem fileMenuHeader = null;
MenuItem fileNewItem = null;
MenuItem fileExitItem = null;
MenuItem extrasMenuHeader = null;
MenuItem extrasLanguageItem = null;
MenuItem extrasLanguage_enUS_Item = null;
MenuItem extrasLanguage_deDE_Item = null;
MenuItem extrasLanguage_esES_Item = null;
MenuItem separator = null;
As you can see, it looks pretty much like a common SWT application's source code. We have our Display and Shell objects and the single GUI elements (in our case Menus and MenuItems). The only big difference is, our MainUI class implements the ILocalizable interface, we have previously created.
Let us have a closer look on what is happening next.
public MainUI() {
Localizer.getInstance().register(this);
initUI();
Localizer.getInstance().localizeAll();
shell.open();
shell.addListener(SWT.Close, event -> Localizer.getInstance().unregister(this));
while (!shell.isDisposed()) {
if (!display.readAndDispatch())
{
display.sleep();
}
}
display.dispose();
}
In our MainUI constructor some logic for the localization is implemented. As we can see in its first line of code the instance is registered at the Localizer using its register method. Here we do not need to pass a name of our choice, since the MainUI will only exist once the application runs - so we can rely on our Localizer, which choses the fully qualified class' name in this case for identifying the ILocalizer instance - for now the MainUI object.
After this we have a method initUI which initializes our application's user interface - we will come back to this briefly. We also come back in a few moments on the line which calls the localizeAll method of our Localizer.
Another line of code we should have focus on is the line that adds a listener to the Close event of our shell. Here we unregister the MainUI from the Localizer. In fact here it would not be necessary to do so, since our application is going to be disposed here and so the Localizer will be, but I think it is a good practice to keep the logical flow being strictly implemented through the whole application, thus would also make it easier to extend our application later on.
Initializing the User Interface
private void initUI() {
shell.setSize(640, 480);
shell.setText("application.title");
initMenu();
}
This method does nothing else than setting the window's initial size and title. It also calls the method which is initializing the window's menus.
As stated in the method's comments the text "application.title" is only a dummy value. It does not belong to the resource files we have previously created, so far. I only prefer to set the resource's names as placeholder texts, hence it makes it much easier to find out whether a localization is missing than working with "real" texts - due the placeholer texts look very strange in a running application.
The initMenu method also does exactly what you would expect from it - it initializes the menus.
private void initMenu() {
menuBar = new Menu(shell, SWT.BAR);
fileMenuHeader = new MenuItem(menuBar, SWT.CASCADE);
fileMenuHeader.setText("menu.file");
fileMenu = new Menu(shell, SWT.DROP_DOWN);
fileMenuHeader.setMenu(fileMenu);
fileNewItem = new MenuItem(fileMenu, SWT.PUSH);
fileNewItem.setText("menu.file.new");
fileNewItem.setAccelerator(SWT.F2);
separator = new MenuItem(fileMenu, SWT.SEPARATOR);
fileExitItem = new MenuItem(fileMenu, SWT.PUSH);
fileExitItem.setText("menu.file.exit");
extrasMenuHeader = new MenuItem(menuBar, SWT.CASCADE);
extrasMenuHeader.setText("menu.extras");
extrasMenu = new Menu(shell, SWT.DROP_DOWN);
extrasMenuHeader.setMenu(extrasMenu);
extrasLanguageItem = new MenuItem(extrasMenu, SWT.CASCADE);
extrasLanguageItem.setText("menu.extras.language");
extrasLanguageMenu = new Menu(shell, SWT.DROP_DOWN);
extrasLanguageItem.setMenu(extrasLanguageMenu);
extrasLanguage_deDE_Item = new MenuItem(extrasLanguageMenu, SWT.PUSH);
extrasLanguage_deDE_Item.setText("menu.extras.language.deDE");
extrasLanguage_enUS_Item = new MenuItem(extrasLanguageMenu, SWT.PUSH);
extrasLanguage_enUS_Item.setText("menu.extras.language.enUS");
extrasLanguage_esES_Item = new MenuItem(extrasLanguageMenu, SWT.PUSH);
extrasLanguage_esES_Item.setText("menu.extras.language.esES");
fileNewItem.addListener(SWT.Selection, event -> new StatusWindow(shell));
fileExitItem.addListener(SWT.Selection, event -> shell.close());
extrasLanguage_deDE_Item.addListener(SWT.Selection, event -> {
Localizer.getInstance().setLocale(new Locale("de", "DE"));
Localizer.getInstance().localizeAll();
});
extrasLanguage_enUS_Item.addListener(SWT.Selection, event -> {
Localizer.getInstance().setLocale(new Locale("en", "US"));
Localizer.getInstance().localizeAll();
});
extrasLanguage_esES_Item.addListener(SWT.Selection, event -> {
Localizer.getInstance().setLocale(new Locale("es", "ES"));
Localizer.getInstance().localizeAll();
});
shell.setMenuBar(menuBar);
}
You see, it is quite common Java code for a SWT application. Our menus are set up, using placeholder texts like "menu.file", "menu.file.new", etc.
Some interesting things happen in the lines below the "Set up listeners." comment:
- When the user selectes the "New" item from the "File" menu a new instance of the "StatusWindow" class is created (we will implement this in the next step).
- The "Exit" menu item causes the shell (MainUI) to close, which also triggers the shell's closing event, where we have set a listener in our constructor on, causing the
MainUI being unregistered from our Localizer. - The single lanugage menu item's Selection event is listened and causes to set the selected Locale for our
Localizer and calling the Localizer.localizeAll method. You may have mentioned that our "English" menu item assigns the Locale for "en-US" to our Localizer. But a resource file for this Locale does not exist. No need to worry, in this case Java falls back to the default resource file, which in our case holds the English localization - everything fine.
MainUI - The Final Step
By now the compiler would not compile our application - not only because the "StatusWindow" implementation is missing, but more important: the ILocalizable.doLocalize method has not yet been implemented - but we need to do so, hence the interface expects us to do this. So, here we go:
@Override
public void doLocalize() {
shell.setText(Localizer.getInstance().getString("application.title"));
fileMenuHeader.setText(Localizer.getInstance().getString("menu.file"));
fileNewItem.setText(Localizer.getInstance().getString("menu.file.new"));
fileExitItem.setText(Localizer.getInstance().getString("menu.file.exit"));
extrasMenuHeader.setText(Localizer.getInstance().getString("menu.extras"));
extrasLanguageItem.setText(Localizer.getInstance().getString("menu.extras.language"));
extrasLanguage_deDE_Item.setText(Localizer.getInstance().getString("menu.extras.language.deDE"));
extrasLanguage_enUS_Item.setText(Localizer.getInstance().getString("menu.extras.language.enUS"));
extrasLanguage_esES_Item.setText(Localizer.getInstance().getString("menu.extras.language.esES"));
shell.layout(true);
}
}
Let us have a look at the single lines - pick out one of your choice, no matter which one, hence they look almost all the same. We call the single widget's setText method, which assignes any text to it, that is displayed on the screen. In this assignement method we grab our Localizer's single instance and call its getString method. This method retrieves a string from our resource file for the currently selected language.
So far these files only contain the "application.title" entry. Let us add the other entries as well now. When you are finished, the files shoul look like follows:
- LocalizationExample.properties
- application.title=LocalizeExample
- menu.file=&File
- menu.file.new=&New\tF2
- menu.file.exit=E&xit
- menu.extras=&Extras
- menu.extras.language=&Language
- menu.extras.language.deDE=&Deutsch
- menu.extras.language.enUS=&English
- menu.extras.language.esES=E&spa\u00f1ol
- statusWindow.title=Status
- label.identifier=Internal name
- label.processors=Number of CPUs
- label.freeMemory=Free memory (bytes)
- label.totalMemory=Total memory (bytes)
- LocalizationExample_de_DE.properties
- application.title=LocalizeExample de-DE
- menu.file=&Datei
- menu.file.new=&Neu\tF2
- menu.file.exit=B&eenden
- menu.extras=&Extras
- menu.extras.language=&Sprache
- menu.extras.language.deDE=&Deutsch
- menu.extras.language.enUS=&English
- menu.extras.language.esES=E&spa\u00f1ol
- statusWindow.title=Status de-DE
- label.identifier=Interner Name
- label.processors=CPU-Anzahl
- label.freeMemory=Freier Speicher (Bytes)
- label.totalMemory=Gesamt-Speicher (Bytes)
- LocalizationExample_es_ES.properties
- application.title=LocalizeExample es-ES
- menu.file=&Fichero
- menu.file.new=&Nuevo\tF2
- menu.file.exit=&Terminar
- menu.extras=&Extras
- menu.extras.language=&Idioma
- menu.extras.language.deDE=&Deutsch
- menu.extras.language.enUS=&English
- menu.extras.language.esES=E&spa\u00f1ol
- statusWindow.title=Estado es-ES
- label.identifier=Nombre interno
- label.processors=N\u00famero de CPU
- label.freeMemory=Almac\u00e9n libre (byte)
- label.totalMemory=Toda el almac\u00e9n (byte)
Now our localized resource files are ready and contain everything we need. They also already contain the localized texts for our sample "StatusWindow" class, we are now going to implement.
Sample StatusWindow
Let us create a new class called "StatusWindow" in the "com.hidensity.example.ui" package of our project. This class' code looks pretty much like the MainUI class' source code, but has some slight differences.
package com.hidensity.example.ui;
import com.hidensity.example.localize.ILocalizable;
import com.hidensity.example.localize.Localizer;
import org.eclipse.swt.SWT;
import org.eclipse.swt.layout.GridData;
import org.eclipse.swt.layout.GridLayout;
import org.eclipse.swt.widgets.Label;
import org.eclipse.swt.widgets.Shell;
import org.eclipse.swt.widgets.Text;
import java.util.UUID;
public class StatusWindow implements ILocalizable {
private String internalName = null;
private Shell shell = null;
Label labelIdentifier = null;
Text textIdentifier = null;
Label labelProcessors = null;
Text textProcessors = null;
Label labelFreeMemory = null;
Text textFreeMemory = null;
Label labelTotalMemory = null;
Text textTotalMemory = null;
public StatusWindow(Shell parentShell) {
internalName = String.format("%s[%s]", this.getClass().getName(), UUID.randomUUID().toString());
Localizer.getInstance().register(internalName, this);
shell = new Shell(parentShell, SWT.SHELL_TRIM | SWT.TOOL);
initUI();
Localizer.getInstance().localize(internalName);
shell.open();
shell.addListener(SWT.Close, event -> Localizer.getInstance().unregister(internalName));
}
Like the MainUI we have member definitions of some widgets (Labels and Text boxes) and we have a Shell object. An important difference is the member internalName. Since our application's user might open a bunch of Status windows - we have no logic implemented to limit this to only one instance - registering the status window only with its fully qualified name would result in the second instance would overwrite the first one, the third one the second one, and so on... Resulting in only the last instance of all visible ones would be localized. A behaviour we do no want to have - hence all instances should be localized. Thus we generate an internal name. It contains the fully qualified class' name followed by a randomly generated UUID in square brackets.
When the user now opens the first instance of our StatusWindow class its name might be (simplified) "com.hidensity.example.ui.StatusWindow[79]", while the second instance could be "com.hidensity.example.ui.StatusWindow[84]" - both names are unique, so it does not come to a naming conflict in our Localizer.
Also we are adding a listener to the window's Close event, causing it to unregister from the Localizer.
The creation of the Shell object also is a little bit different from the one in the MainUI class, since we bind it to a parentShell - in our case the MainUI, hence they belong together.
We also have a method for initializing the window - initUI and then we call the Localizer's localize method for the current window's instance. Well, of course we could call the local doLocalize method directly, without making our way through the Localizer - but I prefrer this way and also advice you to do so, hence implementing side-effects of localization could be done at a single location and are not spread all over your code.
The code for the user interface's initialization and the ILocalizable.doLocalize method shall be mentioned and left uncommented, due to I think the mechanisms should be quite clear, now.
private void initUI() {
shell.setSize(400, 200);
GridLayout layout = new GridLayout(2, false);
shell.setLayout(layout);
labelIdentifier = new Label(shell, SWT.NONE);
labelIdentifier.setLayoutData(new GridData(GridData.VERTICAL_ALIGN_BEGINNING));
labelIdentifier.setText("label.identifier");
textIdentifier = new Text(shell, SWT.NONE | SWT.READ_ONLY | SWT.BORDER | SWT.MULTI | SWT.WRAP);
textIdentifier.setLayoutData(new GridData(GridData.FILL_HORIZONTAL));
textIdentifier.setText(internalName);
labelProcessors = new Label(shell, SWT.NONE);
labelProcessors.setText("label.processors");
textProcessors = new Text(shell, SWT.NONE | SWT.READ_ONLY | SWT.BORDER);
textProcessors.setLayoutData(new GridData(GridData.FILL_HORIZONTAL));
textProcessors.setText(String.valueOf(Runtime.getRuntime().availableProcessors()));
labelFreeMemory = new Label(shell, SWT.NONE);
labelFreeMemory.setText("label.freeMemory");
textFreeMemory = new Text(shell, SWT.NONE | SWT.READ_ONLY | SWT.BORDER);
textFreeMemory.setLayoutData(new GridData(GridData.FILL_HORIZONTAL));
textFreeMemory.setText(String.valueOf(Runtime.getRuntime().freeMemory()));
labelTotalMemory = new Label(shell, SWT.NONE);
labelTotalMemory.setText("label.totalMemory");
textTotalMemory = new Text(shell, SWT.NONE | SWT.READ_ONLY | SWT.BORDER);
textTotalMemory.setLayoutData(new GridData(GridData.FILL_HORIZONTAL));
textTotalMemory.setText(String.valueOf(Runtime.getRuntime().totalMemory()));
}
@Override
public void doLocalize() {
shell.setText(Localizer.getInstance().getString("statusWindow.title"));
labelIdentifier.setText(Localizer.getInstance().getString("label.identifier"));
labelProcessors.setText(Localizer.getInstance().getString("label.processors"));
labelFreeMemory.setText(Localizer.getInstance().getString("label.freeMemory"));
labelTotalMemory.setText(Localizer.getInstance().getString("label.totalMemory"));
shell.layout(true);
}
}
The only thing I want to mention here in particular is the last line of code in the doLocalize method, that causes the shell's layout to be updated, so that all localized text are fully visible.
Main Method
We are almost done. The only thing that is yet missing, is our application's main method. Let us create a new class called "LocalizationExample" in the "com.hidensity.example" package. This class does not really contain much code:
package com.hidensity.example;
import com.hidensity.example.localize.Localizer;
import com.hidensity.example.ui.MainUI;
import java.util.Locale;
public class LocalizationExample {
public static void main(String[] args) {
Localizer.getInstance().setLocale(Locale.getDefault());
new MainUI();
}
}
The only things we are doing here, is setting the system's default locale to our Localizer instance and run a new instance of the MainUI class. Nothing else.
Conclusion
If you have everything set up in the right way, you should now have a project which looks similar to this:
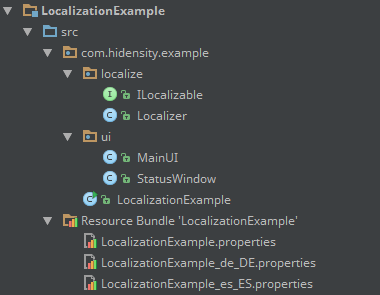
(Note: The ResourceBundle is shown like this in my IDE (IntelliJ IDEA), maybe your IDE shows them in a different way.)
Set up your IDE for running your project - select the LocalizationExample class for being the main class and give it a try. You should now be presented something similar to this:

Open a new "StatusWindow" by pressing the F2 key or selecting "New" from the "File" menu and you should be presented our fulminant status toolbox window. Now play around a little bit with the localization menu and you should see that the status window is localized immediately when the appropriate language menu item has been selected. The screenshots below show that it is everytime the same status window (look at the same unique internal name).
English locale:
German locale:
Spanish locale:
We are done! I hope I could show you, that localizing a Java application is neither rocket science nor brain surgery. And, being honest, it is also very simple to make existing applications support multiple languages. Only a few lines of codes are necessary.
I also hope you find this article helpful and am looking forward to your response.
Points of Interest
Lambda Expressions
As you can see in the code, I am using some Lambda Expressions in the code (e.g.
localizeObjects.keySet().forEach(key) -> ...
This source code has been developed using Java 1.8, but is also usable on previous versions. To use it with Java 1.6 or 1.7 you just need to rewrite the Lambda Expressions. The general logic is not touched by this.
Resource files - 1
As stated above, Java falls back to the application's default resource file, in case of a missing own resource file for a selected Locale. In our case we assign the "en-US" locale to our Localizer for the English translation and Java selects the default file, holding the English translation. But what happens when you are working on a machine whose default language is English, but the application's default language should be Chinese? Well, also pretty simple to accomplish this task.
The Locale.getDefault method returns the default Locale of the system you are working on. In the previously preconceived environment, this would be "en-US". So we would have to create the following files for our localization ResourceBundle:
- Chinese (default): [resourceBundleName].properties
- English: [resourceBundleName]_en_US.properties
- ...
Now, when the user is working on a system whose default Locale is "en-US" the English localization is used, since Locale.getDefault would return "en-US". In all other cases the Chinese localization would be used, because this is the default one.
Resource files - 2
In order to have special characters being displayed correctly on the user interface, it is necessary to encode them using their unicode-character representation in the resource files. You can see this especially in the Spanish translation in our example.
History
- 2015-04-27 Initial version 1.0
Developing software since 1991.
Graduated as B.Sc., M.Sc. and Ph.D.
Experienced in (in chronological order): Turbo-Pascal, C, C++, Visual Basic, JavaScript, PHP, COBOL(-ILE), CL(-ILE), Visual Basic .NET, RPG(-ILE), Java, C#.
Databases: DB2, MySQL, Oracle, PostgreSQL.


 General
  News
News  Suggestion
  Question
  Bug
Bug  Answer
  Joke
Joke  Praise
  Rant
Rant  Admin
Admin 


