In this fourth post in my series on continuous delivery with VSO, we take a look at executing automated web tests with Microsoft Test Manager. There are quite a few moving parts involved in getting all this working so it’s worth explaining the overall aim before diving in with the specifics.
Overview
The tests we want to run are automated web tests written using the Selenium framework. I first wrote these tests for my Continuous Delivery with TFS blog posts series and you can read about how to create the tests here and how to run them using MTM and TFS here. The goal in this post is to run these tests using MTM and VSO, triggered as part of the DAT stage of the pipeline from RM. The tests are run from a client workstation that is configured with MTM (a requirement at the time of writing) and the Microsoft Test Agent. I’ve used Selenium’s Firefox driver in the test code so Firefox is also required on the client machine.
In terms of what actually happens, firstly RM copies the complete build over to the client workstation and then executes a PowerShell script that runs TCM.exe which is a command-line utility that lets you run tests that are part of a test plan. Precisely what happens next is under the bonnet stuff but it’s along the lines of the test controller is informed that there is work to be done and that in turn informs the test agent on the client machine that it needs to run tests. The test agent knows from the test plan which tests to run and in which DLL they live and has access to the DLLs in the local copy of the build folder. Each test first starts Firefox and then connects to the web server running the deployed Contoso University and performs the automation specified in the test.
In many ways, the process of getting all this to work with VSO rather than TFS is very similar and because of that I don’t go in to every detail in this post and instead refer back to my TFS blog post.
Configure a Test Controller
VSO doesn’t offer a test controller facility so you’ll need to configure this yourself. If you have a test controller already in use, then it’s simplicity itself to repurpose it to point to your VSO account using the Browse button. If you are starting from scratch, see here for the details but obviously ensure you connect to VSO rather than TFS. One other difference is that in order to get past some permissions problems, I found it necessary to specify credentials for the lab service account – I used the same as the service logon account.
Although I started off by repurposing an existing controller, because of permissions problems, I ended up creating a dedicated build and test server as I wanted to start with a clean sheet. One thing I found was that the Visual Studio Test Controller service wouldn’t automatically start after booting the OS from the Stopped (deallocated) state. The application error log was clearly reporting that the test controller wasn’t able to connect to VSO. Manually starting the service was fine so presumably there was some sort of timing issue with other OS components not being ready.
Configure Microsoft Test Manager
If MTM isn’t already installed on your development workstation, then that’s the first step. The second step is to connect MTM to your VSO account. I already had MTM installed and when I went to connect it to VSO, the website was already listed. If that’s not the case, you can use the Add server link from the Connect to Your Team Project dialog. Navigating down to your Team Project (ContosoUniversity) enables the Connect now link which then takes you to a screen that allows you to choose between Testing Center and Lab Center. Choose the latter and then configure Lab Center as per the instructions here.
Continue following these instructions to configure Testing Centre with a new test plan and test cases. Note that you need to have the Contoso University solution open in order to associate the actual tests with the test cases. You’ll also need to ensure that when deployed the tests navigate to the correct URL. In the Contoso University demo application, this is hard-coded and you need to make the change in Driver.cs located in the ContosoUniversity.Web.SeFramework project.
Configure a Web Client Test Machine
The client test machine needs to be created in the cloud service that was created for DAT and joined to the domain if you are using one. The required configuration is very similar to that required for TFS as described here with the exception that the Release Management Deployment Agent isn’t required and nor is the RMDEPLOYER account. Getting permissions correctly configured on this machine proved critical and I eventually realized that the Windows account that the tests will run under needs to be configured so that MTM can successfully connect to VSO with the appropriate credentials. To be clear, these are not the test account credentials themselves but rather the normal credentials you use to connect to VSO. To configure all this, once the test account has been added to the Local Administrators group and MTM has been installed and the licence key applied, you will need to log on to Windows as the test account and start MTM. Connect to VSO and supply your VSO credentials in the same way as you did for your development workstation and verify that you can navigate down to the Contoso University team project and open the test plan that was created in the previous section.
Initially, I also battled with getting the test agent to register correctly with the test controller. I eventually uninstalled the test agent (which I had installed manually) and let the test controller perform the install followed by the configuration. Whether that was the real solution to the problem I don’t know but it got things working for me.
Executing TCM.exe with PowerShell
As mentioned above, the code that starts the tests is a PowerShell script that executes TCM.exe. As a starting point, I used the script that Microsoft developed for agent-based release templates but had to modify it to make it work with RM-VSO. In particular, changes were made to accommodate the way variables are passed in to the script (some implicit such as $TfsUrl or $TeamProject and some explicit such as $PlanId or $SuiteId) and to remove the optional build definition and build number parameters which are not available to the vNext pipeline and caused errors when specified on the TCM.exe command line. The modified script (TcmExecvNext.ps1) and the original Microsoft script for comparison (TcmExec.ps1) are available in a zip here and TcmExecvNext.ps1 should be copied to the Deploy folder in your source control root. One point to note is that for agent-based pipelines to TFS Collection URL is passed as $TfsUrlWithCollection however in vNext pipelines it is passed in as $TfsUrl.
Configure Release Management
Because we are using RM-VSO, this part of the configuration is completely different from the instructions for RM-TFS. However before starting any new configuration, you’ll need to make a change to the component we created in the previous post. This is because TCM.exe doesn’t seem to like accepting the name of a build folder if it has a space in it. Some more fiddling with PowerShell might have found a solution but I eventually changed the component’s name from Drop Folder to DropFolder. Note that you’ll need to visit the existing action and reselect the newly named component. Another issue which cropped-up is that TCM.exe choked when the build directory parameter was supplied with a local file path. The answer was to create a share at C:\Windows\DtlDownloads\DropFolder and configure with appropriate permissions.
The new configuration procedure for RM-VSO is as follows:
- From Configure Paths > Environments, link the web client test machine to the DAT environment.
- From Configure Apps > vNext Release Templates open Contoso University\DAT>DQA.
- From the Toolbox, drag a Deploy Using PS/DSC action to the deployment sequence to follow Deploy Web and Database and rename the action Run Automated Web Tests.
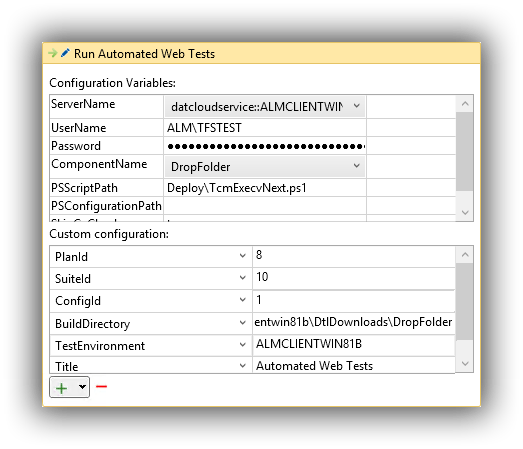
- Open up the properties of Run Automated Web Tests and set the Configuration Variables as follows:
ServerName = choose the name of the web client test machine from the dropdown.UserName = this is the test domain account (ALM\TFSTEST in my case) that was configured for the web client test machine.Password = password for the UserNameComponentName = choose DropFolder from the dropdown.PSScriptPath = Deploy\TcmExecvNext.ps1SkipCaCheck = true
- Still in the properties of Run Automated Web Tests and set the Custom configuration as follows:
PlanId = 8 (or whatever your Plan ID is as it is likely to be different)SuiteId = 10 (or whatever your Suite ID is as it is likely to be different)ConfigId = 1 (or whatever your Configuration ID is as it is likely to be different)BuildDirectory = \\almclientwin81b\DtlDownloads\DropFolder (your machine name may be different)TestEnvironment = ALMCLIENTWIN81B (yours may be different)Title = Automated Web Tests
Bearing in mind that the Deploy Using PS/DSC action doesn’t allow itself to be resized to show all configuration values, the result should look something like this:
Start a Build
From Visual Studio, manually queue a new build from your build definition. If everything is in place, the build should succeed and you can open Microsoft Test Manager to check the results. Navigate to Testing Center > Test > Analyze Test Runs. You should see your test run listed and double-clicking it will hopefully show the happy sight of passing tests:

Testing Times
As I noted in the TFS version of this post, there are a lot of moving parts to get configured and working in order to be able to trigger tests to run from RM. Making all this work with VSO took many hours working through all the details and battling with permissions problems and myriad other things that didn’t work in the way I was expecting them to. With luck, I’ve hopefully captured all the details you need to try this in your own environment. If you do encounter difficulties, please post in the comments and I’ll do what I can to help.
Cheers – Graham
The post Continuous Delivery with VSO: Executing Automated Web Tests with Microsoft Test Manager appeared first on Please Release Me.
Dr Graham Smith is a former research scientist who got bitten by the programming and database bug so badly that in 2000 he changed careers to become a full-time software developer. Life moves on and Graham currently manages a team of software engineers and specialises in continuous delivery and application lifecycle management with the Team Foundation Server ecosystem.


