Introduction
This is the second installment of the article : Part 1: Create & Run CRUD JQuery Mobile Apps from your mobile device using JQM.Show.
In the first article we dealt with setting up JQM.Show, discussing the Hospital Management System in detail and creating the Doctors file with the respective User Interface. We also touched on how RAD applications work and what to expect from JQM.Show. At the current moment, we are working closely to add IndexedDB and a XML backend similar to our single JSON file records previously discussed in this article.
Some silly assumptions: You have read part 1 of this series.
Download HMSLocalStorage.zip
Download HMSJSON.zip
Download HMSSQL.zip
Download JQM.Show 2 for your android mobile device.
Background
With JQM.Show, one is able to create CRUD JQuery Mobile Prototype apps in three easy steps following the AMF methodology, that being A-pplication, M-odel and F-fields. This then provides one with three easy steps to create a fully functional HTML5 web application that is both responsive and will run on any mobile device. Added to that the application created will also be compatible with PhoneGap build and be converted into a Hybrid application as mentioned in my article here.
With this installment in using JQM.Show to build these web apps, we are continuing on where we left off. We will be creating the Hospitals user interface and the respective backend javascripts for our Hospital Management System, calling it HMS.
For each hospital, we will just store basic information. These will be Hospital Name, Address Line 1, Address Line 2, City and Postal Code. For our Hospital model, we will also create a listing screen where the hospital details will be viewable using a listview and also selectable for editing purposes. This listview will be searchable, grouped and will be a data-inset listview.
We will also create a report to list all available hospitals and this will be exportable to excel for further manipulation. When we add Patients, we will create relationships between the doctors and the hospitals and the patients and draw these relationships using my favourable d3 charting framework.
The information in this HMS application will be stored in LocalStorage, however with a change of just the backend property, we will create both a JSON backend and a WEBSQL backend. When a future article about creating XML backend databases is published, you will see how one can adopt such a system for XML storage and later IndexedDB and possibly MySQL going forward.
Let me depict in pictures what we want to achieve for more clarity:
Figure 1: Hospital Listings - this shows a list of all captured hospitals in HMS. The Listview is data-inset, grouped by alphabets and searchable. There is also a left side panel that enables one to Add a new hospital, go back and also view the report.
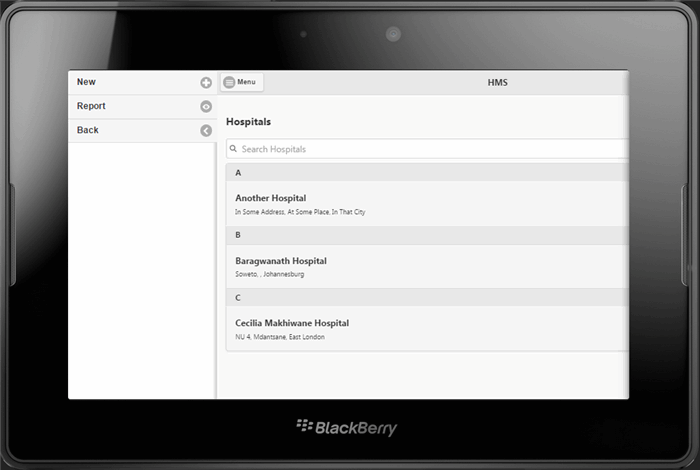
Figure 2: Add Hospital - this is the screen to add a new hospital to the list, depending on the attributes we have set.

Figure 3: Edit Hospital - this screen appears when one selects a hospital from ths listing to enable one to update hospital details. A user can select to Update/ Delete a hospital from this screen.
Figure 4: Hospital Report - list is a table that is generated when a user accesses the Report from the listing screen. All available hospitals are listed here and the table is filterable by column.
Figure 5: Excel Hospital Report - clicking Export to Excel from the Hospital Report screen generates an excel report from the available hospital listings.
Figure 6: Patient Hospital Relationships - this screen uses the D3 chart to draw a relationship between hospitals and patients. Its like a small information portal that will list patients per hospital in an animated fashion. Clicking the round button by the hospital name collapses the details of each hospital. Clicking Export at top right exports your d3 relationship to a png. This you can use in presenting the information. This was thoroughly explained in this article.
Using the code
Now that you have seen the user interface and how it will look like, lets create the Hospital Module with JQM.Show so that we quickly generate this app.
1. Fire up JQM.Show from your mobile device. If you dont have, you can download it from this link.
2. I assume that you have already created the HMS from our Part 1 article, if so, please follow that article first.
3. I am using Genymotion for my development and will demonstrate using that framework.
4. After you Sign In into your profile, Selecting Let's Play will take you to the list of available projects after signing in.
5. Select HMS 1.00 from the list of available projects, you can refer to the Points of Interest Step 1-3 of this article for how this was done. Figure 7 below depicts how your list migth appear.
Figure 7: List of applications in JQM.Show
Selecting a project, will open its properties that you can update and save. This information will be used to create the SPA application you want.
Figure 8: HMS Attributes - making HMS alive.
App Name: This is the name of the application we are creating. Line 3 of app.js, defines the application like this
var HMS = {};
Author: The name of the person creating this application
Copyright: The final owner of this application
Version: Currently we are working on Version 1.00 of HMS.
Transition: This is the page transition we will use across all pages in our app. Pages can slide, fade, popup etc. Custom transitions have also been added here as discussed in my article of enhancing the family tree. JQuery Mobile transitions are explained here.
The slide selected is defined in line 4 of app.js, where the source code of your application is:
var pgtransition = 'slide';
Enable Security: we want our HMS application to enable people to Sign In and Sign Up. Turning this on creates the Sign In and Sign Up models with their fields and back end source code for whatever backend we choose.
Enable PhoneGap: this will load the respective cordova.js in our app for any device specifics that we want to access. Currently I'm working on accessing the camera for taking photos as part of this experience. For now let's leave this off.
Select Next, to update more HMS properties.
Figure 9 appears: These are the advanced properties of this project.
Type in the author information here like email, the support website and description of the project. I guess you are wondering why this information and where it goes. If you open then index.html file and the attached config.xml file, this information is used there, let's see below. These are the first 4 lines of the index.html file.
<!DOCTYPE html>
<html  manifest="index.appcache">
    <head>
        <title>HMS</title>
Line 17 - 21 of the same file will contain this content depening on what you have specified here.
<meta name='copyright' content='Anele Mbanga ' />
        <meta name='author' content=' Anele Mbanga' />
        <meta name='email' content='anele@mbangas.com' />
        <meta name='website' content='http://www.mbangas.com/jqmshow/hms' />
        <meta name='description' content='Web app to manage hospital patients. Available from Android Play Store at https://play.google.com/store/apps/details?id=com.b4a.JQMShow' />
You will note that the main index.html file also is loaded with scripts to add your css and js files. You can also update these and add your own css and js files when customising the application. For example, you might want to update the icons used in your applications with your own by replacing the referenced pngs in these lines.
<link rel="apple-touch-icon" href="apps.png">
        <link rel="icon" type="image/png" href="apps.png">
        <link rel="shortcut icon" type="image/png" href="apps.png">
        <link rel="apple-touch-icon" sizes="57x57" href="apps57.png">
        <link rel="apple-touch-icon" sizes="72x72" href="apps72.png">
        <link rel="apple-touch-icon" sizes="80x80" href="apps80.png">
        <link rel="apple-touch-icon" sizes="114x114" href="apps114.png">
        <link rel="apple-touch-icon-precomposed" href="appsIconPreComposed.png">
        <link rel="apple-touch-startup-image" href="appsIconStartUp320by460.png">
These are the css files that are included with all the apps developed by JQM.Show as of version 3 now.
<link rel="stylesheet" href="jquery.mobile-1.4.5.min.css">
        <link rel="stylesheet" href="toastr.min.css">
        <link rel="stylesheet" href="jqm-datebox.css">
        <link rel="stylesheet" href="animate.css">
        <link rel="stylesheet" href="addtohomescreen.css">
toastr.min.css is for handing the green toast messages that popup telling you that s record has been added/updated/deleted.
jqm-datebox.css is for the datepicker widged for all date fields in your JQM.Show application.
animate.css is for the custom transitions that can be used with a JQM.Show web app.
addtohomescreen.css is for use when an icon is added to the home screen of your app.
The js files used by JQM.Show are the following:
<script src="jquery.min.js" type="text/javascript"></script>
<script src="navbar.js" type="text/javascript"></script>
<script src="jquery.mobile-1.4.5.min.js" type="text/javascript"></script>
<script src="jqm-datebox.core.js" type="text/javascript"></script>
<script src="jqm-datebox.mode.slidebox.js" type="text/javascript"></script>
<script src="jqm-datebox.mode.flipbox.js" type="text/javascript"></script>
<script src="jqm-datebox.mode.datebox.js" type="text/javascript"></script>
<script src="jqm-datebox.mode.customflip.js" type="text/javascript"></script>
<script src="jqm-datebox.mode.custombox.js" type="text/javascript"></script>
<script src="jqm-datebox.mode.calbox.js" type="text/javascript"></script>
<script src="toastr.min.js" type="text/javascript"></script>
<script src="fastclick.js" type="text/javascript"></script>
<!--
<script src="stanfordcryptolibrary.js" type="text/javascript"></script>
<script src="excellentexport.min.js" type="text/javascript"></script>
<script src="iscroll.js" type="text/javascript"></script>
<script src="password.js" type="text/javascript"></script>
<script src="d3.min.js" type="text/javascript"></script>
<script src="d3tree.js" type="text/javascript"></script>
<script src="addtohomescreen.min.js" type="text/javascript"></script>
<script src="app.js" type="text/javascript"></script>
navbar.js is for handling div based tab navigation. This was first explored in our family tree app and is used here for the patient screens.
jqm-datebox... for all datepickers
fastclick.js - this for handling click event delays. This is effected in line 27 of our app.js file like this
FastClick.attach(document.body);
stanfordcryptolibrary.js - this was discussed here. We are using this for passwords.
Line 954 of our application in app.js, uses this library to encrypt the password as depicted here.
UserRec.ConfirmPassword = sjcl.encrypt('MashJQMShow', UserRec.ConfirmPassword);
in line 984, we decrypt it.
UserRec.ConfirmPassword = sjcl.decrypt('MashJQMShow', UserRec.ConfirmPassword);
MashJQMShow is the salt key.
iscroll.js - scrolling for elements, this for listviews currently. We have initiates iscroll like this for our listviews
var pgDoctorListScroller = new IScroll('#pgDoctorList', {mouseWheel:true, scrollbars:true, bounce:true, zoom:false});

var pgUserListScroller = new IScroll('#pgUserList', {mouseWheel:true, scrollbars:true, bounce:true, zoom:false});

var pgHospitalListScroller = new IScroll('#pgHospitalList', {mouseWheel:true, scrollbars:true, bounce:true, zoom:false});
As you can see, these are for our existing listviews that shows on the Doctors listing, Users Listing and Hospitals listing. For each model we have by default, we have a listview that lists the records thus this is created automatically for one.
d3.min.js, d3tree,js - charting library for your relationships screen as depicted in Figure 6. This was also discussed here first.
addtohomescreen.js - code to add your app icon to the home screen of your device.
Line 28 - 29 of our app.js file effects this device icon like this.
addToHomescreen();
var addToHomeConfig = {returningVisitor: true, expire: 720, autostart: false};
add to home screen runs when the app is first run from the web.
app.js - code for your app generated by JQM.Show
Our backend for HMS is LocalStorage, thus select that this time around. You can also select SQL for WebSQL, JSON, XML in version 3.
Select Next, now we will be provided with a list of models available for HMS. Models define our tables (in database terms) and they just represent what we want to record. We have already created the doctors model with its field and now we will create Hospitals to store our simple details for hospitals.
Figure 10: HMS Model Listing
To create the Hospitals model, click on New (create a new Model), figure 11 appears.
Figure 11: Model Creation.
Model Name: In model name, type in Hospital.
Display Name should be Hospitals. This is the text that will be displayed in the page title header potion. The Display name is usually the plural form of your model name.
In Previous Page, select pgMenu, this is the name of the SpringBoard page for the app. You can however select whatever page name you want. 3 pages are created per model, add page, update page and listing page.
Leave Next Page blank, that usually is the name of the next page that should be accessed.
Accessing a previous and a next page works with header buttons. One on the left and one on the right of the screen.
Mini is the data-mini of the controls in the add, edit page for this model. At the time of writing there is currently a bug with the slider control when mini controls are used. Checking Mini on ensures that all controls within the forms will have a data-mini property = true thus rendering them smaller.
No Label ensures that when checked, all the forms dont have a label. Figure 2 and 3 above above are add update screens with labels in them to indicate the field names. Unchecking this takes the labels off from the page.
In Field Contain ensures that all child controls of the page will be held with a div with fieldcontain data-role.
Leave navigation bar items blank. We are not splitting this model into various sections yet. We will however split the patient details so that they fit nicely on the screen. Having navigation tabs improves the navigation of your application. We are done with defining the model, we need to give it more attributes like field names, click Next. Figure 12 appears, this is the definition of the ListView parameters for the Hospital Listings page.
Figure 12: ListView definition for Hospitals and other properties
SplitView - when checked, this creates a split view of our model to have a listview and data entry in one screen. We dont want that for hospitals, then we leave this unchecked.
Inset - we want the listview to have a data-inset property for it to display within the page. Unchecking this makes the listview to fill the complete width of the page.
Auto Dividers - we want the hospital names to be sorted in alphabetic order and the list to be devided
Searchable - we want the listview to be filtered, also check this.
Just setting these properies like this creates Figure 1 above and will have the following html definition.
Hospital Listing ListView Definition
<div data-model="Hospital" id="pgHospital" data-role="page">
                                <div data-position="left" data-display="reveal" data-position-fixed="true" id="pgHospitalPnl" data-role="panel">
                                    <ul data-role="listview" id="pgHospitalPnlLV">
                                        <li data-icon="plus"><a data-transition="slide" href="#pgAddHospital">New</a></li>
                                        <li data-icon="eye"><a data-transition="slide" href="#pgRptHospital">Report</a></li>
                                        <li data-icon="carat-l"><a data-transition="slide" href="#pgMenu">Back</a></li>
                                    </ul>
                                </div>

                                <header id="pgHospitalHdr" data-role="header" data-position="fixed">
                                    <h1>HMS</h1>
                                    <a data-role="button" id="pgHospitalMenu" href="#pgHospitalPnl" data-icon="bars" data-transition="slide" class="ui-btn-left">Menu</a>
                                    <a data-role="button" id="pgHospitalNew" data-icon="plus" data-theme="b" class="ui-btn-right">New</a>
                                </header>
                                <div id="pgHospitalCnt" data-role="content">
                                    <h3>Hospitals</h3><ul data-role="listview" data-inset="true" id="pgHospitalList" data-autodividers="true" data-filter="true" data-filter-placeholder="Search Hospitals">
                                        <li data-role="list-divider">Your Hospitals</li>
                                        <li id="noHospital">You have no hospitals</li>

                                    </ul>
                                </div>

                            </div>
From the html definition above, let's just recap, our model name is Hospital, so everything that has to deal with the hospital model will have such a prefix. The page has been defined as pgHospital. We also automatically add a left side panel in the listing for adding, reporting and going to the previous screen. This was added to ease navigation. The data display propertly of the left panel is reveal. Side panels were initially discussed here by me.
As you can see, the slide transition is applied to all our anchors here as that was the choice we made. Before our listview definition, the Display name for hospitals is enclosed in h3 above.
Our inset property translated as data-inset="true, auto dividers to data-autodividers="true" and Searchable to data-filter="true" with a data-filter-placeholder="Search <displayname>"
Per each model, we follow these principles all through out.
Figure 13: Hospital Model Fields
Figure 13 above, details the names of the fields for the Hospital Model. We easily created these like this.
1. Click "New Fields", this will open up Figure 14 below.
Figure 14: Hospital -> Add Fields
2. Type in the field names for the Hospital Model, these are Hospital Name;Address Line 1;Address Line 2;City;Postal Code. Please note that fields in this instance should be separated by semi-colons. NB: The first field that you specify should be the primary key of your model. Ours is the Hospital Name.
3. Select Next, you are done defining the field attributes for the Hospital Model. You will be taken back to the Fields Listing for the Hospital as per Figure 13 above. We need to change some few properies for each field.
Changing Field Properties
Figure 15: Hospital Name Field (I will leave these up to you to update like this)
Figure 16: Address Line 1
Figure 17: Address Line 2
Figure 19: City
Figure 20: Postal Code
That's it, we have finished defining everything about our Hospitals. In case you make a mistake, you can press and hold any fields in the listing, Figure 21 will appear.
Figure 21: Delete / Move Field (Tab Order & Positioning)
Our model is defined just like we want it now, now let JQM.Show create the source code for you and the html definitions for everything. Due to this being a continuation, everything will be re-written from scratch, thus, its important that any customizations you need and will do are done once your system is fully completed by JQM.Show.
Select the back menu button and go back to the app definition screen as depicted in Figure 10.
Figure 21: App Menu
On the app menu, press the blue chrome like button to create your local storage based web app called HMS. Lets look at the output for the Hospital Model.
The following is done...
1. A Hospital Listing Page is created to list all hospitals (Figure 1)
2. A screen to Add a new Hospital is created (Figure 2)
3. A screen to Edit/Update/Delete hospitals is created (Figure 3)
3. A Hospital Report screen is also created with functionality to export to Excel (Figure 4 & Figure 5)
All of these pages have their corresponding source code and html definition. For each model you create, this will be the process that JQM.Show will follow. Should you have relationships defined though for each model. Your left side panel will have additional functionality to link to those relationships. We will demonstrate that with article 3 of this series when we look at patients.
The hospital listing html definition was discussed above. Line 16-20 of our app has the following code in respect to the listing.
var HospitalLi = '<li ><a data-id="Z2"><h2>Z1</h2><p>DESCRIPTION</p></a></li>';
var HospitalHdr = '<li data-role="list-divider">Your Hospitals</li>';
var noHospital = '<li id="noHospital">You have no hospitals</li>';
var pgHospitalListScroller = new IScroll('#pgHospitalList', {mouseWheel:true, scrollbars:true, bounce:true, zoom:false});
These are just variables for our ListView and how it works. Before the Hospital Listing page is displayed, local storage is checked for any available hospitals, if some exists, these are loaded and if not, the default values are shown.
$(document).on('pagebeforechange', function (e, data) {
var toPage = data.toPage[0].id;
switch (toPage) {
case 'pgHospital':
$('#pgRptHospitalBack').data('from', 'pgHospital');
app.checkForHospitalStorage();
break;
Before change calls app.checkForHospitalStorage which is...
app.checkForHospitalStorage = function () {
var HospitalObj = app.getHospital();
if (!$.isEmptyObject(HospitalObj)) {
app.displayHospital(HospitalObj);
} else {
$('#pgHospitalList').html(HospitalHdr + noHospital).listview('refresh');
}
};
This calls app.getHospital, which returns a parsed json object of all existing hospitals and if that is not empty, displays the hospitals with app.displayHospital.
app.getHospital, does this..
app.getHospital = function () {
var HospitalObj = localStorage['hms-hospital'];
if (!HospitalObj) {
HospitalObj = {};
localStorage['hms-hospital'] = JSON.stringify(HospitalObj);
} else {
HospitalObj = JSON.parse(HospitalObj);
}
return HospitalObj;
};
the name of our application is HMS and we have a model called hospital, thus our LocalStorage storage location will be hms-hospital, this differenciates all our models whilst still tells one the app name easily. After adding a few hospitals, on your browser hit F12 to access the developer menu.
Figure 22: LocalStorage
From above, each model we have is prefixed by the app name called hms. Its then important that no two app names are the same when you are using LocalStorage as a back end. Once app.getHospital executes and returns an array of these hospitals, then app.displayHospital displays them in the listview.
app.displayHospital = function (HospitalObj) {
var html = '';
var n;
for (n in HospitalObj) {
var HospitalRec = HospitalObj[n];
var pkey = HospitalRec.HospitalName;
pkey = pkey.split('-').join(' ');
HospitalRec.HospitalName = pkey;
var nItem = HospitalLi;
nItem = nItem.replace(/Z2/g,n);
var nTitle = '';
nTitle = n.split('-').join(' ');
nItem = nItem.replace(/Z1/g,nTitle);
var nDescription = '';
nDescription += HospitalRec.AddressLine1;
nDescription += ', ';
nDescription += HospitalRec.AddressLine2;
nDescription += ', ';
nDescription += HospitalRec.City;
nItem = nItem.replace(/DESCRIPTION/g,nDescription);
html += nItem;
}
$('#pgHospitalList').html(HospitalHdr + html).listview('refresh');
};
If you recall, when each hospital is listed in Figure 1, we wanted the Address Line 1, Address Line 2 and City to be displayed on the Description line of each listview item (second line). Do you remember how this was done? When we were creating each field, we checked on the Description property, thus telling JQM.Show to put that field in each listview item we want. app.displayHospital then does that, we pass it the Hospital object returned from LocalStorage, then for each hospital, the field values are read and each item generated within the loop.
We get each hospital we want..
var HospitalRec = HospitalObj[n];
By default, the hospital, by virture of being a primary key will always be in the title of each listview item.
We create each hospital entry...
which currently is..
var HospitalLi = '<li ><a data-id="Z2"><h2>Z1</h2><p>DESCRIPTION</p></a></li>';
Z2, gets the hospital name in uncleaned format. When we select each hospital, this data-id property is read and passed to the edit screen.
nItem = nItem.replace(/Z2/g,n);
Then the title is updated, which the clean version of the hospital name without the -.
var nTitle = '';
nTitle = n.split('-').join(' ');
nItem = nItem.replace(/Z1/g,nTitle);
Then the description is build up from the selected fields, being address line 1, 2 and city.
var nDescription = '';
nDescription += HospitalRec.AddressLine1;
nDescription += ', ';
nDescription += HospitalRec.AddressLine2;
nDescription += ', ';
nDescription += HospitalRec.City;
nItem = nItem.replace(/DESCRIPTION/g,nDescription);
html += nItem;
When the html is built up by each hospital, then the listview is updated, and refreshed with the contents
$('#pgHospitalList').html(HospitalHdr + html).listview('refresh');
Adding a new hospital.
The page to add a new hospital is also easy. Based on the fields we have specified in our model above, a screen is added linked to the page. The adding page is called pgAddHospital based on our model. The input controls specified will be prefixed by this page name to differentiate them from any other controls. Lets look at this. As er Figure 2, this page has a header, a footer and some controls in the middle. It is defined like this.
<div data-model="Hospital" id="pgAddHospital" data-role="page">

                                <div data-position="left" data-display="reveal" data-position-fixed="true" id="pgAddHospitalPnl" data-role="panel">

                                    <ul data-role="listview" id="pgAddHospitalPnlLV">

                                        <li data-icon="plus"><a data-transition="slide" href="#pgAddHospital">New</a></li>

                                        <li data-icon="eye"><a data-transition="slide" href="#pgRptHospital">Report</a></li>

                                        <li data-icon="carat-l"><a data-transition="slide" href="#pgHospital">Back</a></li>

                                    </ul>

                                </div>


                                <header id="pgAddHospitalHdr" data-role="header" data-position="fixed">

                                    <h1>HMS</h1>

                                    <a data-role="button" id="pgAddHospitalMenu" href="#pgAddHospitalPnl" data-icon="bars" class="ui-btn-left">Menu</a>

                                </header>

                                <div id="pgAddHospitalCnt" data-role="content">

                                    <h3>Add Hospital</h3><form action="#" method="post" id="pgAddHospitalForm" name="pgAddHospitalForm">

                                        <div data-role="fieldcontain">

                                            <label for="pgAddHospitalHospitalName">Hospital Name<span style='color:red;'>*</span></label>

                                            <input  required title="Enter hospital name here." type="text" name="pgAddHospitalHospitalName" id="pgAddHospitalHospitalName" placeholder="Enter hospital name here." autocomplete="off" data-clear-btn="true"></input>

                                        </div>

                                        <div data-role="fieldcontain">

                                            <label for="pgAddHospitalAddressLine1">Address Line 1<span style='color:red;'>*</span></label>

                                            <input  required title="Enter address line 1 here." type="text" name="pgAddHospitalAddressLine1" id="pgAddHospitalAddressLine1" placeholder="Enter address line 1 here." autocomplete="off" data-clear-btn="true"></input>

                                        </div>

                                        <div data-role="fieldcontain">

                                            <label for="pgAddHospitalAddressLine2">Address Line 2</label>

                                            <input type="text" name="pgAddHospitalAddressLine2" id="pgAddHospitalAddressLine2" placeholder="Enter address line 2 here." autocomplete="off" data-clear-btn="true"></input>

                                        </div>

                                        <div data-role="fieldcontain">

                                            <label for="pgAddHospitalCity">City<span style='color:red;'>*</span></label>

                                            <input  required title="Enter city here." type="text" name="pgAddHospitalCity" id="pgAddHospitalCity" placeholder="Enter city here." autocomplete="off" data-clear-btn="true"></input>

                                        </div>

                                        <div data-role="fieldcontain">

                                            <label for="pgAddHospitalPostalCode">Postal Code<span style='color:red;'>*</span></label>

                                            <input  required title="Enter postal code here." type="number" name="pgAddHospitalPostalCode" id="pgAddHospitalPostalCode" placeholder="Enter postal code here." autocomplete="off" data-clear-btn="true"></input>

                                        </div>

                                    </form>

                                </div>


                                <footer id="pgAddHospitalFtr" data-role="footer" data-position="fixed">

                                    <div id="pgAddHospitalFtrNavBar" data-role="navbar">

                                        <ul>

                                            <li><a id="pgAddHospitalBack" data-icon="carat-l">Cancel</a>

                                            </li>

                                            <li><a type="submit" id="pgAddHospitalSave" data-icon="action">Save</a>

                                            </li>

                                        </ul>

                                    </div>

                                </footer></div>
Selecting the menu on this screen opens up the left slide panel that gives access to add a new hospital, view a report of hospitals and go to the listing screen. Within the page content, our h3 holds, Add Hospital.
We wanted each field to be inside a field container, thus each looks like
<div data-role="fieldcontain">
 <label for="pgAddHospitalHospitalName">Hospital Name<span style='color:red;'>*</span></label>
 <input  required title="Enter hospital name here." type="text" name="pgAddHospitalHospitalName" id="pgAddHospitalHospitalName" placeholder="Enter hospital name here." autocomplete="off" data-clear-btn="true"></input>
</div>
The rest of the properties for each field are based on what we have named it. Look at the title attribute and also the placeholder, and also these...
name="pgAddHospitalHospitalName" id="pgAddHospitalHospitalName"
This screen has a cancel and save button at the footer. Cancel takes us back to the listing screen, whilst save ensures that our hospital record is saved to localstorage. You can refer to the previous articles about getting and saving the screen contents to localstorage as I have discussed that very well. JQM.Show always produces the same source code just linked to a model name, thus I wont be repeating much, please bear with me.
Updating an existing hospital.
<div data-url="HospitalName" data-model="Hospital" id="pgEditHospital" data-role="page">

                                    <div data-position="left" data-display="reveal" data-position-fixed="true" id="pgEditHospitalPnl" data-role="panel">

                                        <ul data-role="listview" id="pgEditHospitalPnlLV">

                                            <li data-icon="plus"><a data-transition="slide" href="#pgAddHospital">New</a></li>

                                            <li data-icon="eye"><a data-transition="slide" href="#pgRptHospital">Report</a></li>

                                            <li data-icon="carat-l"><a data-transition="slide" href="#pgHospital">Back</a></li>

                                        </ul>

                                    </div>


                                    <header id="pgEditHospitalHdr" data-role="header" data-position="fixed">

                                        <h1>HMS</h1>

                                        <a data-role="button" id="pgEditHospitalMenu" href="#pgEditHospitalPnl" data-icon="bars" class="ui-btn-left">Menu</a>

                                    </header>

                                    <div id="pgEditHospitalCnt" data-role="content">

                                        <h3>Edit Hospital</h3><form action="#" method="post" id="pgEditHospitalForm" name="pgEditHospitalForm">

                                            <div data-role="fieldcontain">

                                                <label for="pgEditHospitalHospitalName">Hospital Name<span style='color:red;'>*</span></label>

                                                <input  required readonly="readonly" data-clear-btn="true" autofocus="true" title="Enter hospital name here." type="text" name="pgEditHospitalHospitalName" id="pgEditHospitalHospitalName" placeholder="Enter hospital name here." autocomplete="off"></input>

                                            </div>

                                            <div data-role="fieldcontain">

                                                <label for="pgEditHospitalAddressLine1">Address Line 1<span style='color:red;'>*</span></label>

                                                <input  required title="Enter address line 1 here." type="text" name="pgEditHospitalAddressLine1" id="pgEditHospitalAddressLine1" placeholder="Enter address line 1 here." autocomplete="off" data-clear-btn="true"></input>

                                            </div>

                                            <div data-role="fieldcontain">

                                                <label for="pgEditHospitalAddressLine2">Address Line 2</label>

                                                <input type="text" name="pgEditHospitalAddressLine2" id="pgEditHospitalAddressLine2" placeholder="Enter address line 2 here." autocomplete="off" data-clear-btn="true"></input>

                                            </div>

                                            <div data-role="fieldcontain">

                                                <label for="pgEditHospitalCity">City<span style='color:red;'>*</span></label>

                                                <input  required title="Enter city here." type="text" name="pgEditHospitalCity" id="pgEditHospitalCity" placeholder="Enter city here." autocomplete="off" data-clear-btn="true"></input>

                                            </div>

                                            <div data-role="fieldcontain">

                                                <label for="pgEditHospitalPostalCode">Postal Code<span style='color:red;'>*</span></label>

                                                <input  required title="Enter postal code here." type="number" name="pgEditHospitalPostalCode" id="pgEditHospitalPostalCode" placeholder="Enter postal code here." autocomplete="off" data-clear-btn="true"></input>

                                            </div>

                                        </form>

                                    </div>


                                    <footer id="pgEditHospitalFtr" data-role="footer" data-position="fixed">

                                        <div id="pgEditHospitalFtrNavBar" data-role="navbar">

                                            <ul>

                                                <li><a data-transition="slide" id="pgEditHospitalBack" href="#pgHospital" data-icon="carat-l">Cancel</a>

                                                </li>

                                                <li><a type="submit" id="pgEditHospitalUpdate" data-icon="action">Update</a>

                                                </li>

                                                <li><a id="pgEditHospitalDelete" data-icon="delete">Delete</a>

                                                </li>

                                            </ul>

                                        </div>

                                    </footer></div>
The edit/update/delete screen enables one to update or delete an existing hospital. The name of this page is
You will note that the input controls are the same, except this time around they are prefixed by pgEditHospital.
Reporting on Existing Hospitals
<div data-model="Hospital" id="pgRptHospital" data-role="page">
<header id="pgRptHospitalHdr" data-role="header" data-position="fixed">
<h1>HMS</h1>
<a data-role="button" id="pgRptHospitalBack" data-icon="carat-l" class="ui-btn-left">Back</a>
<a data-role="button" id="pgRptHospitalNew" href="#pgAddHospital" data-icon="plus" data-theme="b" data-transition="slide" class="ui-btn-right">New</a>
</header>
<div id="pgRptHospitalCnt" data-role="content">
<table id="RptHospital" data-column-btn-text="Columns To Display" data-column-btn-theme="b" data-role="table" data-mode="columntoggle" data-column-popup-theme="a" class="ui-responsive table-stroke table-stripe ui-shadow">
<caption>Hospitals Report</caption>
<thead>
<tr class="ui-bar-c">
<th class="ui-bar-c">Hospital Name</th>
<th data-priority="2" class="ui-bar-c">Address Line 1</th>
<th data-priority="3" class="ui-bar-c">Address Line 2</th>
<th data-priority="4" class="ui-bar-c">City</th>
<th data-priority="5" class="ui-bar-c">Postal Code</th>
</tr>
</thead>
<tbody>
</tbody>
<tfoot>
<tr><td></td></tr>
<tr><td colspan="5">Powered by JQM.Show - https:
</table>
<div data-role="fieldcontain">
<a download="Hospital.xls" onclick="return ExcellentExport.excel(this, 'RptHospital', 'Hospital');" id="pgRptHospitalExport" data-corners="true" href="#" class="ui-btn ui-corner-all ui-shadow">Export to Excel</a></div>
</div>
</div>
The first article to discuss report creation is my family tree article, please refer to that. The crux of the matter here is that when we defined our fields, we checked the Report checkbox for each field we wanted to appear on the report. When JQM.Show creates the reporting screen, it looks at those fields and generates headings based on the specified fields. Also the content of this report is updated before the screen is shown, by calling this method.
app.HospitalRpt = function () {
$('#RptHospital tbody tr').remove();
var HospitalObj = app.getHospital();
var newrows = '';
var n;
for (n in HospitalObj) {
var HospitalRec = HospitalObj[n];
n = n.split('-').join(' ');
var eachrow = '<tr>';
eachrow += '<td class="ui-body-c">' + n + '</td>';
eachrow += '<td class="ui-body-c">' + HospitalRec.AddressLine1 + '</td>';
eachrow += '<td class="ui-body-c">' + HospitalRec.AddressLine2 + '</td>';
eachrow += '<td class="ui-body-c">' + HospitalRec.City + '</td>';
eachrow += '<td class="ui-body-c">' + HospitalRec.PostalCode + '</td>';
eachrow += '</tr>';
newrows += eachrow;
}
$('#RptHospital').append(newrows);
$('#RptHospital').table('refresh');
};
This concludes our hospital model and its respective html definitions and source code. Please explorer the attached source code as it will provide more light into this article. All the attached html definitions, source code is generated for you by JQM.Show to produce a basic working web app within minutes.
Points of Interest
JQM.Show is currently evolving bit by bit. This is the second article that discusses in detail how to create an application using this conceptualized framework. In three easy steps one is able to create a fully fledged web application in minutes with just a clear data definition. In this article we have created a hospital model for our Hospital Management System and also tried to explain it how JQM.Show helps one in cutting the development time quickly. Most applications are about storing and retrieving data and we seek to make that an easy thing to do by following best practise and available recommendations. Due to JQM.Show now able to generate back end specific source code, I have included the WebSQL and JSON versions of HMS. We will in the future add other backends. Enjoy.
I'm a Bachelor of Commerce graduate, fell inlove with ICT years back with VB5. Used Pick & System Builder to create a windows app. Very curious, developed my first web database app called Project.Show using ExtJS. Published on Google Play Store, learned JQuery Mobile, a project manager at best. My first intranet app eFas with MySQL.
Fear closes people to a lot of things and we hold ourselves back being held by it. Thus the sooner you believe you can't do something, the sooner everything will work towards that belief. Believe in yourself at all times because you can do anything you set your mind to it!
I have a very beautiful woman and four kids, the best joys in the world. East London, South Africa is currently home.
Awards:
Best Mobile Article of February 2015 (First Prize)
http://www.codeproject.com/Articles/880508/Create-a-CRUD-web-app-using-JQuery-Mobile-and-Loca
Best Mobile Article of May 2015 (Second Prize)
http://www.codeproject.com/Articles/991974/Creating-JQuery-Mobile-CRUD-Apps-using-JQM-Show-Ge
Apps
Bible.Show (Android Store App)
https://www.facebook.com/bibleshow
https://play.google.com/store/apps/details?id=com.b4a.BibleShow
JQM.Show (Android Store App)
https://www.facebook.com/jqmshow
https://play.google.com/store/apps/details?id=com.b4a.JQMShow
CodeProject.Show (An offline CodeProject Article writer)
http://www.codeproject.com/Articles/993453/CodeProject-Show-A-CodeProject-offline-article-wri


 General
  News
News  Suggestion
  Question
  Bug
Bug  Answer
  Joke
Joke  Praise
  Rant
Rant  Admin
Admin 


