Introduction
HTML5 Local Storage provides an unsecured way to store your data on your computer as the data is stored in plain text. This article seeks to demonstrate how one can encrypt and decrypt passwords of their web apps and store and retrieve such from LocalStorage.
Some silly assumptions: I will assume that you know about LocalStorage and JQuery Mobile apps as this is the framework used here. Also for this exercise I used the Windows Similator with Microsoft WebMatrix. Inside WebMatrix, one can also use an iPad and iPhone simulator. I have not been able to find an Android device simulator yet. This emulator allows input through the built in keyboard as if a user is actually using the device. This made my testing a little slow as the iPad and iPhone simulators allowed my keyboard inputs. Figure 3 depicts this.
Download Stanford_Encrypt.zip
Background
I wanted to encrypt the information that I'm storing in LocalStorage web so that its not easily identified especially the password. Using the Stanford Crypto library, this is easily performed. More details about this library are available here. For this exercise we will develop a simple Sign In and Sign Up screens. I will explore this with the definition of the user interface and the code behind to make the whole process work. I will not explain the ins and outs of saving and retrieving the records from LocalStorage as I have covered most of that here. So please refer to that article for more details about CRUD operations to LocalStorage and the configuration of the message boxes and the alert boxes.
Using the code
We define our user interface using just two screens, the Sign In and Sign Up page.
Sign In - html definition and code to read user details from LocalStorage.
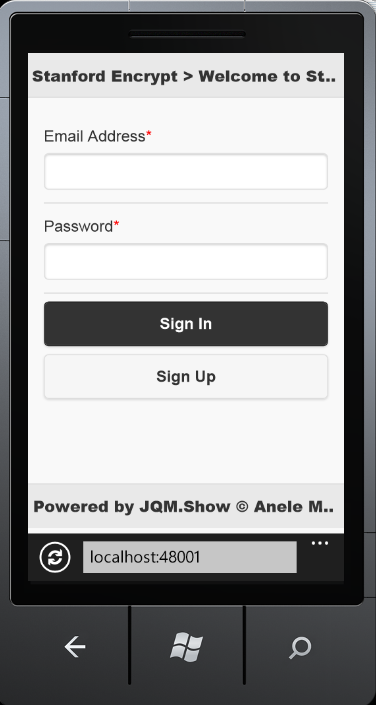
Figure 1 below depicts the resulting output of the html behind the Sign In page. The Sign In page asks the user for an email address and password. As soon as the details are entered, these are read from LocalStorage for existence, if not the user is informed that he/she is not registered. Once successful, a user is taken to the springboard to access other web app modules. Before a user can Sign In, he/she should be Sign Up first.
Figure 1
The Sign In Screen html definition is shown below:
<div id="pgSignIn" data-role="page">
<header id="pgSignInheader" data-role="header" data-position="fixed">
<h1>Stanford Encrypt > Welcome to Stanford Encrypt</h1>
</header>
<div id="pgSignIncontent" data-role="content">
<form action="#" method="post" id="pgSignInForm" name="pgSignInForm">
<div data-role="fieldcontain">
<label for="pgSignInEmail" id="lblpgSignInEmail">Email Address<span style='color:red;'>*</span></label>
<input type="email" name="pgSignInEmail" id="pgSignInEmail" placeholder="Enter email address here." autocomplete="off" data-clear-btn="true" title="Enter email address here." required></input>
</div>
<div data-role="fieldcontain">
<label for="pgSignInPassword" id="lblpgSignInPassword">Password<span style='color:red;'>*</span></label>
<input autocomplete="off" type="password" name="pgSignInPassword" id="pgSignInPassword" placeholder="Enter password here." data-clear-btn="true" title="Enter password here." required></input>
</div>
<div><button type="submit" id="pgSignInIn" class="ui-btn ui-corner-all ui-shadow ui-btn-b">Sign In</button>
</div>
<div><button id="pgAddUserUp" class="ui-btn ui-corner-all ui-shadow">Sign Up</button>
</div>
</form>
</div>
<footer id="pgSignInfooter" data-role="footer" data-position="fixed">
<h1>Powered by JQM.Show © Anele Mbanga 2015</h1>
</footer></div>
Figure 2
This depicts an error message when a user is not signed up into the app. When a user Sign's Up, the web app verifies their username i.e. the email address, their passwords and whether they are active or not. Only authenticated users are able to Sign In.

Once sucessful, a user will be taken to the springboard to access the list of users available. See Figure 4 for that.
For the Sign In code to work, there are some checks as indicated by the code below. The code has been commented to indicate what is happening. For more details about the usage of the alerts please refer to my post about CRUD apps using JQuery Mobile.
app.SignInUser = function(Email,Password){
$('#pgSignIn').data('success', 'false');
Email = Email.replace(/ /g,'-');
var usersObj = app.GetUser();
var userRec = usersObj[Email];
switch (userRec) {
case undefined:
$('#pgSignIn').data('success', 'false');
Email = Email.replace(/-/g,' ');
$('#alertboxheader h1').text('User Error');
$('#alertboxtitle').text(Email);
$('#alertboxprompt').text('This user is NOT registered in this App!');
$('#alertboxok').data('topage', 'pgSignIn');
Email = Email.replace(/ /g,'-');
$('#alertboxok').data('id', Email);
$.mobile.changePage('#alertbox', {transition: 'pop'});
return;
break;
default:
var pwd = userRec.Password;
pwd = sjcl.decrypt('MashJQMShow', pwd);
var atv = userRec.Active;
if (Password != pwd) {
$('#pgSignIn').data('success', 'false');
Email = Email.replace(/-/g,' ');
$('#alertboxheader h1').text('Password Error');
$('#alertboxtitle').text(Email);
$('#alertboxprompt').text('The password specified is incorrect!');
$('#alertboxok').data('topage', 'pgSignIn');
Email = Email.replace(/ /g,'-');
$('#alertboxok').data('id', Email);
$.mobile.changePage('#alertbox', {transition: 'pop'});
return;
} else {
$('#pgSignIn').data('success', 'true');
}
if (atv == false) {
$('#pgSignIn').data('success', 'false');
Email = Email.replace(/-/g,' ');
$('#alertboxheader h1').text('Account Error');
$('#alertboxtitle').text(Email);
$('#alertboxprompt').text('This account is no longer active. Contact your System Administrator!');
$('#alertboxok').data('topage', 'pgSignIn');
Email = Email.replace(/ /g,'-');
$('#alertboxok').data('id', Email);
$.mobile.changePage('#alertbox', {transition: 'pop'});
return;
} else {
$('#pgSignIn').data('success', 'true');
}
var succ = $('#pgSignIn').data('success');
if (succ == 'true'){
pgSignInClear();
$.mobile.changePage('#pgMenu', {transition: 'slide'});
}
break;
}
};
From the code above, the crux of the matter in decrypting a stored password is on the following piece of code.
var pwd = userRec.Password;
pwd = sjcl.decrypt('MashJQMShow', pwd);
var atv = userRec.Active;
if (Password != pwd) {
$('#pgSignIn').data('success', 'false');
Email = Email.replace(/-/g,' ');
$('#alertboxheader h1').text('Password Error');
$('#alertboxtitle').text(Email);
$('#alertboxprompt').text('The password specified is incorrect!');
$('#alertboxok').data('topage', 'pgSignIn');
Email = Email.replace(/ /g,'-');
$('#alertboxok').data('id', Email);
$.mobile.changePage('#alertbox', {transition: 'pop'});
return;
The password for the encription and decryption is MashJQMShow however you can use your own password there. The password passed for verification is the exact encrypted password stored and that's why we decrypt it here.
Sign Up - html definition and resulting output
To sign up, a user needs to specify their First Name, Last Name, Email Address, and Password. Currently they also have to specify their User Type and Active status. The last two details can be hidden for new users. Once all the information is specified, the user details are saved to LocalStorage. Figure 3 below is the Sign Up screen.
<div id="pgAddUser" data-role="page">

<header id="pgAddUserheader" data-role="header" data-position="fixed">
<h1>Stanford Encrypt > Add User</h1>
<a data-role="button" id="pgAddUserBack" data-icon="arrow-l" class="ui-btn-left">Back</a>
</header>
<div id="pgAddUsercontent" data-role="content">
<form action="#" method="post" id="pgAddUserForm" name="pgAddUserForm">
<div data-role="fieldcontain">
<label for="pgAddUserFirstName" id="lblpgAddUserFirstName">First Name<span style='color:red;'>*</span></label>
<input type="text" name="pgAddUserFirstName" id="pgAddUserFirstName" placeholder="Enter first name here." autocomplete="off" data-clear-btn="true" title="Enter first name here." required></input>
</div>
<div data-role="fieldcontain">
<label for="pgAddUserLastName" id="lblpgAddUserLastName">Last Name<span style='color:red;'>*</span></label>
<input type="text" name="pgAddUserLastName" id="pgAddUserLastName" placeholder="Enter last name here." autocomplete="off" data-clear-btn="true" title="Enter last name here." required></input>
</div>
<div data-role="fieldcontain">
<label for="pgAddUserEmail" id="lblpgAddUserEmail">Email Address<span style='color:red;'>*</span></label>
<input type="email" name="pgAddUserEmail" id="pgAddUserEmail" placeholder="Enter email address here." autocomplete="off" data-clear-btn="true" title="Enter email address here." required></input>
</div>
<div data-role="fieldcontain">
<label for="pgAddUserPassword" id="lblpgAddUserPassword">Password<span style='color:red;'>*</span></label>
<input autocomplete="off" type="password" name="pgAddUserPassword" id="pgAddUserPassword" placeholder="Enter password here." data-clear-btn="true" title="Enter password here." required></input>
</div>
<div data-role="fieldcontain">
<label for="pgAddUserConfirmPassword" id="lblpgAddUserConfirmPassword">Confirm Password<span style='color:red;'>*</span></label>
<input onfocus="ValidatePassword(document.getElementById('pgAddUserPassword'), this);
" oninput="ValidatePassword(document.getElementById('pgAddUserPassword'), this);
" autocomplete="off" type="password" name="pgAddUserConfirmPassword" id="pgAddUserConfirmPassword" placeholder="Enter confirm password here." data-clear-btn="true" title="Enter confirm password here." required></input>
</div>
<div dir="ltr" data-role="fieldcontain">
<label for="pgAddUserUserType" id="lblpgAddUserUserType">User Type<span style='color:red;'>*</span></label>
<select name="pgAddUserUserType" id="pgAddUserUserType" data-native-menu="false" data-mini="true" data-inline="true" dir="ltr" class="required">
<option value="null" data-placeholder="true">Select User Type</option>
<option value="Administrator">Administrator</option>
<option value="User">User</option>
</select>
</div>
<div data-role="fieldcontain">
<input type="checkbox" name="pgAddUserActive" id="pgAddUserActive" autocomplete="off" value="Active"></input>
<label for="pgAddUserActive" id="lblpgAddUserActive">Active</label>
</div>
<div><button type="submit" id="pgAddUserSave" class="ui-btn ui-corner-all ui-shadow ui-btn-b">Save User</button>
</div>
</form>
</div>
</div>
When the user Signs Up, the user details are stored in LocalStorage. The password is encrypted with a password first before being stored. This is done within the function that reads the form control contents.
function pgAddUserGetRec(){
var UserRec
UserRec = {};
UserRec.FirstName = $('#pgAddUserFirstName').val();
UserRec.LastName = $('#pgAddUserLastName').val();
UserRec.Email = $('#pgAddUserEmail').val();
UserRec.Password = $('#pgAddUserPassword').val();
UserRec.Password = sjcl.encrypt('MashJQMShow', UserRec.Password);
UserRec.ConfirmPassword = $('#pgAddUserConfirmPassword').val();
UserRec.ConfirmPassword = sjcl.encrypt('MashJQMShow', UserRec.ConfirmPassword);
UserRec.UserType = $('#pgAddUserUserType').val();
UserRec.Active = $('#pgAddUserActive').prop('checked');
return UserRec;
}
NB: The password to encrypt the password should be the same as the one used to decrypt the saved data. The line above the encryption reads the password from the form and then encrypts it. The outcome of this function is what gets passed to the method to save the user details to localstorage. This method below indicates this further
$('#pgAddUserSave').on('click', function(e){
e.preventDefault();
e.stopImmediatePropagation();
var UserRec;
UserRec = pgAddUserGetRec();
app.addUser(UserRec);
});
The Windows Phone Simulator Input
The windows phone simulator allows input from the simulators keyboard. Whilst this is a very interesting feature, I found it to be a little tedious compared to inputing with my keyboard and mouse, however it was quiet nice to see my prototype web app also being able to run on this simulator. To test your webapps using this simulator, install Microsoft WebMatrix first, on the Run menu, there is a choice to add other simulators.
Figure 4
The Springboard
Figure 5
The springboard is defined as a listview that gets beautifully formetted using CSS and is defined as follows.
<div id="pgMenu" data-role="page" data-theme="b" class="my-page">
<header id="pgMenuheader" data-role="header" data-position="fixed">
<h1>Stanford Encrypt</h1>
</header>
<div id="pgMenucontent" data-role="content">
<ul data-role="listview" data-inset="true" id="sbItems">
<li data-icon="false"><a data-transition="slide" id="sbUser" href="#pgUser"><h2>Users</h2><p>Maintain Users</p><img height="200" width="100%" src="apps80.png" alt="Users" class="ui-li-thumb"></img></a></li>
<li data-icon="false"><a data-transition="slide" id="sbLogOff" href="#pgSignIn"><h2>Log Off</h2><p>Exit Stanford Encrypt</p><img height="200" width="100%" src="poweroffw.png" alt="Log Off" class="ui-li-thumb"></img></a></li>
</ul>
</div>
</div>
Once a user selects Users, a list of available users in the web app as captured will be shown. An end user can select a specific user to open the details of that user. Figure 6 below depicts the list of users available.
Figure 6
The listview here is updated during runtime from the list of available users in the system. When the app is started for the first time, the list has no users as depicted below.
<div id="pgUser" data-role="page">
<header id="pgUserheader" data-role="header" data-position="fixed">
<h1>Stanford Encrypt > Users</h1>
<a data-role="button" id="pgUserBack" data-icon="arrow-l" class="ui-btn-left">Back</a>
<a data-role="button" id="pgUserNew" data-icon="plus" data-theme="b" class="ui-btn-right">New</a>
</header>
<div id="pgUsercontent" data-role="content">
<ul data-role="listview" data-inset="true" id="pgUserList" data-autodividers="true" data-filter="true" data-filter-placeholder="Search Users" data-filter-reveal="false">
<li data-role="list-divider">UserHdr</li>
<li id="noUser">You have no users</li>
</ul>
</div>
</div>
The dynamic listview updater does the updates before the Listing page is shown by executing this code.
app.displayUser = function(){
var UserObj = app.getUser();
var html = '';
var n;
for (n in UserObj){
var UserRec = UserObj[n];
var nItem = UserLi;
nItem = nItem.replace(/Z2/g,n);
var nTitle = '';
nTitle += UserRec.FirstName;
nTitle += ', ';
nTitle += UserRec.LastName;
nItem = nItem.replace(/Z1/g,nTitle);
var nDescription = '';
nDescription += UserRec.UserType;
nItem = nItem.replace(/DESCRIPTION/g,nDescription);
html += nItem;
}
$('#pgUserList').html(UserHdr + html).listview('refresh');
};
Figure 7 depicts a selected user. I decided to rotate the screen this time to be able to show the full header of the edit screen. The Add User / Sign Up screens use the same code however the screen title gets changed depending where a user is accessing the screen from. When Sign Up is selected, the screen title will be Sign Up however when selected from the user listing, the screen title will be Add User.
Figure 7
First things first:
To make the encryption and decryption work, the javascript library from Stanford was included as part of our web application definition. You will notice this line in the attached html file.
<script src="stanfordcryptolibrary.js" type="text/javascript"></script>
Points of Interest
Encryption and Decryption using the Stanford Crypto Library has been such a nice experience. This teaches one that it is possible to store encrypted data to the localstorage. I guess with this I can even decrypt the actual LocalStorage key, but I have not tried that. A new simulator has been used here compared to my previous posts and using the simulator keys for input were a little tedious for me due to the speed I wanted to have this running and testing it.
History
My articles speak more about JQuery Mobile and CRUD web apps as indicated here.
A follow up article on adding security features to the app in question was also discussed here.
This article seeks to encrypt and decrypt the passwords stored on Localstorage with 128 bit encryption to demonstrate how we can protect information stored in LocalStorage.
I'm a Bachelor of Commerce graduate, fell inlove with ICT years back with VB5. Used Pick & System Builder to create a windows app. Very curious, developed my first web database app called Project.Show using ExtJS. Published on Google Play Store, learned JQuery Mobile, a project manager at best. My first intranet app eFas with MySQL.
Fear closes people to a lot of things and we hold ourselves back being held by it. Thus the sooner you believe you can't do something, the sooner everything will work towards that belief. Believe in yourself at all times because you can do anything you set your mind to it!
I have a very beautiful woman and four kids, the best joys in the world. East London, South Africa is currently home.
Awards:
Best Mobile Article of February 2015 (First Prize)
http://www.codeproject.com/Articles/880508/Create-a-CRUD-web-app-using-JQuery-Mobile-and-Loca
Best Mobile Article of May 2015 (Second Prize)
http://www.codeproject.com/Articles/991974/Creating-JQuery-Mobile-CRUD-Apps-using-JQM-Show-Ge
Apps
Bible.Show (Android Store App)
https://www.facebook.com/bibleshow
https://play.google.com/store/apps/details?id=com.b4a.BibleShow
JQM.Show (Android Store App)
https://www.facebook.com/jqmshow
https://play.google.com/store/apps/details?id=com.b4a.JQMShow
CodeProject.Show (An offline CodeProject Article writer)
http://www.codeproject.com/Articles/993453/CodeProject-Show-A-CodeProject-offline-article-wri


 General
  News
News  Suggestion
  Question
  Bug
Bug  Answer
  Joke
Joke  Praise
  Rant
Rant  Admin
Admin 


