Introduction
The aim of this article is to highlight how easy it is for any programmer to step into the world of lot and hardware engineering through an uncomplicated out of the box microcontroller known as the Spark core.
Often novice programmers like myself do not make the leap from software engineering to hardware engineering deu to the steep setup process of Microcontrollers and associated costs of making the devices internet ready.
Unlike the traditional Arduino Uno which requires additional hardware modules such as wifi shields to connect to the internet ,the sparkcore has an embeded wifi chip which makes it an innovative microcontroller that needs to be Highlighted as it is Internet ready out of the box./p>
This article will simply explain how to setup and connect the Spark Microcontroller to the internet and is meant for beginners. It is intended to make the activation ,setup configuration and use as seemless as possible in in conjunction with the Android platform .
This artical within the scope of stage 2 connectivity will Outline :
- Specifications of the Spark microcontroller
- Seemless activation and setup of the Spark microcontroller using wifi
- How to flash the spark core via its web Ide , using the Arduino coding syntax.
We apologise in advanced to experienced experts that may be expecting Cli and additional tinkering of the Sparkcore in comparison with arduino ,but we write this article to encourage simplicity and ease of use and connectivity for any one and everyone.
Back Ground on Internet of Things
In a nutshell The Internet of things is a innovative revolution that allows one to connect embeded devices to the internet :
- Interface virtual code, with numerous physical hardware that have the capacity to share data
- Execute remote commands
- Deliver output through a networked environment via the internet using Micro processors and controllers.
- Create Wearable technology
In the fields of :
- Information and Technology
- Neural network development
- Data sampling
- Education
- Science
- Medicine
- Sociology Etc
What is the SPark Core ?
| The spark core is a versatile (802.11 b/g) wifi enabled ARM 32-bit Cortex micro controller available for $39.00.
Featuring USART,SPI and I2C interfaces.
An ARM 32-bit Cortex-M3 CPU with a 72Mhz operating frequency.
128KB of Flash memory for firmware storage and 20KB of SRAM.
which you can use to connect Digital and Analog hardware Via 8 Digital and 8 Analog GPIO pins.
Examples of such hardware include:
- Sensors
- Switchers
- Motors
- actuators
- buzzers
- Leds
- speakers
- Potentio meters
- and other shields too.
| |  |
Manufacturers Device Specifications
Programming Language Syntax
- You can program the core using Arduino, C/C++ or even ARM assembly.
Spark Core
- 8 digital I/O pins, 8 analog I/O pins
- 8 PWM pins; UART (Serial), SPI, I2C, and JTAG peripherals available
- Programmed wirelessly (through Spark Cloud), via USB or JTAG
- 3.3V DC supply voltage (on board power regulator); can be powered by USB Micro
- 100mA typical current consumption; 300mA peak consumption (during transmit events)
- 2MB of external flash; EEPROM supplied by CC3000
Microcontroller
- STM32F103 microcontroller
- ARM Cortex M3 architecture
- 32-bit 72Mhz processor
- 128KB of Flash, 20KB of RAM
Wi-Fi module
- Texas Instruments SimpleLink CC3000
- 802.11b/g
- Range of 100-300 feet

Getting started Connecting and Configuring Spark Core Microcontoller over WIFI
SUDO STEPS
- Plug the included USB cable into the Spark Core and your computer. The Core should start blinking blue.
- Download and Install the Spark core Android App on your android phone or tablet from https://play.google.com/store/apps/details?id=io.spark.core.android
- Register your email address and Device on the Spark cloud via Adroid app.
- Access the Web IDE https://www.spark.io/login and CODE your First instruction set in arduino syntax in the web ide.
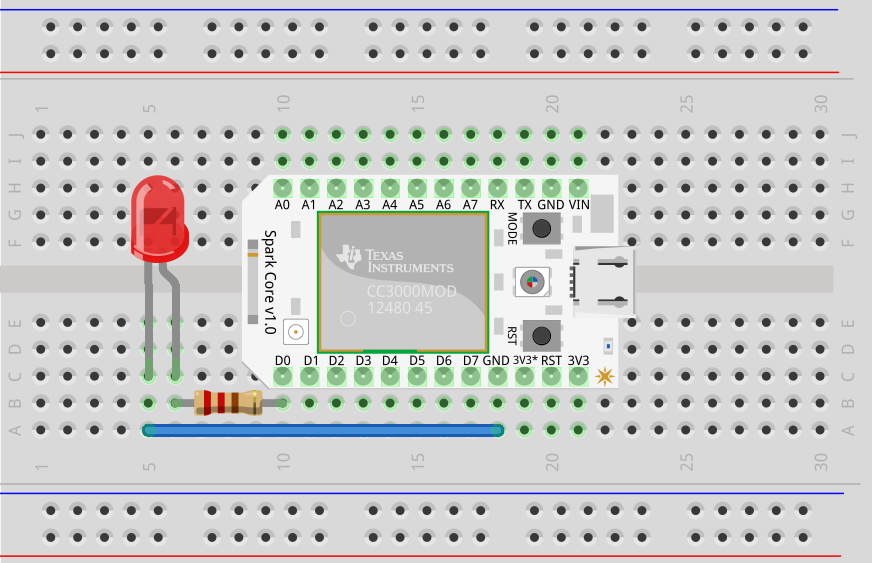
- Connect sensors to Analog and Digital pins or to bread board.
- Flash your devices micro controller via the web ide with firmware that created in step 4 and you are good to go.
- You can use the Spark io android app in step 2 that you downloaded to remotely controll each pins on and off state and read and write parameters.
- Very simple
Step 1: Power the Core
Plug the included USB cable into the Spark Core and your computer.
The Core should start blinking blue!
If it doesnt blink blue ,press and hold the mode button until the light turns blue("The button on the left") Now put your spark core device aside leaving it still connected to the USB.

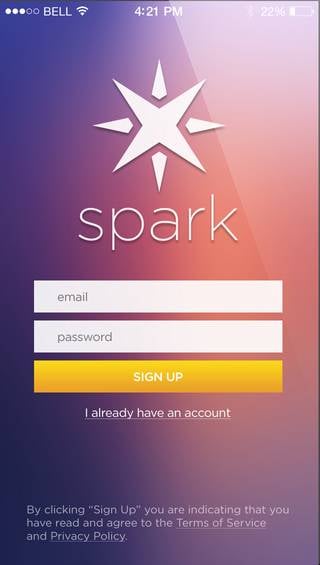
Step 2: Install the Android App
If you have an Android tablet or phone install the Spark core companion APP from google play.
https://play.google.com/store/apps/details?id=io.spark.core.android
Fill in your email address and password and click register,It should take 10-30 seconds to go to the next screen
In the SSID field type in your Home network SSID That you use to connect to the Internet with and its Password and click connect. Please Ensure the correct credentials have been entered
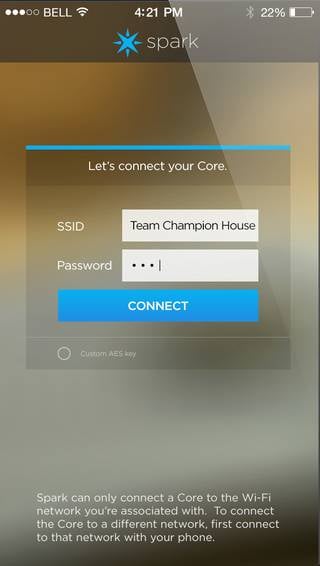
Now Focus your attention to the led light on the spark Core It should go through a sequence of flashes.
Remember when you first plugged in the USB cable and the light turned blue,that was when it began listening for wifi credentials.
What the color of light and its blink speed means:
Step 4 :Loging into the Web Ide !
- Blinking blue: Listening for Wi-Fi credentials
- Solid blue: Getting Wi-Fi info from app
- Blinking green: Connecting to the Wi-Fi network
- Blinking cyan: Connecting to the Spark Cloud
- Blinking magenta: Updating to the newest firmware
- Breathing cyan: Connected! (slow light pulse)
If all goes well,your device led light should be breathing cyan and your android app should present you with the screen below
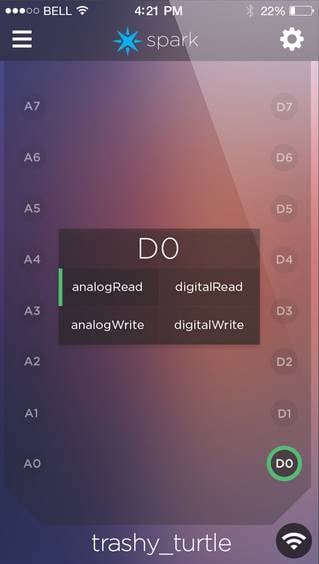
The Spark app should now be on the Tinker screen!
By default the embeded Led light on your spark device is connected to Pin D7 so let us test to see if the spark device is indeed connected to the internet and whether it can receive remote commands.
Lets begin our first test !
- Tap D7 then tap digitalWrite in the popup. Now when you tap the D7 circle the tiny blue LED on your spark microcontroller should turn on! In the screen shot below Digital pin 0 has been selected indicated by the green circle surrounding D0. All the other pins are greyed out indicating you have not selected them.
Congratulations Your device is now Operational!
- Simply Navigate to: https://www.spark.io/login

- Login with your email address and password.
- Once logged in you should see the following screen
- Type in your arduino code and than click on the flash button to flash your Spark Micro controller over the internet.
- Its that easy, At this point i would like to let you know that i reside on a small island in the middle of the pacific ocean,we dont have access to much electronics so for the purpouse of this article i will just write a loop that flashes the led connected by default pin D7.
Writing flashable code in the web IDE in arduino syntax
int defaultled = D7;
void setup()
{
pinMode(defaultled, OUTPUT);
}
void loop()
{
digitalWrite(defaultled, HIGH);
delay(2000);
digitalWrite(defaultled, LOW);
delay(1000);
digitalWrite(defaultled, HIGH);
delay(500);
digitalWrite(defaultled, LOW);
delay(1000);
}
Once you have finished writing your code in the web IDE click on the flash icon to upload your insrtuction set

Lets look at another example this one is provided by spark.io
int myled = D0;
void setup()
{
pinMode(myled, OUTPUT);
}
void loop()
{
digitalWrite(myled, HIGH);
delay(2000);
digitalWrite(myled, LOW);
delay(1000);
digitalWrite(myled, HIGH);
delay(500);
digitalWrite(myled, LOW);
delay(1000);
}
Once you have finished writing your code in the web IDE click on the flash icon to upload your insrtuction set
Important points to note
Windows Device drivers(optional)
Baudrate: 9600
Data Bits: 8
Parity: none
Stop Bits: 1
Power supply
You can connect an external power supply Via the V in pin that can range from 3.6V to 6.0V DC but its recommended to power the Core via the USB port or usa a 3.6V LiPo battery.
PINS AND I/O
The board has a total of 18 IO pins that operate at 3.3V. 8 analog pins labled A0,A1,A2,A3,A4,A5,A6,A7 on the left hand side of the board and has 8 Digital pins labled D0,D1,D2,D3,D4,D5,D6,D7 on the Right hand side of the board The pins labeled TX and RX are preset to serial.
Analog Inputs
Pins A0 to A7 can be set up as analog inputs and can measure voltages of upto 3.3V The pins can be read using analogRead() function and it will return a 12bit value.
Conclusion
Thank you very much for reading this article on how to setup development environment and flash your first code to the spark core intended for people who are new to coding and engineering.
References
https://www.spark.io/
Prilvesh is a Front end and Back end developer who holds certificates from Google , Microsoft and Oracle who Specializes in Web development and automation using Python and PHP.
He has experience designing developing and building Api's and secure platforms that can handle enterprise level transactions with encryption.
He often simplifies complex problems and solves them through processes and procedures that are efficient and easily understandable even by non programmers including management.


 General
  News
News  Suggestion
  Question
  Bug
Bug  Answer
  Joke
Joke  Praise
  Rant
Rant  Admin
Admin 


