Intel is seeing a greater number of design wins in the burgeoning Android phone and tablet market, and many developers want to create apps for this market. In this blog I’ll show you how to create a simple app for a Samsung Galaxy Tab 3 10.1 with an Intel® Atom™ processor Z2560 and provide some sample Android tablet code.
Install Development Tools
First, make sure you have the latest versions of the following software tools installed:
- Eclipse* IDE
- ADT Plugin for Eclipse
- JDK and JRE
- Android SDK
Installing Eclipse* IDE
It's simple. Go to the Downloads section on the official site: https://www.eclipse.org/downloads and download the Classic version. Then unzip the files into an appropriate folder on your development system.
Installing the ADT Plugin for Eclipse
Run Eclipse. In the dialog box, install the plugin via the menu Help → Install new software.
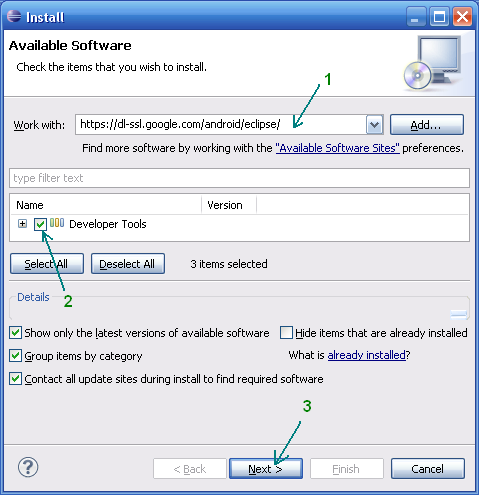
In the Work with window, type in the plugin’s download address: https://dl-ssl.google.com/android/eclipse/ (If it fails, the plugin can be downloaded and installed manually using this link: http://developer.android.com/sdk/eclipse-adt.html). In the table will appear Developer Tools. Click the box next to Developer Tools and then click Next. After a successful installation, I recommend restarting the Eclipse environment.
Setting Up the Java*Environment
If you have not yet installed the Java Development Kit (JDK) and Java Runtime Environment (JRE) , you should install them now. Download and install the JDK and JRE from this Oracle web page.
Installing the Android SDK
The last step is to download and install the latest version of the Android SDK. This can be done from this site for Android developers. Then you add the platform and other additional elements of the SDK. I recommend that you add all available elements.

Now that you’ve installed all the necessary tools, you can create your first application. The next section leads you through a sample tablet app.
Creating a Tablet App for Android
Let’s create a sample app for a Samsung Galaxy Tab 3 10.1 with an Intel Atom processor Z2560.
- First, run Eclipse and select File | New | Project…, in the list. Select Android | Android Application Project and press the Next button.
- On a dialog box called Setup Wizard New Android App, fill in the following text fields with your information:
- Application name - a descriptive name for the application, like "MyApp."
- Project Name - enter the name of the project, like "MyProject."
- Package Name - enter a unique name for the package, such as "ru.egorfilimonov.helloworld".
- Minimum Required SDK - select the minimum supported platform. In the Target SDK platform, choose a value under which you will write a program. You can leave the default value if you wish.
- Compile With - the default is the latest version of Android. We do not need to change this.
- Theme - choose a theme from the list of standard themes for your application or leave it unchanged.
- After filling in all the fields, click the Next button.
- Leave the Create custom launcher icon box checked, so you can use your own icon for the program.
- Leave the Create activity box checked as well.
- Do not check the Mark this project as library box, as you are not creating a library.
- Leave the Create Project in Workspace box checked so that all your projects will be stored in a special folder: C:\Users\UserName\workspace
- When finished with these settings, click the Next button. Here we need to choose the appearance of the application screen. Most applications targeted for Android have a screen called Create Activity that features a Project Wizard offering several templates that can help you build your app:
- Blank Activity
- Fullscreen Activity
- Master / Detail Flow
- The Master / Detail Flow template is designed for tablet apps. Choose this template.
Click the Finish button. We will now create a new project.
Working with a Project
The "Hello, World!" program is already built into any new project, so you do not even need to write anything. You just need to start the project and get ready to program! Expand the src folder and the ru.<…>.helloworld subfolder, which is the name of your package, to see the MainActivity.java file. Double-click the file to open it in the Code Editor. The IDE has already generated the minimum code required for the MainActivity.java file. It is even easier to open the file via the toolbar, which is located on the form. Find the button of MainActivity and select Open MainActivity.
Look at the code:
package ru.<…>.helloworld;
import android.support.v7.app.ActionBarActivity;
import android.support.v7.app.ActionBar;
import android.support.v4.app.Fragment;
import android.os.Bundle;
import android.view.LayoutInflater;
import android.view.Menu;
import android.view.MenuItem;
import android.view.View;
import android.view.ViewGroup;
import android.os.Build;
public class MainActivity extends ActionBarActivity {
@ Override
protected void onCreate (Bundle savedInstanceState) {
super.onCreate (savedInstanceState);
setContentView (R.layout.activity_main);
if (savedInstanceState == null) {
	getSupportFragmentManager (). beginTransaction ()
	. Add (R.id.container, new PlaceholderFragment ()). Commit ();
}
}
@ Override
public boolean onCreateOptionsMenu (Menu menu) {
getMenuInflater (). inflate (R.menu.main, menu);
return true;
}
@ Override
public boolean onOptionsItemSelected (MenuItem item) {
int id = item.getItemId ();
if (id == R.id.action_settings) {
return true;
}
return super.onOptionsItemSelected (item);
}
public static class PlaceholderFragment extends Fragment {
public PlaceholderFragment () {
}
@ Override
public View onCreateView (LayoutInflater inflater, ViewGroup container,
Bundle savedInstanceState) {
View rootView = inflater.inflate (R.layout.fragment_main, container,
false);
return rootView;
}
}
}
This is file where name of class MainActivity coincides with Java file (this rule established language Java). The first line is the name of the package (Package Name). Next, there are lines that import the required classes for the project. If warning icons appear to the left of the class names, read the messages that pop up when your cursor is over them. For example, if you see a yellow triangle with an exclamation mark and the message is that "this class is not used," you can safely remove the extra lines.
After that is the announcement of the class that inherits (extends) from the abstract class ActionBarActivity. In the class we see the method onCreate (). It is called when the application creates and displays the markup activity. Let’s examine the method's code.
Line super.onCreate (savedInstanceState); is the parent class that performs the operations necessary for the activity. You do not need to touch this line; leave it unchanged.
The second line setContentView (R.layout.activity_main); is of more interest. The setContentView (int) method connects the content of the markup file. In the argument, we specify the file name without the extension from a folder res/layout/. By default, it creates a project file called activity_main.xml.
Further, there is a fragment of dynamic loading.
if (savedInstanceState == null) {
getSupportFragmentManager (). beginTransaction ()
. Add (R.id.container, new PlaceholderFragment ()). Commit ();
}
After the onCreate () method, the onCreateOptionsMenu () and onOptionsItemSelected () methods are associated with the handling menu.
And finally, at the end of an internal static class fragment is the PlaceholderFragment.
Now that you’ve seen the tools and steps involved in creating Android apps for Intel processor-based tablets, I hope you’ll agree that it’s fun, simple, and interesting. This was a simple introduction, so for more information check out these resources:
http://developer.android.com/samples/index.html
http://code.tutsplus.com/tutorials/android-sdk-samples--mobile-20901
About the Author
Egor Filimonov works in the Software & Service Group at Intel Corporation. He is a student of Lobachevsky State University in Nizhni Novgorod, Russia, on mechanic and mathematics faculty. His specialty is applied mathematics and informatics. Egor’s main interest is High Performance Computing (HPC) and mobile technologies.
Intel, the Intel logo, and Atom are trademarks of Intel Corporation in the U.S. and/or other countries.
Copyright © 2014 Intel Corporation. All rights reserved.
*Other names and brands may be claimed as the property of others.
Intel is inside more and more Android devices, and we have tools and resources to make your app development faster and easier.


