Introduction
A tower defense game is a very simple game. Wikipedia says that the goal of a tower defense game is "... to try to stop enemies from crossing a map by building traps to slow them down and towers which shoot at them as they pass." These enemies appear in form of units, which have properties such as speed or hitpoints. Towers have varied abilities and must be bought by spending money. The player earns money by defeating the incoming waves of enemies.
This article will build a basic tower defense game that is easily extensible and open for modification. We will build this game for the modern web by using HTML5, CSS3 and JavaScript. Drawing will be done by using the <canvas> element, however, drawing is fully decoupled and could be quite easily changed to <div> elements with some CSS styling.
The project itself does not contain any dependencies to 3rd party code such as jQuery, AngularJS or any existing game engine. Instead everything is build from the ground up. This is much easier than many people think and gives us some additional freedom. Another reason is that potential overhead by including unnecessary functions is avoided. Last but not least this yields a great possibility for a useful tutorial.
Background
Several times a year I reach out to give some lectures in state of the art technologies, e.g. "Programming with C#" or "Web Applications with HTML5, CSS3 and JavaScript". Usually I am quite enthusiastic about those courses. One reason for is that the learning curve is quite steep, however, with talented students who find a way to deal with the presented material more or less easily. Another reason is that in the end amazing projects will be created. Every time I am really happy what is possible after just two weeks of work. From zero to hero (close enough)!
The cool thing about this concept is that I can give my students "project-ideas". I am full of ideas, which is kind of a problem for me personally, since I will never find the time to do them all, at least not in the way that I want to do them. Nevertheless for a final project students are of course allowed to make some shortcuts and to stop at an arbitrary, but useful, point. This way not only my students can learn a lot of cool stuff, but I can teach myself one or the other useful bit as well. At least it is a good cross-check if the idea I had my mind for solving a particular problem really works (and how good it works).
Most of the projects are actually games. Its not a requirement, but it makes sense if we think about it. If we have a specific project in mind, then this application might actually help us and therefore we might pick it as a final project. However, most people do not need a specific kind of application at a very specific point in time. Creating a game has the benefit of having something, which is a lot of fun to use in general. Also other people might enjoy it as well, as a game never solves a problem, but creates a new problem (a kind of task or mission if you want). This problem can then be only solved with the application (i.e. the game) itself.
Of course most students never wrote a game - or at least a graphical game. Therefore they need to learn what a game engine is as they might require it. So I teach them how to write a simple game engine and how to design their game. Sometimes I give them useful algorithms or implementations. Another important (but often ignored) problem is where to get all those resources, e.g. sounds and graphics. Luckily I have a bunch of good URLs and resources stored on my hard drive.
This tower defense game has originally been developed in the C# lecture. It used SDL.NET for rendering and DirectX for playing sounds. Most sprites have been drawn in paint, which gives the game some retro pixel-look. Now I decided to improve that project by porting it to JavaScript. In the end I considered it a good test: How well (and how fast) could I aggregate this special kind of C# code to the web?
Game engine essentials
A game engine is a piece of code that is responsible for drawing the graphics, playing the sound and spinning the logic. These three duties should be as separate as possible. If we can decouple them perfectly, then the code is really flexible and maintainable. While the video loop is time-independent, i.e. it is executing its body as often as possible, the logic loop is usually time-dependent, i.e. pulsing at a pre-set frequency. This is quite important: Sometimes a game might too graphics intense for a certain computer. While the logic is still running at a fixed rate per second, the graphics might seem to stutter. This is an effect of the architecture: A fixed number of logic steps with a variable number of graphic steps.
In our game we place the main logic routine in a class that is called GameLogic. By calling the start() method we will trigger the logic. From that point on the JavaScript engine will call the tick() method in constant intervals defined in constants.ticks. We will only start the logic loop if no logic loop is running.
var GameLogic = Base.extend({
start: function() {
if (!this.gameLoop) {
var me = this;
me.view.start();
me.gameLoop = setInterval(function() {
me.tick();
}, constants.ticks);
}
},
tick: function() {
},
pause: function() {
if (this.gameLoop) {
this.view.pause();
clearInterval(this.gameLoop);
this.gameLoop = undefined;
}
},
);
The logic class already knows that there is something like a view. However, it does not know the specific view, nor does it know any methods besides start() and stop(). When the logic loop starts the video loop should also begin. Additionally we would like to end the continuous graphic drawing when the logic pauses.
The interaction with the UI will be done over events. There are two sides for this connection:
- Events triggered by UI elements such as clicking a button
- Events triggered by the game logic such as wave finished
The event system that is used by the game logic is implemented in JavaScript. We use an object to keep track of registered events and assigned event listeners. Every event can have an arbitrary number of listeners.
var Base = Class.extend({
    init: function() {
        this.events = {};
    },
    registerEvent: function(event) {
        if (!this.events[event])
            this.events[event] = [];
    },
    unregisterEvent: function(event) {
        if (this.events[event])
            delete this.events[event];
    },
    triggerEvent: function(event, args) {
        if (this.events[event]) {
            var e = this.events[event];

            for (var i = e.length; i--; )
                e[i].apply(this, [args || {}]);
        }
    },
    addEventListener: function(event, handler) {
        if (this.events[event] && handler && typeof(handler) === 'function')
            this.events[event].push(handler);
    },
    removeEventListener: function(event, handler) {
        if (this.events[event]) {
            if (handler && typeof(handler) === 'function') {
                var index = this.events[event].indexOf(handler);
                this.events[event].splice(index, 1);
            } else
                this.events[event].splice(0, this.events[event].length);
        }
    },
});
Derived classes register events (usually in their init() method) by using the registerEvent() method. The triggerEvent() method is used to fire an event. Listeners can be registered or unregistered by using the addEventListener() and removeEventListener() methods. This is then quite similar to (un-)registering an event handler to any UI element in JavaScript.
In the end we will then write code as follows:
logic.addEventListener('moneyChanged', function(evt) {
    moneyInfo.textContent = evt.money;
});
This will help us wiring the game logic and the UI together.
Building a tower defense game
Tower defense games are not very hard to build. There are several reasons for this:
- A basic tower defense game might be round-based
- They are perfectly suitable for coarse grids
- Only very basic physics is required
- The rules are actually very simple and straight forward
The core of any tower defense game is (like in most strategy games) a good path-finding algorithm. Since we will not deal with thousands of units, we are not interested in a very fast algorithm. For this sample project we can just use the famous A* algorithm. There are several implementations in nearly all programming languages. One example is my implementation, which is more or less a port from C#. If you are interested how it works, then just read the article available on my web page. The article also contains the link for a short demo using a single (fixed) strategy.
In this case the enumeration for storing the different maze strategies looks like the following object:
var MazeStrategy = {
    manhattan        : 1,
    maxDXDY          : 2,
    diagonalShortCut : 3,
    euclidean        : 4,
    euclideanNoSQR   : 5,
    custom           : 6,
    air              : 7
};
Usually units move with a Manhattan metric over the maze. The Manhattan metric is a special one, that does not allow diagonal shortcuts. In the Manhattan metric going from (1,1) to (2,2) takes a minimum of 2 steps. As a comparison the ordinary Euclidean metric allows diagonal moves. Here we can go from (1,1) to (2,2) in just a single step.
There are other metrics, which are used in the game (like an Euclidean metric without square rooting the squared distances, which will be different from the ordinary Euclidean in some scenarios). Among these metrics the air strategy is the most remarkable. It will make any computation of a proper way obsolete by knowing that the shortest distance is just ignoring any obstacles at all. This strategy is used by a single unit, which can only be attacked by a special anti-air tower.
A tower is implemented by deriving from the Tower class. A sketch of the code is shown below.
var Tower = GameObject.extend({
init: function(speed, animationDelay, range, shotType) {
},
targetFilter: function(target) {
return target.strategy !== MazeStrategy.air;
},
update: function() {
this._super();
},
shoot: function() {
},
});
The targetFilter() method is used as a filter for targets. All towers, except the anti-air tower, will use the standard filter, which just excludes air units. The code for implementing the anti-air tower then overrides the original method.
var Flak = Tower.extend({
    init: function() {
        this._super(Flak.speed, 200, Flak.range, Flak.shotType);
        this.createVisual(Flak.sprite, [1, 1, 1, 1]);
    },
    targetFilter: function(target) {
        return target.strategy === MazeStrategy.air;
    },
});
The constructor, which is the init() method just calls the base constructor with the specific arguments. Additionally the visual for the tower is created. A visual stores the whole sprite information such as frames, direction-based movements and the sprite-image source.
Every tower defines a shot type, which is just the type of a proper shot class. In JavaScript terms: This is a reference to the constructor function that could be used to instantiate a proper shot object.
The base class for every shot type has the following outline:
var Shot = GameObject.extend({
init: function(speed, animationDelay, damage, impactRadius) {
},
update: function() {
},
});
In case of the Flak tower we define the shotType property to be a reference to AirShot. This constructor function is as simple as the code below:
var AirShot = Shot.extend({
    init: function() {
        this._super(AirShot.speed, 10, AirShot.damage, AirShot.impactRadius);
        this.createVisual(AirShot.sprite, [1, 1, 1, 1], 0.2);
        this.playSound('flak');
    },
});
There is no definition for targets. The list of possible targets will always be set by the tower, that instantiated the shot object. As the AirShot will only be used by the Flak tower, it will always be only active against air units. The constructor looks quite similar. The major difference is that a shot object will also play a sound after being instantiated.
The following screenshot shows the game during some action.

So what are the targets of a tower that can be hit by a shot? Well, these targets come in form of a unit. It should be obvious at this point that we will follow the same strategy as before. We will use a base class called Unit as the boilerplate for every derived object.
var Unit = GameObject.extend({
init: function(speed, animationDelay, mazeStrategy, hitpoints) {
},
playInitSound: function() {
},
playDeathSound: function() {
},
playVictorySound: function() {
},
update: function() {
},
hit: function(shot) {
},
});
There are several units in this game. Balancing everything depends mostly on creating some good wave-algorithm, which will do its best to make the game hard, but not impossible. Let's have a look at the various unit types:
- Mario - a very easy opponent
- Rope - just a little bit harder (more hitpoints)
- Fire Wizzrobe - quite fast, but not many hitpoints
- Air Wolf - the only air unit in the game
- DarkNut - the speed is okay, hitpoints much higher
- Speedy - fastest unit in the game, with quit some hitpoints
- Armos - most hitpoints, but also slowest unit
Adding a new unit is quite easy (and actually a lot of fun, too!). Key questions in the design of a new unit are: When should the unit appear and what properties (mostly speed, armor) should be considered?
As an example we consider the implementation of the Mario unit. The following code adds another unit with the name Mario to the collection of unit types.
var Mario = Unit.extend({
    init: function() {
        this._super(Mario.speed, 100, MazeStrategy.manhattan, Mario.hitpoints);
        this.createVisual(Mario.sprite, [8,8,8,8]);
    },
}, function(enemy) {
    enemy.speed = 2.0;
    enemy.hitpoints = 10;
    enemy.description = 'You have to be careful with that plumber.';
    enemy.nickName = 'Mario';
    enemy.sprite = 'mario';
    enemy.rating = enemy.speed * enemy.hitpoints;
    types.units['Mario'] = enemy;
});
The first part controls instances of Mario, while the second one just sets static properties, which apply to all instances. The sprite will be loaded from the list of available sprites in the createVisual() method.
The sample game
In order to get a working game of the provided code we have to bundle everything together. We start by using a very simple HTML boilerplate code:
<!doctype html>
<html>
<head>
<meta charset=utf-8 />
<title>Tower Defense Demo</title>
<link href="Content/style.css" rel="stylesheet" />
</head>
<body>
<div id="frame" class="hidden">
    <div id="info">
        <div id="money-info" title="Money left"></div>
        <div id="tower-info" title="Towers built"></div>
        <div id="health-info" title="Health left"></div>
    </div>
    <canvas id="game" width=900 height=450>
        <p class="error">Your browser does not support the canvas element.</p>
    </canvas>
    <div id="towers"></div>
    <div id="buttons">
        <button id="startWave">Start Wave</button>
        <button id="buyMedipack">Buy Medipack</button>
        <button id="buyTowerbuild">Buy Towerbuild</button>
    </div>
</div>
<script src="Scripts/manifest.js"></script>
<script src="Scripts/oop.js"></script>
<script src="Scripts/utilities.js"></script>
<script src="Scripts/path.js"></script>
<script src="Scripts/resources.js"></script>
<script src="Scripts/video.js"></script>
<script src="Scripts/sound.js"></script>
<script src="Scripts/main.js"></script>
<script src="Scripts/logic.js"></script>
<script src="Scripts/units.js"></script>
<script src="Scripts/shots.js"></script>
<script src="Scripts/towers.js"></script>
<script src="Scripts/app.js"></script>
</body>
</html>
Alright so this is a little bit more than a minimal working example, however, it is much less than a very sophisticated example that makes use of every information that the game provides.
All those JavaScript files could be bundled and minimized. Web frameworks such as ASP.NET MVC do that automatically, or we write some make script that performs that task as a one-time build. So what else do we have here? The most important element is the <canvas> element that is placed in the center of the frame given by a <div> element.
The three buttons are responsible for controlling the game. We can either start a new wave (we should have prepared before), buy a medipack or buy another tower build right. The number of possible towers is limited. Buying the right for building yet another tower is some cost that will grow with the number of possible towers.
How can we build towers? Well, this is not directly visible from the code above. We will use the <div> element with the id towers. This will be used as a container, which will be filled with the registered tower types. The existing JavaScript code looks as follows:
var towerPanel = document.querySelector('#towers');
var towerButtons = [];

var addTower = function(tower) {
    var div = document.createElement('div');
    div.innerHTML = [
        '<div class=title>', tower.nickName, '</div>',
        '<div class=description>', tower.description, '</div>',
        '<div class=rating>', ~~tower.rating, '</div>',
        '<div class=speed>', tower.speed, '</div>',
        '<div class=damage>', tower.shotType.damage, '</div>',
        '<div class=range>', tower.range, '</div>',
        '<div class=cost>', tower.cost, '</div>',
    ].join('');
    towerButtons.push(div);
    div.addEventListener(events.click, function() {
        towerType = tower;

        for (var i = towerButtons.length; i--; )
            towerButtons[i].classList.remove('selected-tower');

        this.classList.add('selected-tower');
    });
    towerPanel.appendChild(div);
};
var addTowers = function() {
    for (var key in types.towers)
        addTower(types.towers[key]);
};
So we just need to invoke the addTowers() method. This will iterate over all towers, creating and adding a new button for each tower.
A look at the CSS is not really interesting. The <canvas> element works pretty well without any styling. Therefore styling is left to people who really care about a professional look for their games.
The class diagram
One of the purposes of rewriting the whole game was the incentive to describe everything in an object oriented manner. This will make the coding more interesting as well as simpler. Also the final game will contain less bugs. The following class diagram was planned before creating the game:
The game follows this class diagram closely. Extending the game as actually as easy as using the game as a basic boilerplate for an arbitrary tower defense game. In theory it should also be very easy to extend the battle field with other types, such as mud, gates and more. The trick here is to use other tiles, which will not reflect a weight of 0 when being build. This is already included, however, it is not in use.
In the next section we will see how we can use the existing code for publishing our own tower defense game.
Using the code
The given code does not represent a finished game. Instead it represents a kind of tower defense game boilerplate. The provided web application is just an example that uses the various parts of the code to represent a sample game.
The resource loader is a quite interesting class. It defines the core-functionality for a specialized resource loader. Basically it just receives a list of resources, optionally set with callback functions for progress, error and complete indication.
var ResourceLoader = Class.extend({
    init: function(target) {
        this.keys = target || {};
        this.loaded = 0;
        this.loading = 0;
        this.errors = 0;
        this.finished = false;
        this.oncompleted = undefined;
        this.onprogress = undefined;
        this.onerror = undefined;
    },
    completed: function() {
        this.finished = true;

        if (this.oncompleted &&typeof(this.oncompleted) === 'function') {
            this.oncompleted.apply(this, [{
                loaded : this.loaded,
            }]);
        }
    },
    progress: function(name) {
        this.loading--;
        this.loaded++;
        var total = this.loaded + this.loading + this.errors;

        if (this.onprogress && typeof(this.onprogress) === 'function') {
            this.onprogress.apply(this, [{
                recent : name,
                total : total,
                progress: this.loaded / total,
            }]);
        }

        if (this.loading === 0)
            this.completed();
    },
    error: function(name) {
        this.loading--;
        this.errors++;
        var total = this.loaded + this.loading + this.errors;

        if (this.onerror && typeof(this.onerror) === 'function') {
            this.onerror.apply(this, [{
                error : name,
                total : total,
                progress: this.loaded / total,
            }]);
        }
    },
    load: function(keys, completed, progress, error) {
        this.loading += keys.length;

        if (completed && typeof(completed) === 'function')
            this.oncompleted = completed;
        if (progress && typeof(progress) === 'function')
            this.onprogress = progress;
        if (error && typeof(error) === 'function')
            this.onerror = error;

        for (var i = keys.length; i--; ) {
            var key = keys[i];
            this.loadResource(key.name, key.value);
        }
    },
    loadResource: function(name, value) {
        this.keys[name] = value;
    },
});
There are two implementations of this resource loader in action. One is for images, the other for sounds. Both load resources different, since images can be easily retrieved by the following code:
var ImageLoader = ResourceLoader.extend({
    init: function(target) {
        this._super(target);
    },
    loadResource: function(name, value) {
        var me = this;
        var img = document.createElement('img');
        img.addEventListener('error', function() {
            me.error(name);
        }, false);
        img.addEventListener('load', function() {
            me.progress(name);
        }, false);
        img.src = value;
        this._super(name, img);
    },
});
However, for audio elements this is not so easily possible. The main issue here is, that different browsers support different audio formats. Therefore the following code is required. It will check what format is supported by the browser (if any) and pick the detected format. In this example the format choices are fixed to MP3 and OGG.
var SoundLoader = ResourceLoader.extend({
    init: function(target) {
        this._super(target);
    },
    loadResource: function(name, value) {
        var me = this;
        var element = document.createElement('audio');
        element.addEventListener('loadedmetadata', function() {
            me.progress(name);
        }, false);
        element.addEventListener('error', function() {
            me.error(name);
        }, false);

        if (element.canPlayType('audio/ogg').replace(/^no$/, ''))
            element.src = value.ogg;
        else if (element.canPlayType('audio/mpeg').replace(/^no$/, ''))
            element.src = value.mp3;
        else
            return me.progress(name);

        this._super(name, element);
    },
});
Generally it is quite simple to extend this resource loader to an arbitrary number of formats, however, since adjustments are trivial the flexibility is not an issue here.
In this code we additionally introduce another kind of resource loader, which does not derive from ResourceLoader. Instead it just tries to bundle other ResourceLoader instances. The reason for this is simple: In the end we just have to specify the kind of resource loaders to use for some set of resources. The whole loading process will be supervised by this loader, which just triggers the given resource loaders consecutively.
So what is actually needed for rolling out our own tower defense game?
- Define your resources and change some global variables in manifest.js
- Define custom towers by replacing / modifying the file towers.js
- Define custom units by replacing / modifying the file units.js
- Define custom shots by replacing / modifying the file shots.js
- You want something different than a canvas for drawing? Consider extending video.js
Combine everything in a simple startup script as follows. We can embed this script in the document in general. If we minimize all available scripts you should also wrap it in an IIFE (Immediately-Invoked-Function-Expression). This will make all global variables local, which will be a superior choice. That approach, however, has the problem that we cannot embed the startup script in the document, as the embedded script cannot see the local variables from some function that is contained in another script file.
A very simple startup script:
(function() {
    "use strict";

    var canvas = document.querySelector('#game');
    var towerType = undefined;

    var getMousePosition = function(evt) {
        var rect = canvas.getBoundingClientRect();
        return {
            x: evt.clientX - rect.left,
            y: evt.clientY - rect.top
        };
    };

    var addHandlers = function() {
        logic.addEventListener(events.playerDefeated, function() {
            timeInfo.textContent = 'Game over ...';
        });
        startWaveButton.addEventListener(events.click, function() {
            logic.beginWave();
        });
        canvas.addEventListener(events.click, function(evt) {
            var mousePos = getMousePosition(evt);
            var pos = logic.transformCoordinates(mousePos.x, mousePos.y);
            evt.preventDefault();

            if (towerType) logic.buildTower(pos, towerType);
            else logic.destroyTower(pos);
        });
    };
    var completed = function(e) {
        addHandlers();
        view.background = images.background;
        logic.start();
    };

    var view = new CanvasView(canvas);
    var logic = new GameLogic(view, 30, 15);
    var loader = new Loader(completed);
    loader.set('Images', ImageLoader, images, resources.images);
    loader.set('Sounds', SoundLoader, sounds, resources.sounds);
    loader.start();
})();
This does everything except determining which tower should be build. A more sophisticated version is included in the provided sample source.
Balancing the game
The initial version of the demo game has been quite easy. The main issue here is, that the distribution of opponents has been chosen to be uniform. A consequence of this choice is that even in high levels very easy opponents might spawn. To make the issue even worse, the chance for some tough opponents is the same as the odds for easy opponents are.
Preventing such scenarios is easy by choosing a better distribution. In this case a gaussian distribution that works within the spawn of possible opponents seems to be the best. The only question is, where we want to place the peak of this gaussian distribution. The peak will then mark what kind of opponents are to be expected. This peak can be moved according to the level.
In code form we will have to write a very simple algorithm for generating gaussian random values. This is not a hard task, as we can use the very simple Box–Muller transform.
var randu = function(max, min) {
    min = min || 0;
    return (Math.random() * (max - min) + min);
}

var randg = function(sigma, mu) {
    var s, u, v;
    sigma = sigma === undefined ? 1 : sigma;
    mu = mu || 0;

    do
    {
        u = randu(1.0, -1.0);
        v = randu(1.0, -1.0);
        s = u * u + v * v;
    } while (s == 0.0 || s >= 1.0);

    return mu + sigma * u * Math.sqrt(-2.0 * Math.log(s) / s);
}
In this case we throw away the other possible number, which is based on v. Usually we would store this number in a buffer and use it in every other request to the randg function. For our simple game we just omit it, practically overusing random numbers.
The WaveList has been modified to generate easy waves in the beginning and hard ones in the end. First we use a polynom to find the number of opponents in the given round. This is done by using some magic numbers that have been computed by applying a polynom fit to desired values. Now the behavior is given by a low number of opponents in the first few rounds and an increasing number of opponents beyond level 20. In level 50 we have already to face more than 150 opponents.
var WaveList = Class.extend({
random: function() {
var wave = new Wave(this.index);
var n = ~~(1.580451 - 0.169830 * this.index + 0.071592 * this.index * this.index);
var upper = this.index * 0.3 + 1;
var m = Math.min(this.unitNames.length, ~~upper);
var maxtime = 1000 * this.index;
wave.prizeMoney = n;
for (var i = 0; i < n; ++i) {
var j = Math.max(Math.min(m - 1, ~~randg(1.0, 0.5 * upper)), 0);
var name = this.unitNames[j];
var unit = new (types.units[name])();
wave.add(unit, i === 0 ? 0 : randd(maxtime));
}
return wave;
},
});
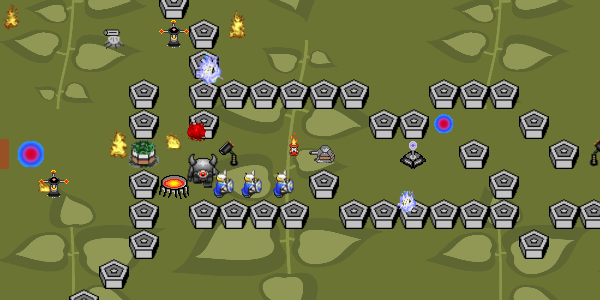
The upper boundary in the selection of opponents is given by the upper variable. The maxtime is just the number of opponents times a second for each opponent. The peak of the gaussian is placed in the center between the lower and upper boundary. The upper boundary is shifted with regard to the current level. Eventually we will reach the strongest opponent and place the center of our gaussian distribution there. This is the point where most opponents will be really strong, with some weaker opponents and only a few, if any, weak opponents.
The previous screenshot shows the new design of the demonstration game in a very late stage. A quite tedious maze has been created for slowing down opponents. Also many hellgates are in place, which are an excellent way to stop even strongly armored opponents. Finally we also have to deal with a lot of stacked opponents, which will cause a lot of problems for our towers.
Another feature of this small iteration is the ability to restore an existing game. The current game will be saved once a wave has finished. If the browser finds a stored game in the beginning, it will ask the player if the previous game should be restored. This enables long term playing without worries.
Two methods are responsible for storing and loading a game. The first one is the saveState() method. This converts the current GameLogic instance into a portable object. This object does not have any references that need to be resolved. It is basically an atomic information object.
var GameLogic = Base.extend({
saveState: function() {
var towers = [];
for (var i = 0; i < this.towers.length; i++) {
var tower = this.towers[i];
towers.push({
point : { x : tower.mazeCoordinates.x , y : tower.mazeCoordinates.y },
type : tower.typeName,
});
}
return {
mediPackCost : this.mediPackCost,
mediPackFactor : this.mediPackFactor,
towerBuildCost : this.towerBuildCost,
towerBuildFactor : this.towerBuildFactor,
towerBuildNumber : this.maxTowerNumber,
hitpoints : this.player.hitpoints,
money : this.player.money,
points : this.player.points,
playerName : this.player.name,
towers : towers,
wave : this.waves.index,
state : this.state,
};
},
loadState: function(state) {
this.towers = [];
for (var i = 0; i < state.towers.length; i++) {
var type = types.towers[state.towers[i].type];
var tower = new type();
var point = state.towers[i].point;
var pt = new Point(point.x, point.y);
if (this.maze.tryBuild(pt, tower.mazeWeight)) {
tower.mazeCoordinates = pt;
tower.cost = type.cost;
this.addTower(tower);
}
}
this.mediPackFactor = state.mediPackFactor;
this.towerBuildFactor = state.towerBuildFactor;
this.player.points = state.points;
this.player.name = state.playerName;
this.setMediPackCost(state.mediPackCost);
this.setTowerBuildCost(state.towerBuildCost);
this.setMaxTowerNumber(state.towerBuildNumber);
this.player.setHitpoints(state.hitpoints);
this.player.setMoney(state.money);
this.waves.index = state.wave;
this.state = state.state;
},
});
The second method shown in the code above is called loadState(). Given an atomic information object we can spawn all towers (instances) and set all required properties properly. This way we can do whatever we want with the atomic information object. A natural choice is to stringify (or - in reverse - parse) the object for storing it in the localstorage.
Another possible usage would involve some asynchronous access, e.g. saving it in a database on some server or locally. We could also transport it in the context of a cookie.
There are no winners in this game. So the only remaining question is: How far can you come? At some point one will lose. This will also erase the save game. The other option would be, to delete the save game once a new wave has started. However, in the current version this allows the game to refresh the browser to avoid losing too early.
Some final touches
Of course a game, like any other software, is never finished. Nevertheless, as this should be just a small porting project I wanted to finish it in some way. There are plenty of things that are missing or not very professional looking like using the messages boxes provided by the browser. One of the things that is, however, crucial in my opinion is the option to see with what kind of opponents the player will possibly deal be in the next round.
Implementing this was actually straight forward. First I need some way to read out the opponents of the next level. As I am using random waves, I had to implement a way of accessing the next wave, before it was actually created.
var WaveList = Class.extend({
nextOpponents: function() {
var upper = this.index * 0.3 + 1.3;
var m = Math.min(this.unitNames.length, ~~upper);
var units = [];
for (var i = 0; i < this.unitNames.length && i < m; i++)
units.push(this.unitNames[i]);
return units;
},
});
Now we can use this function in our app.js file, which is basically the glueing part between our logic and the UI. Here we can add a method as follows:
var updateNextWave = function() {
    nextwave.innerHTML = '';
    var names = logic.waves.nextOpponents();

    for (var i = 0; i < names.length; i++) {
        var name = names[i];
        var unit = types.units[name];
        var img = images[unit.sprite];
        var div = document.createElement('div');
        var icon = document.createElement('canvas');
        var width = img.width / unit.frames;
        icon.width = 32;
        icon.height = 32;
        var targetHeight = img.height > 32 ? 32 : img.height;
        var targetWidth = width * targetHeight / img.height;
        var ctx = icon.getContext('2d');
        ctx.drawImage(img, 0, 0, width, img.height, 16 - targetWidth * 0.5, 16 - targetHeight * 0.5, targetWidth, targetHeight);
        div.appendChild(icon);
        var info = document.createElement('div');
        info.innerHTML = [
            '<div class=title>', unit.nickName, '</div>',
            '<div class=description>', unit.description, '</div>',
            '<div class=rating>', ~~unit.rating, '</div>',
            '<div class=speed>', unit.speed, '</div>',
            '<div class=damage>', unit.hitpoints, '</div>',
        ].join('');
        info.classList.add('info');
        div.appendChild(info);
        nextwave.appendChild(div);
    }
};
Basically we just loop over all given names, get the type, which is the constructor function with some properties, and use it for creating a preview pane similar to the one for the towers. Most of the work is actually spent to make a preview image out of the given sprite (with rescaling etc.) by using a canvas. This is different to the preview images used by the tower buttons, where some CSS rules have been applied.
One final thing is the constraint that the graphics context only draws images (which is the current frames for those sprites). This is not very helpful if we want to present more dynamic information. So I decided to extend it by a few lines of code:
var CanvasView = View.extend({
drawVisual: function(element) {
element.draw(ctx, dx, dy, w, h);
},
});
Now a draw() method of every element is called with some arguments. Therefore every element could override this to provide a custom overlay.
Here is the standard implementation provided by GameObject.
var GameObject = Base.extend({
draw: function(ctx, x, y, width, height) {
},
});
And here is a custom implementation as used by Unit:
var Unit = GameObject.extend({
draw: function(ctx, x, y, width, height) {
var maxLength = 12;
var barLength = maxLength * this.health / this.hitpoints;
x += (width - maxLength) * 0.5;
ctx.fillStyle = 'rgba(0, 0, 0, 0.4)';
ctx.fillRect(x, y - 6, maxLength, 3);
ctx.fillStyle = '#00ff00';
ctx.fillRect(x, y - 6, barLength, 3);
},
});
What are we doing here? Well, as somebody might know after reading the lines of code, we are actually displaying the current health status of the unit. First we are drawing a slightly opaque rectangle that illustrates the full scale. Then we place a green rectangle on top of it, which indicates the current health status.
Now we know how many hitpoints are left! Too bad we can't use this information as every tower automatically targets units. This may be changed in a future version, however, at the moment I consider this project closed.
Points of Interest
The code uses the same approach for "OOP" JavaScript as the Mario game (the article can be found here on CodeProject). Programming with JavaScript is of course object-oriented from the beginning, however, the prototype pattern and object-centric style makes inheritance and class-centric architecture harder than it should be. This is where the file oop.js comes in quite handy. It allows us to extend existing definitions and create new one.
Additionally some kind of reflection is possible here. We can add these functions (let's call them types) to some objects or arrays. This way we can simulate something that is similar to reflection in the .NET-Framework or Java. We only need to perform this addition explicitly. However, this has the benefit that there is no more filtering required. Also we are quite flexible and can easily change orders, values and more.
We also do not need attributes any more. Attributes just annotate some type, i.e. place a static value to a class. In JavaScript we can give an arbitrary function properties. Since a class is just a type, which is represented by the constructor function in JavaScript, we can place as some properties on this function as we want to.
Answer to the question: How well and fast can it be ported?
The official answer is: 4 evenings. However, it took me some time to figure out some problems with the original code and get the intentions of the original authors right. Also debugging some code in JavaScript is really harder than in C# using Visual Studio (and I think I am quite experienced with JavaScript). The biggest problem does not even come from general algorithms or implementations. Most of the time the dynamic type system caused the bug by hiding some trivial type errors that usually a compiler would detect. I confess, however, that e.g. using TypeScript would have been beneficial in that aspect. TypeScript would have also made the OOP approach obsolete, since it contains keywords for using classes, which will transpile beautifully to code that is similar to the runtime code that is generated now. But there is also one problem with TypeScript. I think that the development time with TypeScript would have been slightly longer - even with debugging time included - for a project of the given size.
Can I try it online?
Sure, I placed a version (that differs slightly in the code from the provided demo application) online on my web page. You can play it at html5.florian-rappl.de/towerdefense. If you have any comments, suggestions or improvements, then feel welcome to post it here or by writing any kind of message.
History
- v1.0.0 | Initial Release | 01.03.2014
- v1.1.0 | Updated resource loader | 03.03.2014
- v1.1.1 | Corrected some typos | 04.03.2014
- v1.2.0 | Update on balancing | 19.03.2014
- v1.2.1 | Corrected missing images | 26.03.2014
- v1.3.0 | Added some final remarks | 08.04.2014
Florian lives in Munich, Germany. He started his programming career with Perl. After programming C/C++ for some years he discovered his favorite programming language C#. He did work at Siemens as a programmer until he decided to study Physics.
During his studies he worked as an IT consultant for various companies. After graduating with a PhD in theoretical particle Physics he is working as a senior technical consultant in the field of home automation and IoT.
Florian has been giving lectures in C#, HTML5 with CSS3 and JavaScript, software design, and other topics. He is regularly giving talks at user groups, conferences, and companies. He is actively contributing to open-source projects. Florian is the maintainer of AngleSharp, a completely managed browser engine.


 General
  News
News  Suggestion
  Question
  Bug
Bug  Answer
  Joke
Joke  Praise
  Rant
Rant  Admin
Admin 


 !
!![Rose | [Rose]](https://www.codeproject.com/script/Forums/Images/rose.gif)
 are as follows: