Introduction
Suppose you are developing an ASP.NET web application and you want to maintain a consistent look and feel across all the pages within your web application. You then have two options, the first one is to design the head, body and footer sections on each page. In this approach, you need to write more code on each page so ASP.NET 2.0 introduced "Master Pages" that helps enable this when using .aspx based pages or templates. It is your second option. Razor also supports this concept with a feature called "layouts" that allow you to define a common site template, and then inherit its look and feel across all the views/pages on your web application.
Create an MVC Application
I will create an MVC application using Visual Studio 2012. So let's see step-by-step how to create a MVC application.
Step 1: Go to "File" -> "New" -> "Project...".
Step 2: Choose "ASP.NET MVC 4 Web Application" from the list, then give the application name "LayoutMvcApplication" and set the path in the location input where you want to create the application.
Step 3: Now choose the Project Template "Empty" and select "Razor" as the view engine from the dropdown list.
Create Layout for Application
A layout is used to provide a consistent look and feel of all pages of a web application so we create a layout for the web application. Let's see the procedure for that.
Step 1: Create a "Content" folder in the root directory of the web application.
Step 2: Create a Style Sheet "Site.css" under the content folder. That CSS file contains all CSS classes necessary for a consistent web application page design.
Step 3: Create a "Shared" folder under the "View" folder.
Step 4: Create a "_Layout.cshtml" file under the "Shared" folder. The file "_Layout.cshtml" represents the layout of each page in the application. Right-click on the Shared folder in Solution Explorer, then go to "Add" item and click on "View".
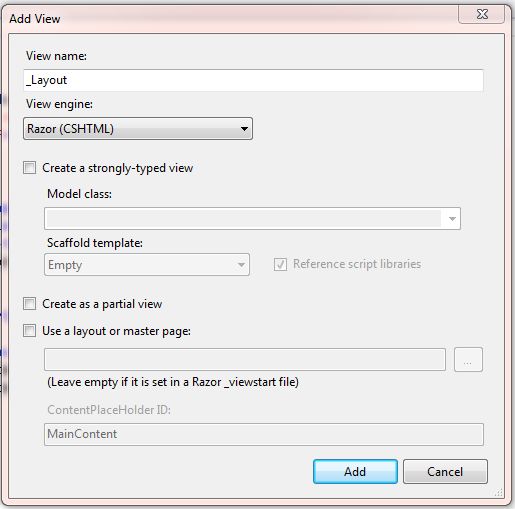
Figure 1.1 Create a layout for application
Now the View has been created. Write the following code in the "_Layout.cshtml" file.
        <!DOCTYPE html>
<html lang="en">
<head>
    <meta charset="utf-8" />
    <title>@ViewBag.Title - Code Express</title>
    <link href="~/favicon.ico"
    rel="shortcut icon" type="image/x-icon" />
    <link rel="stylesheet"
    href="@Url.Content("~/Content/Site.css")" />
</head>
<body>
    <header>
            <div class="content-wrapper">
                <div class="float-left">
                    <p class="site-title">
                        @Html.ActionLink("Code Express",
                        "Index", "Home")
                    </p>
                </div>
                <div class="float-right">
                <nav>
                        <ul id="menu">
                            <li>@Html.ActionLink("Home",
                            "Index", "Home")</li>
                            <li>@Html.ActionLink("About",
                            "About", "Home")</li>
                        </ul>
                    </nav>
                </div>
            </div>
        </header>
    <div id="body">
        @RenderSection("featured", required: false)
        <section class="content-wrapper main-content clear-fix">
                @RenderBody()
            </section>
    </div>
    <footer>
            <div class="content-wrapper">
                <div class="float-left">
                    <p>© @DateTime.Now.Year â€" Code Express</p>
                </div>
            </div>
        </footer>
</body>
</html>
In this layout, we are using an HTML helper method and some other system defined methods so let's see these methods one by one.
Url.Content(): Content() method is a method of UrlHelper class. It converts a virtual (relative) path to an application absolute path. It has one parameter of string type that is a virtual path of the content. It returns an application's absolute path. If the specified content path (parameter of the method) does not start with the tilde (~) character, then this method returns contentPath unchanged. Url.Content() ensures that all links work no matter if the site is in a virtual directory or in the web site root.Html.ActionLink(): The easiest way to render an HTML link in is to use the HTML.ActionLink() helper. With MVC, the Html.ActionLink() does not link to a view. It creates a link to a controller action. ActionLink() is an extension method of the HtmlHelper class. It returns an anchor element (an element) that contains the virtual path of the specified action. When you use an ActionLink() method, then you need to pass three string parameters. The parameters are linkText (the inner text of the anchor element), actionName (the name of the action) and controllerName (the name of the controller).RenderSection(): RenderSection() is a method of the WebPageBase class. Scott wrote at one point, the first parameter to the "RenderSection()" helper method specifies the name of the section we want to render at that location in the layout template. The second parameter is optional, and allows us to define whether the section we are rendering is required or not. If a section is "required", then Razor will throw an error at runtime if that section is not implemented within a view template that is based on the layout file (that can make it easier to track down content errors). It returns the HTML content to render.RenderBody(): In layout pages, renders the portion of a content page that is not within a named section. It returns the HTML content to render. RenderBody is required, since it's what renders each view.
The _ViewStart File
The "_ViewStart" file in the Views folder contains the following content:
 @{
    Layout = "~/Views/Shared/_Layout.cshtml";
}
Create Controller in MVC Application
You need to create a controller that contains an action method to render the view on the user interface. I will create a HomeController controller with two action methods, one is Index and the other is About. Both action methods execute when the request type is GET and renders a view on the browser. So use the following procedure:
Step 1: Right-click on the Controllers folder under Solution Explorer, then go to "Add" and click on "Controller".
Step 2: Give the name HomeController for the Controller name input and select "Empty MVC controller" from the Template dropdown list. After that, click on "Add".
Now you need to write the following code in the "HomeController.cs" file:
using System.Web.Mvc;
namespace LayoutMvcApplication.Controllers
{
    public class HomeController : Controller
    {
        public ActionResult Index()
        {
            return View();
        }

        public ActionResult Index()
        {
            return View();
        }
    }
}
Create View in MVC Application
You need to create two views (Index and About) that inherit the "_Layout" view via the "_ViewStart" view so you need to use the following procedure.
Step 1: Right-click on the Index() action method under the "HomeController.cs" file, then click on "Add View".
Step 2: Leave Add New screen unchanged and click on "Add".
Now you should write the following code in your web application index view:
 @{
    ViewBag.Title = "Index";
}

@section featured
{
    <section class="featured">
        <div class="content-wrapper">
            <hgroup class="title">
                <h1>@ViewBag.Title.</h1>
            </hgroup>
            <p>
               It is featured section. That is named section in
               Layout template that defined by RenderSection
            </p>
        </div>
    </section>
}
<p> It is body of Index view that renders in BodyRender.</p>
You can follow the same steps for the About view and create it.

Figure 1.2 Implement layout on view
You can get the same design for the About view. You can download the source code from the attachment.


 General
  News
News  Suggestion
  Question
  Bug
Bug  Answer
  Joke
Joke  Praise
  Rant
Rant  Admin
Admin 


