CodeProjectIntroduction
In one of my previous posts, I have described how to customize toolbar buttons in SharePoint forms and how to add Approve and Reject buttons to the bottom of Workflow tasks in particular. Geir Mathisen commented on this post that it would be nice if Approve and Reject buttons could be used for changing approval status in the lists and libraries with content approval enabled. In this article, I would like to cover this case.
First, we have to enable content approval feature which allows to make items or documents visible only to submitters and users with special permission (Approve/reject items) unless they are approved by these users. Go to the list settings and choose Version Settings section. Here, we should set 'Require content approval for submitted items' option to 'Yes'.
Now that we enabled content approval feature in our list, new columns - Approver Comments and Approval Status were added automatically but they do not appear in the list of fields in settings and in Forms Designer. We will add them to forms with the help of HTML-control. Open Forms Designer, choose Edit form and place HTML-control with the following content:
Comments:
<SharePoint:FormField id="_ModerationCommentsField"
FieldName="_ModerationComments"
runat="server"
ControlMode="Edit"
__designer:bind="{ddwrt:DataBind('u','_ModerationCommentsField','Value',
'ValueChanged','ID',ddwrt:EscapeDelims(string(@ID)),'@_ModerationComments')}" />
FormField is a SharePoint component which renders control for a specific field and form mode. In our case, it will be Approver Comments field whose internal name is _ModerationComments in edit mode. So if you wish to place Approver Comments field in display or new form, you have to specify the appropriate mode in ControlMode property: Display or New. As you may have guessed, the most valuable part of this code is __designer:bind attribute with ddwrt:DataBind function. I will not get deeper into technical aspects of this SharePoint control, just say that this property is required to map control and field and define control event that will notify SharePoint that field is changed. You can omit __designer:bind attribute if ControlMode of your field is Display. If ControlMode is New, you have to set the first parameter of ddwrt:DataBind function to 'i' which means 'Insert'. You can get more information on SharePoint data binding in the following article: http://www.bryancook.net/2009/09/understanding-sharepoints-ddwrtdatabind.html
Ok, next we have to set CDATA property of HTML-control to False. This property has become available since 2.8.6 version of Forms Designer. If it is 'True', __designer:bind attribute will be ignored by SharePoint and entered data will not be saved.
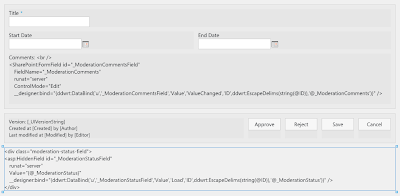
Great, now we can modify Approver Comments fields directly in edit form. Unfortunately, SharePoint does not support controls for Approval Status in edit or new modes so, we have to define them ourselves. Put a new HTML-control with the following content to your form:
<div class="moderation-status-field">
<asp:HiddenField id="_ModerationStatusField"
runat="server"
Value="{@_ModerationStatus}"
__designer:bind="{ddwrt:DataBind('u','_ModerationStatusField','Value','Load',
'ID',ddwrt:EscapeDelims(string(@ID)),'@_ModerationStatus')}" />
</div>
Here, I put a hidden field and bound its value to Approval Status field. It could be text box as well as drop down, but I am going to set value of this control via JavaScript when user clicks the appropriate button: Approve or Reject, so the hidden field is the most suitable for my needs. As you can see, I wrapped the hidden field into DIV container to get it in JavaScript by CSS class. Approval Status field accepts the following values:
- 0 —
Approved - 1 —
Rejected - 2 —
Pending - 3 —
Draft - 4 —
Scheduled
Do not forget to set CDATA of HTML-control to False.
Now, we should enable buttons feature of Forms Designer and put two additional Save buttons at the bottom of our form: Approve and Reject. Here is my form in Forms Designer:
Next, we should implement OnClick handler of Approve and Reject buttons to set the appropriate value of Approval Status.
Code for Approve button:
$('.moderation-status-field > input').val(0) Code for Reject button:
$('.moderation-status-field > input').val(1) Here is my final form:
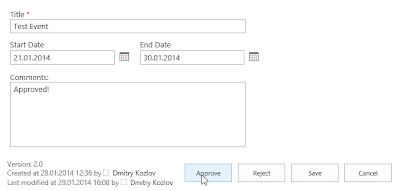
When user clicks Approve button, the current item is saved and turned to Approve state, since Reject button turns item to Rejected state.
Should you have any difficulty following these instructions, feel free to leave your questions.


 General
  News
News  Suggestion
  Question
  Bug
Bug  Answer
  Joke
Joke  Praise
  Rant
Rant  Admin
Admin 


