“Memory Visualizer” is a program implemented in C++ using the OpenGL library. It allows you to browse and see the contents (in decimal, hex, char and binary formats) of every address in the process address space. It also color maps every byte in memory so we visually get an idea about the most common byte values. A lot of variables (x86-x64, physical vs. virtual memory, etc…) could affect the way we visualize memory, so they are described in detail in the sections that follow.

The implementation is simple, but it certainly helped me refresh my memory about computer memory. I hope it’ll do the same for you.
CPU Architecture
On an x86 machine, general-purpose registers (GPR) are 32-bit wide. Thus, a CPU register can refer to one of 2 ^ 32 possible addresses. Knowing that each address identifies a single byte of storage, on a 32-bit system, we can have a maximum of 4 GB of RAM (physical memory). On an x64 processor, GPRs are 64-bit wide, and thus it’s possible to refer to 2 ^ 64 locations (16 exbibytes). Although it’s possible to refer to that much memory, the largest RAM in the world by far is 2.5 TB ($4.7 million and 10,000 times the size of RAM in your PC. More details here).
The CPU architecture doesn’t directly affect the size of the virtual address in memory. It’s the targeted platform when compiling our C++ application that does have an impact on the way we are going to visualize memory. When compiling C++ using Visual Studio on a 64-bit Windows operating system, the code is built as a 32-bit application by default. However, we can still build 64-bit applications using Visual Studio (see section below). Using the sizeof operator (results in table below), we can clearly see that a pointer in a 32-bit C++ app has a size of 4 bytes (32 bits) while a pointer in a 64-bit app has a size of 8 bytes (64-bit).

So if we build our app as 32-bit, we’ll be able to browse virtual memory addresses ranging from address 0 to address 2^32 – 1. Building that app as 64-bit, we can browse virtual memory addresses from 0 to 2^64 – 1.
Visual Studio X64
To build a 64-bit application in Visual Studio, go to Build \ Configuration Manager, in the “Active solution platform” drop-down, select <New…>. Select x64 in the “Type or select the new platform” drop-down. Click OK then rebuild your application. If you don’t see the “x64″ in the drop-down, check this page for installing Visual Studio 64-bit Components.

Physical Memory vs. Virtual Memory
Although physical memory is the actual location where data\code is stored, processes in an operating system don’t interact directly with physical memory. Instead, processes operate on virtual memory. Thus, our C++ program will reflect the virtual memory and not the physical memory. Here is a nice diagram that shows the relationship between virtual and physical address spaces.
A machine of 2 GB of RAM can actually have 4 GB of virtual memory. The extra memory is usually stored on a hard disk drive. Since I/O with a disk is much slower than volatile memory, new and active processes are located in RAM while other non-active processes reside on disk. Based on usage, virtual memory is swapped back and forth between RAM and hard drive to ensure most efficient execution possible. Thus, the total virtual space is limited by both the actual physical space and hard disk space.
Virtual memory is also dependent on the type of operating system installed on the machine. For example, on a 64-bit Windows Server R2 Enterprise, the virtual memory limit is 2 TB. On a 64-bit Windows 7 Ultimate, the limit is 192 GB. On a 64-bit Vista Ultimate, the limit is 128 GB. However, on a 32-bit Windows 7 Ultimate or Windows Vista Ultimate, the limit is 4 GB. In short, on a Windows Operating system, limits range between 2 GB and 2 TB based on the version of the OS. Full details available here.
Process Private Address Space
Although the total virtual address space can get up to 2 TB on Windows Server 2008 R2, this doesn’t mean that each process can take advantage of that much memory. The maximum amount of addressable memory a process can have is dependent on the Operating System and the way the program is compiled. By default, every process takes 2 GB of private address space on any Windows Operating System whatever the processor architecture is. However, a program can be flagged as large address aware during linkage, and in that case, a 32-bit process can take up to 3 GB on a 32-bit Windows (with 4GT enabled) and 4 GB on a 64-bit Windows, while a 64-bit process takes 8 TB on a 64-bit Windows. Full details available here.

Large Address Aware
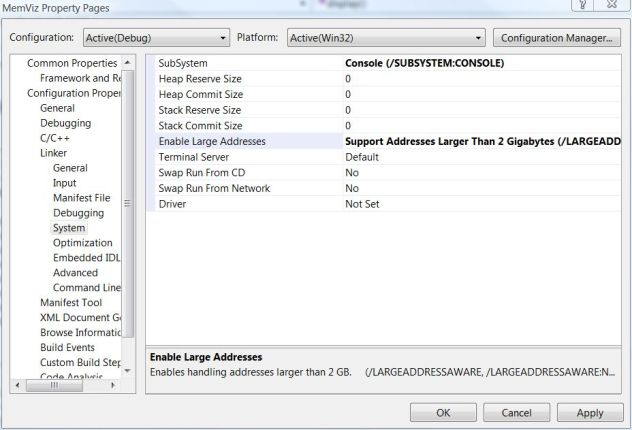
To make a program large address aware in Visual Studio, go to Project \ Properties \ Configuration Properties \ Linker \ System. Set “Enable Large Addresses” to “Support Addresses Larger Than 2 Gigabytes (/LARGEADDRESSAWARE)”.

Access Violation
Every process has its own private address space. A process can’t read from the address space of another process. Thus, our Memory Visualizer C++ program will only be able to view the content of virtual memory addresses in its address space. If we try to access the contents of an address (except for shared memory) outside the process private address space, we will get an access violation exception.
Since in our program we can browse to any address (by changing the value of a pointer p) then view the contents of that address using *p, there is a very high possibility that we end up trying to view the contents outside our address space and thus get an access violation exception.
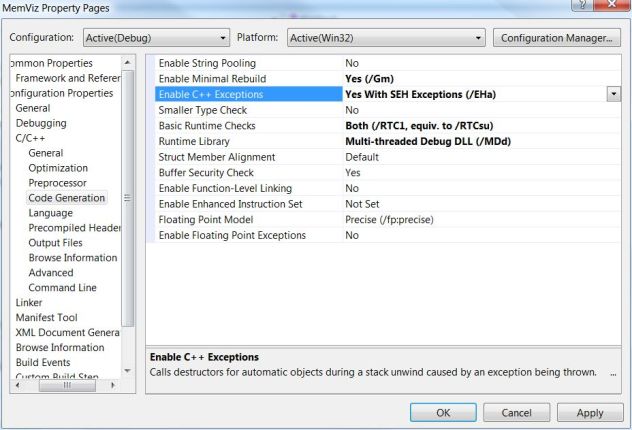
By default, in a project compiled with Visual C++, an access violation exception that happens inside a try\catch(…) block is not caught. The reason for this is that Visual C++ has two types of exception handling: Synchronous Exception Handling (/EHs) and Asynchronous Exception Handling (/EHa). The default Exception handling mechanism in Visual C++ 2005 (and later) is synchronous, which means it only handles exceptions thrown by a throw statement. Any hardware exceptions will not be caught by the synchronous model for performance reasons. To get the access violation exceptions caught, I had to change the exception handling model in my VS project to asynchronous. To do so, go to Project \ Properties \ Configuration Properties \ C/C++ \ Code Generation, and change “Enable C++ Exceptions” to “Yes With SEH Exceptions (/EHa)”.

The Visualization
With all those memory concepts finally sorted out, we can now get to visualizing it.
- A virtual memory address refers to one byte in memory. Thus, we should declare the address pointer as follows:
unsigned char *currentAddress;
- Start with an address inside our process. We can get the address of any primitive type or array declared (stack) or the address of anything initialized on the heap with malloc or new. I chose the address of the argc argument to the main method.
start_Address = (unsigned char *)&argc;
- Show the content of up to 24 addresses at a time.
for (currentAddress = top_entry; currentAddress < top_entry + 24; currentAddress++)
{
}
- In case an access violation happens while trying to access the contents of an address, show the ‘?’ value in all formats.
bool av = false;
try
{
currentValue = *currentAddress;
}
catch(...)
{
av = true;
}
if(av)
{
}
else
{
}
- An address is displayed in hexadecimal. Contents of an address (a byte) is displayed in decimal (value between 0 and 255), as ASCII character (GLUT capable of displaying letters, digits, and few symbols), in hexadecimal format and binary format.
- Based on the value of address content, a color is used. More details about color mapping below.
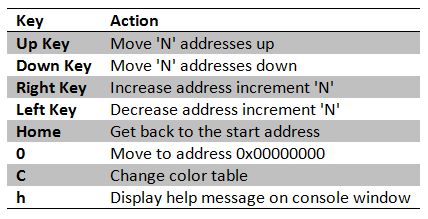
Usage

Color Mapping
The content of an address (a byte) can have a value ranging from 0 to 255 (in decimal format). We need to assign a color for each of those values ranging from black to white. The RGB system accepts 256 different values for each of the color components red, green and blue. With 256 values for each color components, the number of possible colors that can be generated is 256 ^ 3 (permutation with repetition). The challenge here is to meaningfully map 16,777,216 possible colors to 256 colors only.
Color Lookup Table (CLUT)
A color look-up table (CLUT) is a mechanism used to transform a range of input colors into another range of colors. In our case, we want to transform the 16,777,216 range to a 256 range. We will try to generate more than one color table and see where the visualization looks best.
Gray Scale
We will start with the simplest color table. A color looks gray if all the R, G, and B components are equal. When R = G = B = 0, the color is black. As we increase the value of the color components, the color will get lighter (dark gray) and lighter (gray) and lighter (light gray) until it becomes white with R = G = B = 255.

for(i = 0; i < 256; i++)
{
gray[i][0] = i;
gray[i][1] = i;
gray[i][2] = i;
}
RB
To keep things simple, let’s remove one variable out of the equation. So as if the green component doesn’t exist, think of a way to combine the red and blue components to give a feeling of moving from red to blue as we move from 0 to 255.
For color 0, use (255, 0, 0), for color 1, use (254, 0, 1), …, for color n use (255 – n, 0, n), … for color 255 use (0, 0, 255).

for(i = 0; i < 256; i++)
{
rb[i][0] = 255 - i;
rb[i][1] = 0;
rb[i][2] = i;
}
RGB
Let’s say that now we would like to put back the green color into the color scale. We can do so by splitting the scale in half. 0 to 127 will represent the move from red to green and 128 to 255 will represent the move from green to blue.
Color 0 is (255, 0, 0), Color 1 is (253, 2, 0), Color n (where n < 128) is (255 – 2n, 2n, 0). Color 128 is (0, 255, 0), Color 129 is (0, 253, 2) and color n (where n >= 128) is (0, 255 – 2n, 2n).

for(i = 0; i < 128; i++)
{
rgb[i][0] = 255 - 2 * i;
rgb[i][1] = 2 * i;
rgb[i][2] = 0;
}
for(; i < 256; i++)
{
rgb[i][0] = 0;
rgb[i][1] = 255 - 2 * i;
rgb[i][2] = 2 * i;
}
Rainbow
The conventional 7 colors of a rainbow are red, orange, yellow, green, blue and violet. See Roygbiv.

for(i = 0; i < 64; i++)
{
    roygbv[i][0] = 255;
    roygbv[i][1] = i * 4;
    roygbv[i][2] = 0;
}

for(; i < 128; i++)
{
    roygbv[i][0] = 255 - (i * 4);
    roygbv[i][1] = 255;
    roygbv[i][2] = 0;
}

for(; i < 192; i++)
{
    roygbv[i][0] = 0;
    roygbv[i][1] = 255 - (i * 4);
    roygbv[i][2] = i * 4;
}

for(; i < 256; i++)
{
    roygbv[i][0] = i * 4;
    roygbv[i][1] = 0;
    roygbv[i][2] = 255;
}
Hot
Hot is the transition from black to red to yellow to white.

for(i = 0; i < 85; i++)
{
    hot[i][0] = i * 3;
    hot[i][1] = 0;
    hot[i][2] = 0;
}

for(; i < 170; i++)
{
    hot[i][0] = 255;
    hot[i][1] = (i - 85) * 3;
    hot[i][2] = 0;
}

for(; i < 256; i++)
{
    hot[i][0] = 255;
    hot[i][1] = 255;
    hot[i][2] = (i - 170) * 3;
}
Cold
Cold is the transition from cyan to magenta.

for(i = 0; i < 256; i++)
{
    cold[i][0] = i;
    cold[i][1] = 255 - i;
    cold[i][2] = 255;
}
Random
Generate random numbers for the R, G, and B components.

for(i = 0; i < 256; i++)
{
    random[i][0] = rand() % 256;
    random[i][1] = rand() % 256;
    random[i][2] = rand() % 256;
}
Source Code
Download the source code of the memory visualizer from my GitHub page. If you have any issues compiling or running the app, check out this blog post for details about compiling and running an OpenGL app that uses the GLUT library. CodeProject
Filed under: OpenGL, Science Tagged: CLUT, colour scale, colour table, CPU Architecture, Gigabyte Tuning, Large Address Aware, Physical Memory, Private Address Space, sizeof, Virtual Memory, x64, x86 


 General
  News
News  Suggestion
  Question
  Bug
Bug  Answer
  Joke
Joke  Praise
  Rant
Rant  Admin
Admin 


