Visual Studio add ins are a very quick and easy way to extend the functionality of Visual Studio. They aren't as cool as their big brother, Visual Studio packages and you get a lot more control with packages but they do provide a quick and easy way to get your functionality out there. Creating an add in is simple using the wizard, just make a few selections and Visual Studio sets up the solution and adds an example button to the tools menu, you just fill in the blanks to execute your code.
I think that there are however a few important subtleties and concepts that are not made clear and that you should be aware of when creating an add in and want to provide a smooth and problem free user experience. Things like, UI not being created, UI not being updated or being created multiple times in the same menu. I came up against these things when creating the Compare to Branch extension for Team Foundation Server and wanted to share my experience here so that others don't have to go through the same head scratching I did. There is a fully worked example in the code that uses all the elements discussed here, hopefully this will provide a template so others can just focus on implementing functionality.
Contents
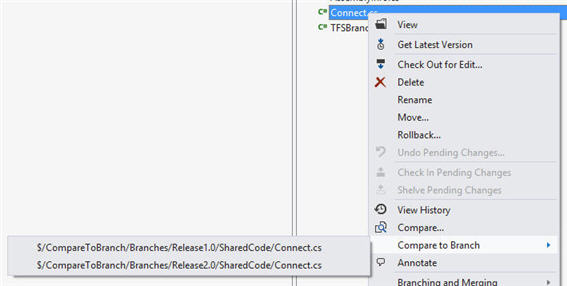
Compare to Branch is an add in I wrote for Visual Studio 2010/2012 and TFS 2010/2012 that lets you easily compare files and folders across branches in Visual Studio. Just right click on an item in the source control explorer and a list of branch related items appears in a popup allowing you to easily compare that item across branches. I wrote it to try and help me better visualise the differences between a growing number of released and supported versions of a project I am working on at the moment. The ability to compare across branches was always available to TFS users by using the compare dialog but the number of button clicks to do it was too much I thought. Compare to Branch reduces the process to just 2 mouse clicks.
Get it from the Visual Studio Gallery here.
The example code is written in VS 2010 but will work fine is VS2012 as well. I have included the project user files as they contain debug settings you will need (e.g. what version of devenv.exe to run on debug). If these don't match your system or you need to change them then you can in the project settings, debug tab.
Each add in project also contains a file named - ForTesting.addin. These xml files need to be copied to the add in directly of the version of Visual Studio you want to debug. e.g. %MYDOCUMENTS%\Visual Studio 2010\Addins. You also need to update the <Assembly> node in the addin files to point to the addin dll your project is building and the <Version> node to reference the correct version of Visual Studio you are targeting.
When starting a new instance of Visual Studio to debug your addin I find it is best to rename the extension of these files before starting Visual Studio. Then undo the rename and open the solution. This prevents Visual Studio taking out a lock on your debug dlls and preventing you from rebuilding them.
I have not tested this code against Visual Studio 2008 and lower.
Fire up Visual Studio and create a new project of type 'Visual Studio Add-in' (under the Other Project Types->Extensibility). Click through the wizard but be sure to set it to create an example button under the tools menu and load your add in on start up.

When Visual Studio starts up it examines the set of folders for .AddIn files. The contents of this file tells Visual Studio that there is an add in to load and what to do with this add in. The folder hierarchy VS uses can be seen in the options dialog.
The wizard created project puts an .AddIn file called 'MyAddin- For Testing.AddIn' in %VSMYDOCUMENTS%\Addins (%MYDOCUMENTS%\Visual Studio 2010\Addins on my PC) and this is the addin file that Visual Studio will parse when we try to debug our add in.
Hit F5 and note that the project is set to start another instance of Visual Studio on debugging. This instance starts up, reads the For Testing.AddIn file, loads our debug assembly and we see our new button created in the Tools menu.
Debugging the code we can see how the UI is created in the OnConnection method of the Connect class. We can update that code to tweak the UI as we wish and there are a few functions we need to implement ourselves. An Exec function that is called when the add in is invoked and a QueryStatus function that sets the UI status of our button. It seems that is all there is left to do but there are a few important things to understand first.
Lets look at the .AddIn xml file in a little more detail.
<Extensibility xmlns="http://schemas.microsoft.com/AutomationExtensibility">
    <HostApplication>
        <Name>Microsoft Visual Studio</Name>
        <Version>10.0</Version>
    </HostApplication>
    <Addin>
        <FriendlyName>FindInSolutionExplorer</FriendlyName>
        <Description>Easily find files in the solution explorer</Description>
        <Assembly>C:\Users\Ham\Documents\Visual Studio 2010\Projects\FindInSolutionExplorer\FindInSolutionExplorer\bin\FindInSolutionExplorer.dll</Assembly>
        <FullClassName>FindInSolutionExplorer.Connect</FullClassName>
        <LoadBehavior>5</LoadBehavior>
        <CommandPreload>1</CommandPreload>
        <CommandLineSafe>1</CommandLineSafe>
    </Addin>
</Extensibility>
Most of settings should be self explanatory. See this msdn article for more info. The file tells Visual Studio where to load our add in assembly from and the class name and namespace of our connect class. The important settings in my opinion are LoadBehaviour and CommandPreLoad.
LoadBehaviour specifies whether we want the add in to load when Visual Studio starts up. If it is set to 0 then the user will have to manually load the addin from the Add-in Manager dialog (available from the tools menu) before they want to use it.
CommandPreLoad greatly affects the behavior of how our UI is created. If it is set to 0 then the UI is created every time the add in loads and deleted every time the add in is unloaded or Visual Studio is shut down. In this sense the UI is temporary.
If it is set to 1 then Visual Studio creates and persists the UI the first time it encounters the .addin file and runs the OnConnection method. All subsequent starts of Visual Studio will not run the add in OnConnection method and recreate or update the UI. In this sense the UI is considered permanent. The idea behind this is to optimise the start up time of Visual Studio. If CommandPreLoad is true then LoadBehaviour becomes largely irrelevant, it can be used to control whether other add in dependant resources are loaded/created but not when the UI is created.
This distinction between permanent and temporary UI is very important and greatly affects how you code and manage your add in. Lets look at the two methods in more detail with a few examples.
The example solution contains a project demonstrating temporary UI. Note that CommandPreLoad = 0 in the .addin file. The most important bits of the code are
public void OnConnection(object application, ext_ConnectMode connectMode, object addInInst, ref Array custom)
{
applicationObject = (DTE2)application;
addInInstance = (AddIn)addInInst;
switch (connectMode)
{
case ext_ConnectMode.ext_cm_UISetup:
break;
case ext_ConnectMode.ext_cm_Startup:
AddTemporaryUI();
break;
case ext_ConnectMode.ext_cm_AfterStartup:
AddTemporaryUI();
break;
}
}
private void AddTemporaryUI()
{
object[] contextUIGuids = new object[] { };
Commands2 commands = (Commands2)applicationObject.Commands;
try
{
tempCommand = commands.Item(
string.Format("{0}.{1}", addInInstance.ProgID, MY_COMMAND_NAME), -1);
}
catch
{
}
if (tempCommand == null)
{
tempCommand = commands.AddNamedCommand2(
addInInstance,
MY_COMMAND_NAME,
MY_COMMAND_NAME,
MY_COMMAND_NAME,
true,
59,
ref contextUIGuids,
(int)(vsCommandStatus.vsCommandStatusSupported | vsCommandStatus.vsCommandStatusEnabled));
}
CommandBars cmdBars = (CommandBars)applicationObject.CommandBars;
if (tempCommand != null)
{
CommandBar codeWindowCommandBar = cmdBars["Code Window"];
if (codeWindowCommandBar != null)
{
tempCodeWindowCommandBarButton = (CommandBarButton)tempCommand.AddControl(
codeWindowCommandBar, codeWindowCommandBar.Controls.Count + 1);
tempCodeWindowCommandBarButton.Caption = "Example button in the code window menu";
}
CommandBar solutionExplorerItemCommandBar = cmdBars["Item"];
if (solutionExplorerItemCommandBar != null)
{
tempCommandBarPopup = (CommandBarPopup)solutionExplorerItemCommandBar.Controls.Add(
MsoControlType.msoControlPopup, System.Type.Missing, System.Type.Missing,
solutionExplorerItemCommandBar.Controls.Count + 1, true);
tempCommandBarPopup.Caption = "Example Popup";
tempSECommandBarButton1 = (CommandBarButton)tempCommand.AddControl(
tempCommandBarPopup.CommandBar, tempCommandBarPopup.Controls.Count + 1);
tempSECommandBarButton1.Caption = "Example button 1 in the solution explorer item menu";
tempSECommandBarButton2 = (CommandBarButton)tempCommand.AddControl(
tempCommandBarPopup.CommandBar, tempCommandBarPopup.Controls.Count + 1);
tempSECommandBarButton2.Caption = "Example button 2 in the solution explorer item menu";
}
}
}
public void OnDisconnection(ext_DisconnectMode disconnectMode, ref Array custom)
{
switch (disconnectMode)
{
case ext_DisconnectMode.ext_dm_HostShutdown:
case ext_DisconnectMode.ext_dm_UserClosed:
if ((tempSECommandBarButton1 != null))
{
tempSECommandBarButton1.Delete(true);
}
if ((tempSECommandBarButton2 != null))
{
tempSECommandBarButton2.Delete(true);
}
if ((tempCodeWindowCommandBarButton != null))
{
tempCodeWindowCommandBarButton.Delete(true);
}
if (tempCommandBarPopup != null)
{
tempCommandBarPopup.Delete();
}
if (tempCommand != null)
{
tempCommand.Delete();
}
break;
}
} The most important things to note here are
- The
OnConnection method will only ever recieve a value of ext_cm_Startup or ext_cm_AfterStartup depending on whether the add in was loaded manually by the user via the addin manager dialog or automatically on startup. The ext_cm_UISetup case will never happen, that is only relevant for permanent UI ( CommandPreLoad = 1) - Have a look at AddTemporaryUI to see how to add UI elements to different parts of Visual Studio.
- The OnDisconnection method explicitly deletes all the controls and commands we created.
It is possible to see the temporary nature of the UI. If you hit F5 and start the project the add in will load and the UI will be created. If you then manually unload the add in via the add in manager dialog, OnDisconnection is called and the UI gets deleted and disappears from Visual Studio. Reload the addin and AddTemporaryUI is called and the UI recreated. If you fail properly dispose of the the controls and commands in OnDisconnection then when you next load the addin using the add in manager you will see multiple instances of UI being created, very unwelcome.
If you go down the route of permanent UI then your .addin file will look something like this
<LoadBehavior>1</LoadBehavior>
<CommandPreload>1</CommandPreload>
If you debug the PermanentUI example project, you will see OnConnection gets called with connectMode equal to ext_cm_UISetup. Here we setup our permanent UI, a button on the tools menu and a new button on the standard Visual Studio toolbar. Note, we don't dispose of anything in OnDisconnection. The idea here is the commands and UI are created once during connection and that is it. The next time Visual Studio loads it reads the commands and associated UI from a store and saves the initialisation cost of creating them. The code is much more simple than the temporary case.
public void OnConnection(object application, ext_ConnectMode connectMode, object addInInst, ref Array custom)
{
applicationObject = (DTE2)application;
addInInstance = (AddIn)addInInst;
MessageBox.Show(string.Format("OnConnection with connectMode: {0}", connectMode));
switch (connectMode)
{
case ext_ConnectMode.ext_cm_UISetup:
AddPermanentUI();
break;
case ext_ConnectMode.ext_cm_Startup:
break;
case ext_ConnectMode.ext_cm_AfterStartup:
break;
}
}
private void AddPermanentUI()
{
object[] contextUIGuids = new object[] { };
Commands2 commands = (Commands2)applicationObject.Commands;
try
{
permCommand = commands.Item(
string.Format("{0}.{1}", addInInstance.ProgID, MY_COMMAND_NAME), -1);
MessageBox.Show("Permanent UI Example: Command already exists");
}
catch
{
}
if (permCommand == null)
{
MessageBox.Show("Permanent UI Example: Creating command");
permCommand = commands.AddNamedCommand2(
addInInstance,
MY_COMMAND_NAME,
MY_COMMAND_NAME,
MY_COMMAND_NAME,
true,
59,
ref contextUIGuids,
(int)(vsCommandStatus.vsCommandStatusSupported | vsCommandStatus.vsCommandStatusEnabled));
}
CommandBars cmdBars = (CommandBars)applicationObject.CommandBars;
if (permCommand != null)
{
MessageBox.Show("Permanent UI Example: Creating UI");
CommandBar menuBarCommandBar = ((CommandBars)applicationObject.CommandBars)["MenuBar"];
CommandBarControl toolsControl = menuBarCommandBar.Controls["Tools"];
CommandBarPopup toolsPopup = (CommandBarPopup)toolsControl;
CommandBarButton toolsMenuCommandBarButton = (CommandBarButton)permCommand.AddControl(
toolsPopup.CommandBar, 1);
toolsMenuCommandBarButton.Caption = "Example button on the tools menu";
CommandBar standardCommandBar = cmdBars["Standard"];
CommandBarButton standardCommandBarButton = (CommandBarButton)permCommand.AddControl(
standardCommandBar, standardCommandBar.Controls.Count + 1);
standardCommandBarButton.Style = MsoButtonStyle.msoButtonIcon;
}
}But i'm sure you thinking, 'every time I debug my project I can see OnConnection being called with a value ext_cm_UISetup and my UI getting created. This is because the default debugger settings are to start devenv with the command line /resetaddin PermanentUI.Connect. The /resetaddin switch destroys all data persisted for this addin and forces it to be recreated during OnConnection. Try starting Visual Studio normally or removing this command from the debugger settings. There are message box popups telling you what is happening so you can see when and how the commands and UI are getting created. You will see how AddPermanentUI is not called if Visual Studio is started normally.
This leads to an interesting point. How do you update the UI in your addin. If you released a new version how could you be sure running it was going to update the UI as you wish. The solution is to reset your addin before you install the new version and the easiest way to do that is by calling
devenv.exe /ResetAddIn Namespace.Connect /Command File.Exit
from your installer. I would also recommend that the install process starts and closes an instance of Visual Studio at the end of the install process to force-ably create and persist the UI. This will reduce the instance of errors around setting up your add in for the first time.
My preference is for temporary UI. It is much more intuitive from a development point of view. If you need to use permanent UI for performance reasons I recommend you test all scenarios around upgrading etc thoroughly. There are further little gotchas surrounding the use of permanent UI if you create command bars and I would point you in the direction of mztools, a great resource for these types of issues.
You can see from the example so far that the way add ins guide you to add UI and functionality to Visual Studio is by creating commands and then from those commands generating one or more controls. The controls are then tied to the commands and Visual Studio handles all the plumbing from that point on.
We can , if needed, bypass this command system and directly create the controls ourselves. This might be useful where the command based Exec and QueryStatus system doesn't fit your needs and you need an extra level of control e.g. perhaps you need to dynamically generate UI. The code would look something like this
CommandBarButton newControl = (CommandBarButton)codeWindowCommandBar.Controls.Add(
MsoControlType.msoControlButton, Type.Missing, Type.Missing, 1, Type.Missing);
newControl.Caption = "button created with no command";
newControl.Click += new _CommandBarButtonEvents_ClickEventHandler(newControl_Click);
void newControl_Click(CommandBarButton Ctrl, ref bool CancelDefault)
{
} Be sure to clean up any controls you create in the OnDisconnection method if using the TemporaryUI approach. Actually this approach will fail using the Permanent UI model. This is because only controls linked to commands get persisted so these controls you create manually will be lost the next time Visual Studio runs. Another reason to stick with Temporary UI.
There are two ways to configure the icon used in your GUI. You can pick an icon from the Microsoft Office System and specify the integer of this icon in AddNamedCommand2. Note the number 59, this corresponds to the smiley face icon. For information about how to find the ID numbers for standard icons, see Listing Button Faces in the Command Bar for the Microsoft Office System on the MSDN Web site.
commands.AddNamedCommand2(
        addInInstance,
     MY_COMMAND_NAME,
     MY_COMMAND_NAME,
     MY_COMMAND_NAME,
     true,
     59,
     ref contextUIGuids,
     (int)(vsCommandStatus.vsCommandStatusSupported | vsCommandStatus.vsCommandStatusEnabled));
Or using the same method, you can pass in an object of type Bitmap from your assembly resources. There is an example of this in the fully worked example below.
commands.AddNamedCommand2(
      addInInstance,
      MY_COMMAND_NAME,
      MY_COMMAND_NAME,
      MY_COMMAND_NAME,
      false,
      Resources.MyBitmap,
      ref contextUIGuids,
      (int)(vsCommandStatus.vsCommandStatusSupported | vsCommandStatus.vsCommandStatusEnabled));
Logging is going to be essential if you are going to diagnose problems with your add in on a users computer. To this end I wrote the AddInLogger class, which gives the ability to log messages and errors to the event log or alternatively (if you are debugging say), to the output window in Visual Studio.
Example usage is as follows.
public void OnConnection(object application, ext_ConnectMode connectMode, object addInInst, ref Array custom)
{
applicationObject = (DTE)application;
addInInstance = (AddIn)addInInst;
bool logtoOutputWindow = System.Diagnostics.Debugger.IsAttached;
logger = new AddInLogger(applicationObject, "MyAddIn", logtoOutputWindow);
logger.LogMessage(string.Format("OnConnection() called with connectMode: '{0}'", connectMode));
try
{
}
catch (Exception ex)
{
logger.LogError(ex.ToString());
}
}Here we create an instance of the logger class. If we are debugging, all logs are written to a new pane named "MyAddIn" in the output window. Otherwise are logs are written to the event log under an event source named "MyAddIn".
Note: If you are logging to the event log then you have to make sure an event source of name "MyAddIn" exists. You can't rely on your application code creating this if it doesn't exist as it is likely it won't have the permissions to do so. You can create the event source manually using powershell but best practice is to create it in your installer (as we will see next)
New-EventLog -LogName Application -Source MyAddin
The AddInLogger code looks like this and should be self explanatory
internal class AddInLogger
{
private string eventSource = string.Empty;
private OutputWindowPane outputWindowPane = null;
private bool logtoOutputWindow = true;
internal AddInLogger(DTE _applicationObject, string _eventSource, bool _logtoOutputWindow)
{
try
{
logtoOutputWindow = _logtoOutputWindow;
eventSource = _eventSource;
if (logtoOutputWindow)
{
Window window = _applicationObject.Windows.Item(Constants.vsWindowKindOutput);
OutputWindow outputWindow = (OutputWindow)window.Object;
outputWindowPane = null;
for (int i = 1; i <= outputWindow.OutputWindowPanes.Count; ++i)
{
if (outputWindow.OutputWindowPanes.Item(i).Name.Equals(eventSource,
StringComparison.CurrentCultureIgnoreCase))
{
outputWindowPane = outputWindow.OutputWindowPanes.Item(i);
break;
}
}
if (outputWindowPane == null)
outputWindowPane = outputWindow.OutputWindowPanes.Add(eventSource);
}
}
catch
{
}
}
internal void LogMessage(string message)
{
try
{
if (logtoOutputWindow)
{
outputWindowPane.OutputString(string.Format("{0}\n", message));
}
else
{
EventLog.WriteEntry(eventSource, message);
}
}
catch
{
}
}
internal void LogError(string message)
{
try
{
if (logtoOutputWindow)
{
outputWindowPane.OutputString(string.Format("Error: {0}\n", message));
}
else
{
EventLog.WriteEntry(eventSource, message, EventLogEntryType.Error);
}
}
catch
{
}
}
} The old setup and deployment projects are gone from Visual Studio 2012 and onwards so nowadays we are forced to use WIX. It sometimes feels like black magic finding the right markup to do what you want but it does start to make sense after a while (download the latest version of WIX from the homepage)
The markup below creates a very simple installer for our add in and can be used as a template for your add in installers if you wish. The steps are
- Check the versions of Visual Studio you are supporting are present
- Create the event log source for your logging
- Deploy the add in dll(s) and addin file to the addin directory of a particluar version of Visual Studio
- Use XmlUtil to update the Visual Studio version number in the addin file
I won't go into too much detail about the WIX markup, it should be quite self explanatory. Be sure to replace all GUIDS with your own or you might run into some problems. The installer also supports automatic upgrades. When you want to release a new version just update the product version number and create a new product GUID.
If you copy and paste then please be sure to re generate all the GUIDS or you might find yourself in trouble.
="1.0"="UTF-8"
<Wix xmlns="http://schemas.microsoft.com/wix/2006/wi">
<Product Id="NEW-GUID-HERE"
Version="1.0.0.0"
Name="My Add In"
Language="1033"
Manufacturer="Company Name"
UpgradeCode="NEW-GUID-HERE">
<Package InstallerVersion="200" Compressed="yes" InstallScope="perMachine" />
<Media Id="1" Cabinet="media1.cab" EmbedCab="yes" />
<UI Id="UserInterface">
</UI>
<UIRef Id="WixUI_Minimal" />
<MajorUpgrade Schedule="afterInstallInitialize" AllowDowngrades="yes"/>
<Property Id="VS2010INSTALLATIONFOLDER" Secure="yes">
<RegistrySearch Id="VS2010InstallationFolderRegistrySearchId" Type="raw"
Root="HKLM" Key="SOFTWARE\Microsoft\VisualStudio\10.0"
Name="InstallDir">
</RegistrySearch>
</Property>
<Property Id="VS2012INSTALLATIONFOLDER" Secure="yes">
<RegistrySearch Id="VS2012InstallationFolderRegistrySearchId" Type="raw"
Root="HKLM" Key="SOFTWARE\Microsoft\VisualStudio\11.0"
Name="InstallDir">
</RegistrySearch>
</Property>
<Condition Message="This add-in requires Visual Studio 2010 or 2012 to be already installed">
VS2012INSTALLATIONFOLDER OR VS2010INSTALLATIONFOLDER
</Condition>
<Directory Id="TARGETDIR" Name="SourceDir">
<Component Id="EventLog" Guid="NEW-GUID-HERE">
<Util:EventSource xmlns:Util="http://schemas.microsoft.com/wix/UtilExtension"
Log="Application" Name="MyAddIn"
EventMessageFile="[NETFRAMEWORK20INSTALLROOTDIR]EventLogMessages.dll"/>
</Component>
<Directory Id="CommonAppDataFolder">
<Directory Id="MicrosoftDirId" Name="Microsoft">
<Directory Id="VisualStudioDirId" Name="VisualStudio">
<Directory Id="Dir100Id" Name="10.0">
<Directory Id="Dir100AddInsId" Name="AddIns">
<Component Id="MyAddIn2010Resources" Guid="NEW-GUID-HERE">
<File Id="MyAddInDll2010" Name="MyAddIn.dll" Vital="yes"
Source="..\MyAddIn\bin\MyAddIn.dll"/>
<File Id="MyAddInAddIn2010" Name="MyAddIn.Addin" Vital="yes"
Source="..\MyAddIn\MyAddIn.Addin"/>
<Util:XmlFile xmlns:Util="http://schemas.microsoft.com/wix/UtilExtension"
Id="VS2010SetVersion" Action="setValue" File="[#MyAddInAddIn2010]"
ElementPath="/Extensibility/HostApplication/Version"
Value="10.0" Sequence="1" />
</Component>
</Directory>
</Directory>
<Directory Id="Dir110Id" Name="11.0">
<Directory Id="Dir110AddInsId" Name="AddIns">
<Component Id="MyAddIn2012Resources" Guid="NEW-GUID-HERE">
<File Id="MyAddInDll2012" Name="MyAddIn.dll" Vital="yes"
Source="..\bin\MyAddIn.dll"/>
<File Id="MyAddInAddIn2012" Name="MyAddIn.Addin" Vital="yes"
Source="..\MyAddIn.Addin"/>
<Util:XmlFile xmlns:Util="http://schemas.microsoft.com/wix/UtilExtension"
Id="VS2012SetVersion" Action="setValue" File="[#MyAddInAddIn2012]"
ElementPath="/Extensibility/HostApplication/Version"
Value="11.0" Sequence="1" />
</Component>
</Directory>
</Directory>
</Directory>
</Directory>
</Directory>
</Directory>
<Feature Id="ProductFeature" Title="My Add In" Level="1" >
<ComponentRef Id="EventLog"/>
<Feature Id="VS2010" Title="Visual Studio 2010"
Description="Installs the add-in for Visual Studio 2010" Level="1" AllowAdvertise="no">
<Condition Level="0">NOT VS2010INSTALLATIONFOLDER</Condition>
<ComponentRef Id="MyAddIn2010Resources"/>
</Feature>
<Feature Id="VS2012" Title="Visual Studio 2012"
Description="Installs the add-in for Visual Studio 2012" Level="1" AllowAdvertise="no">
<Condition Level="0">NOT VS2012INSTALLATIONFOLDER</Condition>
<ComponentRef Id="MyAddIn2012Resources"/>
</Feature>
</Feature>
</Product>
</Wix>The example code contains a full example that implements all the ideas above. It adds a 'Find In Solution Button' to the code window context menu. When clicked the file is located and selected in the solution explorer. Its a quick and easy way to locate where files are in the solution explorer. I'm sure I use to have this functionality from another extension in an old dev environment but I can't remember what extension provided it so I decided to write my own. You just right click in a file and click the button, the file should then selected and shown in the solution explorer.
I hope example can be used as a template to quickly create other addins. You need to just
- Update
OnConnection to create the UI you require - Update the
Exec and QueryStatus methods for your functionality - Update the installer to suit your needs
You can find the code to search the solution explorer in the example project. It's actually a tricky little problem, much more difficult than it should be. The code is not 100% production ready but serves it purpose here and works *most* of the time.
Before you dive into developing add ins you need to ask yourself whether add ins are the right framwork to develop your Visual Studio extension. The other option is Visual Sudio Packages. Visual Studio Packages are the big brother to Add Ins. They give you much much greater control over Visual Studio than add ins can but this is at the cost of complexity. There is also provide much better support of Packages in the Visual Studio Gallery and via nuget.
I think if I had the choice again I would write Compare To Branch, as a package. It got quite complicated to control the UI the way I wanted to (because it is dynamic) and packages would let me better optimise the way it works.
I still think add ins have their place. If you need to something quick and simple then add ins are the way to go. All you need is a dll and an xml file copied to right location on your computer and you are off.


 General
  News
News  Suggestion
  Question
  Bug
Bug  Answer
  Joke
Joke  Praise
  Rant
Rant  Admin
Admin 


