In this part:
- History
- What is the use of Web API, if there is, for instance, WCF
- REST Concepts and RMM Model
- The first application example of ASP.NET MVC + Web API + jQuery + AJAX
- Using OData in Web API
So, to understand the use of this all, we need to make the subject and
its purpose clear. But let’s begin with some history to clarify (from my point
of view) the need for Web API introduction.
History
Without falling too far into past details,
it would be best to mention that Microsoft had a long way of developing service-oriented systems
that has the main pillars: ASMX, .NET Remoting, WCF. Using web services based on ASMX (approx. in 2002), developers could
quiet easily create a web service that implemented various versions of SOAP, but it was accessible only over HTTP. At the same time, there was Remoting technology that enabled service developing
not only using HTTP. In 2006 Microsoft released .NET 3.0 and Windows Communication Foundation (WCF) that covered both ASMX and .NET Remoting offerings, and
suggested even more interesting opportunities. For example, it’s easy to develop
a web service for TCP with the
help of WCF, with token-based
authentication, and run it in “with-Windows-own-hand” developed service. I personally
got acquainted with WCF in 2009, when
I developed program infrastructure for collecting logs for a couple dozens of
machines – there were WCF-service
running at headnode machine, and the rest machines performed Powershell script once per N minutes that called WCF-service and sent it the data. I
would not claim that it’s easy to perform for the first time, but I appreciated
the elegancy of the approach.
In 2007 ASP.NET MVC framework was released in CTP version. Even then the idea was hovering in
the air: the Internet is used quite easily – the process of web-page
information exchange mostly uses text messages instead of binary data, HTTP is used, client part for various tasks
handling. That lead to the idea of developing something that would have serialization
backup only in XML and JSON. What for would I use, in particular,
that was a partially heavy WCF that eventually did not utilize REST from the beginning, if I wanted
to create the simplest RESTful service? So
here came ASP.NET MVC with its built-in routing
mechanism.
MVC Routing
As opposed to WCF, where service
is equal to physical file path, MVC Routing mechanisms work differently: it associates an address with the
address of a controller’s method. E.g., if we used WCF, then call
to the service would be:
http://server/MyService.svc
And if we used ASP.NET MVC:
http://server/MyService/Get/123 As you can see, such addressing enables you to encapsulate internal
behaviour. MVC routing also enables you to transfer a request from the address mentioned above to arbitrary controller methods . This all brings to a much easier
further application support: we can alter internal behaviour in the way that is
convenient, e.g., quickly change an old implementation for a new one just having
touched up the routing configuration. With the help of such routing mechanism, Web API creation (actually, additional layer on ASP.NET) enabled developing HTTP REST-services that work for the same
project with ASP.NET MVC, and can be entirely integrated
into MVC pipeline (into the logical one, not into implementation). But before you
start to write REST-service with
Web API, we need to clarify what is meant
by REST-service –
coming further.
A bit about RET
Some say that to make links nice means to make 100% REST compliant API. Indeed, it’s
not true, and REST (was mentioned for the first time
in a dissertation of one of the one intelligent fellow), is not as simple as it
seems to be. Construction rules for REST-services refer to some limits that also define the architecture,
so, you would have to take that into consideration, and either agree or
disagree with it.
To understand the core of REST, we will use RMM (REST Maturity Model) that was introduced by Leonardo
Richardson in 2008. Those who are familiar with CMMI (Capability Maturity Model Integration) will immediately notice word
similarity – and it’s not by accident. Like CMMI, this model describes several
levels of compliance with some set of rules and methodology. RMM implies 4 levels – from 0 to 3. In this model, everything
starts with the simplest things at Level 0, where API corresponds to RPC style, and everything ends with a
conformity to all the basic paradigms - REST. Surely, if you use this system
to describe your own model and get stuck at some level that is lower than 3 – your
service is not REST. Let’s look at
a not-very-artistic RMM picture, and then study an example of guestbook
service in accordance with RMM.

Level 0
According to Level 0, we would just have a WCF-service GuestService that had one method CreatePost() that would receive such arguments
as record’s heading, user’s name and e-mail. The method would return the
record’s number. For the administrator there would be some more methods – DeletePost() and UpdatePost(). Each of them would receive
some message and return some answer. And, of course, GetAllPosts(). A simple system.
So, our service at Level 0 RMM would look like that:
| Method
| URL
| HTTP verb
| Visibility
|
| CreatePost
| /api/GuestService.svc
| POST
| e.g., WSDL
|
| DeletePost
| /api/GuestService.svc
| POST
| e.g., WSDL
|
| UpdatePost
| /api/GuestService.svc
| POST
| e.g., WSDL
|
| GetAllPosts
| /api/GuestService.svc
| POST
| e.g., WSDL
|
According to the table, we would have some API with all the operations having
their own links (URLs). Yet, links
look entirely inexplicit and unrelated to the semantic context: whether we delete
a record #1 or update a record #100 – URL would remain the same. Such system
corresponds to Level 0 of RMM and to its main characterictic: one URL = one HTTP verb. HTTP verbs give the same results: POST for everything, moreover, you would have to write
your own methods. One of RESTful HTTP’s rules is no need for new methods creation:
just conform to the list that includes all the necessary HTTP verbs. We will talk about them a bit
later.
Surely, it is worth to take into account that the client (in this situation
with the service) has to know how to call needed operation, that is, are there
any logical connections such as contracts (here we go with WSDL). But do we actually need extra logical
connections? Even REST requires us to know only the base
URL, and all other operations should be accessible at so-called hypermedia
elements (links, forms, etc). The server should control the whole process and dictate
the appearance of links and forms without sharing this information with a
client, so that it can react properly if any changes occur in the system. These
are all HATEOAS
principles, coming up later.
So, let’s move to Level 1.
Level 1
So, we decided to make our service a REST one. What steps should we take? First,
our service should conform to Level 1, that is, a REST-service should be resource-oriented: using not request-response pattern and methods
like in RPC, but
resources accessible via HTTP vverbs – and that’s it. GET, DELETE, POST, sometimes PUT, and HEAD from time to time. This principle
is fundamental for REST-services: if
your service offers a bunch of various methods, it would not be a REST one (according to RMM).
Thereby, following Level 1 rule “Arbitrary URL = one HTTP verb”, let’s create a new table
for API.
| Method
| URL
| HTTP verb
| Visibility
|
| CreatePost
| /api/posts
| POST
| e.g., WSDL
|
| DeletePost
| /api/posts/1
| POST
| e.g., WSDL
|
| UpdatePost
| /api/posts/1
| POST
| e.g., WSDL
|
| GetAllPosts
| /api/posts
| POST
| e.g., WSDL
|
But here we have a RESTful-ness problem: a client still does not comprehend how the
links differ without service contract: /api/posts and /api/posts
and, for instance, WSDL. A client should have a contract. Level of cohesion remains
the same, and apart from this, one HTTP verb is still observed. At least our service reached Level
1 of RMM. Let’s try
to move on to Level 2.
Level 2
Level 2 rule is “Arbitrary URL = Arbitrary HTTP verbs”. This is when we have to
reconsider our service as resource-oriented. What’s coming from a client? How to
process it? Where to send it?
As a matter of fact, such HTTP verbs as CreatePost and GetAllPosts do not exist. But there are POST, GET, PUT, and DELETE so we can utilize them and move on
to Level 2. Note that HTTP verbs have
some features, e.g., PUT and DELETE are idempotent. That is, whenever
we call on them, they would return the same result as HTTP-answer: e.g., regardless of when
we call for PUT, it would
change the same entity. POST is not idempotent for a known
reason: a new entity is created. GET is not idempotent, but it’s safe – there are no changes in the system and it must be that way whenever we call on GET. It’s really important, I saw a system
in which GET-method showed on the server side logical changes
in entities states in the data source – and that’s not right.
So let’s look at our service at Level 2.
| Method
| URL
| HTTP verb
| Visibility
|
| CreatePost
| /api/posts
| POST
| e.g., WSDL
|
| DeletePost
| /api/posts/1
| DELETE
| e.g., WSDL
|
| UpdatePost
| /api/posts/1
| PUT
| e.g., WSDL
|
| GetPost
| /api/posts
| GET
| e.g., WSDL
|
Looks much better. Now we have a service corresponding to HTTP verbs and various URL (mostly). But we remain cohesive to
a client. To resolve this we move on to Level 3.
Level 3
Level 3 is HATEOAS. The message
in this abbreviation is for a client to know nothing but the initial site
address. The remaining information will be given to a client with the help of
links, buttons, other semantic elements. A client should get an access to the resources
and their state without any primary knowledge how to do it.
So, an API
corresponding to Level 3 is provided
in the table. Note, that even if a service corresponds to all RMM features, there may be some nuances
crashing everything down.
| Method
| URL
| HTTP verbs
| Visibility
|
| CreatePost
| /api/posts
| POST
| HTTP POST
|
| DeletePost
| /api/posts/1
| DELETE
| HTTP DELETE
|
| UpdatePost
| /api/posts/1
| PUT
| HTTP PUT
|
| GetPost
| /api/posts
| GET
| HTTP GET
|
The last words about
REST
And a few last words about REST: it’s important to remember about standard HTTP error codes so that your service would conform to REST. A service should return known error
codes. Such terms are not to be necessarily followed, but their creation and usage
was approved by the smartest people, and would help those who support the service
understand that the author of the code was not inadequate while creating the
service.
| Code status
| Meaning
|
| 200
| ОК.
|
| 201
| Entity was created so response could include a link to a newly created
entity
|
| 202
| The same as 200, but it is used with async operations.
|
| 301
| Resource was moved. Response could include link to a new resource.
|
| 400
| Bad request (client-side).
|
| 401
| Unauthorized.
|
| 403
| Access is forbidden – client was authenticated but not authorized.
|
| 404
| Resource was not found or client don’t have an access to it and should not know why.
|
| 409
| Server error.
|
| 500
| Server error.
|
Web API
Recall that Web API appeared in ASP.NET MVC 4 and provoked lots of
discussions: another technology helping to create a web-site, and again REST – what for? That’s a good
question – when there are various technologies like WCF among many other. But these are all “global” things,
and when it comes to some big app implementation, you would have to drag a bit
of not-so-surely-useful tools “just-in-case” they help. Web API is the tool which enables in an
easy, quick, and nice implementation of RESTful-service using HTTP.
Let’s create ASP.NET MVC 4 application and choose a
corresponding Web API template.
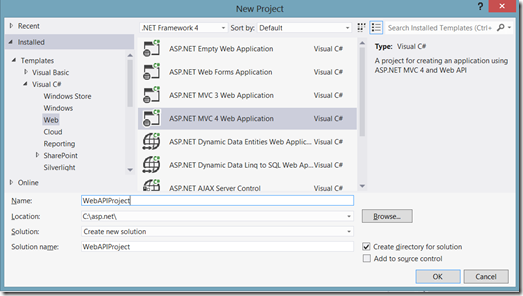
After a project creation, you will see a MVC-application. The first entry
point would be a specialized WebAPI ValuesController that is by-turn inherited not from Controller, but from ApiController.
Just like in any controller, scaffolding creates a code: in case of Web API-controller it’s stubs for the HTTP verbs methods: GET, POST, PUT, and DELETE.
| HTTP Verb
| Controller method
| Description
|
| Get()
| GET
| Method returns an array of data of any Ienumerable-related type.
|
| Get(string)
| GET
| Method returns one entity based on method argument.
|
| Post(string)
| POST
| Method adds a new entity.
|
| Put(string,string)
| PUT
| Method updates existed entity. Difference between Put and Post is that
Post always creating a new entity.
|
| Delete(string)
| DELETE
| Method deletes an entity from a system.
|
Let’s add a context to a test database. In this article series, I will use
a test database that I always use when I teach courses at http://atraining.ru. It consists
of two very simple not related to each other tables: CourseSet and Student.
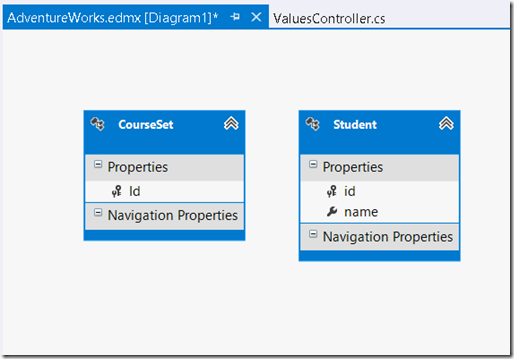
Let’s make some changes in WebAPI controller and correspondingly define its methods. As the code is simple
enough, I provide no comments to it.
using System;
using System.Collections.Generic;
using System.Linq;
using System.Net;
using System.Net.Http;
using System.Net.Http.Formatting;
using System.Net.Http.Headers;
using System.Web.Http;
using WebApiJsonAjax.Models;
namespace WebApiJsonAjax.Controllers
{
public class ValuesController : ApiController
{
private atrainingdatabaseEntities
_ctx = new atrainingdatabaseEntities();
public List<Models.Student>
Get()
{
var students = from e in _ctx.Student select e;
return students.ToList();
}
public string Get(int id)
{
return
"value" + id;
}
public Student Post(Student student)
{
return
student;
}
public void Put(int id,
[FromBody]string value)
{
}
public void Delete(int id)
{
var student
= _ctx.Student.Where(s => s.id == id).FirstOrDefault();
_ctx.Student.Remove(student);
_ctx.SaveChanges();
}
}
}
We save the controller and test it: push F5 and follow http://localhost:[port]/api/values. Note that
when someone invokes this link using GET verb, he would get a when someone invokes this link using GET verb, he would get a JSON result. WebAPI can process and return values in JSON and XML: it depends on a client’s configuration. Let’s look at
what what Chrome and IE return in this case (screenshots
are placed correspondingly) to look at another are placed correspondingly) to look at another Web API feature - Content Negotiation.


The whole serialization process of Student-type objects in JSON is performed by a framework (which
is really convenient), in comparison
to ASP.NET MVC: if we want to return JSON
from a
controller, we have to
use return Json explicitly. Let’s discuss why the results returned
by the service in the two browsers are of different formats.
Content Negotiation
Content Negotiation in HTTP standards is a process of communication
details negotiation between a client and a server. When a client calls a server,
he sends a query with Accept directive pointing out what answer is
expected. Let’s perform GET, but with a help
of “curl” utility to trace the process. Fiddler screenshots are provided. Moreover, we’ll
have a look at queries of Chrome and IE with a help
of in-browser integrated applications.
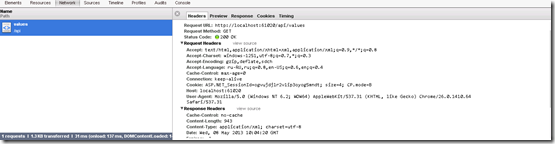
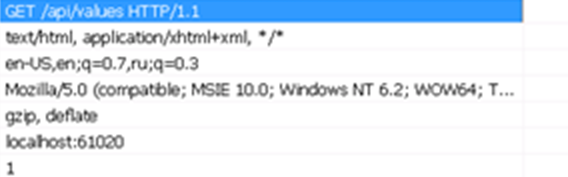
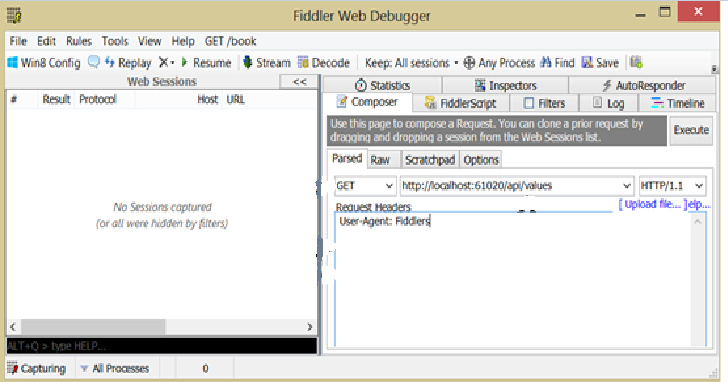
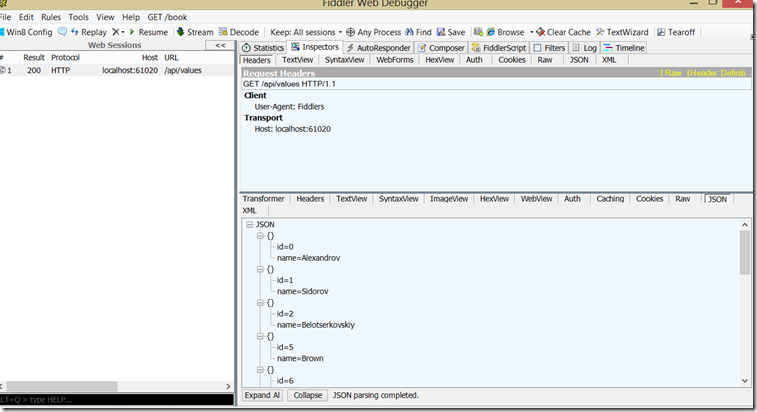
Fiddler interface
working in parallel to curl.
Accept value is what
a client wants to receive from a server. As we see from the screenshots, Chrome wants to “see” text/html,application/xhtml+xml,application/xml;q=0.9,*/*;q=0.8 (q is a format “weight”: the bigger
the weight, the more wish there is from a client to see the result in a certain
format, and tells it to a server). Yet, IE wants to see text/html, application/xhtml+xml, */*. Note that Web API don’t recognize what IE wants to see, and sends the default result to JSON that doesn’t have any support of application/xhtml+xml, but there is */* support, that
is “I will receive a content in any type that will be returned by a server”. Chrome receives what it wants in the
desirable XML format.
Let’s have a look at the way curl and Fiddler do this.
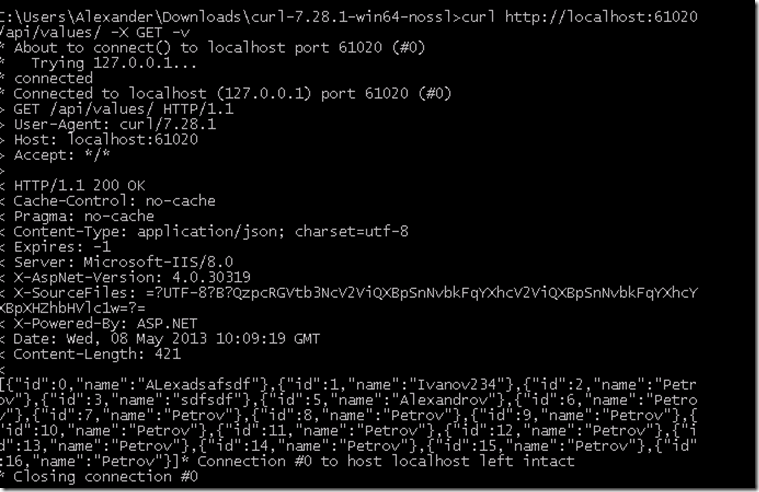
JSON answer for a client doesn’t care about the
result format.
Let’s point out what we would like to see explicitly.
As splendid as it is: the result format depends on a client’s demands.
It is this process that is called Content Negotiation, and it is a
very important client-server communication process. Note how easy and elegant
the format resolution was. Indication of the result format brings us to a more
complicated code provided below.
 public
HttpResponseMessage Get()
{

var students = (from e in _ctx.Student select e);

var resp = new HttpResponseMessage(HttpStatusCode.OK);
    resp.Content = new
ObjectContent<IEnumerable<Student>>(students, new
JsonMediaTypeFormatter());

resp.Headers.ConnectionClose = true;
    resp.Headers.CacheControl = new CacheControlHeaderValue();
    resp.Headers.CacheControl.Public = true;

return resp;
}
If you want to return the result in the format that is independent from a
client’s preferences, you have to get an access to a message that would be
formed for the result, and define its properties with a help of a special
mechanism – Formatter. It goes
without saying that you can create your own converters with a more perplexed
logical structure.
So, in the code provided above:
- We receive Student collection
- An instance of HttpResponseMessage class with a 201 OK status is created. This message
will be returned to the client.
- The message includes our data model that is converted into JSON format.
- The message is returned to a client.
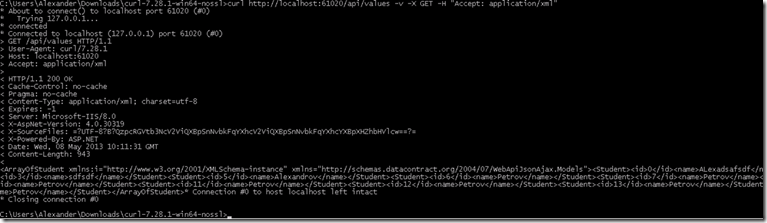
Let’s repeat our query in curl, telling that we want to see only application/xml.

Despite Accept: application/xml, the result was returned in JSON format.
Content Negotiation in Web API in its beauty. We move on.
Using Web API from MVC view with jQuery
So, our REST-service is
almost complete. Web API quite naturally does not support any
view generation mechanism. Let’s connect our service with MVC view.
We will use Web API from Index view from HomeController. jQuery will take the data from a
service and we will create a new table.
The whole page code is provided.
 <header>
    <div class="content-wrapper">
        <div
class="float-left">
            <p
class="site-title">

<a href="~/">ASP.NET Web API</a></p>
        </div>
    </div>
</header>
<div id="body">
    <section class="featured">
        <div
class="content-wrapper">

            <table
id="students"></table>

<script>


$(function () {

var $students = $("#students");

$.ajax({

url: "api/values",

contentType: "json",

success: function(data) {

$.each(data, function(index, item) {
        var $row =
$("#templates").find(".row-template").clone();

$row.find(".Name").html(item.name);

$row.find(".delete").click(function() {

$.ajax({ url: "api/values/" + item.id,

type: "DELETE",

success: function() {

$row.remove();

}

});

});

$students.append($row);


});

}

});

})

</script>
        </div>
    </section>
    <section class="content-wrapper main-content
clear-fix">

        <div id="templates"
style="display:none">


<table>


<tr class="row-template">


<td class="Name"></td>

<td><input type="button" value ="Del"
class="delete"/></td>

</tr>

</table>

</div>

</section>
</div>
The code is quite simple: we get data from the server and
create a dynamic table.
To delete one record means to push an attached button.
Let’s add the remaining functionality: PUT and POST, this will require a lot of code.
I provide entire view and controller listings.
using
System;
using System.Collections.Generic;
using System.Linq;
using System.Net;
using System.Net.Http;
using System.Net.Http.Formatting;
using System.Net.Http.Headers;
using System.Web.Http;
using WebApiJsonAjax.Models;
namespace WebApiJsonAjax.Controllers
{
public class ValuesController : ApiController
{
private atrainingdatabaseEntities
_ctx = new atrainingdatabaseEntities();
public HttpResponseMessage Get()
{
var students = (from e in _ctx.Student select e);
var resp = new HttpResponseMessage(HttpStatusCode.OK);
resp.Content
= new ObjectContent<IEnumerable<Student>>(students, new
JsonMediaTypeFormatter());
resp.Headers.ConnectionClose = true;
resp.Headers.CacheControl = new CacheControlHeaderValue();
resp.Headers.CacheControl.Public = true;
return resp;
}
public string Get(int id)
{
return
"value" + id;
}
public HttpResponseMessage
Post([FromBody]Student student)
{
try
{
_ctx.Student.Add(student);
_ctx.SaveChanges();
}
catch
(Exception e)
{
return Query.CreateErrorResponse(HttpStatusCode.InternalServerError,
e.Message);
{
try
{
_ctx.Student.Add(student);
_ctx.SaveChanges();
}
catch
(Exception e)
{
return Query.CreateErrorResponse(HttpStatusCode.InternalServerError,
e.Message);
};
return Query.CreateResponse(HttpStatusCode.OK);
}
public HttpResponseMessage Put(int
id, Student student)
{
try
{
var studentToChange = _ctx.Student.FirstOrDefault(s => s.id == id);
studentToChange.name = student.name;
_ctx.SaveChanges();
} catch
(Exception e)
{
return Query.CreateErrorResponse(HttpStatusCode.InternalServerError,
e.Message);
};
return Query.CreateResponse(HttpStatusCode.OK);
}
public void Delete(int id)
{
var student = _ctx.Student.Where(s => s.id == id).FirstOrDefault();
_ctx.Student.Remove(student);
_ctx.SaveChanges();
}
}
}
PUT and POST method implementations appeared in the
controller. Operations in
both methods are enclosed in try/catch block, and a message is created and sent if something goes
wrong. Note, that there is a very useful attribute: you can mark controller
method argument as [FromBody] or [FromUrl], which correspondingly mean to
take an argument from the query body or from URL.
View code is provided below. Handlers of record creation and edit events
were added. Note that JSON.stringify converts everything given into JSON.
 <header>

    <div class="content-wrapper">
        <div
class="float-left">
            <p
class="site-title">

<a href="~/">ASP.NET Web API</a></p>
        </div>
    </div>
</header>
<div id="body">
    <section class="featured">
        <div
class="content-wrapper">

            <table
id="students"></table>

<script>

$(function() {

var $students = $("#students");

$.ajax({

url: "api/values",

contentType: "json",

success: function(data) {

$.each(data, function(index, item) {

var $row = $("#templates").find(".row-template").clone();

$row.find(".Name").html("<input type=’text’ class=’studentname’
id=’" + item.id + "’ value=’" + item.name +
"’></input>");

$row.find(".delete").click(function() {

$.ajax({

url: "api/values/" + item.id,

type: "DELETE",

success: function() {

$row.remove();

}

});

});


$row.find(".change").click(function() {


var student = {


id: item.id,


name: $row.find(".studentname").attr("value")


};

var student = {

id: item.id,

name: $row.find(".studentname").attr("value")

};


$.ajax({


url: "api/values/" + item.id,


type: "PUT",


contentType: "application/json; charset=utf-8",


data: JSON.stringify(student),


success: function() {

url: "api/values/" + item.id,

type: "PUT",

contentType: "application/json; charset=utf-8",

data: JSON.stringify(student),

success: function() {

}

});

});

$students.append($row);

});

}

});

});

function addStudent()
{


var student = {

name: $("#frm").find("#name").attr("value"),

};

$.ajax({

url: "api/values",

type: "POST",

contentType: "application/json; charset=utf-8",

data: JSON.stringify(student),

success: function() {

alert("Added!");

}

});

}

</script>
        </div>
    </section>
    <section class="content-wrapper main-content
clear-fix">

        <div id="templates"
style="display:none">


<table>


<tr class="row-template">

<form>

<td class="Name"></td>

<td><input
type="button" value ="Change"
class="change"/></td>


<td><input type="button" value ="Del"
class="delete"/></td>

</form>

</tr>


</table>

        </div>

<form id="frm">

<input type="text" name="name" id="name"/>

<td><input type="button" value ="Add"
onclick="return addStudent();"/></td>


</form>

    </section>

</div>
    </section>
</div>
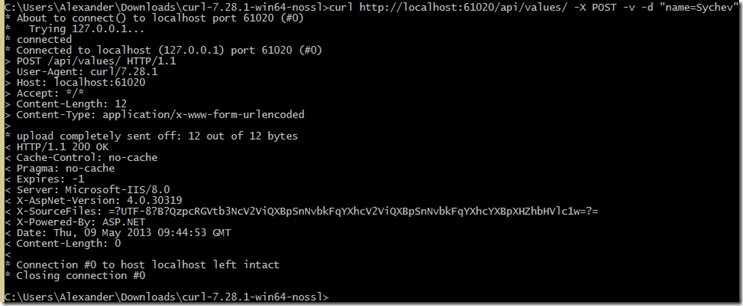
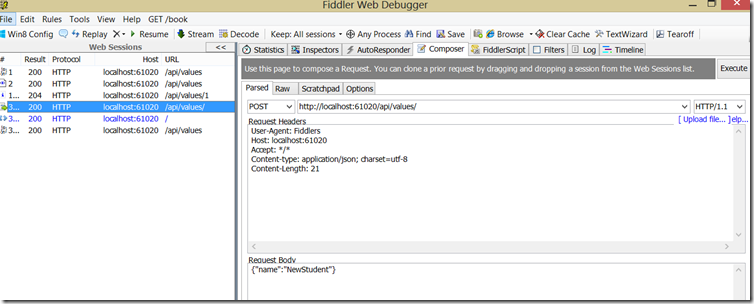
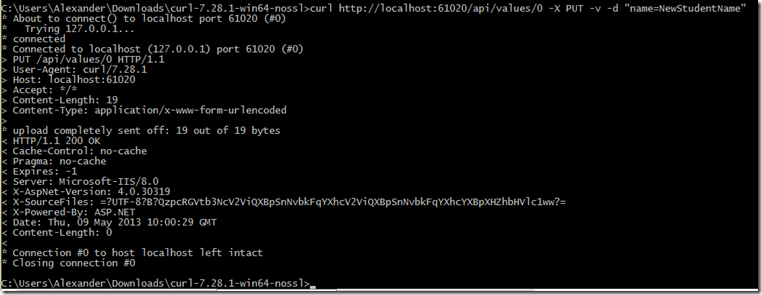
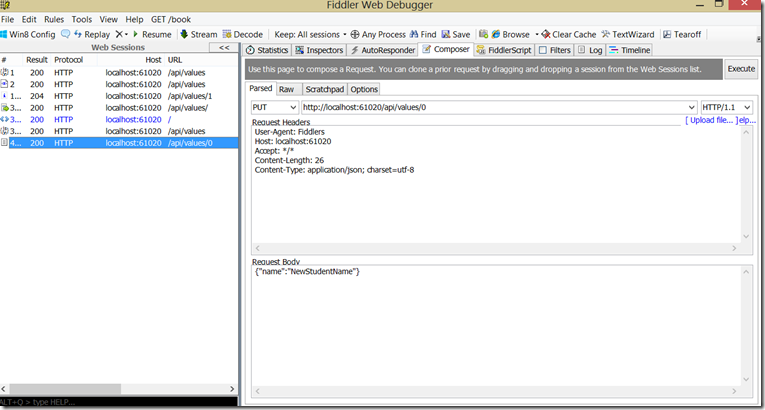
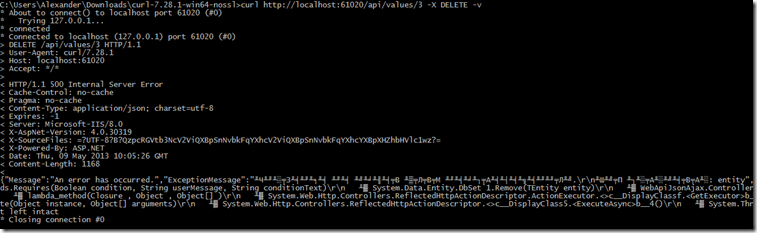
Let’s imitate behavior of creation, updating, and deleting operations
with the help of curl and Fiddler. Note, that in curl the message body is created in a special way: if we have a complicated model, then we put name=Sychev,
but if we have a simple model with one then we have to use -d
"=Sychev".
POST:
PUT:
DELETE:
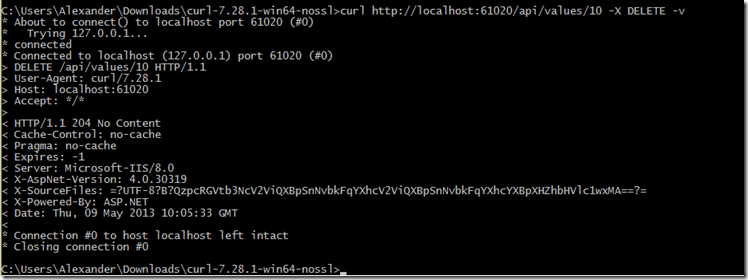
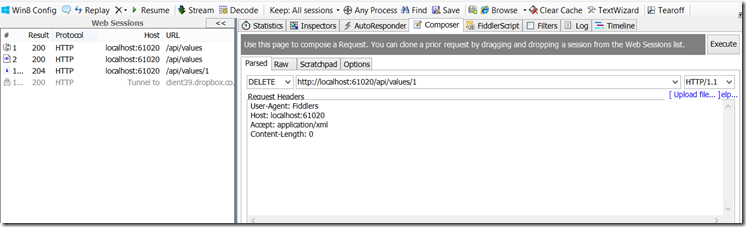
This happens if we return
an error message to a client as an answer.
Congratulations, our REST-service at Web API using ASP.NET MVC and jQuery is complete. Now let’s
have a look at some additional functionality.
Odata support in Web APIASP.NET Web API has a built-in support of several parameters of Odata queries, e.g., sorting, filtering, and paging.
OData usage in Web API begins with a packet installation
including a pack of dependencies with the help of NuGet,.

Substitute Get method
content with the
corresponding code.
 [Queryable(AllowedQueryOptions
= AllowedQueryOptions.All)]
      public IQueryable<Student> Get()
      {
          return
_ctx.Student.AsQueryable();
      }
To use Odata method,
we need to mark it as [Queryable] and
tell it to return IQueryable. Serialization
of Odata data will be performed in bit different way later on.
Now let’s add to WebApiConfig file in App_Start
folder some sugar, coming later on. WebApiConfig code should
looked as the code provided below.
  public
static class WebApiConfig
{
    public static void Register(HttpConfiguration config)
    {
        GlobalConfiguration.Configuration.Formatters.JsonFormatter.AddQueryStringMapping("$format",
"json", "application/json");

GlobalConfiguration.Configuration.Formatters.XmlFormatter.AddQueryStringMapping("$format",
"xml", "application/xml");

GlobalConfiguration.Configuration.Formatters.XmlFormatter.AddQueryStringMapping("$format",
"xml", "application/xml");

config.Routes.MapHttpRoute(
            name:
"DefaultApi",

routeTemplate: "api/{controller}/{id}",
            defaults:
new { id = RouteParameter.Optional }
        );
    }
Let’s run the
project and follow http://localhost:[port]/api/values. XML will
be printed, which is returned by OData.
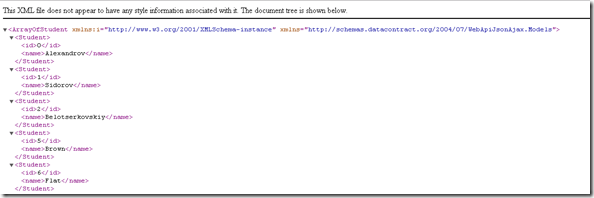
Note that data is
serializing in a bit different way, and this should be taken into account while
developing.
Now we can use
opportunities provided by OData. E.g., follow the link:
http://localhost:61020/api/values?$filter=(id eq 6)
Or:
http://localhost:61020/api/values?$filter=(id eq 6)&$format=json Format is a nonstandard procedure, that we added into WebApiConfig
file.
Using OData, we
can interact with the server-stored data model with the help of format. Surely,
we have to be careful despite the fact that Web API OData provides read only access to
the data.
Thank you for
attention.
Windows Azure MVP.


