Introduction
In Part 2 of this tutorial, we design the InfoPath form and deploy it to SharePoint Form library. Then we will add the deployed InfoPath to a Site Page in InfoPath Form WebPart, connect it with a Query String filter web part and read the data using the WCF service we developed in Part 1.
InfoPath Form Designing
- Open Microsoft InfoPath Designer 2010. In File Menu, select New and then select Blank Form from the available templates. When you save the InfoPath form, it will ask for file name. Remember this will be the editable or design version of our InfoPath form. We will be publishing this form and uploading a published version of this form to SharePoint InfoPath gallery. Ensure you have proper naming conventions for both files as both files will be having
.xsn as extension. - Select the appropriate design from the Page Design tab. Table layouts can be added from Insert Tab. For more on Microsoft InfoPath 2010 Designer, you can visit this link.
- We will now add a data connection. To add a new connection, click on the Data Connections in Data tab. This opens up a Pop-up, click on the Add button on the pop-up. This will start the Data Connection Wizard. Select Receive Data radio button, and click next.
- In next screen, select SOAP Web Service radio button and click next. The next screen will require the URL of the WCF Service we built. (The service is deployed in ISAPI folder and can be located in the
_vti_bin folder in IIS). If the URL is proper and the service is accessible, the next screen will show the Operations available. Select GetProjectDetailsById operation and click on next. There are not values for Parameters screen so click on next. We do not want to store the copy of the data in form template, so click on next. Uncheck the ‘Automatically retrieve data when form is opened’ and click on finish. You may want to convert the connection to Connection File. To read more about Connection files, click on this link. - In Data tab, click Show Fields button to see the fields available in the form. The
Fields dropdown should have a secondary connection now.
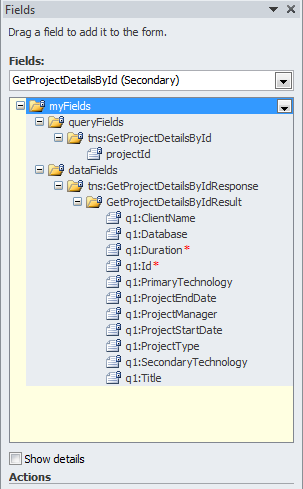
- Now select Main connection in the Fields drop-down. You will see a group named
myFields, rename it to something more meaningful. I have renamed it to ProjectManagementFields. Keep the group selected and click on Add Field link at the bottom of the window. In the pop-up, add the name and data type of the field that will be the input parameter for our form. In this form, we will add ProjectId in our Main connection. - We have to add a rule on change of the
Main connection field ProjectId. In this rule, we will set the value of the queryFields column (Secondary connection) to the value from the Main connection column. Next, we will retrieve the data using the WCF method.

- Now drag-drop the fields from Secondary connection on to the form. We will need 2 buttons to save the form and close the form. In this part, we won’t be adding any functionality to the Save button. We add a rule to close the form on Close button.
InfoPath Form Publishing
- To deploy the InfoPath Form, first we will have to publish the form. Before we start publishing our form, we need to set the security and trust level of the form. The InfoPath form needs to run in Full trust mode. To set the security, in InfoPath Designer, go to File -> Info. On the Form Information panel, select Advanced Form Options. Now select Security and Trust from the available categories. Uncheck ‘Automatically determine security level’ if it is selected, and then select Full Trust option. Click on Ok to close the window.
- To publish the form, in File menu, select Publish option. Now click on SharePoint Server button. This will open up the Publishing wizard. The first screen of the wizard is for providing SharePoint URL. Enter the Site URL and click on next. In the next screen, select the option that enables the form to be filled out using browser, and then select Administrator-approved form template option.
- In the next screen, browse the location on your local file system where the published form will be stored. Ensure you give it a different name compared to the Design form. Now click on next.
- In this screen, we have to provide the parameters we want to expose to the connected web parts. We will select Project Id as Input parameter.
- Click on next and then click on Publish button. This will publish the form to the location provided in the wizard screen.
InfoPath Form Publishing
- To deploy the InfoPath form, we will need a Form Library in our site. So create a Form Library before we deploy the form.
- Next in Central Admin, go to General Application Settings. Under InfoPath Form Service section, click on Manage Form Template link. This will redirect to a window where we will be able add our published form. Ensure you have admin rights as uploading the form will need Farm Administrator rights.
- Browse the location of the published form and upload the form.
- After uploading the form, click on the newly added form. In the context menu, select Activate to Site Collection option. This activates the form on the Site collection it is uploaded on and will be available as content type.
- Now in the Form Library (created in step 1 of deployment), go to Library Settings. Click on "Add from existing site content types” available in "Content Types" section of the page.
- The newly added form will be available for selection in the list box. Add the form and click on Ok Button.
- Using SharePoint Designer, add a Web Part Site Page. Open the form in browser and add a query filter web part. Add a "
TID" query string to the Query Filter web part. Ensure you don’t add "Id" column as it will not be recognized in filter web part. Add another "InfoPath Form Web Part". - Click the link "Click here to open the tool pane" to open up the InfoPath Web part configuration settings panel. In the settings panel, select the Form library and the InfoPath content type added to the form library.
- Now connect the query string web part and the InfoPath form web part. We are done with the deployment. You should be able to browse the Site page and populate the data on the form by passing the proper query string parameter.
I have been designing and developing systems in .NET since 2006. Started out with .NET 1.1, and progressed through to current version. Started working with SharePoint 2010 in 2011, and am currently gaining experience in SharePoint Online and hosted apps.


 General
  News
News  Suggestion
  Question
  Bug
Bug  Answer
  Joke
Joke  Praise
  Rant
Rant  Admin
Admin 


 .
.